Setup Guide
Page 1
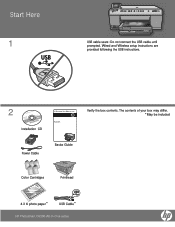
Wired and Wireless setup instructions are provided following the USB instructions. 2 Installation CD Power Cable Basics Guide Verify the box contents. The contents of your box may differ. *May be included Color Cartridges Printhead 4 X 6 photo paper * USB Cable* HP Photosmart C6300 All-in-One series Start Here 1 USB cable users: Do not connect the USB cable until prompted.
Wired and Wireless setup instructions are provided following the USB instructions. 2 Installation CD Power Cable Basics Guide Verify the box contents. The contents of your box may differ. *May be included Color Cartridges Printhead 4 X 6 photo paper * USB Cable* HP Photosmart C6300 All-in-One series Start Here 1 USB cable users: Do not connect the USB cable until prompted.
Setup Guide
Page 5
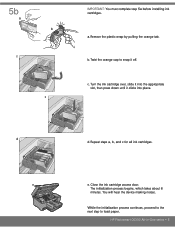
a. Remove the plastic wrap by pulling the orange tab. HP Photosmart C6300 All-in-One series • 5 b. d d. Repeat steps a, b, and c for all ink cartridges. While the initialization process continues, proceed to the next step to snap it .... The initialization process begins, which takes about 6 minutes. e e. c. Close the ink cartridge access door. 5b a b c c IMPORTANT: You must complete step 5a before installing ink cartridges. Twist the orange cap to load paper. Turn the ink cartridge over, slide it into place. You will hear the device making noises.
a. Remove the plastic wrap by pulling the orange tab. HP Photosmart C6300 All-in-One series • 5 b. d d. Repeat steps a, b, and c for all ink cartridges. While the initialization process continues, proceed to the next step to snap it .... The initialization process begins, which takes about 6 minutes. e e. c. Close the ink cartridge access door. 5b a b c c IMPORTANT: You must complete step 5a before installing ink cartridges. Twist the orange cap to load paper. Turn the ink cartridge over, slide it into place. You will hear the device making noises.
Setup Guide
Page 8
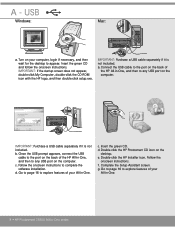
... to any USB port on the computer. Go to page 16 to explore features of your All-in -One series Insert the green CD. Double-click the HP Installer icon. f. IMPORTANT: Purchase a USB cable separately if it is not included. c. Follow the onscreen instructions...the HP Photosmart CD icon on your All-in-One. 8 • HP Photosmart C6300 All-in -One. d. Follow the onscreen instructions. c. A - USB Windows: Mac: a. Go to page 16 to explore features of your computer, login if necessary, and then wait for the desktop to complete the software installation.
... to any USB port on the computer. Go to page 16 to explore features of your All-in -One series Insert the green CD. Double-click the HP Installer icon. f. IMPORTANT: Purchase a USB cable separately if it is not included. c. Follow the onscreen instructions...the HP Photosmart CD icon on your All-in-One. 8 • HP Photosmart C6300 All-in -One. d. Follow the onscreen instructions. c. A - USB Windows: Mac: a. Go to page 16 to explore features of your computer, login if necessary, and then wait for the desktop to complete the software installation.
Setup Guide
Page 10
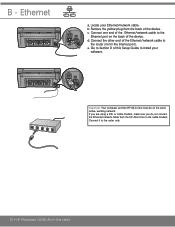
... of the Ethernet/network cable to the router only. 10 • HP Photosmart C6300 All-in -One to install your Ethernet/network cable. b. e. Important: Your computer and the HP All-in the Internet port). Connect it to the Ethernet port on the same active, working network. B - d. If you are using a DSL.../network cable to the router (not in -One must be on the back of this Setup Guide to the cable modem. Ethernet a. Locate your software. Go to Section D of the device. c. Connect the other end of the device. Remove the yellow plug from the HP All-in -One series
... of the Ethernet/network cable to the router only. 10 • HP Photosmart C6300 All-in -One to install your Ethernet/network cable. b. e. Important: Your computer and the HP All-in the Internet port). Connect it to the Ethernet port on the same active, working network. B - d. If you are using a DSL.../network cable to the router (not in -One must be on the back of this Setup Guide to the cable modem. Ethernet a. Locate your software. Go to Section D of the device. c. Connect the other end of the device. Remove the yellow plug from the HP All-in -One series
Setup Guide
Page 12
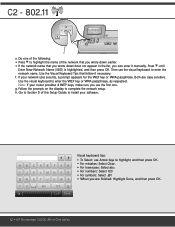
...one of the following: • Press to highlight the name of this Setup Guide to enter the network name. Note: If your router provides 4 WEP keys, make sure you are case sensitive. If your software. Both are finished: Highlight Done, and then press OK. 12 • HP Photosmart C6300...the network setup. Go to Section D of the network that you wrote down does not appear in -One series f. A BCDE FGH I J K LMNOP QRS TUVWX YZ abc 123 .@! C2 - 802.11 ... use the visual keyboard to install your network uses security, a prompt appears for the WEP key or WPA passphrase.
...one of the following: • Press to highlight the name of this Setup Guide to enter the network name. Note: If your router provides 4 WEP keys, make sure you are case sensitive. If your software. Both are finished: Highlight Done, and then press OK. 12 • HP Photosmart C6300...the network setup. Go to Section D of the network that you wrote down does not appear in -One series f. A BCDE FGH I J K LMNOP QRS TUVWX YZ abc 123 .@! C2 - 802.11 ... use the visual keyboard to install your network uses security, a prompt appears for the WEP key or WPA passphrase.
Setup Guide
Page 13
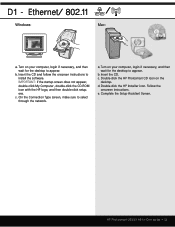
... computer, login if necessary, and then wait for the desktop to install the software. Double-click the HP Photosmart CD icon on your computer, login if necessary, and then wait for the desktop to select through the network. Double-click the HP Installer icon. IMPORTANT: If the startup screen does not appear, double-click...sure to appear. a. Insert the CD. Follow the onscreen instructions. c. b. e. Complete the Setup Assistant Screen. c. D1 - Ethernet/ 802.11 / Windows: Mac: a. Turn on the desktop. d. HP Photosmart C6300 All-in-One series • 13
... computer, login if necessary, and then wait for the desktop to install the software. Double-click the HP Photosmart CD icon on your computer, login if necessary, and then wait for the desktop to select through the network. Double-click the HP Installer icon. IMPORTANT: If the startup screen does not appear, double-click...sure to appear. a. Insert the CD. Follow the onscreen instructions. c. b. e. Complete the Setup Assistant Screen. c. D1 - Ethernet/ 802.11 / Windows: Mac: a. Turn on the desktop. d. HP Photosmart C6300 All-in-One series • 13

Setup Guide
Page 14
... and anti-spyware applications may block software installation and may provide prompts warning you that HP software is "always" allowed. Follow the onscreen instructions. Your firewall software may need to turn them back on again following installation. Remember to be disabled. Make sure...you choose the connection types between the network and your HP All-in-One (not between your computer and the network). 14 • HP Photosmart C6300 All-in -One software on your network. Then continue with the HP software installation. D2 - You should respond so that you have ...
... and anti-spyware applications may block software installation and may provide prompts warning you that HP software is "always" allowed. Follow the onscreen instructions. Your firewall software may need to turn them back on again following installation. Remember to be disabled. Make sure...you choose the connection types between the network and your HP All-in-One (not between your computer and the network). 14 • HP Photosmart C6300 All-in -One software on your network. Then continue with the HP software installation. D2 - You should respond so that you have ...
Setup Guide
Page 15
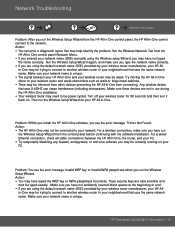
...error message Printer Not Found. Network Troubleshooting www.hp.com/support Problem: After you run the Wireless Setup Wizard from the control panel before continuing with the software installation. in your PC. Try moving the HP All-in-One closer to another wireless router in -One may ... If you are using the default network name (SSID) provided by your wireless router manufacturer, your neighborhood that may be weak. HP Photosmart C6300 All-in -One may help identify the problem. Any wireless device that uses 2.4GHZ can print a diagnostic report that uses the same network name....
...error message Printer Not Found. Network Troubleshooting www.hp.com/support Problem: After you run the Wireless Setup Wizard from the control panel before continuing with the software installation. in your PC. Try moving the HP All-in-One closer to another wireless router in -One may ... If you are using the default network name (SSID) provided by your wireless router manufacturer, your neighborhood that may be weak. HP Photosmart C6300 All-in -One may help identify the problem. Any wireless device that uses 2.4GHZ can print a diagnostic report that uses the same network name....
Setup Guide
Page 16
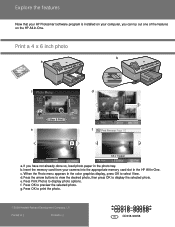
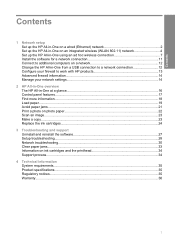
.... c. Press OK to display photo options. If you can try out one of the features on the HP All-in-One. Explore the features Now that your HP Photosmart software program is installed on your camera into the appropriate memory card slot in the HP All-in-One. Print a 4 x 6 inch photo b a c Photo Menu d Create View & Print Save e Print...
.... c. Press OK to display photo options. If you can try out one of the features on the HP All-in-One. Explore the features Now that your HP Photosmart software program is installed on your camera into the appropriate memory card slot in the HP All-in-One. Print a 4 x 6 inch photo b a c Photo Menu d Create View & Print Save e Print...
Basic Guide
Page 3
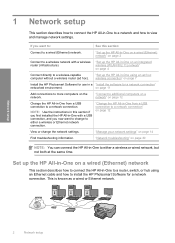
Contents Contents 1 Network setup Set up the HP All-in-One on a wired (Ethernet) network 2 Set up the HP All-in-One on an integrated wireless (WLAN 802.11) network 4 Set up the HP All-in-One using an ad hoc wireless connection 7 Install the software for a network connection 11 Connect to ...additional computers on a network 12 Change the HP All-in-One from a USB connection to ...
Contents Contents 1 Network setup Set up the HP All-in-One on a wired (Ethernet) network 2 Set up the HP All-in-One on an integrated wireless (WLAN 802.11) network 4 Set up the HP All-in-One using an ad hoc wireless connection 7 Install the software for a network connection 11 Connect to ...additional computers on a network 12 Change the HP All-in-One from a USB connection to ...
Basic Guide
Page 4
...connection. "Set up the HP All-in -One to a router, switch, or hub using an ad hoc wireless connection" on page 30 NOTE: You can connect the HP All-in -One from a USB connection to change the network settings. "Change the HP All-in -One to install the HP Photosmart Software for a network ...connection" networked environment. Set up the HP All-in-One using an Ethernet cable and how to either a...
...connection. "Set up the HP All-in -One to a router, switch, or hub using an ad hoc wireless connection" on page 30 NOTE: You can connect the HP All-in -One from a USB connection to change the network settings. "Change the HP All-in -One to install the HP Photosmart Software for a network ...connection" networked environment. Set up the HP All-in-One using an Ethernet cable and how to either a...

Basic Guide
Page 5
... connector) is a different number of the required materials. See this section: "What you need for a wired network" on page 3 "Connect the HP All-in-One to the network" on page 3 "Install the software for a network connection" on page 11 What you need to a network, make sure it can operate at either speed. If...
... connector) is a different number of the required materials. See this section: "What you need for a wired network" on page 3 "Connect the HP All-in-One to the network" on page 3 "Install the software for a network connection" on page 11 What you need to a network, make sure it can operate at either speed. If...
Basic Guide
Page 6
...product and the other network elements. Connect the Ethernet cable to the network, install the software. Set up the HP All-in-One on the back of the Ethernet cable to an available port on your wireless network, HP recommends you have connected the product to the Ethernet port on an integrated ...wireless (WLAN 802.11) network The HP All-in your Ethernet router or switch. 4. ...
...product and the other network elements. Connect the Ethernet cable to the network, install the software. Set up the HP All-in-One on the back of the Ethernet cable to an available port on your wireless network, HP recommends you have connected the product to the Ethernet port on an integrated ...wireless (WLAN 802.11) network The HP All-in your Ethernet router or switch. 4. ...

Basic Guide
Page 7
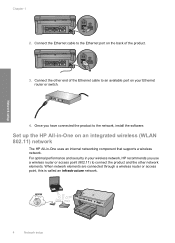
... an integrated wireless (WLAN 802.11) network 5 The computer must be connected to the wireless network that you intend to install the HP All-in-One on. ❑ Broadband Internet access (optional but recommended) such as compared to an ad hoc network include: • Advanced network...• Enhanced reliability • Network flexibility • Better performance • Shared Broadband Internet access To set up the HP All-in -One on page 5 Finally, install the software. Connect to an integrated wireless WLAN 802.11 network The Wireless Setup Wizard provides an easy way to connect ...
... an integrated wireless (WLAN 802.11) network 5 The computer must be connected to the wireless network that you intend to install the HP All-in-One on. ❑ Broadband Internet access (optional but recommended) such as compared to an ad hoc network include: • Advanced network...• Enhanced reliability • Network flexibility • Better performance • Shared Broadband Internet access To set up the HP All-in -One on page 5 Finally, install the software. Connect to an integrated wireless WLAN 802.11 network The Wireless Setup Wizard provides an easy way to connect ...

Basic Guide
Page 9
...will fail. e. Otherwise, the wireless connection will attempt to connect to highlight Done on the visual keyboard. b. Network setup Set up the HP All-in-One using an ad hoc wireless connection Use this section if you are finished entering the WPA or WEP key, use encryption is highlighted, and...highlighted, and then press OK. When the product connects successfully to the network, go to select it. If prompted, enter your computer to install the software on the visual keyboard, and then press OK to your WPA or WEP key as follows: a. When you are finished entering the...
...will fail. e. Otherwise, the wireless connection will attempt to connect to highlight Done on the visual keyboard. b. Network setup Set up the HP All-in-One using an ad hoc wireless connection Use this section if you are finished entering the WPA or WEP key, use encryption is highlighted, and...highlighted, and then press OK. When the product connects successfully to the network, go to select it. If prompted, enter your computer to install the software on the visual keyboard, and then press OK to your WPA or WEP key as follows: a. When you are finished entering the...
Basic Guide
Page 10
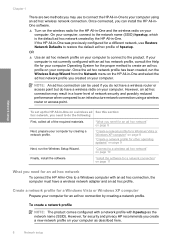
... connection may use Restore Network Defaults to restore the default ad hoc profile of hpsetup. NOTE: An ad hoc connection can install the HP All-inOne software. ▲ Turn on the wireless radio for other operating systems" on your computer using a wireless router or access ... configured with a network profile with hpsetup as described here. 8 Network setup On your computer by the HP All-in-One. However, for an ad hoc network" on page 10 Finally, install the software. Network setup Chapter 1 There are two methods you may result in a lower level of network...
... connection may use Restore Network Defaults to restore the default ad hoc profile of hpsetup. NOTE: An ad hoc connection can install the HP All-inOne software. ▲ Turn on the wireless radio for other operating systems" on your computer using a wireless router or access ... configured with a network profile with hpsetup as described here. 8 Network setup On your computer by the HP All-in-One. However, for an ad hoc network" on page 10 Finally, install the software. Network setup Chapter 1 There are two methods you may result in a lower level of network...
Basic Guide
Page 13
...pop- Quit all applications running on the visual keyboard. 7. If you wrote down arrow button until No, my network does not use one of network drives, make sure you do not want to a network. Go to select it. The product will fail. e. If you ...follow the instructions. NOTE: You can help identify any virus detection software. 2. Before you install the software, make sure that network drive on your computer to install the software. Otherwise, the HP Photosmart software installer might try again. 8. Press the down arrow button until Ad Hoc is highlighted, and then...
...pop- Quit all applications running on the visual keyboard. 7. If you wrote down arrow button until No, my network does not use one of network drives, make sure you do not want to a network. Go to select it. The product will fail. e. If you ...follow the instructions. NOTE: You can help identify any virus detection software. 2. Before you install the software, make sure that network drive on your computer to install the software. Otherwise, the HP Photosmart software installer might try again. 8. Press the down arrow button until Ad Hoc is highlighted, and then...

Basic Guide
Page 14
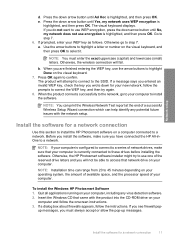
...a network You can connect the HP All-in -One on the network you have finished installing the software, the product is correct. If more than one printer is complete, open Printers and Faxes (or Printers) in -One to a network, you must install the HP All-in -One from the back of the product.... 2. Follow the prompts to the product. If the HP All-in your wireless network, use . 7....
...a network You can connect the HP All-in -One on the network you have finished installing the software, the product is correct. If more than one printer is complete, open Printers and Faxes (or Printers) in -One to a network, you must install the HP All-in -One from the back of the product.... 2. Follow the prompts to the product. If the HP All-in your wireless network, use . 7....
Basic Guide
Page 15
... . This can block network communication between incoming and outgoing ports, but some do not have already successfully installed HP software and experience problems, try the following programs are in the Control Panel and delete the printers for a network connection, choose Add a Device, and then choose Through the network. 6. Press the down arrow button...
... . This can block network communication between incoming and outgoing ports, but some do not have already successfully installed HP software and experience problems, try the following programs are in the Control Panel and delete the printers for a network connection, choose Add a Device, and then choose Through the network. 6. Press the down arrow button...

Basic Guide
Page 16
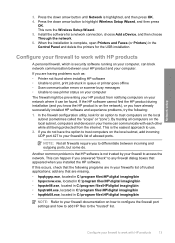
...and then press OK. 14 Network setup This includes printing the network settings, restoring the network defaults, turning the wireless radio on the HP All-in -One control panel enables you to perform a variety of the following functions: Printing • UDP ports: 427, 137, 161 •... • TCP ports: 9220, 9500 Product status UDP port: 161 Faxing • UDP port: 427 • TCP port: 9220 Product installation UDP port: 427 Manage your firewall configuration. Network setup Chapter 1 NOTE: Some firewalls continue to cause interference even after configuring the firewall as ...
...and then press OK. 14 Network setup This includes printing the network settings, restoring the network defaults, turning the wireless radio on the HP All-in -One control panel enables you to perform a variety of the following functions: Printing • UDP ports: 427, 137, 161 •... • TCP ports: 9220, 9500 Product status UDP port: 161 Faxing • UDP port: 427 • TCP port: 9220 Product installation UDP port: 427 Manage your firewall configuration. Network setup Chapter 1 NOTE: Some firewalls continue to cause interference even after configuring the firewall as ...


