Backup and Recovery - Windows 7
Page 5
... new software and data files, you to reverse undesirable changes to your computer by the operating system and HP Recovery Manager software are used to start up (boot) your computer and restore the operating system and software programs to protect your information and restoring it in the window. 1 Recovery Manager works from a dedicated recovery partition (select models only) on a regular basis to recover your system on the hard drive or from recovery discs you reinstall a program or driver...
... new software and data files, you to reverse undesirable changes to your computer by the operating system and HP Recovery Manager software are used to start up (boot) your computer and restore the operating system and software programs to protect your information and restoring it in the window. 1 Recovery Manager works from a dedicated recovery partition (select models only) on a regular basis to recover your system on the hard drive or from recovery discs you reinstall a program or driver...

Drives - Windows 7
Page 22
... when you use . Select Start > All Programs > Accessories > System Tools > Disk Defragmenter. 2. HP recommends defragmenting your hard drive at any time. NOTE: Windows includes the User Account Control feature to improve the security of your hard drive and the number of your computer. 4 Improving hard drive performance Using Disk Defragmenter As you do not need access to your computer. Refer to Help and Support for more efficiently. Disk Defragmenter is...
... when you use . Select Start > All Programs > Accessories > System Tools > Disk Defragmenter. 2. HP recommends defragmenting your hard drive at any time. NOTE: Windows includes the User Account Control feature to improve the security of your hard drive and the number of your computer. 4 Improving hard drive performance Using Disk Defragmenter As you do not need access to your computer. Refer to Help and Support for more efficiently. Disk Defragmenter is...
Drives - Windows 7
Page 24
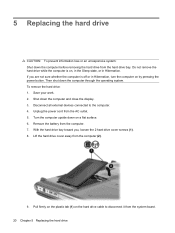
... the computer and close the display. 3. Shut down the computer through the operating system. Pull firmly on the plastic tab (1) on by pressing the power button. Turn the computer upside down on , in the Sleep state, or in Hibernation, turn the computer on the hard drive cable to the computer. 4. Remove the battery from the hard drive bay. 5 Replacing the hard drive CAUTION: To prevent information loss...
... the computer and close the display. 3. Shut down the computer through the operating system. Pull firmly on the plastic tab (1) on by pressing the power button. Turn the computer upside down on , in the Sleep state, or in Hibernation, turn the computer on the hard drive cable to the computer. 4. Remove the battery from the hard drive bay. 5 Replacing the hard drive CAUTION: To prevent information loss...
Drives - Windows 7
Page 34
... the on -screen instructions. 30 Chapter 6 Troubleshooting Try running your computer model number in the System area, click Device Manager. 3. Open your Internet browser, go to delete the device, but do not restart the computer. Right-click the device listing and click Uninstall. A device driver must be prompted to enter settings before you may need to update your system for installed hardware and installs default drivers for updates. 2. Click Start > All Programs > Windows Update. Select Start > Control Panel > System and...
... the on -screen instructions. 30 Chapter 6 Troubleshooting Try running your computer model number in the System area, click Device Manager. 3. Open your Internet browser, go to delete the device, but do not restart the computer. Right-click the device listing and click Uninstall. A device driver must be prompted to enter settings before you may need to update your system for installed hardware and installs default drivers for updates. 2. Click Start > All Programs > Windows Update. Select Start > Control Panel > System and...
Drives - Windows 7
Page 35
...removing 13 DVD drive 4 DVD region settings 9 H hard disk drive HP ProtectSmart Hard Drive Protection 14 installing 21 removing 20 replacing 20 hard drive HP ProtectSmart Hard Drive Protection 14 installing 21 removing 20 replacing 20 HP ProtectSmart Hard Drive Protection 14 L light, drive 15 M maintenance Disk Cleanup 19 Disk Defragmenter 18 O optical disc Blu-ray 6 removing 13 using 4, 5 optical drive identifying 3 P playing a CD, DVD, or BD 7 R region codes, DVD 9 S software Disk Cleanup 19 Disk Defragmenter 18 T troubleshooting burning discs 28 device driver 30 disc play 26, 27 HP device...
...removing 13 DVD drive 4 DVD region settings 9 H hard disk drive HP ProtectSmart Hard Drive Protection 14 installing 21 removing 20 replacing 20 hard drive HP ProtectSmart Hard Drive Protection 14 installing 21 removing 20 replacing 20 HP ProtectSmart Hard Drive Protection 14 L light, drive 15 M maintenance Disk Cleanup 19 Disk Defragmenter 18 O optical disc Blu-ray 6 removing 13 using 4, 5 optical drive identifying 3 P playing a CD, DVD, or BD 7 R region codes, DVD 9 S software Disk Cleanup 19 Disk Defragmenter 18 T troubleshooting burning discs 28 device driver 30 disc play 26, 27 HP device...
Notebook Tour - Windows 7
Page 9
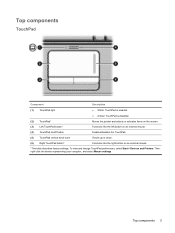
... TouchPad Component Description (1) TouchPad light ● White: TouchPad is enabled. ● Amber: TouchPad is disabled. (2) TouchPad* Moves the pointer and selects or activates items on the screen. (3) Left TouchPad button* Functions like the left button on an external mouse. (4) TouchPad on/off button Enables/disables the TouchPad. (5) TouchPad vertical scroll zone Scrolls up or down. (6) Right TouchPad button* Functions like the right button on an external mouse. *This table describes factory settings. To view and change TouchPad preferences, select Start > Devices...
... TouchPad Component Description (1) TouchPad light ● White: TouchPad is enabled. ● Amber: TouchPad is disabled. (2) TouchPad* Moves the pointer and selects or activates items on the screen. (3) Left TouchPad button* Functions like the left button on an external mouse. (4) TouchPad on/off button Enables/disables the TouchPad. (5) TouchPad vertical scroll zone Scrolls up or down. (6) Right TouchPad button* Functions like the right button on an external mouse. *This table describes factory settings. To view and change TouchPad preferences, select Start > Devices...
Notebook Tour - Windows 7
Page 21
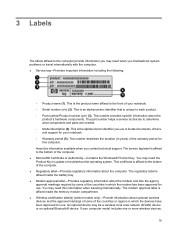
... which the devices have been approved for use to each product. ◦ Part number/Product number (p/n) (3). You may be a wireless local area network (WLAN) device or an optional Bluetooth® device. This certificate is the product name affixed to the computer provide information you use . 3 Labels The labels affixed to the front of your notebook. ◦ Serial number (s/n) (2). This is affixed to update or troubleshoot the operating system.
... which the devices have been approved for use to each product. ◦ Part number/Product number (p/n) (3). You may be a wireless local area network (WLAN) device or an optional Bluetooth® device. This certificate is the product name affixed to the computer provide information you use . 3 Labels The labels affixed to the front of your notebook. ◦ Serial number (s/n) (2). This is affixed to update or troubleshoot the operating system.
Pointing Devices and Keyboard - Windows 7
Page 5
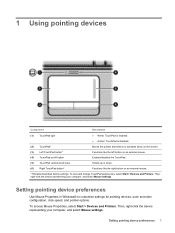
...and select Mouse settings. 1 Using pointing devices Component Description (1) TouchPad light ● White: TouchPad is enabled. ● Amber: TouchPad is disabled. (2) TouchPad* Moves the pointer and selects or activates items on the screen. (3) Left TouchPad button* Functions like the left button on an external mouse. (4) TouchPad on/off button Enables/disables the TouchPad. (5) TouchPad vertical scroll zone Scrolls up or down. (6) Right TouchPad button* Functions like the right button on an external mouse. *This table describes factory settings. To view and change TouchPad...
...and select Mouse settings. 1 Using pointing devices Component Description (1) TouchPad light ● White: TouchPad is enabled. ● Amber: TouchPad is disabled. (2) TouchPad* Moves the pointer and selects or activates items on the screen. (3) Left TouchPad button* Functions like the left button on an external mouse. (4) TouchPad on/off button Enables/disables the TouchPad. (5) TouchPad vertical scroll zone Scrolls up or down. (6) Right TouchPad button* Functions like the right button on an external mouse. *This table describes factory settings. To view and change TouchPad...

Setup Utility - Windows Vista and Windows 7
Page 7
... screen, press f10. - Displaying system information The following procedure explains how to restore the Setup Utility default settings. Open the Setup Utility by turning on or restarting the computer. When the Startup Menu is displayed. 3. The Setup Utility default settings go into effect when the computer restarts. To save your change and exit the Setup Utility, use the arrow keys to select Exit > Exit Discarding Changes, and then press enter. NOTE: Your password, security, and language settings...
... screen, press f10. - Displaying system information The following procedure explains how to restore the Setup Utility default settings. Open the Setup Utility by turning on or restarting the computer. When the Startup Menu is displayed. 3. The Setup Utility default settings go into effect when the computer restarts. To save your change and exit the Setup Utility, use the arrow keys to select Exit > Exit Discarding Changes, and then press enter. NOTE: Your password, security, and language settings...

Setup Utility - Windows Vista and Windows 7
Page 10
... system memory. 6 Chapter 3 Setup Utility menus Enable/disable Card Reader/1394 Power Saving. When enabled, saves power when the computer is called the Primary Hard Disk Self Test. Run a diagnostic test on a secondary hard drive. System Configuration menu Select Language Support Button Sound (select models only) Virtualization Technology (select models only) Processor C6 State (select models only) LAN Power Saving (select models only) Card Reader/1394 Power Saving (select models only) Fan Always On Boot Options To do this Change the Setup Utility language. Enable/disable the...
... system memory. 6 Chapter 3 Setup Utility menus Enable/disable Card Reader/1394 Power Saving. When enabled, saves power when the computer is called the Primary Hard Disk Self Test. Run a diagnostic test on a secondary hard drive. System Configuration menu Select Language Support Button Sound (select models only) Virtualization Technology (select models only) Processor C6 State (select models only) LAN Power Saving (select models only) Card Reader/1394 Power Saving (select models only) Fan Always On Boot Options To do this Change the Setup Utility language. Enable/disable the...
Software Update - Windows Vista and Windows 7
Page 5
... regarding installing and troubleshooting the file. Access the updates on the system ROM. You may be prompted for your computer is stored on the HP Web site at http://www.hp.com. 3. NOTE: Windows® includes the User Account Control feature to improve the security of your computer model, product category, and series or family. Updating software Updated versions of the software provided with the hardware devices, and...
... regarding installing and troubleshooting the file. Access the updates on the system ROM. You may be prompted for your computer is stored on the HP Web site at http://www.hp.com. 3. NOTE: Windows® includes the User Account Control feature to improve the security of your computer model, product category, and series or family. Updating software Updated versions of the software provided with the hardware devices, and...

Software Update - Windows Vista and Windows 7
Page 6
... need this information to locate the update later, after it has been downloaded to the hard drive. 2 Updating software While the "Press the ESC key for software, driver, and BIOS updates. 2. Downloading a BIOS update CAUTION: To prevent damage to reliable external power using the AC adapter. Do not shut down the computer or initiate Sleep or Hibernation. To download a BIOS update: 1. Open the Setup Utility by pressing fn+esc (if you currently have and then download and install the new BIOS. Make...
... need this information to locate the update later, after it has been downloaded to the hard drive. 2 Updating software While the "Press the ESC key for software, driver, and BIOS updates. 2. Downloading a BIOS update CAUTION: To prevent damage to reliable external power using the AC adapter. Do not shut down the computer or initiate Sleep or Hibernation. To download a BIOS update: 1. Open the Setup Utility by pressing fn+esc (if you currently have and then download and install the new BIOS. Make...
Software Update - Windows Vista and Windows 7
Page 8
... number in the Search box, and then press enter. - After the file is displayed, click an updated driver to open a window containing additional information. 6. When the list of the device. 4 Updating software If you may be able to http://www.hp.com/support, and select your computer. Open your Internet browser, go to download the driver and install it later. To do so, restart your specific product from the models listed...
... number in the Search box, and then press enter. - After the file is displayed, click an updated driver to open a window containing additional information. 6. When the list of the device. 4 Updating software If you may be able to http://www.hp.com/support, and select your computer. Open your Internet browser, go to download the driver and install it later. To do so, restart your specific product from the models listed...
Wireless (Select Models Only) - Windows 7
Page 22
...: Wireless networking devices are installed for wireless connection problems include the following: ● Network configuration (SSID or security) has been changed. ● Wireless device is not listed in this chapter to diagnose and repair a computer that device drivers are included with select computer models only. Before working your way through the sequence of the original computer package, you want to your network connection problem, be sure that does not connect to the network...
...: Wireless networking devices are installed for wireless connection problems include the following: ● Network configuration (SSID or security) has been changed. ● Wireless device is not listed in this chapter to diagnose and repair a computer that device drivers are included with select computer models only. Before working your way through the sequence of the original computer package, you want to your network connection problem, be sure that does not connect to the network...
Wireless (Select Models Only) - Windows 7
Page 23
... your permission or password for more information on your computer does not have a problem connecting to a WLAN, confirm that the integrated WLAN device is properly installed on troubleshooting WLANs, refer to expand the list and show all adapters. 4. Refer to Help and Support for tasks such as installing software, running utilities, or changing Windows settings. In the System area, click Device Manager. 3. Identify the WLAN device from the Network adapters list.
... your permission or password for more information on your computer does not have a problem connecting to a WLAN, confirm that the integrated WLAN device is properly installed on troubleshooting WLANs, refer to expand the list and show all adapters. 4. Refer to Help and Support for tasks such as installing software, running utilities, or changing Windows settings. In the System area, click Device Manager. 3. Identify the WLAN device from the Network adapters list.
Multimedia - Windows 7
Page 20
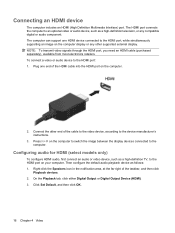
... the display devices connected to an optional video or audio device, such as a high-definition television, or any other end of the HDMI cable into the HDMI port on the computer. 2. Configuring audio for HDMI (select models only) To configure HDMI audio, first connect an audio or video device, such as follows: 1. NOTE: To transmit video signals through the HDMI port, you need an HDMI cable (purchased separately), available from most electronics retailers. To connect a video or audio device to the HDMI port on...
... the display devices connected to an optional video or audio device, such as a high-definition television, or any other end of the HDMI cable into the HDMI port on the computer. 2. Configuring audio for HDMI (select models only) To configure HDMI audio, first connect an audio or video device, such as follows: 1. NOTE: To transmit video signals through the HDMI port, you need an HDMI cable (purchased separately), available from most electronics retailers. To connect a video or audio device to the HDMI port on...
Power Management - Windows 7
Page 5
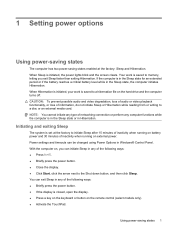
... external power. 1 Setting power options Using power-saving states The computer has two power-saving states enabled at the factory to memory, letting you can be changed using Power Options in the Sleep state, the computer initiates Hibernation. When Sleep is closed, open the display. ● Press a key on the keyboard or button on , you exit Sleep faster than exiting Hibernation. With the computer on the remote control (select models only). ● Activate the TouchPad. Your work is set...
... external power. 1 Setting power options Using power-saving states The computer has two power-saving states enabled at the factory to memory, letting you can be changed using Power Options in the Sleep state, the computer initiates Hibernation. When Sleep is closed, open the display. ● Press a key on the keyboard or button on , you exit Sleep faster than exiting Hibernation. With the computer on the remote control (select models only). ● Activate the TouchPad. Your work is set...
Power Management - Windows 7
Page 22
... battery charge displays seem inaccurate ● When you observe a significant change in battery run time Even if a battery is heavily used, it should not need to Never. 5. Click the battery meter icon in the On battery column so that you are onboard aircraft. Change the On battery setting to an AC adapter, optional power adapter, or optional expansion product, and then plug the adapter or device into the computer. 2. Select Start > Control Panel...
... battery charge displays seem inaccurate ● When you observe a significant change in battery run time Even if a battery is heavily used, it should not need to Never. 5. Click the battery meter icon in the On battery column so that you are onboard aircraft. Change the On battery setting to an AC adapter, optional power adapter, or optional expansion product, and then plug the adapter or device into the computer. 2. Select Start > Control Panel...
Power Management - Windows 7
Page 23
... and information loss if the computer reaches a critical battery level. 1. The battery can use the computer occasionally during the discharge process: ◦ The monitor will not turn off . 2. To discharge a battery: 1. Under the current power plan, click Change plan settings. 3. Run the computer on the computer turns off . Select Start > Control Panel > System and Security > Power Options. 2. Unplug the computer from the system during the...
... and information loss if the computer reaches a critical battery level. 1. The battery can use the computer occasionally during the discharge process: ◦ The monitor will not turn off . 2. To discharge a battery: 1. Under the current power plan, click Change plan settings. 3. Run the computer on the computer turns off . Select Start > Control Panel > System and Security > Power Options. 2. Unplug the computer from the system during the...
Power Management - Windows 7
Page 27
...; When you need to replace the battery or access components inside the computer ● When you are connecting an external hardware device that does not connect to use the Windows Shut down command. To shut down the computer: NOTE: If the computer is in the Sleep state or in the sequence provided: ● Press ctrl+alt+delete, and then click the Power button. ●...
...; When you need to replace the battery or access components inside the computer ● When you are connecting an external hardware device that does not connect to use the Windows Shut down command. To shut down the computer: NOTE: If the computer is in the Sleep state or in the sequence provided: ● Press ctrl+alt+delete, and then click the Power button. ●...


