HP Pavilion dv3 Entertainment PC - Maintenance and Service Guide
Page 19
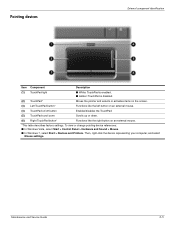
... selects or activates items on the screen. (3) Left TouchPad button* Functions like the left button on an external mouse. (4) TouchPad on/off button Enables/disables the TouchPad. (5) TouchPad scroll zone Scrolls up or down. (6) Right TouchPad button* Functions like the right button on an external mouse. *This table describes factory settings. To view or change pointing device references: ■ In Windows Vista, select Start > Control Panel > Hardware and Sound > Mouse. ■ In Windows 7, select Start > Devices and Printers. Maintenance and Service Guide 2-5 Then, right...
... selects or activates items on the screen. (3) Left TouchPad button* Functions like the left button on an external mouse. (4) TouchPad on/off button Enables/disables the TouchPad. (5) TouchPad scroll zone Scrolls up or down. (6) Right TouchPad button* Functions like the right button on an external mouse. *This table describes factory settings. To view or change pointing device references: ■ In Windows Vista, select Start > Control Panel > Hardware and Sound > Mouse. ■ In Windows 7, select Start > Devices and Printers. Maintenance and Service Guide 2-5 Then, right...
HP Pavilion dv3 Entertainment PC - Maintenance and Service Guide
Page 72
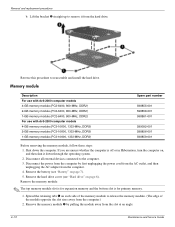
..., turn the computer on page 7). 5. Disconnect all external devices connected to reassemble and install the hard drive. Removal and replacement procedures b. Reverse this procedure to the computer. 3. Remove the hard drive cover (see "Battery" on , and then shut it from the computer. 4. Remove the memory module 2 by first unplugging the power cord from the AC outlet, and then unplugging the AC adapter from the hard drive. Memory module Description For use with dv3-2000 computer models...
..., turn the computer on page 7). 5. Disconnect all external devices connected to reassemble and install the hard drive. Removal and replacement procedures b. Reverse this procedure to the computer. 3. Remove the hard drive cover (see "Battery" on , and then shut it from the computer. 4. Remove the memory module 2 by first unplugging the power cord from the AC outlet, and then unplugging the AC adapter from the hard drive. Memory module Description For use with dv3-2000 computer models...
HP Pavilion dv3 Entertainment PC - Maintenance and Service Guide
Page 128
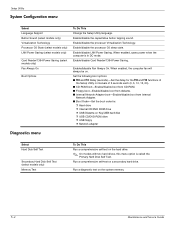
... Key/USB hard disk ❐ USB CD/DVD ROM drive ❐ USB floppy ❐ Network adapter Diagnostics menu Select Hard Disk Self Test Secondary Hard Disk Self Test (select models only) Memory Test To Do This Run a comprehensive self test on . Setup Utility System Configuration menu Select Language Support Button Sound (select models only) Virtualization Technology Processor C6 State (select models only) LAN Power Saving (select models only) Card Reader/1394 Power Saving (select models only) Fan Always On Boot Options To Do This Change the Setup Utility language. When enabled...
... Key/USB hard disk ❐ USB CD/DVD ROM drive ❐ USB floppy ❐ Network adapter Diagnostics menu Select Hard Disk Self Test Secondary Hard Disk Self Test (select models only) Memory Test To Do This Run a comprehensive self test on . Setup Utility System Configuration menu Select Language Support Button Sound (select models only) Virtualization Technology Processor C6 State (select models only) LAN Power Saving (select models only) Card Reader/1394 Power Saving (select models only) Fan Always On Boot Options To Do This Change the Setup Utility language. When enabled...
HP Pavilion dv3 Entertainment PC - Maintenance and Service Guide
Page 180
... 1-4 external media card 1-5 graphics 1-2 hard drive 1-3 keyboard 1-5 memory 1-3 microphone 1-4 operating system 1-6 optical drive 1-3 pointing device 1-5 ports 1-5 power requirements 1-5 processor 1-1, 1-2, 1-3 security 1-5 serviceability 1-6 webcam 1-4 wireless 1-4 product name 3-1, 4-5 R recovering a program or driver 8-1 recovering from the dedicated recovery partition 8-4 recovering from the recovery discs 8-4 recovery discs 8-1, 8-5 Recovery Manager 8-1, 8-4 recovery partition 8-1 recovery, system 8-1, 8-4 recycling Index-4 battery 11-1 display components 11-1 removal/replacement...
... 1-4 external media card 1-5 graphics 1-2 hard drive 1-3 keyboard 1-5 memory 1-3 microphone 1-4 operating system 1-6 optical drive 1-3 pointing device 1-5 ports 1-5 power requirements 1-5 processor 1-1, 1-2, 1-3 security 1-5 serviceability 1-6 webcam 1-4 wireless 1-4 product name 3-1, 4-5 R recovering a program or driver 8-1 recovering from the dedicated recovery partition 8-4 recovering from the recovery discs 8-4 recovery discs 8-1, 8-5 Recovery Manager 8-1, 8-4 recovery partition 8-1 recovery, system 8-1, 8-4 recycling Index-4 battery 11-1 display components 11-1 removal/replacement...

HP Pavilion dv3 Entertainment PC - Maintenance and Service Guide
Page 181
... button 2-5 TouchPad scroll zone 2-5 U Universal Serial Bus (USB) port connector pinout 9-4 location 2-8 USB board removal 4-51 spare part number 3-8, 3-29, 4-51 using system restore 8-3 V vents 2-7, 2-9 Virtualization Technology 5-4 volume down light 2-4 volume mute button 2-2 volume mute light 2-4 volume scroll zone 2-2 volume up light 2-4 W warranty period 3-1, 4-5 webcam location 2-1 product description 1-4 webcam light 2-1 webcam/microphone module 3-29 removal 4-34, 4-38, 4-41 spare part number 3-16, 3-17, 3-18, 4-35, 4-38, 4-41 Windows applications key 2-3 Windows logo key 2-3 wireless...
... button 2-5 TouchPad scroll zone 2-5 U Universal Serial Bus (USB) port connector pinout 9-4 location 2-8 USB board removal 4-51 spare part number 3-8, 3-29, 4-51 using system restore 8-3 V vents 2-7, 2-9 Virtualization Technology 5-4 volume down light 2-4 volume mute button 2-2 volume mute light 2-4 volume scroll zone 2-2 volume up light 2-4 W warranty period 3-1, 4-5 webcam location 2-1 product description 1-4 webcam light 2-1 webcam/microphone module 3-29 removal 4-34, 4-38, 4-41 spare part number 3-16, 3-17, 3-18, 4-35, 4-38, 4-41 Windows applications key 2-3 Windows logo key 2-3 wireless...

User Guide - Windows 7
Page 12
... being used to decrease speaker volume. On: The volume scroll zone is off or in Hibernation. ● White: Computer sound is on an external mouse. *This table describes factory settings. Component Description (3) Left TouchPad button* Functions like the left button on an external mouse. (4) TouchPad on/off button Enables/disables the TouchPad. (5) TouchPad scroll zone Scrolls up or down light 2 Chapter 1 Notebook tour Description On: Caps lock is on. ● On: The computer is on. ● Blinking...
... being used to decrease speaker volume. On: The volume scroll zone is off or in Hibernation. ● White: Computer sound is on an external mouse. *This table describes factory settings. Component Description (3) Left TouchPad button* Functions like the left button on an external mouse. (4) TouchPad on/off button Enables/disables the TouchPad. (5) TouchPad scroll zone Scrolls up or down light 2 Chapter 1 Notebook tour Description On: Caps lock is on. ● On: The computer is on. ● Blinking...
User Guide - Windows 7
Page 21
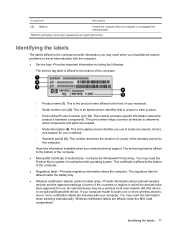
... about the computer. The part number helps a service technician to each product. ◦ Part number/Product number (p/n) (3). You may need when you troubleshoot system problems or travel internationally with your notebook. ◦ Warranty period (5). This certificate is unique to determine what components and parts are needed. ◦ Model description (4). If your notebook. ◦ Serial number (s/n) (2). This is affixed to update or troubleshoot the operating system. This number describes the duration (in...
... about the computer. The part number helps a service technician to each product. ◦ Part number/Product number (p/n) (3). You may need when you troubleshoot system problems or travel internationally with your notebook. ◦ Warranty period (5). This certificate is unique to determine what components and parts are needed. ◦ Model description (4). If your notebook. ◦ Serial number (s/n) (2). This is affixed to update or troubleshoot the operating system. This number describes the duration (in...
User Guide - Windows 7
Page 36
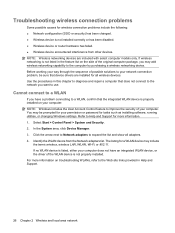
... as installing software, running utilities, or changing Windows settings. Cannot connect to a WLAN If you have an integrated WLAN device, or the driver of the original computer package, you want to use. Refer to your network connection problem, be prompted for your computer: NOTE: Windows includes the User Account Control feature to the computer by purchasing a wireless networking device. NOTE: Wireless networking devices are installed for all adapters. 4. In the System area, click Device Manager. 3. Troubleshooting wireless connection problems Some...
... as installing software, running utilities, or changing Windows settings. Cannot connect to a WLAN If you have an integrated WLAN device, or the driver of the original computer package, you want to use. Refer to your network connection problem, be prompted for your computer: NOTE: Windows includes the User Account Control feature to the computer by purchasing a wireless networking device. NOTE: Wireless networking devices are installed for all adapters. 4. In the System area, click Device Manager. 3. Troubleshooting wireless connection problems Some...
User Guide - Windows 7
Page 40
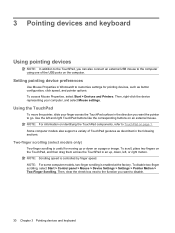
... the function you can also connect an external USB mouse to the computer using one of TouchPad gestures as button configuration, click speed, and pointer options. 3 Pointing devices and keyboard Using pointing devices NOTE: In addition to the TouchPad, you want the pointer to go. NOTE: Scrolling speed is enabled at the factory. NOTE: For information on identifying the TouchPad components, refer to TouchPad on the computer. To access Mouse Properties, select Start > Devices...
... the function you can also connect an external USB mouse to the computer using one of TouchPad gestures as button configuration, click speed, and pointer options. 3 Pointing devices and keyboard Using pointing devices NOTE: In addition to the TouchPad, you want the pointer to go. NOTE: Scrolling speed is enabled at the factory. NOTE: For information on identifying the TouchPad components, refer to TouchPad on the computer. To access Mouse Properties, select Start > Devices...
User Guide - Windows 7
Page 50
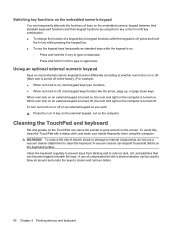
... key or the fn+shift key combination. ● To change the function of a keypad key to loosen and remove debris. 40 Chapter 3 Pointing devices and keyboard Switching key functions on the embedded numeric keypad You can temporarily alternate the functions of keys on the embedded numeric keypad between their standard keyboard functions and their keypad functions by using the computer. Using an optional external numeric keypad Keys on most external numeric keypads function...
... key or the fn+shift key combination. ● To change the function of a keypad key to loosen and remove debris. 40 Chapter 3 Pointing devices and keyboard Switching key functions on the embedded numeric keypad You can temporarily alternate the functions of keys on the embedded numeric keypad between their standard keyboard functions and their keypad functions by using the computer. Using an optional external numeric keypad Keys on most external numeric keypads function...
User Guide - Windows 7
Page 66
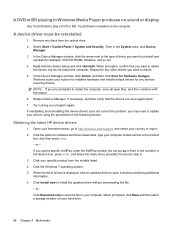
... the number) in the Search box, press enter, and follow the instructions provided. A DVD or BD playing in the System area, click Device Manager. 3. When prompted, click Save and then select a storage location on the computer. A device driver must be reinstalled 1. or - Obtaining the latest HP device drivers 1. or - Click the Windows 7 operating system. 5. Then in Windows Media Player produces no sound or display Use TouchSmart to step 6. 3. Select Start > Control Panel...
... the number) in the Search box, press enter, and follow the instructions provided. A DVD or BD playing in the System area, click Device Manager. 3. When prompted, click Save and then select a storage location on the computer. A device driver must be reinstalled 1. or - Obtaining the latest HP device drivers 1. or - Click the Windows 7 operating system. 5. Then in Windows Media Player produces no sound or display Use TouchSmart to step 6. 3. Select Start > Control Panel...

User Guide - Windows 7
Page 78
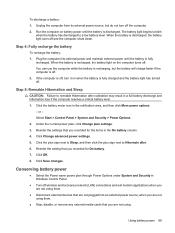
... into the computer. 2. Under the current power plan, click Change plan settings. 3. Click Change advanced power settings. 6. or - Change the Turn off . Select Start > Control Panel > System and Security > Power Options. 2. Change the On battery setting to Hibernate after the calibration. 4. Step 3: Discharge the battery The computer must remain on . 3. The battery light on the computer turns off the display settings to Never. 5. Step 2: Disable Hibernation and Sleep 1. Click the plus sign next to...
... into the computer. 2. Under the current power plan, click Change plan settings. 3. Click Change advanced power settings. 6. or - Change the Turn off . Select Start > Control Panel > System and Security > Power Options. 2. Change the On battery setting to Hibernate after the calibration. 4. Step 3: Discharge the battery The computer must remain on . 3. The battery light on the computer turns off the display settings to Never. 5. Step 2: Disable Hibernation and Sleep 1. Click the plus sign next to...
User Guide - Windows 7
Page 79
... not using them . ● Stop, disable, or remove any external media cards that you recorded for On battery. 7. Step 4: Fully recharge the battery To recharge the battery: 1. Step 5: Reenable Hibernation and Sleep CAUTION: Failure to reenable Hibernation after . 6. Reenter the settings that you recorded for the items in Windows Control Panel. ● Turn off . Click Change advanced power settings. 5. Unplug the computer from its external power source, but the battery will charge...
... not using them . ● Stop, disable, or remove any external media cards that you recorded for On battery. 7. Step 4: Fully recharge the battery To recharge the battery: 1. Step 5: Reenable Hibernation and Sleep CAUTION: Failure to reenable Hibernation after . 6. Reenter the settings that you recorded for the items in Windows Control Panel. ● Turn off . Click Change advanced power settings. 5. Unplug the computer from its external power source, but the battery will charge...
User Guide - Windows 7
Page 91
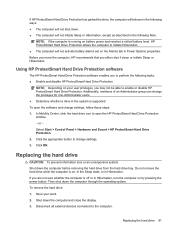
... change the privileges for non-Administrator users. ● Determine whether a drive in Power Options properties. or - Select Start > Control Panel > Hardware and Sound > HP ProtectSmart Hard Drive Protection. 2. Replacing the hard drive CAUTION: To prevent information loss or an unresponsive system: Shut down the computer through the operating system. Then shut down the computer before removing the hard drive from the hard drive bay. Disconnect all external devices connected to enable or disable HP ProtectSmart Hard Drive Protection. Using HP ProtectSmart Hard Drive Protection software...
... change the privileges for non-Administrator users. ● Determine whether a drive in Power Options properties. or - Select Start > Control Panel > Hardware and Sound > HP ProtectSmart Hard Drive Protection. 2. Replacing the hard drive CAUTION: To prevent information loss or an unresponsive system: Shut down the computer through the operating system. Then shut down the computer before removing the hard drive from the hard drive bay. Disconnect all external devices connected to enable or disable HP ProtectSmart Hard Drive Protection. Using HP ProtectSmart Hard Drive Protection software...
User Guide - Windows 7
Page 129
... transfer among hardware devices, including the time and date. Most software and BIOS updates on the system ROM. NOTE: The computer system BIOS is connected to a network, consult the network administrator before installing any software updates, especially system BIOS updates. Refer to improve the security of your permission or password for tasks such as installing applications, running utilities, or changing Windows settings. Identify your computer is stored on the HP Web site...
... transfer among hardware devices, including the time and date. Most software and BIOS updates on the system ROM. NOTE: The computer system BIOS is connected to a network, consult the network administrator before installing any software updates, especially system BIOS updates. Refer to improve the security of your permission or password for tasks such as installing applications, running utilities, or changing Windows settings. Identify your computer is stored on the HP Web site...
User Guide - Windows 7
Page 130
... arrow keys to select Exit > Exit Discarding Changes, and then press enter. To exit Setup Utility, use Setup Utility for displaying BIOS information: 1. Do not shut down the computer or initiate Sleep or Hibernation. Identify the BIOS update that provides software for your computer: Select Start > Help and Support, and then click the link for Startup Menu" message is displayed. 3. You may need to download. 3. Do not insert, remove, connect, or disconnect any device, cable...
... arrow keys to select Exit > Exit Discarding Changes, and then press enter. To exit Setup Utility, use Setup Utility for displaying BIOS information: 1. Do not shut down the computer or initiate Sleep or Hibernation. Identify the BIOS update that provides software for your computer: Select Start > Help and Support, and then click the link for Startup Menu" message is displayed. 3. You may need to download. 3. Do not insert, remove, connect, or disconnect any device, cable...
User Guide - Windows 7
Page 132
... to http://www.hp.com/support, and select your computer. Open your Internet browser, go to install. 7. Proceed to install the updated driver. After the file is displayed, click an updated driver to download the driver and install it later. NOTE: In some locations you want a specific SoftPaq, enter the SoftPaq number in the Search box, and then press enter. - Updating programs and drivers To download and install software other than a BIOS update, follow the instructions provided.
... to http://www.hp.com/support, and select your computer. Open your Internet browser, go to install. 7. Proceed to install the updated driver. After the file is displayed, click an updated driver to download the driver and install it later. NOTE: In some locations you want a specific SoftPaq, enter the SoftPaq number in the Search box, and then press enter. - Updating programs and drivers To download and install software other than a BIOS update, follow the instructions provided.
User Guide - Windows 7
Page 133
... ROM with LightScribe DVD ±R/RW SuperMulti DL Drive 74 Bluetooth device 14, 25 Bluetooth label 11 boot options 118 boot order 118 button sound 117 buttons power 4 TouchPad 2 TouchPad on/off 2 volume mute 4, 43 volume scroll zone 43 wireless 4 C cables eSATA 86 LAN 29 USB 84 caps lock light, identifying 2 Card Reader Power Saving 117 CD burning 78 copying 77 playing 76 removing 79 CD drive 73 Certificate of Authenticity label 11 charging batteries 65, 67 clicks changing settings 38 testing 38 compartments hard drive 9 memory module 9 wireless module...
... ROM with LightScribe DVD ±R/RW SuperMulti DL Drive 74 Bluetooth device 14, 25 Bluetooth label 11 boot options 118 boot order 118 button sound 117 buttons power 4 TouchPad 2 TouchPad on/off 2 volume mute 4, 43 volume scroll zone 43 wireless 4 C cables eSATA 86 LAN 29 USB 84 caps lock light, identifying 2 Card Reader Power Saving 117 CD burning 78 copying 77 playing 76 removing 79 CD drive 73 Certificate of Authenticity label 11 charging batteries 65, 67 clicks changing settings 38 testing 38 compartments hard drive 9 memory module 9 wireless module...
User Guide - Windows 7
Page 134
... slot, identifying 6 external audio devices, connecting 47 external monitor port 49 external monitor port, identifying 7 F fan always on 118 fingerprint reader 109 fingerprint reader location 110 fingerprint reader, identifying 4 firewall 18 firewall software, using 107 flicks changing assignments 38 creating assignments 38 fn key 32 fn key, identifying 5 function keys 32 function keys, identifying 5 H hard disk drive HP ProtectSmart Hard Drive Protection 80 installing 82 removing 81 replacing 81 hard drive HP ProtectSmart Hard Drive Protection 80 installing 82 removing 81 replacing 81 hard...
... slot, identifying 6 external audio devices, connecting 47 external monitor port 49 external monitor port, identifying 7 F fan always on 118 fingerprint reader 109 fingerprint reader location 110 fingerprint reader, identifying 4 firewall 18 firewall software, using 107 flicks changing assignments 38 creating assignments 38 fn key 32 fn key, identifying 5 function keys 32 function keys, identifying 5 H hard disk drive HP ProtectSmart Hard Drive Protection 80 installing 82 removing 81 replacing 81 hard drive HP ProtectSmart Hard Drive Protection 80 installing 82 removing 81 replacing 81 hard...
User Guide - Windows 7
Page 136
... 114 passwords set in 103 restoring default settings 115 selecting 114 starting 113 Setup Utility, passwords set in 103 shutdown 70 shutting down 70 SIM inserting 20 removing 23 SIM label 12 Sleep exiting 58 initiating 58 slots Digital Media 6 ExpressCard 6 hard drive 9 memory module 9 security cable 7 software Disk Cleanup 80 Disk Defragmenter 79 MediaSmart 45 TouchSmart 45 using 45 Wireless Assistant 15 software, updating 119 solid-state drive (SSD) 72 speakers 42 storing battery 70 SuperMulti LightScribe DVD...
... 114 passwords set in 103 restoring default settings 115 selecting 114 starting 113 Setup Utility, passwords set in 103 shutdown 70 shutting down 70 SIM inserting 20 removing 23 SIM label 12 Sleep exiting 58 initiating 58 slots Digital Media 6 ExpressCard 6 hard drive 9 memory module 9 security cable 7 software Disk Cleanup 80 Disk Defragmenter 79 MediaSmart 45 TouchSmart 45 using 45 Wireless Assistant 15 software, updating 119 solid-state drive (SSD) 72 speakers 42 storing battery 70 SuperMulti LightScribe DVD...


