
User Guide
Page 5
... and HP Single Monitor Arm ...14 2 Using the monitor...15 Software and utilities...15 The Information file...15 The Image Color Matching file...15 Using the On-Screen Display (OSD) menu...15 Adjusting Low Blue Light Mode...16 Using Auto-Sleep Mode...16 3 Support and troubleshooting...17 Solving common problems...17 Button lockouts...17 Contacting support...18 Preparing to call technical support...18 Locating the serial number and product number...18 4 Maintaining the monitor...19 Maintenance guidelines...19 Cleaning the monitor...19...
... and HP Single Monitor Arm ...14 2 Using the monitor...15 Software and utilities...15 The Information file...15 The Image Color Matching file...15 Using the On-Screen Display (OSD) menu...15 Adjusting Low Blue Light Mode...16 Using Auto-Sleep Mode...16 3 Support and troubleshooting...17 Solving common problems...17 Button lockouts...17 Contacting support...18 Preparing to call technical support...18 Locating the serial number and product number...18 4 Maintaining the monitor...19 Maintenance guidelines...19 Cleaning the monitor...19...
User Guide
Page 6
Shipping the monitor...19 Appendix A Technical specifications...20 21.5-inch Full HD Model...20 23.8-inch Full HD Model...21 27-inch Full HD Model...22 Preset display resolutions...23 Energy saver feature...23 Appendix B Accessibility...24 Supported assistive technologies...24 Contacting support...24 vi
Shipping the monitor...19 Appendix A Technical specifications...20 21.5-inch Full HD Model...20 23.8-inch Full HD Model...21 27-inch Full HD Model...22 Preset display resolutions...23 Energy saver feature...23 Appendix B Accessibility...24 Supported assistive technologies...24 Contacting support...24 vi

User Guide
Page 7
... LCD monitor so that may accidentally step on dressers, bookcases, shelves, desks, speakers, chests, or carts may fall over them. When unplugging from surrounding light and bright surfaces that they cannot be specifically labeled as a power strip or uninterruptible power supply (UPS). Not all cords and cables connected to route all power strips provide surge protection; The grounding pin is suitable for computer users...
... LCD monitor so that may accidentally step on dressers, bookcases, shelves, desks, speakers, chests, or carts may fall over them. When unplugging from surrounding light and bright surfaces that they cannot be specifically labeled as a power strip or uninterruptible power supply (UPS). Not all cords and cables connected to route all power strips provide surge protection; The grounding pin is suitable for computer users...

User Guide
Page 8
... commonly used operations yy Plug-and-play capability if supported by the operating system yy 100 mm integrated VESA mounting yy Security slot provision on rear of monitor for optional cable lock yy On-Screen Display (OSD) adjustments in several languages for easy setup and screen optimization yy HP Display Assistant software for adjusting monitor settings and enabling theft deterrence features yy HDCP (High Bandwidth Digital Content Protection) copy protection on all digital inputs yy...
... commonly used operations yy Plug-and-play capability if supported by the operating system yy 100 mm integrated VESA mounting yy Security slot provision on rear of monitor for optional cable lock yy On-Screen Display (OSD) adjustments in several languages for easy setup and screen optimization yy HP Display Assistant software for adjusting monitor settings and enabling theft deterrence features yy HDCP (High Bandwidth Digital Content Protection) copy protection on all digital inputs yy...

User Guide
Page 9
...Navigates through the Viewing Modes menu and selects a preset view mode. Opens the Information menu. Front panel controls Control 1 Function buttons (1-4) Menu button Next Active Input button Assignable Function button 1 Viewing Modes button Assignable Function button 2 Information button Assignable Function button 3 2 Power button Function Use these buttons to navigate through the OSD based on or off. To reconfigure Function buttons: 1. Navigates through the OSD menu and selects a video input source. Reassigning the function buttons You can change the three assignable...
...Navigates through the Viewing Modes menu and selects a preset view mode. Opens the Information menu. Front panel controls Control 1 Function buttons (1-4) Menu button Next Active Input button Assignable Function button 1 Viewing Modes button Assignable Function button 2 Information button Assignable Function button 3 2 Power button Function Use these buttons to navigate through the OSD based on or off. To reconfigure Function buttons: 1. Navigates through the OSD menu and selects a video input source. Reassigning the function buttons You can change the three assignable...

User Guide
Page 11
... cause damage. Position the stand over the base, and press down firmly until you hear a clicking sound indicating the monitor is fragile. Attaching the monitor stand and base CAUTION: The screen is locked. 3. Remove the stand/base assembly, and then lift the monitor from surrounding light and bright surfaces. 1. Insert the two tabs on the stand into the bracket on the panel may cause nonuniformity of color or disorientation of...
... cause damage. Position the stand over the base, and press down firmly until you hear a clicking sound indicating the monitor is fragile. Attaching the monitor stand and base CAUTION: The screen is locked. 3. Remove the stand/base assembly, and then lift the monitor from surrounding light and bright surfaces. 1. Insert the two tabs on the stand into the bracket on the panel may cause nonuniformity of color or disorientation of...

User Guide
Page 12
... the rear of the monitor and the other end to the DisplayPort connector on the source device. • Connect one end of an HDMI cable to the HDMI connector on the rear of the monitor and the other end to the HDMI connector on the source device. 6 Chapter 1 Getting Started Connecting the cables NOTE: The monitor ships with the monitor. 1. Connect a video cable. NOTE: The monitor automatically determines which inputs have valid video signals.
... the rear of the monitor and the other end to the DisplayPort connector on the source device. • Connect one end of an HDMI cable to the HDMI connector on the rear of the monitor and the other end to the HDMI connector on the source device. 6 Chapter 1 Getting Started Connecting the cables NOTE: The monitor ships with the monitor. 1. Connect a video cable. NOTE: The monitor automatically determines which inputs have valid video signals.

User Guide
Page 13
... the source device. 3. Do not pull on power cords or cables. To reduce the risk of electric shock or damage to the equipment: Do not disable the power cord grounding plug. WARNING! Setting up the monitor 7 When unplugging the power cord from the AC outlet, grasp the cord by unplugging the power cord from the equipment by the plug. • Connect one end of a VGA cable to the VGA connector on...
... the source device. 3. Do not pull on power cords or cables. To reduce the risk of electric shock or damage to the equipment: Do not disable the power cord grounding plug. WARNING! Setting up the monitor 7 When unplugging the power cord from the AC outlet, grasp the cord by unplugging the power cord from the equipment by the plug. • Connect one end of a VGA cable to the VGA connector on...
User Guide
Page 15
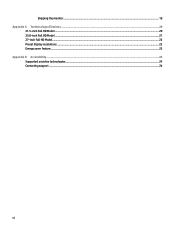
... LCD screens. When the monitor is first turned on, a Monitor Status message is a condition that input for 10 seconds. A burned-in the OSD menu. NOTE: You can disable the power LED in image on the monitor is the current active signal, the current preset monitor resolution, and the recommended preset display resolution. The message shows which input is not covered under the HP warranty. Turning on the monitor Press the power button to turn off the monitor...
... LCD screens. When the monitor is first turned on, a Monitor Status message is a condition that input for 10 seconds. A burned-in the OSD menu. NOTE: You can disable the power LED in image on the monitor is the current active signal, the current preset monitor resolution, and the recommended preset display resolution. The message shows which input is not covered under the HP warranty. Turning on the monitor Press the power button to turn off the monitor...

User Guide
Page 18
... mounting holes. Position the monitor face down on the release latch (1), and slide the stand out of the monitor head. To attach a third-party mounting solution to verify that the manufacturer's mounting solution is rated to a wall, swing arm, or other mounting fixture. For best performance, use the power cord and video cables provided with the VESA standard and is compliant with the monitor. Mounting the monitor The monitor panel can be supported...
... mounting holes. Position the monitor face down on the release latch (1), and slide the stand out of the monitor head. To attach a third-party mounting solution to verify that the manufacturer's mounting solution is rated to a wall, swing arm, or other mounting fixture. For best performance, use the power cord and video cables provided with the VESA standard and is compliant with the monitor. Mounting the monitor The monitor panel can be supported...

User Guide
Page 19
... HP Speaker Bar to portrait orientation. Use the four screws removed from the bottom of the monitor head. 3. Setting up the monitor 13 Attaching the monitor to Removing the monitor stand on page 12. 2. Pull the speaker cover from the VESA holes on the rear of the monitor. 2. Remove the monitor stand. Refer to HP Single Monitor Arm 1. Attaching the HP Speaker Bar to the monitor. IMPORTANT: Follow the HP Single Monitor Arm manufacturer's instructions when mounting the monitor...
... HP Speaker Bar to portrait orientation. Use the four screws removed from the bottom of the monitor head. 3. Setting up the monitor 13 Attaching the monitor to Removing the monitor stand on page 12. 2. Pull the speaker cover from the VESA holes on the rear of the monitor. 2. Remove the monitor stand. Refer to HP Single Monitor Arm 1. Attaching the HP Speaker Bar to the monitor. IMPORTANT: Follow the HP Single Monitor Arm manufacturer's instructions when mounting the monitor...

User Guide
Page 21
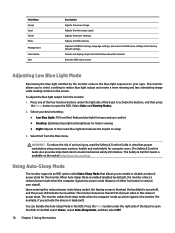
... Format specification. 2 Using the monitor Software and utilities You can access and make adjustments, do the following: 1. This file is activated from within graphics programs that the computer's graphic card is Windows Plug and Play-compatible and the monitor will work through separate BNC-type connectors or through distribution buffers/boxes. Use the Function buttons to adjust the monitor screen image based on the monitor. 2. Main Menu Brightness+ Color Description Adjusts the brightness and contrast levels of...
... Format specification. 2 Using the monitor Software and utilities You can access and make adjustments, do the following: 1. This file is activated from within graphics programs that the computer's graphic card is Windows Plug and Play-compatible and the monitor will work through separate BNC-type connectors or through distribution buffers/boxes. Use the Function buttons to adjust the monitor screen image based on the monitor. 2. Main Menu Brightness+ Color Description Adjusts the brightness and contrast levels of...
User Guide
Page 22
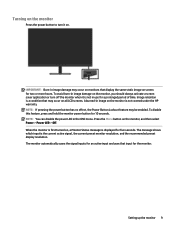
... reduced power state (sleep mode), the display screen is blanked, the backlight is available on the screen. In the OSD select Power, select Auto-Sleep Mode, and then select Off. 16 Chapter 2 Using the monitor To adjust the blue light output from the Main menu. Exits the OSD menu screen. Selects and displays important information about the monitor. Adjusts the power settings. Select Color and Viewing Modes. 2. Reduces blue light for improved eye comfort • Reading: Optimizes blue light and brightness for computer users. Main Menu Image Input Power Menu...
... reduced power state (sleep mode), the display screen is blanked, the backlight is available on the screen. In the OSD select Power, select Auto-Sleep Mode, and then select Off. 16 Chapter 2 Using the monitor To adjust the blue light output from the Main menu. Exits the OSD menu screen. Selects and displays important information about the monitor. Adjusts the power settings. Select Color and Viewing Modes. 2. Reduces blue light for improved eye comfort • Reading: Optimizes blue light and brightness for computer users. Main Menu Image Input Power Menu...

User Guide
Page 23
... adjust the brightness scale as needed. Power Button Lockout is flashing. Open the OSD menu and select Power, select Auto-Sleep Mode, and then set higher than what the monitor supports. Monitor video cable is disconnected. NOTE: If pressing the power button has no effect, press and hold the power button on page 6 for 10 seconds to disable the OSD Lockout function. Open the OSD menu and select the Input menu. Possible Cause Power cord is disconnected. Video resolution and/or refresh rate are set auto-sleep to Connecting the cables...
... adjust the brightness scale as needed. Power Button Lockout is flashing. Open the OSD menu and select Power, select Auto-Sleep Mode, and then set higher than what the monitor supports. Monitor video cable is disconnected. NOTE: If pressing the power button has no effect, press and hold the power button on page 6 for 10 seconds to disable the OSD Lockout function. Open the OSD menu and select the Input menu. Possible Cause Power cord is disconnected. Video resolution and/or refresh rate are set auto-sleep to Connecting the cables...
User Guide
Page 24
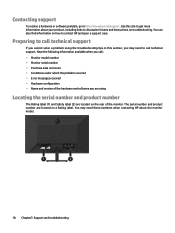
... of the hardware and software you may need to call : • Monitor model number • Monitor serial number • Purchase date on troubleshooting. You can also find information on a Rating label. Use this section, you are using the troubleshooting tips in this site to contact HP and open a support case. Preparing to call technical support If you cannot solve a problem using Locating the serial number and product number The Rating label (1) and Safety...
... of the hardware and software you may need to call : • Monitor model number • Monitor serial number • Purchase date on troubleshooting. You can also find information on a Rating label. Use this section, you are using the troubleshooting tips in this site to contact HP and open a support case. Preparing to call technical support If you cannot solve a problem using Locating the serial number and product number The Rating label (1) and Safety...

User Guide
Page 25
... damaged, contact an authorized HP dealer, reseller, or service provider. • Use only a power source and connection appropriate for ventilation. These openings must position the monitor facedown on a soft area to gently wipe the screen surface. You may need it from excessive light, heat, or moisture. • When removing the monitor stand, you move or ship the monitor. For more difficult cleaning situations, use . Never spray the cleaner...
... damaged, contact an authorized HP dealer, reseller, or service provider. • Use only a power source and connection appropriate for ventilation. These openings must position the monitor facedown on a soft area to gently wipe the screen surface. You may need it from excessive light, heat, or moisture. • When removing the monitor stand, you move or ship the monitor. For more difficult cleaning situations, use . Never spray the cleaner...
User Guide
Page 26
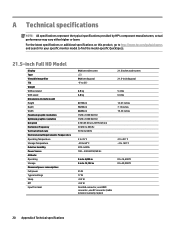
...www.hp.com/go/quickspecs and search for your specific monitor model to find the model-specific QuickSpecs. 21.5-inch Full HD Model Display Type Viewable Image Size Tilt Weight Without stand With stand Dimensions (include stand) Height Depth Width Maximum graphic resolution Optimum graphic resolution Dot pitch Horizontal frequency Vertical refresh rate Environmental Requirements Temperature Operating Temperature Storage Temperature Relative humidity Power Source Altitude: Operating Storage Measured power consumption: Full power Typical settings Sleep Off Input Terminal 54.6 cm wide screen LCD...
...www.hp.com/go/quickspecs and search for your specific monitor model to find the model-specific QuickSpecs. 21.5-inch Full HD Model Display Type Viewable Image Size Tilt Weight Without stand With stand Dimensions (include stand) Height Depth Width Maximum graphic resolution Optimum graphic resolution Dot pitch Horizontal frequency Vertical refresh rate Environmental Requirements Temperature Operating Temperature Storage Temperature Relative humidity Power Source Altitude: Operating Storage Measured power consumption: Full power Typical settings Sleep Off Input Terminal 54.6 cm wide screen LCD...

User Guide
Page 27
23.8-inch Full HD Model Display Type Viewable Image Size Tilt Weight Without stand With stand Dimensions (include stand) Height Depth Width Maximum graphic resolution Optimum graphic resolution Dot pitch Horizontal frequency Vertical refresh rate Environmental Requirements Temperature Operating Temperature Storage Temperature Relative humidity Power Source Altitude: Operating Storage Measured power consumption: Full power Typical settings Sleep Off Input Terminal 60.5 cm wide screen LCD 60.5 cm diagonal -5° to 25° 23.8 inches wide screen 23.8-inch diagonal 3.1 kg 3.8 kg 6.8 lbs...
23.8-inch Full HD Model Display Type Viewable Image Size Tilt Weight Without stand With stand Dimensions (include stand) Height Depth Width Maximum graphic resolution Optimum graphic resolution Dot pitch Horizontal frequency Vertical refresh rate Environmental Requirements Temperature Operating Temperature Storage Temperature Relative humidity Power Source Altitude: Operating Storage Measured power consumption: Full power Typical settings Sleep Off Input Terminal 60.5 cm wide screen LCD 60.5 cm diagonal -5° to 25° 23.8 inches wide screen 23.8-inch diagonal 3.1 kg 3.8 kg 6.8 lbs...

User Guide
Page 28
27-inch Full HD Model Display Type Viewable Image Size Tilt Weight Without stand With stand Dimensions (include stand) Height Depth Width Maximum graphic resolution Optimum graphic resolution Dot pitch Horizontal frequency Vertical refresh rate Environmental Requirements Temperature Operating Temperature Storage Temperature Relative humidity Power Source Altitude: Operating Storage Measured power consumption: Full power Typical settings Sleep Off Input Terminal 68.6 cm wide screen LCD 68.6 cm diagonal -5° to 25° 27 inches wide screen 27-inch diagonal 3.9 kg 4.7 kg 8.6 lbs...
27-inch Full HD Model Display Type Viewable Image Size Tilt Weight Without stand With stand Dimensions (include stand) Height Depth Width Maximum graphic resolution Optimum graphic resolution Dot pitch Horizontal frequency Vertical refresh rate Environmental Requirements Temperature Operating Temperature Storage Temperature Relative humidity Power Source Altitude: Operating Storage Measured power consumption: Full power Typical settings Sleep Off Input Terminal 68.6 cm wide screen LCD 68.6 cm diagonal -5° to 25° 27 inches wide screen 27-inch diagonal 3.9 kg 4.7 kg 8.6 lbs...
User Guide
Page 29
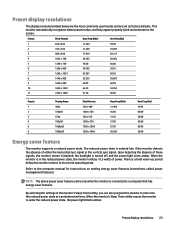
....50 56.250 Vert Freq (Hz) 59.94 60.00 50.00 50.00 60.00 50.00 Energy saver feature The monitor supports a reduced power state. Preset display resolutions The display resolutions listed below are the most commonly used modes and are set as factory defaults. This monitor automatically recognizes these signals, the monitor screen is blanked, the backlight is in the reduced power state, the monitor utilizes
....50 56.250 Vert Freq (Hz) 59.94 60.00 50.00 50.00 60.00 50.00 Energy saver feature The monitor supports a reduced power state. Preset display resolutions The display resolutions listed below are the most commonly used modes and are set as factory defaults. This monitor automatically recognizes these signals, the monitor screen is blanked, the backlight is in the reduced power state, the monitor utilizes


