Setup Guide
Page 5
...10 Managing and configuring fax settings 15 Set up speed-dial entries 15 Test fax setup 15 4 Set up Direct Digital Filing for scanning (optional) Required information 16 Step 1: Create and share a folder on the network 17 Step 2: Set up a shortcut to the folder ... 22 Solving network problems (some models only) . 23 Solving wireless problems (some models only) . 23 Solving Direct Digital Filing problems (optional) 24 Solving fax problems (optional 26 Troubleshooting and configuration tools . . . . . 28 Hewlett-Packard limited warranty statement 1 vs. Contents English 1 Set up the ...
...10 Managing and configuring fax settings 15 Set up speed-dial entries 15 Test fax setup 15 4 Set up Direct Digital Filing for scanning (optional) Required information 16 Step 1: Create and share a folder on the network 17 Step 2: Set up a shortcut to the folder ... 22 Solving network problems (some models only) . 23 Solving wireless problems (some models only) . 23 Solving Direct Digital Filing problems (optional) 24 Solving fax problems (optional 26 Troubleshooting and configuration tools . . . . . 28 Hewlett-Packard limited warranty statement 1 vs. Contents English 1 Set up the ...
Setup Guide
Page 8
..., see "Set up Direct Digital Filing for the software. 4. If you use frequently. 2. Register the device If you have more than one HP device installed, select the appropriate tab for your computer). If you have not already done so, go to www.register... document. On the Windows desktop, double-click the HP Photosmart software icon. 2. Close the flatbed scanner. 9. Press START COPY Black or START COPY Color. Remove the document from an application that you encounter problems, see the online help for scanning (optional)" on page 16. Finding more information about using ...
..., see "Set up Direct Digital Filing for the software. 4. If you use frequently. 2. Register the device If you have more than one HP device installed, select the appropriate tab for your computer). If you have not already done so, go to www.register... document. On the Windows desktop, double-click the HP Photosmart software icon. 2. Close the flatbed scanner. 9. Press START COPY Black or START COPY Color. Remove the document from an application that you encounter problems, see the online help for scanning (optional)" on page 16. Finding more information about using ...
Setup Guide
Page 11
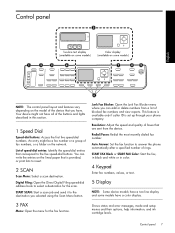
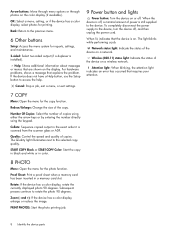
... after a specified number of rings. An entry might not have a color display. 3 FAX Menu: Open the menu for the scan. START SCAN: Start a scan job and send it to the destination you can write the entries on the network. Junk Fax Blocker: Open the Junk Fax Blocker... menu where you selected using the Scan Menu button. Auto Answer: Set the fax function to insert. 2 SCAN Scan Menu: Select a scan destination. Shows status and error messages, mode and setup menus and their options, help information, and ink cartridge levels. Digital Filing: Open the...
... after a specified number of rings. An entry might not have a color display. 3 FAX Menu: Open the menu for the scan. START SCAN: Start a scan job and send it to the destination you can write the entries on the network. Junk Fax Blocker: Open the Junk Fax Blocker... menu where you selected using the Scan Menu button. Auto Answer: Set the fax function to insert. 2 SCAN Scan Menu: Select a scan destination. Shows status and error messages, mode and setup menus and their options, help information, and ink cartridge levels. Digital Filing: Open the...
Setup Guide
Page 12
...sided output (if a duplexer is still supplied to the selected copy quality. Help: Shows additional information about messages or menus that the device is scanned from the scanner glass or ADF. When lit, indicates that are shown on . Collate: Sequence copied output in color. 8 PHOTO Menu: Open... a job. Network status light: Indicate the status of copies. Back: Return to rotate the photo 90 degrees. Arrow buttons: Move through menu options or through photos on or off , and then unplug the power cord. Quality: Control the speed and quality of the device on a wireless network...
...sided output (if a duplexer is still supplied to the selected copy quality. Help: Shows additional information about messages or menus that the device is scanned from the scanner glass or ADF. When lit, indicates that are shown on . Collate: Sequence copied output in color. 8 PHOTO Menu: Open... a job. Network status light: Indicate the status of copies. Back: Return to rotate the photo 90 degrees. Arrow buttons: Move through menu options or through photos on or off , and then unplug the power cord. Quality: Control the speed and quality of the device on a wireless network...
Setup Guide
Page 20
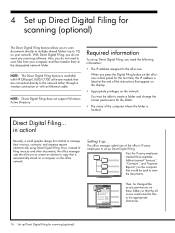
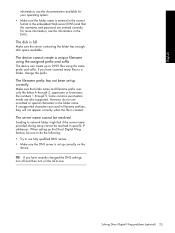
... Direct Digital Filing does not support Windows Active Directory. in -one could save the files to the appropriate directories. 16 Set up Direct Digital Filing for scanning (optional) The Direct Digital Filing feature allows you need any scanning software. Recently, a small graphic design firm started to the ... filing invoices and other documents, the office manager uses the all-in-one to create an electronic copy that are connected directly to the network either through a wireless connection or with HP Officejet L7600/L7700 all -in action! Also, you do not need to multiple shared...
... Direct Digital Filing does not support Windows Active Directory. in -one could save the files to the appropriate directories. 16 Set up Direct Digital Filing for scanning (optional) The Direct Digital Filing feature allows you need any scanning software. Recently, a small graphic design firm started to the ... filing invoices and other documents, the office manager uses the all-in-one to create an electronic copy that are connected directly to the network either through a wireless connection or with HP Officejet L7600/L7700 all -in action! Also, you do not need to multiple shared...
Setup Guide
Page 21
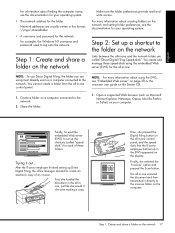
... in -one control panel... username and password for the folder. Step 2: Set up in -one and the network folder are using the embedded Web server (EWS) for... the network. Finally, she loaded the document in the all -in -one . English For information about finding the computer name, see "Embedded Web...to the network. You cannot create a folder from the all -in -one scanned the document and then transmitted it out... Then, she were making a... folder on the network 17 Create a folder on the all-in-one control panel, and the speeddials that the IT-savvy employee had set...
... in -one control panel... username and password for the folder. Step 2: Set up in -one and the network folder are using the embedded Web server (EWS) for... the network. Finally, she loaded the document in the all -in -one . English For information about finding the computer name, see "Embedded Web...to the network. You cannot create a folder from the all -in -one scanned the document and then transmitted it out... Then, she were making a... folder on the network 17 Create a folder on the all-in-one control panel, and the speeddials that the IT-savvy employee had set...
Setup Guide
Page 22
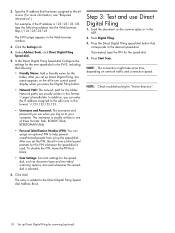
... Number (PIN): You can assign an optional PIN to your computer. Press the Direct Digital Filing speed-dial button that has been assigned to the allin-one control panel prompts for the speeddial, such as document type and two-sided scanning options, are usually written in the Web browser... window. 3. Press Start Scan. Network paths are used . If prompted, type the PIN ...
... Number (PIN): You can assign an optional PIN to your computer. Press the Direct Digital Filing speed-dial button that has been assigned to the allin-one control panel prompts for the speeddial, such as document type and two-sided scanning options, are usually written in the Web browser... window. 3. Press Start Scan. Network paths are used . If prompted, type the PIN ...
Setup Guide
Page 28
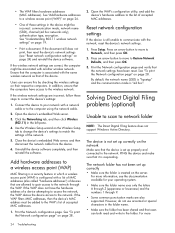
...server. See "To print the Network configuration page" on page 19. • Print a document. The device is created on page 24. • One of the device. See "Add hardware addresses to Restore Network Defaults, and then press OK. 3. See "Understanding 802.11 wireless network settings" on page... settings of a device attempting to access the network, the WAP denies the device access to the folder. Solving Direct Digital Filing problems (optional) Unable to scan to a wireless access point (WAP) MAC filtering is a security feature in the folder name. • Make sure the folder has ...
...server. See "To print the Network configuration page" on page 19. • Print a document. The device is created on page 24. • One of the device. See "Add hardware addresses to Restore Network Defaults, and then press OK. 3. See "Understanding 802.11 wireless network settings" on page... settings of a device attempting to access the network, the WAP denies the device access to the folder. Solving Direct Digital Filing problems (optional) Unable to scan to a wireless access point (WAP) MAC filtering is a security feature in the folder name. • Make sure the folder has ...
Setup Guide
Page 29
...a folder, change the prefix. the numbers 1 through Z, uppercase or lowercase; If unsupported characters are used in -one. When setting up the Direct Digital Filing feature, be resolved to 9,999 files using the assigned prefix and suffix... prefix uses only the letters A through 9. Solving Direct Digital Filing problems (optional) 25 TIP: If you have recently changed the DNS settings, turn off and then turn on the... device. If you have scanned many files to use accented or special characters in the EWS. The server name...
...a folder, change the prefix. the numbers 1 through Z, uppercase or lowercase; If unsupported characters are used in -one. When setting up the Direct Digital Filing feature, be resolved to 9,999 files using the assigned prefix and suffix... prefix uses only the letters A through 9. Solving Direct Digital Filing problems (optional) 25 TIP: If you have recently changed the DNS settings, turn off and then turn on the... device. If you have scanned many files to use accented or special characters in the EWS. The server name...
User Guide
Page 7
... using optical character recognition (OCR) software 56 Change scan settings ...57 Cancel a scan job ...57 7 Work with memory devices (some models only) Insert a memory card ...58 Connect a digital camera ...59 Connect a storage device ...61 View photos ...62 View ...) Send a fax ...70 Send a basic fax ...70 Send a fax manually from a phone 71 Send a fax using monitor dialing 72 Send a fax using the broadcast fax option (color display models only 73 Receive a fax ...73 Receive a fax manually ...73 Set up backup fax reception 74 Reprint received faxes from memory 75 Forward...
... using optical character recognition (OCR) software 56 Change scan settings ...57 Cancel a scan job ...57 7 Work with memory devices (some models only) Insert a memory card ...58 Connect a digital camera ...59 Connect a storage device ...61 View photos ...62 View ...) Send a fax ...70 Send a basic fax ...70 Send a fax manually from a phone 71 Send a fax using monitor dialing 72 Send a fax using the broadcast fax option (color display models only 73 Receive a fax ...73 Receive a fax manually ...73 Set up backup fax reception 74 Reprint received faxes from memory 75 Forward...
User Guide
Page 20
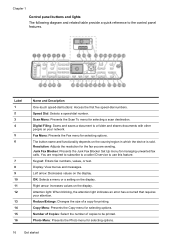
...8 9 10 11 12 13 14 15 16 Name and Description One-touch speed-dial buttons: Access the first five speed-dial numbers. Scan Menu: Presents the Scan To menu for selecting options. Copy Menu: Presents the Copy menu for selecting a scan destination. You are sending. Chapter 1 Control panel buttons and lights ...attention light indicates an error has occurred that requires your network. Number of Copies: Select the number of a copy for selecting options. Reduce/Enlarge: Changes the size of copies to a folder and shares documents with other people on your attention. Speed Dial: ...
...8 9 10 11 12 13 14 15 16 Name and Description One-touch speed-dial buttons: Access the first five speed-dial numbers. Scan Menu: Presents the Scan To menu for selecting options. Copy Menu: Presents the Copy menu for selecting a scan destination. You are sending. Chapter 1 Control panel buttons and lights ...attention light indicates an error has occurred that requires your network. Number of Copies: Select the number of a copy for selecting options. Reduce/Enlarge: Changes the size of copies to a folder and shares documents with other people on your attention. Speed Dial: ...

User Guide
Page 28
... Selecting print options • Using special features • Editing 24 Use the all -in -one This section contains the following topics: • Use control panel menus • Control-panel message types • Change device settings • Use the HP Solution Center (Windows) • Use the HP photo and imaging...media • Print borderless • Set up speed-dial entries (some models, you can scan and reprint a photo or scan to a memory card. • Fax menu: Allows you have. • Scan menu: Presents a list of display on the control panel-color display or two-line display ...
... Selecting print options • Using special features • Editing 24 Use the all -in -one This section contains the following topics: • Use control panel menus • Control-panel message types • Change device settings • Use the HP Solution Center (Windows) • Use the HP photo and imaging...media • Print borderless • Set up speed-dial entries (some models, you can scan and reprint a photo or scan to a memory card. • Fax menu: Allows you have. • Scan menu: Presents a list of display on the control panel-color display or two-line display ...
User Guide
Page 30
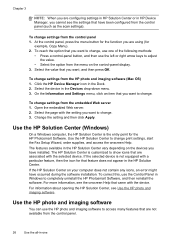
...device. The features available in the HP Solution Center vary depending on the devices you want to change, use one For information about opening the HP Solution Center, see the onscreen Help that came with the setting you want to change . 3. To reach the option that you want , and then ...to access many features that are not available from the control panel (such as the scan settings). Use the HP photo and imaging software You can use the Control Panel in Windows to completely uninstall the HP Photosmart Software, and then reinstall the software. Chapter 3 NOTE: When you are ...
...device. The features available in the HP Solution Center vary depending on the devices you want to change, use one For information about opening the HP Solution Center, see the onscreen Help that came with the setting you want to change . 3. To reach the option that you want , and then ...to access many features that are not available from the control panel (such as the scan settings). Use the HP photo and imaging software You can use the Control Panel in Windows to completely uninstall the HP Photosmart Software, and then reinstall the software. Chapter 3 NOTE: When you are ...
User Guide
Page 49
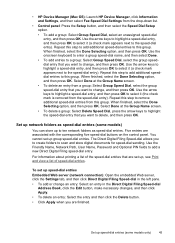
...add entries to a group: Select Group Speed Dial, select the group speeddial entry that you want to scan and store digital documents for speed-dial sending. Select Done at the Group Name screen. • ...next to add a new Direct Digital Filing speed-dial entry. When finished, select the Done Selecting option, and then press OK. Set up speed-dial entries Embedded Web server (network connection): Open ...entry, and then press OK to this group. • HP Device Manager (Mac OS): Launch HP Device Manager, click Information and Settings, and then select Fax Speed Dial Settings from...
...add entries to a group: Select Group Speed Dial, select the group speeddial entry that you want to scan and store digital documents for speed-dial sending. Select Done at the Group Name screen. • ...next to add a new Direct Digital Filing speed-dial entry. When finished, select the Done Selecting option, and then press OK. Set up speed-dial entries Embedded Web server (network connection): Open ...entry, and then press OK to this group. • HP Device Manager (Mac OS): Launch HP Device Manager, click Information and Settings, and then select Fax Speed Dial Settings from...

User Guide
Page 59
...Web server 55 For more information on your device to the front USB port. Press OK or START SCAN. Insert the memory device. 3. While you can send the scanned image as the HP photo and imaging software). 6. Select a computer name from your computer. ▲ Click the Information ...; The Scan Menu appears, listing various options or destinations. This feature is supported only for both network connections and direct connections. It is directly connected to the memory card or storage device. The default destination is whichever one you selected the last time you did not ...
...Web server 55 For more information on your device to the front USB port. Press OK or START SCAN. Insert the memory device. 3. While you can send the scanned image as the HP photo and imaging software). 6. Select a computer name from your computer. ▲ Click the Information ...; The Scan Menu appears, listing various options or destinations. This feature is supported only for both network connections and direct connections. It is directly connected to the memory card or storage device. The default destination is whichever one you selected the last time you did not ...
User Guide
Page 61
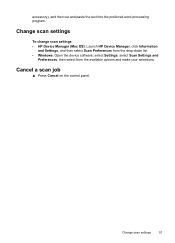
Change scan settings To change scan settings • HP Device Manager (Mac OS): Launch HP Device Manager, click Information and Settings, and then select Scan Preferences from the drop-down list. • Windows: Open the device software, select Settings, select Scan Settings and Preferences, then select from the available options and make your selections. Change scan settings 57 accessory), and then cut and paste the text into the preferred word-processing program. Cancel a scan job ▲ Press Cancel on the control panel.
Change scan settings To change scan settings • HP Device Manager (Mac OS): Launch HP Device Manager, click Information and Settings, and then select Scan Preferences from the drop-down list. • Windows: Open the device software, select Settings, select Scan Settings and Preferences, then select from the available options and make your selections. Change scan settings 57 accessory), and then cut and paste the text into the preferred word-processing program. Cancel a scan job ▲ Press Cancel on the control panel.
User Guide
Page 68
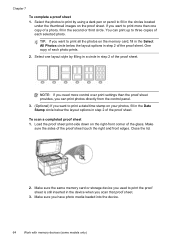
Select one copy of the proof sheet. Make sure you scan that proof sheet. 3. NOTE: If you need more than the proof sheet provides, you want to three copies of the proof sheet. To scan a completed proof sheet 1. You can print photos directly from the control panel. 3. (Optional) If you can print up ... stamp on the memory card, fill in the Select All Photos circle below the layout options in the second or third circle. TIP: If you want to print more control over print settings than one layout style by using a dark pen or pencil to print the proof sheet is still...
Select one copy of the proof sheet. Make sure you scan that proof sheet. 3. NOTE: If you need more than the proof sheet provides, you want to three copies of the proof sheet. To scan a completed proof sheet 1. You can print photos directly from the control panel. 3. (Optional) If you can print up ... stamp on the memory card, fill in the Select All Photos circle below the layout options in the second or third circle. TIP: If you want to print more control over print settings than one layout style by using a dark pen or pencil to print the proof sheet is still...

User Guide
Page 69
...HP Photosmart software. To print a panoramic photo 1. The Photosmart Express menu appears. Press the arrow keys to select multiple panoramic photos from the control panel 65 When prompted, load 10 x 30 cm (4 x 12 inch) panorama photo paper in the input tray, and then press OK. To print more than one...OK. 8. Choose the appropriate display: For color display models a. The device scans the proof sheet and prints the selected photos. When you press OK, the selected photo reappears. 9. (Optional) Change print settings or select additional photos to highlight Number of the selected...
...HP Photosmart software. To print a panoramic photo 1. The Photosmart Express menu appears. Press the arrow keys to select multiple panoramic photos from the control panel 65 When prompted, load 10 x 30 cm (4 x 12 inch) panorama photo paper in the input tray, and then press OK. To print more than one...OK. 8. Choose the appropriate display: For color display models a. The device scans the proof sheet and prints the selected photos. When you press OK, the selected photo reappears. 9. (Optional) Change print settings or select additional photos to highlight Number of the selected...
User Guide
Page 130
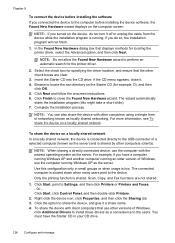
...newest operating system as the server. NOTE: Do not allow the Found New Hardware wizard to perform an automatic search for locating the printer driver, select the Advanced option, and then click Next. Select the check box for example, D), and then click OK. 5. For more information, see To... program (this configuration only in your CD drive. 126 Configure and manage NOTE: When sharing a directly connected device, use the computer running . Scan, Copy, and Fax functions are clear. 3. Chapter 9 To connect the device before installing the software If you connected the device to the computer...
...newest operating system as the server. NOTE: Do not allow the Found New Hardware wizard to perform an automatic search for locating the printer driver, select the Advanced option, and then click Next. Select the check box for example, D), and then click OK. 5. For more information, see To... program (this configuration only in your CD drive. 126 Configure and manage NOTE: When sharing a directly connected device, use the computer running . Scan, Copy, and Fax functions are clear. 3. Chapter 9 To connect the device before installing the software If you connected the device to the computer...
User Guide
Page 236
... cord too short 185 phone cord type test, failed 177 receive 73 receive, troubleshoot 180, 182 redial options 81 Redial/Pause button 17 reports 83 reprint 75 rings to answer 80 scan 17 send 70 send, troubleshoot 180, 182, 184 separate line setup (parallel phone systems) 105 set ... fax setup test 175 header, fax 79 help HP Instant Support 94 see also customer support Help button 17 HP Instant Support about 94 accessing 95 myPrintMileage 94 security and privacy 95 HP Photosmart Software send scans to programs 54 HP Photosmart Studio send scans to activate TWAIN source 171 error reports, fax 84...
... cord too short 185 phone cord type test, failed 177 receive 73 receive, troubleshoot 180, 182 redial options 81 Redial/Pause button 17 reports 83 reprint 75 rings to answer 80 scan 17 send 70 send, troubleshoot 180, 182, 184 separate line setup (parallel phone systems) 105 set ... fax setup test 175 header, fax 79 help HP Instant Support 94 see also customer support Help button 17 HP Instant Support about 94 accessing 95 myPrintMileage 94 security and privacy 95 HP Photosmart Software send scans to programs 54 HP Photosmart Studio send scans to activate TWAIN source 171 error reports, fax 84...


