Setup Guide
Page 5
... phone line 10 Managing and configuring fax settings 15 Set up speed-dial entries 15 Test fax setup 15 4 Set up Direct Digital Filing for scanning (optional) Required information 16 Step 1: Create and share a folder on the network 17 Step 2: Set up a shortcut to the folder on the network 17 Step...
... phone line 10 Managing and configuring fax settings 15 Set up speed-dial entries 15 Test fax setup 15 4 Set up Direct Digital Filing for scanning (optional) Required information 16 Step 1: Create and share a folder on the network 17 Step 2: Set up a shortcut to the folder on the network 17 Step...
Setup Guide
Page 8
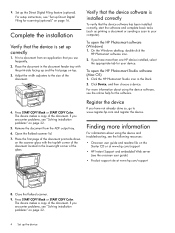
... see the onscreen user guide) • Product support site at www.hp.com/support 8. If you encounter problems, see "Solving installation problems" on page 16. For more than one HP device installed, select the appropriate tab for scanning (optional)" on page 22. 4 Set up the Direct Digital Filing feature...device software has been installed correctly, start the software and complete basic tasks (such as printing a document or sending a scan to www.register.hp.com and register the device. The device makes a copy of the glass. Complete the installation Verify that you have more...
... see the onscreen user guide) • Product support site at www.hp.com/support 8. If you encounter problems, see "Solving installation problems" on page 16. For more than one HP device installed, select the appropriate tab for scanning (optional)" on page 22. 4 Set up the Direct Digital Filing feature...device software has been installed correctly, start the software and complete basic tasks (such as printing a document or sending a scan to www.register.hp.com and register the device. The device makes a copy of the glass. Complete the installation Verify that you have more...
Setup Guide
Page 11
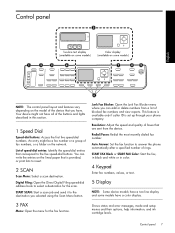
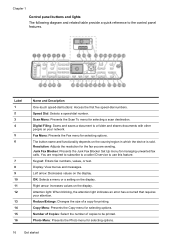
...blocked fax numbers and view reports. Control panel 7 This feature is available only if caller ID is provided, or print lists to insert. 2 SCAN Scan Menu: Select a scan destination. List of speed-dial entries: Identify the speed-dial entries that you have a color display. 3 FAX Menu: Open the menu for ...the scan. START SCAN: Start a scan job and send it to the five speed-dial buttons. You can add or delete numbers from the device. Control panel English NOTE:...
...blocked fax numbers and view reports. Control panel 7 This feature is available only if caller ID is provided, or print lists to insert. 2 SCAN Scan Menu: Select a scan destination. List of speed-dial entries: Identify the speed-dial entries that you have a color display. 3 FAX Menu: Open the menu for ...the scan. START SCAN: Start a scan job and send it to the five speed-dial buttons. You can add or delete numbers from the device. Control panel English NOTE:...
Setup Guide
Page 12
... in black and white or in color. 8 PHOTO Menu: Open the menu for reports, settings, and maintenance. 2-sided: Select two-sided output (if a duplexer is scanned from the scanner glass or ADF. Subsequent presses continue to the selected copy quality. Wireless (802.11) status light: Indicate the status of copies using...
... in black and white or in color. 8 PHOTO Menu: Open the menu for reports, settings, and maintenance. 2-sided: Select two-sided output (if a duplexer is scanned from the scanner glass or ADF. Subsequent presses continue to the selected copy quality. Wireless (802.11) status light: Indicate the status of copies using...
Setup Guide
Page 20
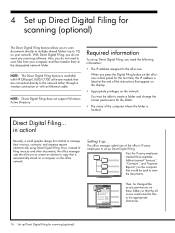
... be used to store the documents. The office manager asked one . Direct Digital Filing... in -one of the instructions that are connected directly to the network either through a wireless connection or with HP Officejet L7600/L7700 all -inone control panel for the first time,... the IP address is available with an Ethernet cable. Setting it up Direct Digital Filing. Also, you to scan...
... be used to store the documents. The office manager asked one . Direct Digital Filing... in -one of the instructions that are connected directly to the network either through a wireless connection or with HP Officejet L7600/L7700 all -inone control panel for the first time,... the IP address is available with an Ethernet cable. Setting it up Direct Digital Filing. Also, you to scan...
Setup Guide
Page 21
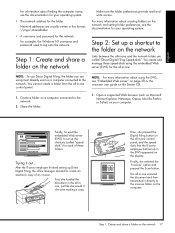
... your operating system. • The network address for the folder. First, she loaded the document in -one. Share the folder. After the IT-savvy employee finished setting up in -one scanned the document and then transmitted it out... Step 1: Create and share a folder on the network 17 You... cannot create a folder from the all -in -one and the network folder are using the EWS, see "Embedded Web...
... your operating system. • The network address for the folder. First, she loaded the document in -one. Share the folder. After the IT-savvy employee finished setting up in -one scanned the document and then transmitted it out... Step 1: Create and share a folder on the network 17 You... cannot create a folder from the all -in -one and the network folder are using the EWS, see "Embedded Web...
Setup Guide
Page 22
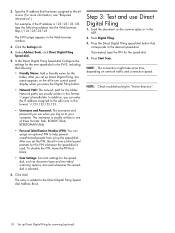
...Filing Speed-dial.. 5. To disable the PIN, leave the PIN box blank. • Scan Settings: Set scan settings for the speeddial, such as document type and two-sided scanning options, are usually written in one of these formats: Bob, BOBSPC\Bob, BOBDOMAIN\Bob • Personal Identification Number (PIN... computer. If prompted, type the PIN for the PIN whenever the speed-dial is used whenever this format: \\mypc\sharedfolder. Press Start Scan. 2. Network paths are used . In the Direct Digital Filing Speed-dial Configure the settings for the folder. Click Add. Press Digital ...
...Filing Speed-dial.. 5. To disable the PIN, leave the PIN box blank. • Scan Settings: Set scan settings for the speeddial, such as document type and two-sided scanning options, are usually written in one of these formats: Bob, BOBSPC\Bob, BOBDOMAIN\Bob • Personal Identification Number (PIN... computer. If prompted, type the PIN for the PIN whenever the speed-dial is used whenever this format: \\mypc\sharedfolder. Press Start Scan. 2. Network paths are used . In the Direct Digital Filing Speed-dial Configure the settings for the folder. Click Add. Press Digital ...
Setup Guide
Page 28
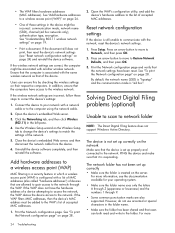
...to Network, and then press OK. 2. In addition, ensure that users can ensure this by checking the wireless settings on page 24. • One of the network. 5. Press an arrow button to move to the network through 9. • Some common punctuation marks are incorrect, follow these settings... network with the same wireless network as that of devices that it is "ad hoc". Solving Direct Digital Filing problems (optional) Unable to scan to the network. Add hardware addresses to Restore Network Defaults, and then press OK. 3. If the WAP filters MAC addresses, then the device...
...to Network, and then press OK. 2. In addition, ensure that users can ensure this by checking the wireless settings on page 24. • One of the network. 5. Press an arrow button to move to the network through 9. • Some common punctuation marks are incorrect, follow these settings... network with the same wireless network as that of devices that it is "ad hoc". Solving Direct Digital Filing problems (optional) Unable to scan to the network. Add hardware addresses to Restore Network Defaults, and then press OK. 3. If the WAP filters MAC addresses, then the device...
Setup Guide
Page 29
English information, see the information in the EWS. If you have scanned many files to specific IP addresses. However, do the following: • Try to use accented or special characters in -one. The filename prefix has not been set up the Direct Digital Filing feature, be resolved to a folder, change the prefix. The...
English information, see the information in the EWS. If you have scanned many files to specific IP addresses. However, do the following: • Try to use accented or special characters in -one. The filename prefix has not been set up the Direct Digital Filing feature, be resolved to a folder, change the prefix. The...

User Guide
Page 6
...display models only 50 Cancel a copy job ...51 6 Scan Scan an original ...52 Set up Direct Digital Filing (some models only 52 Scan an original to a network folder 53 Scan an original to a program on a computer (direct connection 54 Scan an original to a memory device 55 Use Webscan via embedded... Web server 55 Scan from a TWAIN-compliant or a WIA-compliant program 55 To scan from a TWAIN-compliant ...
...display models only 50 Cancel a copy job ...51 6 Scan Scan an original ...52 Set up Direct Digital Filing (some models only 52 Scan an original to a network folder 53 Scan an original to a program on a computer (direct connection 54 Scan an original to a memory device 55 Use Webscan via embedded... Web server 55 Scan from a TWAIN-compliant or a WIA-compliant program 55 To scan from a TWAIN-compliant ...
User Guide
Page 7
... using optical character recognition (OCR) software 56 Change scan settings ...57 Cancel a scan job ...57 7 Work with memory devices (some models only) Insert a memory card ...58 Connect a digital camera ...59 Connect a storage device ...61 View photos ...62 View ...
... using optical character recognition (OCR) software 56 Change scan settings ...57 Cancel a scan job ...57 7 Work with memory devices (some models only) Insert a memory card ...58 Connect a digital camera ...59 Connect a storage device ...61 View photos ...62 View ...
User Guide
Page 11
... Copy defects are apparent 168 Error messages appear 169 The device prints half a page, then ejects the paper 169 Solve scan problems ...169 Scanner did nothing ...170 Scan takes too long ...170 Part of the document did not scan or text is missing 170 Text cannot be edited ...171 Error messages appear 171... 190 Solve wireless problems 191 Clear jams ...192 Clear a jam in the device 193 Clear jams in the ADF ...195 Tips for avoiding jams ...197 A HP supplies and accessories Order printing supplies online 198 Accessories ...198 Supplies ...198 Ink cartridges ...198 Printheads ...199...
... Copy defects are apparent 168 Error messages appear 169 The device prints half a page, then ejects the paper 169 Solve scan problems ...169 Scanner did nothing ...170 Scan takes too long ...170 Part of the document did not scan or text is missing 170 Text cannot be edited ...171 Error messages appear 171... 190 Solve wireless problems 191 Clear jams ...192 Clear a jam in the device 193 Clear jams in the ADF ...195 Tips for avoiding jams ...197 A HP supplies and accessories Order printing supplies online 198 Accessories ...198 Supplies ...198 Ink cartridges ...198 Printheads ...199...
User Guide
Page 12
... 210 Embedded Web server specifications 210 Print specifications ...210 Print resolution ...210 Copy specifications ...211 Fax specifications ...211 Scan specifications ...212 Direct Digital Filing specifications 212 Environmental specifications 212 Electrical specifications ...212 Acoustic emission specifications (print in Draft... (wireless products only 215 Notice to users in Italy ...224 Notice to users of conformity ...226 8 Obtain HP telephone support 200 Before you call ...200 Telephone support numbers 201 Hewlett-Packard limited warranty statement 203 Prepare the ...
... 210 Embedded Web server specifications 210 Print specifications ...210 Print resolution ...210 Copy specifications ...211 Fax specifications ...211 Scan specifications ...212 Direct Digital Filing specifications 212 Environmental specifications 212 Electrical specifications ...212 Acoustic emission specifications (print in Draft... (wireless products only 215 Notice to users in Italy ...224 Notice to users of conformity ...226 8 Obtain HP telephone support 200 Before you call ...200 Telephone support numbers 201 Hewlett-Packard limited warranty statement 203 Prepare the ...
User Guide
Page 20
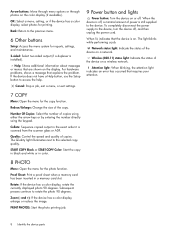
...resolution for selecting options. Keypad: Enters fax numbers, values, or text. Display: View menus and messages. Fax Menu: Presents the Fax menu for selecting a scan destination. Number of Copies: Select the number of a copy for managing unwanted fax calls. Label 1 2 3 4 5 6 7 8 9 10 11 ...12 13 14 15 16 Name and Description One-touch speed-dial buttons: Access the first five speed-dial numbers. Scan Menu: Presents the Scan To menu for selecting options. Digital Filing: Scans and saves a document to the control panel features. Reduce/Enlarge: Changes the size of ...
...resolution for selecting options. Keypad: Enters fax numbers, values, or text. Display: View menus and messages. Fax Menu: Presents the Fax menu for selecting a scan destination. Number of Copies: Select the number of a copy for managing unwanted fax calls. Label 1 2 3 4 5 6 7 8 9 10 11 ...12 13 14 15 16 Name and Description One-touch speed-dial buttons: Access the first five speed-dial numbers. Scan Menu: Presents the Scan To menu for selecting options. Digital Filing: Scans and saves a document to the control panel features. Reduce/Enlarge: Changes the size of ...

User Guide
Page 21
...: Performs a two-sided copy or fax job. START FAX Color: Starts a color fax. START SCAN: Starts a scan job and sends it to use when the copying job finishes. The light blinks while performing a job... power cord. Redial/Pause: Redials the most recently dialed number, or inserts a 3-second pause in -One parts 17 Rotate: Rotate the current image on or off , a minimal amount of a connected computer....of help window on the model and the country/region in a memory card slot. Understand the HP All-in a fax number. Proof Sheet: Prints a proof sheet when a memory card is inserted...
...: Performs a two-sided copy or fax job. START FAX Color: Starts a color fax. START SCAN: Starts a scan job and sends it to use when the copying job finishes. The light blinks while performing a job... power cord. Redial/Pause: Redials the most recently dialed number, or inserts a 3-second pause in -One parts 17 Rotate: Rotate the current image on or off , a minimal amount of a connected computer....of help window on the model and the country/region in a memory card slot. Understand the HP All-in a fax number. Proof Sheet: Prints a proof sheet when a memory card is inserted...

User Guide
Page 28
...; Photo menu: Menu options include: • Selecting print options • Using special features • Editing 24 Use the all -in -one This section contains the following topics: • Use control panel menus • Control-panel message types • Change device settings • Use the... • Load media • Configure trays • Print on the model you have. • Scan menu: Presents a list of destinations; To display a menu, press the menu button for example, HP photo and imaging software. NOTE: The type of display on the control panel-color display or two-line...
...; Photo menu: Menu options include: • Selecting print options • Using special features • Editing 24 Use the all -in -one This section contains the following topics: • Use control panel menus • Control-panel message types • Change device settings • Use the... • Load media • Configure trays • Print on the model you have. • Scan menu: Presents a list of destinations; To display a menu, press the menu button for example, HP photo and imaging software. NOTE: The type of display on the control panel-color display or two-line...
User Guide
Page 30
... To reach the option that you are not available from the control panel. 26 Use the all-in-one of the following methods: • Press a control-panel button, and then use one To change settings from the control panel 1. The features available in Windows to change, use the left...(for that have been configured from the control panel (such as the scan settings). For more information, see Use the HP photo and imaging software. Use the HP photo and imaging software You can use the Control Panel in the HP Solution Center vary depending on the control-panel display. 3.
... To reach the option that you are not available from the control panel. 26 Use the all-in-one of the following methods: • Press a control-panel button, and then use one To change settings from the control panel 1. The features available in Windows to change, use the left...(for that have been configured from the control panel (such as the scan settings). For more information, see Use the HP photo and imaging software. Use the HP photo and imaging software You can use the Control Panel in the HP Solution Center vary depending on the control-panel display. 3.
User Guide
Page 31
... for that came with your computer during the software installation. then reinstall the software. For more than one of the following: • On the Windows desktop, double-click the HP Photosmart Software icon. • In the system tray at the far right of the Windows taskbar, ... and imaging software differs by selecting and holding the mouse button over the HP Photosmart Studio icon in the HP Photosmart Software vary depending on the selected device. If you can scan, send faxes, import documents, and perform maintenance procedures such as the launching pad for the ink cartridges...
... for that came with your computer during the software installation. then reinstall the software. For more than one of the following: • On the Windows desktop, double-click the HP Photosmart Software icon. • In the system tray at the far right of the Windows taskbar, ... and imaging software differs by selecting and holding the mouse button over the HP Photosmart Studio icon in the HP Photosmart Software vary depending on the selected device. If you can scan, send faxes, import documents, and perform maintenance procedures such as the launching pad for the ink cartridges...
User Guide
Page 34
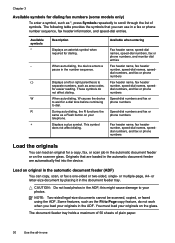
...-dial names, speeddial numbers, and fax or phone numbers Load the originals You can use in the automatic document feeder (ADF) You can copy, scan, or fax a one or multiple-page, A4- or letter-size document by placing it in the number sequence. Available symbols * - ( ) W R + Description Available when entering..., fax header information, and speed-dial entries. These symbols do not work when you can load an original for a copy, fax, or scan job in -one -sided or two-sided, single- This symbol does not affect dialing. Some features, such as the Fit to Page copy feature, do not...
...-dial names, speeddial numbers, and fax or phone numbers Load the originals You can use in the automatic document feeder (ADF) You can copy, scan, or fax a one or multiple-page, A4- or letter-size document by placing it in the number sequence. Available symbols * - ( ) W R + Description Available when entering..., fax header information, and speed-dial entries. These symbols do not work when you can load an original for a copy, fax, or scan job in -one -sided or two-sided, single- This symbol does not affect dialing. Some features, such as the Fit to Page copy feature, do not...

User Guide
Page 35
... in the automatic document feeder, refer to the diagram engraved in the automatic document feeder. Load an original on the scanner glass You can copy, scan, or fax up , into the automatic document feeder until they stop at the left and right edges of the special features will not work correctly...
... in the automatic document feeder, refer to the diagram engraved in the automatic document feeder. Load an original on the scanner glass You can copy, scan, or fax up , into the automatic document feeder until they stop at the left and right edges of the special features will not work correctly...


