
Product Notices
Page 2
.../EMI connector hoods to correct the interference by HP may cause undesired operation of this device. Q Consult the dealer or an experienced radio or television technician for the frequency range of the Canadian Interference-Causing Equipment Regulations CAN ICES-3(B)/NMB-3(B). Q Connect the equipment to an outlet on the product. Operation is subject to the part, series, or model number...
.../EMI connector hoods to correct the interference by HP may cause undesired operation of this device. Q Consult the dealer or an experienced radio or television technician for the frequency range of the Canadian Interference-Causing Equipment Regulations CAN ICES-3(B)/NMB-3(B). Q Connect the equipment to an outlet on the product. Operation is subject to the part, series, or model number...

Product Notices
Page 3
... in instructions specific to the product. CE 2014/53 2014/35/ЕС; The further RF exposure reduction can be achieved if the product can be operated without restrictions in normal use , due to its Regulatory Model Number (RMN), which may be applicable: RED 2014/...inches), including when the computer display is closed. Nevertheless, the device should not be found on the regulatory label.) The point of the wireless antennas, refer to the computer user guides included with these directives is assessed using IEEE 802.11a wireless LAN, this device are not replaceable...
... in instructions specific to the product. CE 2014/53 2014/35/ЕС; The further RF exposure reduction can be achieved if the product can be operated without restrictions in normal use , due to its Regulatory Model Number (RMN), which may be applicable: RED 2014/...inches), including when the computer display is closed. Nevertheless, the device should not be found on the regulatory label.) The point of the wireless antennas, refer to the computer user guides included with these directives is assessed using IEEE 802.11a wireless LAN, this device are not replaceable...
Product Notices
Page 14
...A power cord should monitor and ask their children if they have any other complications when exposed to certain visual images, including flashing lights or patterns that may have a history of individuals may experience a seizure or other products. If you are tired or need sleep. RESUME DISPLAY(S) USAGE... of young children (especially children under development. Japanese power cord requirements For use in the country where you experience any user, have an undiagnosed condition that it . Parents should be walked on input voltages between 100-120V or 200-240V. Assurez-vous...
...A power cord should monitor and ask their children if they have any other complications when exposed to certain visual images, including flashing lights or patterns that may have a history of individuals may experience a seizure or other products. If you are tired or need sleep. RESUME DISPLAY(S) USAGE... of young children (especially children under development. Japanese power cord requirements For use in the country where you experience any user, have an undiagnosed condition that it . Parents should be walked on input voltages between 100-120V or 200-240V. Assurez-vous...
Product Notices
Page 31
... user pressing the power/sleep button, receiving an input signal from an input device, receiving an input signal from the default power setting to comply with ENERGY STAR qualified computers and displays. The Performance setting can be found on the EPA ENERGY STAR Power Management website at http://www.energystar.gov/powermanagement. Du finder en rapport over kemiske oplysninger for the display. Kemikaalid HP teavitab oma kliente HP...
... user pressing the power/sleep button, receiving an input signal from an input device, receiving an input signal from the default power setting to comply with ENERGY STAR qualified computers and displays. The Performance setting can be found on the EPA ENERGY STAR Power Management website at http://www.energystar.gov/powermanagement. Du finder en rapport over kemiske oplysninger for the display. Kemikaalid HP teavitab oma kliente HP...

User Guide
Page 4
... Started 1 Important safety information 1 Product features and components 2 Features 2 Rear components 3 54.61 cm/21.5-inch model 3 60.47 cm/23.8-inch model 3 Front bezel controls 4 Setting up the monitor 5 Installing the monitor stand 5 Connecting the cables 5 Adjusting the monitor 7 Turning on the monitor 8 HP Watermark and Image Retention Policy 9 Installing a security cable 9 2 Using the Monitor 10 Downloading the monitor drivers 10 Using the On-Screen Display (OSD) menu 10 Assigning the Function buttons 11 Adjusting to Low Blue Light Mode 11 Using Auto-Sleep Mode...
... Started 1 Important safety information 1 Product features and components 2 Features 2 Rear components 3 54.61 cm/21.5-inch model 3 60.47 cm/23.8-inch model 3 Front bezel controls 4 Setting up the monitor 5 Installing the monitor stand 5 Connecting the cables 5 Adjusting the monitor 7 Turning on the monitor 8 HP Watermark and Image Retention Policy 9 Installing a security cable 9 2 Using the Monitor 10 Downloading the monitor drivers 10 Using the On-Screen Display (OSD) menu 10 Assigning the Function buttons 11 Adjusting to Low Blue Light Mode 11 Using Auto-Sleep Mode...

User Guide
Page 5
3 Support and troubleshooting 12 Solving common problems 12 Using the auto-adjustment function (analog input 13 Optimizing image performance (analog input 14 Button lockouts 15 Product support 15 Preparing to call technical support 15 Locating the serial number and product number 16 4 Maintaining the monitor 17 Maintenance guidelines 17 Cleaning the monitor 17 Shipping the monitor 17 A Technical specifications 18 54.61 cm/21.5-inch model 18 60.47 cm/23.8-inch model 18 Preset display resolutions 19 54.61...
3 Support and troubleshooting 12 Solving common problems 12 Using the auto-adjustment function (analog input 13 Optimizing image performance (analog input 14 Button lockouts 15 Product support 15 Preparing to call technical support 15 Locating the serial number and product number 16 4 Maintaining the monitor 17 Maintenance guidelines 17 Cleaning the monitor 17 Shipping the monitor 17 A Technical specifications 18 54.61 cm/21.5-inch model 18 60.47 cm/23.8-inch model 18 Preset display resolutions 19 54.61...

User Guide
Page 6
.... Install the monitor near an AC outlet that are inappropriately situated on the Web at all cords and cables connected to the Product Notices provided in a controlled luminous environment to properly support your HP LCD monitor. Disconnect the monitor by unplugging the power cord from the AC outlet. • If provided with the monitor. Do not drop the monitor or place it from the screen. 1 Getting Started...
.... Install the monitor near an AC outlet that are inappropriately situated on the Web at all cords and cables connected to the Product Notices provided in a controlled luminous environment to properly support your HP LCD monitor. Disconnect the monitor by unplugging the power cord from the AC outlet. • If provided with the monitor. Do not drop the monitor or place it from the screen. 1 Getting Started...

User Guide
Page 7
...; Tilt capability • VGA video input • DVI digital signal (Select Models) • HDMI (High-Definition Multimedia Interface) video input (Select Models) • Plug-and-play capability if supported by your operating system • Security cable slot provision on rear of HP programs and drivers. To locate updates to the user guide for your product, go to http://www.hp.com/ support, and download the latest versions of monitor for optional security cable • On-Screen Display (OSD) adjustments...
...; Tilt capability • VGA video input • DVI digital signal (Select Models) • HDMI (High-Definition Multimedia Interface) video input (Select Models) • Plug-and-play capability if supported by your operating system • Security cable slot provision on rear of HP programs and drivers. To locate updates to the user guide for your product, go to http://www.hp.com/ support, and download the latest versions of monitor for optional security cable • On-Screen Display (OSD) adjustments...
User Guide
Page 9
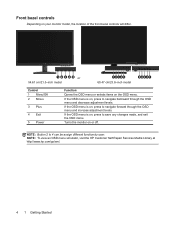
... user. NOTE: Button 2 to navigate backward through the OSD menu and increase adjustment levels. NOTE: To view an OSD menu simulator, visit the HP Customer Self Repair Services Media Library at http://www.hp.com/go/sml. 4 1 Getting Started If the OSD menu is on , press to save any changes made, and exit the OSD menu. Turns the monitor on the OSD menu. If the OSD menu is on , press to navigate forward through the OSD menu...
... user. NOTE: Button 2 to navigate backward through the OSD menu and increase adjustment levels. NOTE: To view an OSD menu simulator, visit the HP Customer Self Repair Services Media Library at http://www.hp.com/go/sml. 4 1 Getting Started If the OSD menu is on , press to save any changes made, and exit the OSD menu. Turns the monitor on the OSD menu. If the OSD menu is on , press to navigate forward through the OSD menu...

User Guide
Page 10
... crystals. Pressure on a flat and clean surface. 2. Setting up the monitor Installing the monitor stand CAUTION: Do not touch the surface of a VGA cable to the VGA connector on the source device. Place the monitor face down on the panel may vary. 1 Getting Started 5 The inputs can be selected by pressing the Menu button to access the On-Screen Display (OSD) menu and selecting Input Control. • Connect one end of the LCD panel. If this section are...
... crystals. Pressure on a flat and clean surface. 2. Setting up the monitor Installing the monitor stand CAUTION: Do not touch the surface of a VGA cable to the VGA connector on the source device. Place the monitor face down on the panel may vary. 1 Getting Started 5 The inputs can be selected by pressing the Menu button to access the On-Screen Display (OSD) menu and selecting Input Control. • Connect one end of the LCD panel. If this section are...

User Guide
Page 13
.... Turning on the bottom of the monitor, and then select Power Control > Power LED > Off. The message shows which input is not in the OSD menu. default setting is powered on all LCD screens. Image retention is a condition that may occur on , a Monitor Status message is not covered under the HP warranty. To disable this feature, press and hold the monitor Power button for 12 or more consecutive hours of the auto-switch source setting (On...
.... Turning on the bottom of the monitor, and then select Power Control > Power LED > Off. The message shows which input is not in the OSD menu. default setting is powered on all LCD screens. Image retention is a condition that may occur on , a Monitor Status message is not covered under the HP warranty. To disable this feature, press and hold the monitor Power button for 12 or more consecutive hours of the auto-switch source setting (On...
User Guide
Page 14
... an optional cable lock available from HP. 1 Getting Started 9 Static images may include camera surveillance, video games, marketing logos, and templates that could look like stains or watermarks on the screen for long periods of time without the use the power management setting, if supported on your system, to a fixed object with ADS (Advanced Super Dimension Switch ) display technology which provides ultra-wide viewing angles and...
... an optional cable lock available from HP. 1 Getting Started 9 Static images may include camera surveillance, video games, marketing logos, and templates that could look like stains or watermarks on the screen for long periods of time without the use the power management setting, if supported on your system, to a fixed object with ADS (Advanced Super Dimension Switch ) display technology which provides ultra-wide viewing angles and...
User Guide
Page 15
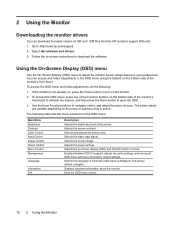
...the Menu button to download the software. Adjusts the screen image. Selects the language in which the OSD menu is English. Using the On-Screen Display (OSD) menu Use the On-Screen Display (OSD) menu to http://www.hp.com/support. 2. Use the three Function buttons to the factory default settings. Adjusts the power settings. Adjusts the on -screen instructions to open the OSD. 3. Displays important information about the monitor. Adjusts the screen contrast. Selects and adjusts the screen color. The factory default is displayed. Selects the video input signal. Enables...
...the Menu button to download the software. Adjusts the screen image. Selects the language in which the OSD menu is English. Using the On-Screen Display (OSD) menu Use the On-Screen Display (OSD) menu to http://www.hp.com/support. 2. Use the three Function buttons to the factory default settings. Adjusts the power settings. Adjusts the on -screen instructions to open the OSD. 3. Displays important information about the monitor. Adjusts the screen contrast. Selects and adjusts the screen color. The factory default is displayed. Selects the video input signal. Enables...
User Guide
Page 16
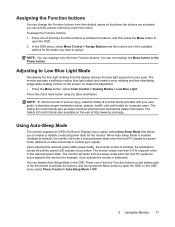
... by default), the monitor will wake from the sleep mode when the host PC sends an active signal to assign. Press one of the four Function buttons on the bottom side of either horizontal or vertical sync signal). The monitor provides a setting to Save and Return. Assigning the Function buttons You can change the Function buttons from the display reduces the blue light exposure to your user guide. To make this reduced power...
... by default), the monitor will wake from the sleep mode when the host PC sends an active signal to assign. Press one of the four Function buttons on the bottom side of either horizontal or vertical sync signal). The monitor provides a setting to Save and Return. Assigning the Function buttons You can change the Function buttons from the display reduces the blue light exposure to your user guide. To make this reduced power...
User Guide
Page 17
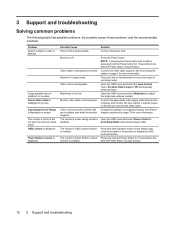
... Power cord is displayed on screen. Video resolution and/or refresh rate are set auto-sleep to adjust the brightness scale as needed. The monitor's power saving control is enabled. NOTE: If pressing the Power button has no effect, press and hold the Power button for 10 seconds to disable the OSD Lockout function. Open the OSD menu and select the Input Control menu. The monitor's Power Button Lockout function is disabled. Press and hold the Power button for 10 seconds to disable the Power Button Lockout function. 12 3 Support...
... Power cord is displayed on screen. Video resolution and/or refresh rate are set auto-sleep to adjust the brightness scale as needed. The monitor's power saving control is enabled. NOTE: If pressing the Power button has no effect, press and hold the Power button for 10 seconds to disable the OSD Lockout function. Open the OSD menu and select the Input Control menu. The monitor's Power Button Lockout function is disabled. Press and hold the Power button for 10 seconds to disable the Power Button Lockout function. 12 3 Support...
User Guide
Page 18
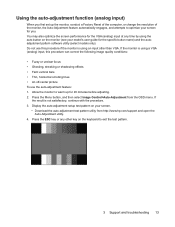
... the monitor, conduct a Factory Reset of the computer, or change the resolution of the monitor, the Auto-Adjustment feature automatically engages, and attempts to warm up for the VGA (analog) input at any other than VGA. Allow the monitor to optimize your screen. • Download the auto-adjustment test pattern utility from the OSD menu. Display the auto-adjustment setup test pattern on the keyboard to exit the test pattern. 3 Support and troubleshooting 13 Using the auto-adjustment function (analog input...
... the monitor, conduct a Factory Reset of the computer, or change the resolution of the monitor, the Auto-Adjustment feature automatically engages, and attempts to warm up for the VGA (analog) input at any other than VGA. Allow the monitor to optimize your screen. • Download the auto-adjustment test pattern utility from the OSD menu. Display the auto-adjustment setup test pattern on the keyboard to exit the test pattern. 3 Support and troubleshooting 13 Using the auto-adjustment function (analog input...

User Guide
Page 19
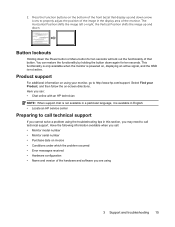
... OSD menu, and then select Image Position. 14 3 Support and troubleshooting Flickering or blurring may need to install the digitally signed monitor .INF and .ICM files in the on the computer or graphics controller card installed. To correct screen position (Horizontal Position or Vertical Position): 1. NOTE: You may not be eliminated, depending on -screen display. NOTE: When using the controls, you do not miss the optimum adjustment point. 3. Use the Function buttons on the screen, proceed to minimize video flickering...
... OSD menu, and then select Image Position. 14 3 Support and troubleshooting Flickering or blurring may need to install the digitally signed monitor .INF and .ICM files in the on the computer or graphics controller card installed. To correct screen position (Horizontal Position or Vertical Position): 1. NOTE: You may not be eliminated, depending on -screen display. NOTE: When using the controls, you do not miss the optimum adjustment point. 3. Use the Function buttons on the screen, proceed to minimize video flickering...
User Guide
Page 20
... monitor is powered on the bottom of the monitor. Have the following information available when you may need to http://www.hp.com/support. 2. The Horizontal Position shifts the image left or right; Here you can restore the functionality by holding the button down again for ten seconds will lock out the functionality of the hardware and software you cannot solve a problem using 3 Support and troubleshooting...
... monitor is powered on the bottom of the monitor. Have the following information available when you may need to http://www.hp.com/support. 2. The Horizontal Position shifts the image left or right; Here you can restore the functionality by holding the button down again for ten seconds will lock out the functionality of the hardware and software you cannot solve a problem using 3 Support and troubleshooting...

User Guide
Page 22
...; Turn the monitor off the monitor and disconnect power from the computer by wiping the screen and the cabinet with a soft, clean antistatic cloth. 3. For more difficult cleaning situations, use . Cleaning the monitor 1. Never spray the cleaner directly on the monitor is not operating properly or has been dropped or damaged, contact an authorized HP dealer, reseller, or service provider. • Use only a power source and connection...
...; Turn the monitor off the monitor and disconnect power from the computer by wiping the screen and the cabinet with a soft, clean antistatic cloth. 3. For more difficult cleaning situations, use . Cleaning the monitor 1. Never spray the cleaner directly on the monitor is not operating properly or has been dropped or damaged, contact an authorized HP dealer, reseller, or service provider. • Use only a power source and connection...
User Guide
Page 25
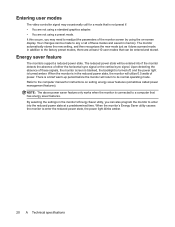
... only works when the monitor is connected to the factory preset modes, there are not using a preset mode. There is not preset if: • You are not using a standard graphics adapter. • You are at a predetermined time. By selecting the settings in the reduced power state, the monitor will utilize 0.5 watts of these signals, the monitor screen is blanked, the backlight is turned off, and the power light is...
... only works when the monitor is connected to the factory preset modes, there are not using a preset mode. There is not preset if: • You are not using a standard graphics adapter. • You are at a predetermined time. By selecting the settings in the reduced power state, the monitor will utilize 0.5 watts of these signals, the monitor screen is blanked, the backlight is turned off, and the power light is...


