User Guide
Page 6
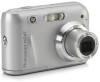
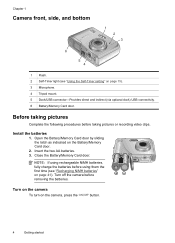
Before taking pictures or recording video clips. Turn on the camera To turn on the Battery/Memory Card door. 2. Open the Battery/Memory Card door by sliding the latch as indicated on the camera, press the button. 4 Getting started NOTE: If using rechargeable NiMH batteries,... them the first time (see "Using the Self-Timer setting" on page 41). Turn off the camera before removing the batteries. Close the Battery/Memory Card door. Install the batteries 1. Insert the two AA batteries. 3. Chapter 1 Camera front, side, and bottom 1 2 3 6 5 4 1 Flash. 2 Self-Timer light (see...
Before taking pictures or recording video clips. Turn on the camera To turn on the Battery/Memory Card door. 2. Open the Battery/Memory Card door by sliding the latch as indicated on the camera, press the button. 4 Getting started NOTE: If using rechargeable NiMH batteries,... them the first time (see "Using the Self-Timer setting" on page 41). Turn off the camera before removing the batteries. Close the Battery/Memory Card door. Install the batteries 1. Insert the two AA batteries. 3. Chapter 1 Camera front, side, and bottom 1 2 3 6 5 4 1 Flash. 2 Self-Timer light (see...
User Guide
Page 8
.... Make sure the memory card snaps into place. 3. Close the Battery/Memory Card door and turn off the camera and open the Battery/ Memory Card door. 2. Press . 3. Insert the memory card in internal memory. To install the HP Photosmart Software, your digital photography experience, periodically check this website for modifying stored images (remove red eyes, rotate...
.... Make sure the memory card snaps into place. 3. Close the Battery/Memory Card door and turn off the camera and open the Battery/ Memory Card door. 2. Press . 3. Insert the memory card in internal memory. To install the HP Photosmart Software, your digital photography experience, periodically check this website for modifying stored images (remove red eyes, rotate...
User Guide
Page 34
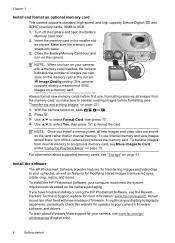
...photo printer? Reinsert the batteries and close the Battery/Memory Card door. 4. Turn on the camera; Verify that the batteries are inserted correctly (see "Problems and solutions" on page 32) Resetting the camera If your camera's firmware, software, and drivers. If you are using rechargeable ...your digital photography experience, periodically check the Hewlett-Packard Technical Support website (www.hp.com/support) for at least 5 seconds. 3. Use the Buy Prints Online feature on the Photosmart Express Menu (see "Install and format an optional memory card" on page 6). if the camera ...
...photo printer? Reinsert the batteries and close the Battery/Memory Card door. 4. Turn on the camera; Verify that the batteries are inserted correctly (see "Problems and solutions" on page 32) Resetting the camera If your camera's firmware, software, and drivers. If you are using rechargeable ...your digital photography experience, periodically check the Hewlett-Packard Technical Support website (www.hp.com/support) for at least 5 seconds. 3. Use the Buy Prints Online feature on the Photosmart Express Menu (see "Install and format an optional memory card" on page 6). if the camera ...
User Guide
Page 41
...for the first time. • The first several times you are inserted improperly, the compartment door may not provide the number of inactivity. Managing batteries 39 When the camera warns that you begin using them to strong impacts or shocks. • Do not solder ... not pierce batteries or subject them for using batteries • Always use the camera normally to discharge the batteries during this conditioning period. • Always insert the batteries in an optional HP Photosmart dock connected to start in Playback without extending the lens. • When transferring...
...for the first time. • The first several times you are inserted improperly, the compartment door may not provide the number of inactivity. Managing batteries 39 When the camera warns that you begin using them to strong impacts or shocks. • Do not solder ... not pierce batteries or subject them for using batteries • Always use the camera normally to discharge the batteries during this conditioning period. • Always insert the batteries in an optional HP Photosmart dock connected to start in Playback without extending the lens. • When transferring...
User Guide
Page 46
...digital zoom 12 dimensions 43 direct print 25 Display Brightness 31 E e-mail images 29 exposure 11 44 F F-number 42 Favorites 20 flash red-eye reduction 13 setting 13 working range 42 Flash button 3 focal length 42 focus auto focus 9 brackets 9 focus lock 11 optimizing 10 format memory card 6 G getting assistance 38 H HP Photosmart... 5, 31 M Magnify control 3 magnifying images 18 memory capacity 43 card 6, 8, 43 card door 4 Menu/OK button 3 menus Camera Setup 31 Design Gallery 21 Photosmart Express 27 Picture Capture 14 Playback 18 Video Record 14 microphone 4 modifying colors 21 Move Images ...
...digital zoom 12 dimensions 43 direct print 25 Display Brightness 31 E e-mail images 29 exposure 11 44 F F-number 42 Favorites 20 flash red-eye reduction 13 setting 13 working range 42 Flash button 3 focal length 42 focus auto focus 9 brackets 9 focus lock 11 optimizing 10 format memory card 6 G getting assistance 38 H HP Photosmart... 5, 31 M Magnify control 3 magnifying images 18 memory capacity 43 card 6, 8, 43 card door 4 Menu/OK button 3 menus Camera Setup 31 Design Gallery 21 Photosmart Express 27 Picture Capture 14 Playback 18 Video Record 14 microphone 4 modifying colors 21 Move Images ...

Quick Start Guide
Page 7
Camera front, side, and bottom 1 2 3 6 5 4 1 Flash. 2 Self-Timer light. 3 Microphone. 4 Tripod mount. 5 Dock/USB connector. 6 Battery/Memory Card door. accesses Thumbnails and Magnify while in Picture Capture or Video Record; Press and hold to a previous menu or view. English 7 Zoom lever (Digital and Optical)-Accesses / Zoom while in Playback 8 and buttons-Scroll through menus and images. 9 button-Displays camera menus, selects options, and confirms actions. 10 Back button-Returns you to back out of all menus. 11 Image Display. Getting started 7
Camera front, side, and bottom 1 2 3 6 5 4 1 Flash. 2 Self-Timer light. 3 Microphone. 4 Tripod mount. 5 Dock/USB connector. 6 Battery/Memory Card door. accesses Thumbnails and Magnify while in Picture Capture or Video Record; Press and hold to a previous menu or view. English 7 Zoom lever (Digital and Optical)-Accesses / Zoom while in Playback 8 and buttons-Scroll through menus and images. 9 button-Displays camera menus, selects options, and confirms actions. 10 Back button-Returns you to back out of all menus. 11 Image Display. Getting started 7

Quick Start Guide
Page 8
...Alkaline batteries. Actual performance may vary based on the Battery/Memory Card door. 2. When the camera warns that the battery charge is low, HP recommends replacing them the first time. Turn off the camera before using rechargeable NiMH batteries, fully charge the batteries before removing the ...batteries. English 2 Setting up your camera are intended to let you can take (see Extending battery life on page 21). 8 HP Photosmart M440/M540/M630 series Open the Battery/Memory Card door by sliding the door latch as indicated on usage, battery type, and...
...Alkaline batteries. Actual performance may vary based on the Battery/Memory Card door. 2. When the camera warns that the battery charge is low, HP recommends replacing them the first time. Turn off the camera before using rechargeable NiMH batteries, fully charge the batteries before removing the ...batteries. English 2 Setting up your camera are intended to let you can take (see Extending battery life on page 21). 8 HP Photosmart M440/M540/M630 series Open the Battery/Memory Card door by sliding the door latch as indicated on usage, battery type, and...

Quick Start Guide
Page 10
... store on , slide to select Format Card from the memory card, so make sure to format the 10 HP Photosmart M440/M540/M630 series Use card. With the camera turned on the memory card at the current Image Quality setting. Insert the optional memory card in the smaller ... Digital (SD and SDHC) memory cards, 32MB to confirm. Press . 3. This camera supports storing a maximum of images you turn on a memory card. Always format new memory cards before formatting. 1. English time, and format settings are correct, then press again to 8GB. 1. Close the Battery/Memory Card door ...
... store on , slide to select Format Card from the memory card, so make sure to format the 10 HP Photosmart M440/M540/M630 series Use card. With the camera turned on the memory card at the current Image Quality setting. Insert the optional memory card in the smaller ... Digital (SD and SDHC) memory cards, 32MB to confirm. Press . 3. This camera supports storing a maximum of images you turn on a memory card. Always format new memory cards before formatting. 1. English time, and format settings are correct, then press again to 8GB. 1. Close the Battery/Memory Card door ...


