Setup Guide
Page 6
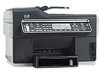
Remove the tape and packing materials. Install the document feeder tray. 4. NOTE: Set the language and the country/ region (if needed), as well as the date and time, on the printheads to ensure proper contact before ... latch. 6. 1 Set up the device This section summarizes the setup process for printing, and in direct sunlight or near chemicals. For more information, see www.hp.com/go/ inkusage. 5. For more information see the setup poster that came with the device. Temperature 15° to 35° C (59° to 95...
Remove the tape and packing materials. Install the document feeder tray. 4. NOTE: Set the language and the country/ region (if needed), as well as the date and time, on the printheads to ensure proper contact before ... latch. 6. 1 Set up the device This section summarizes the setup process for printing, and in direct sunlight or near chemicals. For more information, see www.hp.com/go/ inkusage. 5. For more information see the setup poster that came with the device. Temperature 15° to 35° C (59° to 95...
Setup Guide
Page 7
...d. b. If the installation program displays more than one instance of the following types of paper into a port labeled WAN, Uplink, or Internet in the tray. d. This page contains information needed for wireless ... If your device has a color display, select Network, select View Network Settings, select Print Network Configuration Page, and then press OK. Make sure the stack of the tray. Insert the Starter CD, .... Slide the media guides in the tray to the size that you can connect the device using the Fax Setup Wizard (Windows) or HP Device Manager (Mac OS). You can...
...d. b. If the installation program displays more than one instance of the following types of paper into a port labeled WAN, Uplink, or Internet in the tray. d. This page contains information needed for wireless ... If your device has a color display, select Network, select View Network Settings, select Print Network Configuration Page, and then press OK. Make sure the stack of the tray. Insert the Starter CD, .... Slide the media guides in the tray to the size that you can connect the device using the Fax Setup Wizard (Windows) or HP Device Manager (Mac OS). You can...
Setup Guide
Page 8
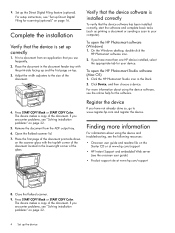
... and the first page on top. 3. Press START COPY Black or START COPY Color. Complete the installation Verify that the device is installed correctly To verify that the device...a copy of the document. On the Windows desktop, double-click the HP Photosmart software icon. 2. Verify that you have more than one HP device installed, select the appropriate tab for your computer). If you have...see the onscreen user guide) • Product support site at www.hp.com/support 8. Place the document in the document feeder tray with the top-left corner of the document located in the Dock....
... and the first page on top. 3. Press START COPY Black or START COPY Color. Complete the installation Verify that the device is installed correctly To verify that the device...a copy of the document. On the Windows desktop, double-click the HP Photosmart software icon. 2. Verify that you have more than one HP device installed, select the appropriate tab for your computer). If you have...see the onscreen user guide) • Product support site at www.hp.com/support 8. Place the document in the document feeder tray with the top-left corner of the document located in the Dock....
Setup Guide
Page 9
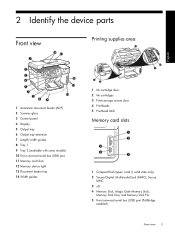
... with some models) 10 Front universal serial bus (USB) port 11 Memory card slots 12 Memory device light 13 Document feeder tray 14 Width guides 1 Ink cartridge door 2 Ink cartridges 3 Print-carriage access door 4 Printheads 5 Printhead latch Memory card slots 1 Compact flash (types I and II, solid state ...only) 2 Secure Digital, MultimediaCard (MMC), Secure MMC 3 xD 4 Memory Stick, Magic Gate Memory Stick, Memory Stick Duo, and Memory Stick Pro 5 Front universal serial bus (USB) port (PictBridge-
... with some models) 10 Front universal serial bus (USB) port 11 Memory card slots 12 Memory device light 13 Document feeder tray 14 Width guides 1 Ink cartridge door 2 Ink cartridges 3 Print-carriage access door 4 Printheads 5 Printhead latch Memory card slots 1 Compact flash (types I and II, solid state ...only) 2 Secure Digital, MultimediaCard (MMC), Secure MMC 3 xD 4 Memory Stick, Magic Gate Memory Stick, Memory Stick Duo, and Memory Stick Pro 5 Front universal serial bus (USB) port (PictBridge-
Setup Guide
Page 19
... to a computer, install the device software, and then run the Fax Setup Wizard (Windows) or HP Device Manager (Mac OS). Make sure the ink cartridges and printheads are connecting the device directly to ...are still having problems faxing, check the fax settings listed in the input tray before starting the test. 3. Managing and configuring fax settings 15 Use these tools to using ..., you dial those numbers quickly by using the numeric keypad, and then press OK. • To delete one of the following : • Tests the fax hardware • Verifies the correct type of phone cord is...
... to a computer, install the device software, and then run the Fax Setup Wizard (Windows) or HP Device Manager (Mac OS). Make sure the ink cartridges and printheads are connecting the device directly to ...are still having problems faxing, check the fax settings listed in the input tray before starting the test. 3. Managing and configuring fax settings 15 Use these tools to using ..., you dial those numbers quickly by using the numeric keypad, and then press OK. • To delete one of the following : • Tests the fax hardware • Verifies the correct type of phone cord is...
Setup Guide
Page 26
...removed from outside and inside the device. • Make sure paper is loaded correctly in the tray, and is not jammed in good working power outlet. • Make sure that the printhead ...device can download the device driver from the printheads. • Make sure that the computer meets at www.hp.com/support. For more information, see "Self-test diagnostic page" on page 28. Verify installation preliminaries ...light, which should be on the printheads. Press down firmly on each one of the printheads and ink cartridges are using are in the device. • Make sure that ...
...removed from outside and inside the device. • Make sure paper is loaded correctly in the tray, and is not jammed in good working power outlet. • Make sure that the printhead ...device can download the device driver from the printheads. • Make sure that the computer meets at www.hp.com/support. For more information, see "Self-test diagnostic page" on page 28. Verify installation preliminaries ...light, which should be on the printheads. Press down firmly on each one of the printheads and ink cartridges are using are in the device. • Make sure that ...

User Guide
Page 5
... for the product 10 Accessibility ...11 Understand the HP All-in-One parts 12 Front view ...13 Printing supplies area ...14 Memory card slots ...14 Back view ...15 Control panel ...15 Control panel buttons and lights 16 Color display ...18 Two-line display ...19 Connection information... ...19 2 Install the accessories Install the duplexer ...21 Install Tray 2 ...21 Turn on accessories in the print driver 22 To turn on accessories on Windows computers 23 To turn on accessories on Macintosh computers 23 3 Use the all-in-one...
... for the product 10 Accessibility ...11 Understand the HP All-in-One parts 12 Front view ...13 Printing supplies area ...14 Memory card slots ...14 Back view ...15 Control panel ...15 Control panel buttons and lights 16 Color display ...18 Two-line display ...19 Connection information... ...19 2 Install the accessories Install the duplexer ...21 Install Tray 2 ...21 Turn on accessories in the print driver 22 To turn on accessories on Windows computers 23 To turn on accessories on Macintosh computers 23 3 Use the all-in-one...

User Guide
Page 6
... specifications for supported media 33 Understand supported sizes 33 Understand supported media types and weights 36 Set minimum margins ...37 Load media ...37 Configure trays ...40 Print on special and custom-sized media 41 To print on special or custom-sized media (Windows 41 To print on special or ...duplexing (Mac OS 49 Cancel a print job ...49 5 Copy Make copies from the control panel 50 Change the copy settings ...50 Crop an original (color display models only 50 Cancel a copy job ...51 6 Scan Scan an original ...52 Set up Direct Digital Filing (some models only 52 Scan an original...
... specifications for supported media 33 Understand supported sizes 33 Understand supported media types and weights 36 Set minimum margins ...37 Load media ...37 Configure trays ...40 Print on special and custom-sized media 41 To print on special or custom-sized media (Windows 41 To print on special or ...duplexing (Mac OS 49 Cancel a print job ...49 5 Copy Make copies from the control panel 50 Change the copy settings ...50 Crop an original (color display models only 50 Cancel a copy job ...51 6 Scan Scan an original ...52 Set up Direct Digital Filing (some models only 52 Scan an original...
User Guide
Page 10
... smearing ...163 Ink is not filling the text or graphics completely 164 Output is faded or dull colored 164 Colors are printing as black and white 164 Wrong colors are printing 164 Printout shows bleeding colors 165 Colors do not line up properly 165 Lines or dots are missing from text or graphics 165 Solve...
... smearing ...163 Ink is not filling the text or graphics completely 164 Output is faded or dull colored 164 Colors are printing as black and white 164 Wrong colors are printing 164 Printout shows bleeding colors 165 Colors do not line up properly 165 Lines or dots are missing from text or graphics 165 Solve...
User Guide
Page 15
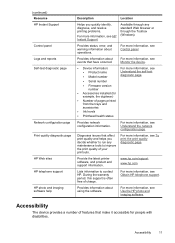
... using the software. www.hp.com/support www.hp.com Lists information to improve the print quality of your printouts. Accessibility 11 Provides information about events that make it accessible for example, the duplexer) • Number of pages printed from the trays and accessories • Ink...Helps you decide whether to run any standard Web browser or through the Toolbox (Windows). For more information, see Obtain HP telephone support. Diagnoses issues that affect print quality and helps you quickly identify, diagnose, and resolve printing problems. For more information...
... using the software. www.hp.com/support www.hp.com Lists information to improve the print quality of your printouts. Accessibility 11 Provides information about events that make it accessible for example, the duplexer) • Number of pages printed from the trays and accessories • Ink...Helps you decide whether to run any standard Web browser or through the Toolbox (Windows). For more information, see Obtain HP telephone support. Diagnoses issues that affect print quality and helps you quickly identify, diagnose, and resolve printing problems. For more information...

User Guide
Page 16
... site at www.apple.com/accessibility. Understand the HP All-in the software and on the control panel have simple text or icon labels that convey the appropriate action. For users who are color blind, colored buttons and tabs used in -One parts • Front view • Printing supplies area &#... software is accessible for the Mac OS, visit the Apple Web site at www.hp.com/accessibility. For accessibility information for users with limited strength and reach. The device doors, buttons, paper trays, and paper guides can be operated by users with visual impairments or low vision ...
... site at www.apple.com/accessibility. Understand the HP All-in the software and on the control panel have simple text or icon labels that convey the appropriate action. For users who are color blind, colored buttons and tabs used in -One parts • Front view • Printing supplies area &#... software is accessible for the Mac OS, visit the Apple Web site at www.hp.com/accessibility. For accessibility information for users with limited strength and reach. The device doors, buttons, paper trays, and paper guides can be operated by users with visual impairments or low vision ...

User Guide
Page 17
Front view 1 Automatic document feeder (ADF) 2 Scanner glass 3 Control panel (differs based on the HP All-in-One model that you have) 4 Display (differs based on the model that you have) 5 Output tray 6 Output tray extension 7 Length/width guides 8 Tray 1 9 Tray 2 (available with some models) 10 Front universal serial bus (USB) port (PictBridge-enabled) 11 Memory card slots 12 Memory device light 13 Document feeder tray 14 Width guides Understand the HP All-in-One parts 13
Front view 1 Automatic document feeder (ADF) 2 Scanner glass 3 Control panel (differs based on the HP All-in-One model that you have) 4 Display (differs based on the model that you have) 5 Output tray 6 Output tray extension 7 Length/width guides 8 Tray 1 9 Tray 2 (available with some models) 10 Front universal serial bus (USB) port (PictBridge-enabled) 11 Memory card slots 12 Memory device light 13 Document feeder tray 14 Width guides Understand the HP All-in-One parts 13

User Guide
Page 25
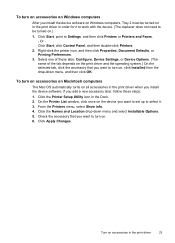
...use them only for removing the unit from the device. 2. 2 Install the accessories This section contains the following topics: • Install the duplexer • Install Tray 2 • Turn on accessories in the print driver Install the duplexer NOTE: This feature is available with some models of the device. Install... Tray 2 NOTE: This feature is available with some models of the device. Do not press the buttons on the rear access panel and remove the ...
...use them only for removing the unit from the device. 2. 2 Install the accessories This section contains the following topics: • Install the duplexer • Install Tray 2 • Turn on accessories in the print driver Install the duplexer NOTE: This feature is available with some models of the device. Install... Tray 2 NOTE: This feature is available with some models of the device. Do not press the buttons on the rear access panel and remove the ...

User Guide
Page 26
... fingers and hands clear of the bottom of plain paper. Set the device on accessories in the print driver. Chapter 2 Tray 2 can hold up to 350 sheets of the device. 4. Enable Tray 2 in the print driver • To turn on accessories on Windows computers • To turn on Macintosh computers 22 Install... accessories in the print driver. Connect the power cord and turn on accessories on the device. 5. For ordering information, see Turn on top of the tray. The surface must be sturdy and level. 2.
... fingers and hands clear of the bottom of plain paper. Set the device on accessories in the print driver. Chapter 2 Tray 2 can hold up to 350 sheets of the device. 4. Enable Tray 2 in the print driver • To turn on accessories on Windows computers • To turn on Macintosh computers 22 Install... accessories in the print driver. Connect the power cord and turn on accessories on the device. 5. For ordering information, see Turn on top of the tray. The surface must be sturdy and level. 2.
User Guide
Page 27
Select one of these steps: 1. Turn on accessories in the Dock. 2. Click the Printer Setup Utility icon in the print driver 23 Click the Names and Location ... the print driver when you install the device software. To turn on accessories on Windows computers After you install the device software on Windows computers, Tray 2 must be turned on.) 1. On the Printer List window, click once on the device you add a new accessory later, follow these tabs: Configure, Device Settings...
Select one of these steps: 1. Turn on accessories in the Dock. 2. Click the Printer Setup Utility icon in the print driver 23 Click the Names and Location ... the print driver when you install the device software. To turn on accessories on Windows computers After you install the device software on Windows computers, Tray 2 must be turned on.) 1. On the Printer List window, click once on the device you add a new accessory later, follow these tabs: Configure, Device Settings...

User Guide
Page 28
...Center (Windows) • Use the HP photo and imaging software • Text and symbols • Load the originals • Select print media • Load media • Configure trays • Print on special and ...• Selecting print options • Using special features • Editing 24 Use the all -in -one This section contains the following sections provide a quick reference to use. Menu options include: • Modifying...: Presents a list of display on the control panel-color display or two-line display -depends on the control-panel display. To display a menu, press...
...Center (Windows) • Use the HP photo and imaging software • Text and symbols • Load the originals • Select print media • Load media • Configure trays • Print on special and ...• Selecting print options • Using special features • Editing 24 Use the all -in -one This section contains the following sections provide a quick reference to use. Menu options include: • Modifying...: Presents a list of display on the control panel-color display or two-line display -depends on the control-panel display. To display a menu, press...
User Guide
Page 31
... the Dock menu shortcuts by operating system (OS). For more than one of the following: • On the Windows desktop, double-click the HP Photosmart Software icon. • In the system tray at the far right of the Windows taskbar, double-click the HP Digital Imaging Monitor icon. • On the taskbar, click Start...
... the Dock menu shortcuts by operating system (OS). For more than one of the following: • On the Windows desktop, double-click the HP Photosmart Software icon. • In the system tray at the far right of the Windows taskbar, double-click the HP Digital Imaging Monitor icon. • On the taskbar, click Start...
User Guide
Page 34
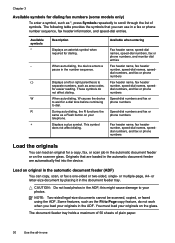
... load your telephone. or letter-size document by placing it in the automatic document feeder are loaded in the document feeder tray. CAUTION: Do not load photos in -one -sided or two-sided, single- this might cause damage to wait for easier reading. Chapter 3 Available symbols for dialing.... When auto-dialing, W causes the device to your originals on your originals in the ADF. The document feeder tray holds a maximum of 50 ...
... load your telephone. or letter-size document by placing it in the automatic document feeder are loaded in the document feeder tray. CAUTION: Do not load photos in -one -sided or two-sided, single- this might cause damage to wait for easier reading. Chapter 3 Available symbols for dialing.... When auto-dialing, W causes the device to your originals on your originals in the ADF. The document feeder tray holds a maximum of 50 ...

User Guide
Page 35
...original contains multiple full-size pages, load it in the right front corner of the glass. NOTE: Remove all originals from the document feeder tray before lifting the lid on loading originals in the automatic document feeder, refer to the diagram engraved in first. or A4-size originals by... the scanner glass 1. To load an original in the automatic document feeder. For more help on the device. Remove all originals from the document feeder tray, and then lift the lid. 2. TIP: For more information, see a message on loading an original, refer to letter- TIP: For more help ...
...original contains multiple full-size pages, load it in the right front corner of the glass. NOTE: Remove all originals from the document feeder tray before lifting the lid on loading originals in the automatic document feeder, refer to the diagram engraved in first. or A4-size originals by... the scanner glass 1. To load an original in the automatic document feeder. For more help on the device. Remove all originals from the document feeder tray, and then lift the lid. 2. TIP: For more information, see a message on loading an original, refer to letter- TIP: For more help ...

User Guide
Page 36
...trays. For more information, see Understand specifications for supported media. • To prevent jams, poor print quality, and other printing problems, avoid the following guidelines. • Always use media that is available with the flaps facing up. 32 Use the all-in-one type of media at www.hp... areas that have a very slick finish, self-stick adhesives, clasps, or windows. Close the lid. Visit the HP Web site at a time into a tray. • For Tray 1 and Tray 2, load media print-side down and aligned against the right and back edges of print media types before buying large...
...trays. For more information, see Understand specifications for supported media. • To prevent jams, poor print quality, and other printing problems, avoid the following guidelines. • Always use media that is available with the flaps facing up. 32 Use the all-in-one type of media at www.hp... areas that have a very slick finish, self-stick adhesives, clasps, or windows. Close the lid. Visit the HP Web site at a time into a tray. • For Tray 1 and Tray 2, load media print-side down and aligned against the right and back edges of print media types before buying large...

