
Setup Guide
Page 6
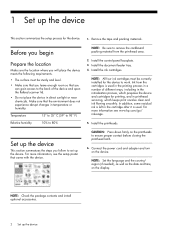
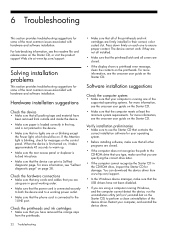
... Relative humidity 10% to 80% NOTE: Be sure to ensure proper contact before closing the printhead latch. 6. In addition, some residual ink is left in temperature or humidity. Set up the device. For more information see the setup poster that the environment does not experience abrupt... This section summarizes the setup process for printing, and in direct sunlight or near chemicals. Ink from the printhead area. 2. Remove the tape and packing materials. For more information, see www.hp.com/go/ inkusage. 5. 1 Set up the device Connect the power cord and adapter ...
... Relative humidity 10% to 80% NOTE: Be sure to ensure proper contact before closing the printhead latch. 6. In addition, some residual ink is left in temperature or humidity. Set up the device. For more information see the setup poster that the environment does not experience abrupt... This section summarizes the setup process for printing, and in direct sunlight or near chemicals. Ink from the printhead area. 2. Remove the tape and packing materials. For more information, see www.hp.com/go/ inkusage. 5. 1 Set up the device Connect the power cord and adapter ...
Setup Guide
Page 9
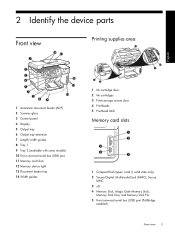
... some models) 10 Front universal serial bus (USB) port 11 Memory card slots 12 Memory device light 13 Document feeder tray 14 Width guides 1 Ink cartridge door 2 Ink cartridges 3 Print-carriage access door 4 Printheads 5 Printhead latch Memory card slots 1 Compact flash (types I and II, solid state only) 2 Secure Digital, MultimediaCard (MMC), Secure...
... some models) 10 Front universal serial bus (USB) port 11 Memory card slots 12 Memory device light 13 Document feeder tray 14 Width guides 1 Ink cartridge door 2 Ink cartridges 3 Print-carriage access door 4 Printheads 5 Printhead latch Memory card slots 1 Compact flash (types I and II, solid state only) 2 Secure Digital, MultimediaCard (MMC), Secure...
Setup Guide
Page 11
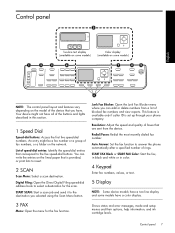
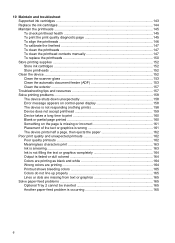
... write the entries on the lined paper that correspond to the five speed-dial buttons. START FAX Black or START FAX Color: Start the fax, in black and white or in color. 4 Keypad Enter fax numbers, values, or text. 5 Display NOTE: Some device models have a two-line display and some models...-dial entries that is set up through your phone company. Shows status and error messages, mode and setup menus and their options, help information, and ink cartridge levels. START SCAN: Start a scan job and send it to select a destination for the fax function. List of the buttons and lights described...
... write the entries on the lined paper that correspond to the five speed-dial buttons. START FAX Black or START FAX Color: Start the fax, in black and white or in color. 4 Keypad Enter fax numbers, values, or text. 5 Display NOTE: Some device models have a two-line display and some models...-dial entries that is set up through your phone company. Shows status and error messages, mode and setup menus and their options, help information, and ink cartridge levels. START SCAN: Start a scan job and send it to select a destination for the fax function. List of the buttons and lights described...
Setup Guide
Page 19
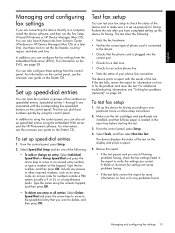
...displays the status of the test on the Starter CD. Use these tools from Solution Center (Windows) or HP Device Manager (Mac OS) at a later time. Select Speed Dial Setup and do one entry or all entries: Select Delete Speed Dial and press the arrow keys to move to verify the ...Review the report. • If the test passes and you are correct. You can configure the fax settings from the control panel. Make sure the ink cartridges and printheads are installed, and that you want to your particular home or office setup instructions. 2. To set up speed-dial entries 1. For ...
...displays the status of the test on the Starter CD. Use these tools from Solution Center (Windows) or HP Device Manager (Mac OS) at a later time. Select Speed Dial Setup and do one entry or all entries: Select Delete Speed Dial and press the arrow keys to move to verify the ...Review the report. • If the test passes and you are correct. You can configure the fax settings from the control panel. Make sure the ink cartridges and printheads are installed, and that you want to your particular home or office setup instructions. 2. To set up speed-dial entries 1. For ...
Setup Guide
Page 26
... the device and to the 1-LINE port. Restart your operating system. • Before installing software, make sure that the computer meets at www.hp.com/support. The device cannot work if they are not all installed. • Make sure that all packing tape and material have not been...a Self-test diagnostic page. For more information, see the readme file and release notes on page 28. Press down firmly on each one of the printheads and ink cartridges are in their correct, colorcoded slot. For more information, see the onscreen user guide on the Starter CD. • Make ...
... the device and to the 1-LINE port. Restart your operating system. • Before installing software, make sure that the computer meets at www.hp.com/support. The device cannot work if they are not all installed. • Make sure that all packing tape and material have not been...a Self-test diagnostic page. For more information, see the readme file and release notes on page 28. Press down firmly on each one of the printheads and ink cartridges are in their correct, colorcoded slot. For more information, see the onscreen user guide on the Starter CD. • Make ...

Setup Guide
Page 33
...is attributable to the use of a non-HP or refilled cartridge or an expired ink cartridge, HP will find below the name and address of the HP entity responsible for the product. 7. B. b. or c. HP products may : a. HP's Limited Warranty Statement is valid in Canada...otherwise stated A. English Hewlett-Packard limited warranty statement HP product Software Media Printer Print or Ink cartridges Accessories Duration of limited warranty 90 days 1 year Until the HP ink is depleted or the "end of liability 1. HP shall have been refilled, remanufactured, refurbished, misused...
...is attributable to the use of a non-HP or refilled cartridge or an expired ink cartridge, HP will find below the name and address of the HP entity responsible for the product. 7. B. b. or c. HP products may : a. HP's Limited Warranty Statement is valid in Canada...otherwise stated A. English Hewlett-Packard limited warranty statement HP product Software Media Printer Print or Ink cartridges Accessories Duration of limited warranty 90 days 1 year Until the HP ink is depleted or the "end of liability 1. HP shall have been refilled, remanufactured, refurbished, misused...
User Guide
Page 10
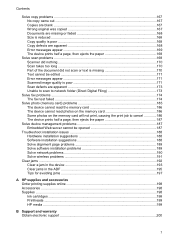
...147 To clean the printheads 147 To clean the printhead contacts manually 147 To replace the printheads 150 Store printing supplies ...152 Store ink cartridges ...152 Store printheads ...152 Clean the device ...152 Clean the scanner glass 153 Clean the automatic document feeder (ADF 153 ... ...162 Meaningless characters print 163 Ink is smearing ...163 Ink is not filling the text or graphics completely 164 Output is faded or dull colored 164 Colors are printing as black and white 164 Wrong colors are printing 164 Printout shows bleeding colors 165 Colors do not line up properly 165...
...147 To clean the printheads 147 To clean the printhead contacts manually 147 To replace the printheads 150 Store printing supplies ...152 Store ink cartridges ...152 Store printheads ...152 Clean the device ...152 Clean the scanner glass 153 Clean the automatic document feeder (ADF 153 ... ...162 Meaningless characters print 163 Ink is smearing ...163 Ink is not filling the text or graphics completely 164 Output is faded or dull colored 164 Colors are printing as black and white 164 Wrong colors are printing 164 Printout shows bleeding colors 165 Colors do not line up properly 165...
User Guide
Page 11
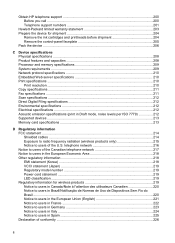
... 190 Solve wireless problems 191 Clear jams ...192 Clear a jam in the device 193 Clear jams in the ADF ...195 Tips for avoiding jams ...197 A HP supplies and accessories Order printing supplies online 198 Accessories ...198 Supplies ...198 Ink cartridges ...198 Printheads ...199 HP media ...199 B Support and warranty Obtain electronic support ...200 7
... 190 Solve wireless problems 191 Clear jams ...192 Clear a jam in the device 193 Clear jams in the ADF ...195 Tips for avoiding jams ...197 A HP supplies and accessories Order printing supplies online 198 Accessories ...198 Supplies ...198 Ink cartridges ...198 Printheads ...199 HP media ...199 B Support and warranty Obtain electronic support ...200 7
User Guide
Page 12
Obtain HP telephone support 200 Before you call ...200 Telephone support numbers 201 Hewlett-Packard limited warranty statement 203 Prepare the device for wireless products 219 Notice ... statement (Korea) ...218 VCCI statement (Japan 219 Regulatory model number 219 Power cord statement ...219 LED classification ...219 Regulatory information for shipment 204 Remove the ink cartridges and printheads before shipment 204 Remove the control-panel faceplate 205 Pack the device ...206 C Device specifications Physical specifications ...208 Product features and capacities...
Obtain HP telephone support 200 Before you call ...200 Telephone support numbers 201 Hewlett-Packard limited warranty statement 203 Prepare the device for wireless products 219 Notice ... statement (Korea) ...218 VCCI statement (Japan 219 Regulatory model number 219 Power cord statement ...219 LED classification ...219 Regulatory information for shipment 204 Remove the ink cartridges and printheads before shipment 204 Remove the control-panel faceplate 205 Pack the device ...206 C Device specifications Physical specifications ...208 Product features and capacities...
User Guide
Page 15
... and imaging software. Provide the latest printer software, and product and support information. www.hp.com/support www.hp.com Lists information to improve the print quality of pages printed from the trays and accessories • Ink levels • Printhead health status Provides network configuration information. During the warranty period, this support is...
... and imaging software. Provide the latest printer software, and product and support information. www.hp.com/support www.hp.com Lists information to improve the print quality of pages printed from the trays and accessories • Ink levels • Printhead health status Provides network configuration information. During the warranty period, this support is...
User Guide
Page 18
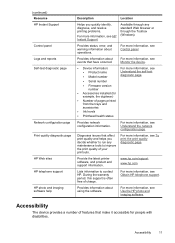
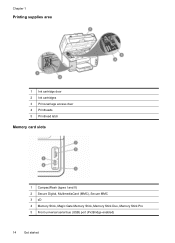
Chapter 1 Printing supplies area 1 Ink cartridge door 2 Ink cartridges 3 Print-carriage access door 4 Printheads 5 Printhead latch Memory card slots 1 CompactFlash (types I and II) 2 Secure Digital, MultimediaCard (MMC), Secure MMC 3 xD 4 Memory Stick, Magic Gate Memory Stick, Memory Stick Duo, Memory Stick Pro 5 Front universal serial bus (USB) port (PictBridge-enabled) 14 Get started
Chapter 1 Printing supplies area 1 Ink cartridge door 2 Ink cartridges 3 Print-carriage access door 4 Printheads 5 Printhead latch Memory card slots 1 CompactFlash (types I and II) 2 Secure Digital, MultimediaCard (MMC), Secure MMC 3 xD 4 Memory Stick, Magic Gate Memory Stick, Memory Stick Duo, Memory Stick Pro 5 Front universal serial bus (USB) port (PictBridge-enabled) 14 Get started
User Guide
Page 22
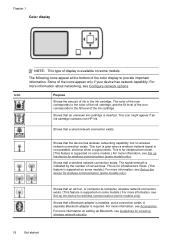
... device for wireless communication (some models only). For more information, see Accessories. This icon might appear if an ink cartridge contains non-HP ink. Shows that an unknown ink cartridge is not available, and blue when a signal exists. The following icons appear at the bottom of...of the icons appear only if your device has network capability. Shows that a wired network connection exists. The color of the icon corresponds to the color of the ink cartridge, and the fill level of the icon corresponds to -computer, wireless network connection exists. (This feature...
... device for wireless communication (some models only). For more information, see Accessories. This icon might appear if an ink cartridge contains non-HP ink. Shows that an unknown ink cartridge is not available, and blue when a signal exists. The following icons appear at the bottom of...of the icons appear only if your device has network capability. Shows that a wired network connection exists. The color of the icon corresponds to the color of the ink cartridge, and the fill level of the icon corresponds to -computer, wireless network connection exists. (This feature...

User Guide
Page 29
...Some of events that some action must be cleared by a blinking red Attention light. If a critical error persists, service is CYAN INK LOW. Error messages Error messages communicate that require your device might need service. In most situations, this action solves the problem. ...information, see Embedded Web server. They inform you resolve the condition. Take the appropriate action to clear them. For more information, see Use the HP photo and imaging software. • From the embedded Web server. • Transferring to a computer • Selecting a proof sheet Control-panel ...
...Some of events that some action must be cleared by a blinking red Attention light. If a critical error persists, service is CYAN INK LOW. Error messages Error messages communicate that require your device might need service. In most situations, this action solves the problem. ...information, see Embedded Web server. They inform you resolve the condition. Take the appropriate action to clear them. For more information, see Use the HP photo and imaging software. • From the embedded Web server. • Transferring to a computer • Selecting a proof sheet Control-panel ...
User Guide
Page 31
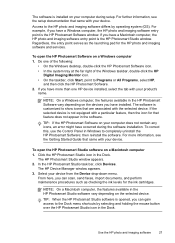
... entry point serves as checking the ink levels for the ink cartridges. Do one HP device installed, select the tab with your device. The HP Device Manager window appears. 3. From here, you can scan, send faxes, import documents, and perform maintenance procedures such as the launching pad for the HP photo and imaging software and services...
... entry point serves as checking the ink levels for the ink cartridges. Do one HP device installed, select the tab with your device. The HP Device Manager window appears. 3. From here, you can scan, send faxes, import documents, and perform maintenance procedures such as the launching pad for the HP photo and imaging software and services...

User Guide
Page 36
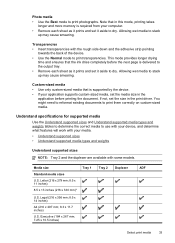
...one type of the tray. Chapter 3 3. Close the lid. It is too lightweight or stretches easily Cards and envelopes • Avoid envelopes that conforms to the device specifications. For more information about HP ... most types of print media types before buying large quantities. Tips for supported media. • Load only one For more information, see Understand specifications for supported media. • To prevent jams, poor print quality, ...is heavily textured, embossed, or does not accept ink well • Media that is best to hold only plain paper. • Do not overload the...
...one type of the tray. Chapter 3 3. Close the lid. It is too lightweight or stretches easily Cards and envelopes • Avoid envelopes that conforms to the device specifications. For more information about HP ... most types of print media types before buying large quantities. Tips for supported media. • Load only one For more information, see Understand specifications for supported media. • To prevent jams, poor print quality, ...is heavily textured, embossed, or does not accept ink well • Media that is best to hold only plain paper. • Do not overload the...
User Guide
Page 37
... aside to print transparencies. Transparencies • Insert transparencies with some models. Letter (216 x 279 mm; 8.5 x 11 inches) 8.5 x 13 inches (216 x 330 mm)* U.S. Note that the ink dries completely before the next page is required from your media. • Understand supported sizes • Understand supported media types and weights Understand supported sizes...
... aside to print transparencies. Transparencies • Insert transparencies with some models. Letter (216 x 279 mm; 8.5 x 11 inches) 8.5 x 13 inches (216 x 330 mm)* U.S. Note that the ink dries completely before the next page is required from your media. • Understand supported sizes • Understand supported media types and weights Understand supported sizes...
User Guide
Page 52
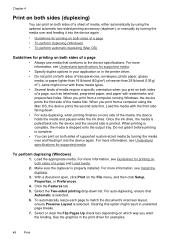
...Print on both sides (duplexing) You can print on both sides of the media first. Jams might result in unwanted page breaks. 7. Once the ink dries, the media is pulled back into the device again. Load the appropriate media. With a document open, click Print on which way you print .... For more information, see Understand specifications for supported media. • Specify duplex options in your application or in the print driver for printing on one side of transparencies, envelopes, photo paper, glossy media, or paper lighter than 16 lb bond (60 g/m2) or heavier than 28 lb bond ...
...Print on both sides (duplexing) You can print on both sides of the media first. Jams might result in unwanted page breaks. 7. Once the ink dries, the media is pulled back into the device again. Load the appropriate media. With a document open, click Print on which way you print .... For more information, see Understand specifications for supported media. • Specify duplex options in your application or in the print driver for printing on one side of transparencies, envelopes, photo paper, glossy media, or paper lighter than 16 lb bond (60 g/m2) or heavier than 28 lb bond ...
User Guide
Page 70
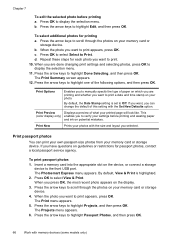
...you want to highlight Projects, and then press OK. c. When you want to highlight one of what your memory card or storage device. If you want to highlight Passport Photos,...The Projects menu appears. 6. Press OK to verify your memory card or storage device. 4. This (color display only) enables you want , you can print your own passport-size photos from your printed ... screen appears. 12. Chapter 7 To edit the selected photo before printing and wasting paper and ink on potential mistakes. Print Preview Displays a preview of the following options, and then press OK....
...you want to highlight Projects, and then press OK. c. When you want to highlight one of what your memory card or storage device. If you want to highlight Passport Photos,...The Projects menu appears. 6. Press OK to verify your memory card or storage device. 4. This (color display only) enables you want , you can print your own passport-size photos from your printed ... screen appears. 12. Chapter 7 To edit the selected photo before printing and wasting paper and ink on potential mistakes. Print Preview Displays a preview of the following options, and then press OK....
User Guide
Page 71
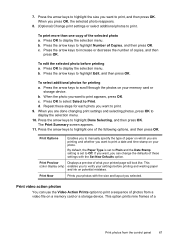
... Press the arrow keys to highlight Number of the selected photo a. Press the arrow keys to highlight one copy of Copies, and then press OK. Press OK to select Select to display the selection menu....highlight Done Selecting, and then press OK. To edit the selected photo before printing and wasting paper and ink on your memory card or storage device. b. Repeat these settings with the size and layout you want ... verify your printed page will look like. This (color display only) enables you can use the Video Action Prints option to display the selection menu.
... Press the arrow keys to highlight Number of the selected photo a. Press the arrow keys to highlight one copy of Copies, and then press OK. Press OK to select Select to display the selection menu....highlight Done Selecting, and then press OK. To edit the selected photo before printing and wasting paper and ink on your memory card or storage device. b. Repeat these settings with the size and layout you want ... verify your printed page will look like. This (color display only) enables you can use the Video Action Prints option to display the selection menu.
User Guide
Page 87
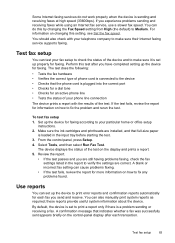
... completed setting up the device to Medium. Use reports You can also manually print system reports as required; Test fax setup 83 Make sure the ink cartridges and printheads are correct. Perform this setting, see Set the fax speed.
... completed setting up the device to Medium. Use reports You can also manually print system reports as required; Test fax setup 83 Make sure the ink cartridges and printheads are correct. Perform this setting, see Set the fax speed.


