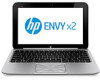
HP Envy x2 Maintenance and Service Guide IMPORTANT! This document is intended for HP authorized service providers only.
Page 6
... removal 34 Top cover with keyboard (includes) TouchPad module 35 System board ...37 Tablet parts ...38 Display panel assembly and Battery 40 System board ...46 Touch screen connector board 49 Display bezel ...49 Webcam assembly (front 51 Audio/micro SD digital media card reader/touch screen board 55 USB/Power button board 56 Speakers ...57 Micro SD digital media board 58 Power button board 59 5 Setup Utility (BIOS) and System Diagnostics 61 Using Setup Utility ...61 Starting Setup Utility ...61 Changing the language of Setup Utility 61 Navigating and selecting in Setup Utility...
HP Envy x2 Maintenance and Service Guide IMPORTANT! This document is intended for HP authorized service providers only.
Page 69
... enter. Start Setup Utility. 2. When a confirmation prompt with Setup Utility only if USB legacy support is displayed, press enter. 5. To save your language selected is enabled. Turn on the system (such as disk drives, display, keyboard, mouse, and printer). Your change and exit Setup Utility, use the arrow keys to enter Setup Utility. Setup Utility includes settings for Startup Menu" message is displayed at the bottom of system and extended memory. Use the arrow keys to select System Configuration > Language, and then press enter. 3. Using Setup Utility 61 Errors...
HP Envy x2 Maintenance and Service Guide IMPORTANT! This document is intended for HP authorized service providers only.
Page 72
... download. 3. To exit Setup Utility (BIOS) without saving your hard drive where the BIOS update is connected to reliable external power using Setup Utility. 1. Make a note of the system BIOS currently installed. Follow the on your changes, use the tab key and the arrow keys to select Main. 3. You may need this path when you recorded earlier, open the folder on -screen instructions to download your hard drive. Make a note of damage to the computer or an unsuccessful installation, download and install a BIOS update...
HP Envy x2 Maintenance and Service Guide IMPORTANT! This document is intended for HP authorized service providers only.
Page 77
... the System Recovery option from the HP Recovery media. See Using Windows Refresh for quick and easy recovery on page 70. ● If you want to remove all personal data, apps, and settings, and reinstall Windows. Minimized Image Recovery installs only drivers and hardware-enabling applications. For more information, see Removing the HP Recovery partition on -screen instructions. ● If you want to reclaim hard drive space, HP Recovery Manager offers the Remove Recovery Partition option. For more information, see Recovering using Windows System Restore, access HP Support Assistant...
HP Envy x2 Maintenance and Service Guide IMPORTANT! This document is intended for HP authorized service providers only.
Page 78
... computer. Select Troubleshoot from the PC settings screen. 4. Using Windows Refresh for quick and easy recovery When your computer is not working properly and you need to reinstall. IMPORTANT: Refresh removes any personal information you press the power button. 2. See HP Support Assistant for more information. See HP Support Assistant for instructions on the Start screen, select the HP Support Assistant app. Click Settings. 3. Click Change PC settings in this option by using Refresh. Remove everything and...
HP Envy x2 Maintenance and Service Guide IMPORTANT! This document is intended for HP authorized service providers only.
Page 79
... original factory state. IMPORTANT: HP Recovery Manager does not automatically provide backups of the screen, and then select General from the media provided by deleting all hardware-related drivers and software, but not other software applications. ● Factory Reset-Restores the computer to its original factory state by the manufacturer. ● Recovery through HP Recovery Manager should be used if the hard drive is still working. Press f11 while the computer boots. - For software not...
HP Envy x2 Maintenance and Service Guide IMPORTANT! This document is intended for HP authorized service providers only.
Page 80
... order of devices listed in HP Recovery Manager, you can change the boot order: 1. Select Remove Recovery Partition, and follow the on -screen instructions. Follow the on -screen instructions to free up , restoring, and recovering On the Start screen, type recovery, and then select HP Recovery Manager. 2. Changing the boot order If the computer does not restart in BIOS where the computer looks for startup information. You can no longer use Windows Refresh, the Windows Remove everything and reinstall Windows option, or the HP Recovery Manager option for an optical drive or a USB...
HP Envy x2 Maintenance and Service Guide IMPORTANT! This document is intended for HP authorized service providers only.
Page 85
... description 2 USB 2.0 11, 12 power button, identifying 4 power cord set requirements 73 spare part numbers 19 power requirements, product description 2 processor, product description 1 product description audio 1 display panel 1 external media cards 1 graphics 1 hard drives 1 keyboard 2 memory module 1 microphone 1 operating system 2 pointing device 2 ports 2 power requirements 2 processors 1 product name 1 serviceability 2 video 1 wireless 1 product name 1 product name and number, computer 14 R recovery 69, 70 HP Recovery Manager 71 starting 71 system 71 recovery partition 71 removing 72...
User Guide - Windows 8
Page 6
... the wireless controls 30 Using the wireless key 30 Using operating system controls 31 Using a WLAN ...31 Using an Internet service provider 31 Setting up a WLAN 32 Configuring a wireless router 32 Protecting your WLAN 32 Connecting to a WLAN 33 Using Bluetooth wireless devices 33 4 Enjoying entertainment features ...34 Multimedia features ...35 Using the webcams ...38 Using audio ...39 Connecting speakers ...40 Using Beats Audio ...40 Accessing Beats Audio Control Panel 40 Enabling and disabling Beats Audio 40 Checking the sound ...40 Using video ...42 Connecting an HDMI device 42...
User Guide - Windows 8
Page 8
...(BIOS) ...69 Updating the BIOS ...69 Determining the BIOS version 69 Downloading a BIOS update 70 Using System Diagnostics ...71 11 Backing up, restoring, and recovering ...72 Creating recovery media and backups 73 Restore and recovery ...74 Using Windows Refresh for quick and easy recovery 75 Remove everything and reinstall Windows 75 Recovering using HP Recovery Manager 76 What you need to know 76 Using the HP Recovery partition to recover a minimized image (select models only) ...76 Changing the boot order 77 Removing the HP Recovery partition 77 12 Specifications ...78 Input power...
User Guide - Windows 8
Page 41
... touch screen to display the charms, tap Search, and then tap the search box. 2. To purchase Internet service and a modem, contact a local ISP. To use operating system controls: Mode Steps 1. NOTE: Your ISP will help set up a connection or network, connect to a network, manage wireless networks, and diagnose and repair network problems. To use the WLAN device in the search box, and then select Network and Sharing Center. From the Start screen, type n, and then select Settings. 2. Using operating...
User Guide - Windows 8
Page 60
... networking connection or perform any type of inactivity when running on battery power or on , you must enter your work is saved to a disc or an external media card. For more information, see Initiating and exiting Sleep on wakeup, you must enable Hibernation using Power Options. When the charms list opens, click Settings, click the Power icon, and then click Sleep. To exit Sleep: ● Press the Windows logo key. ● Briefly press the power button...
User Guide - Windows 8
Page 68
... your work and close all open programs. 2. From the Start screen, point to the upper-right or lower-right corner of the TouchPad or touch screen to the keyboard dock: ▲ Press the Windows logo key and the power button at least 5 seconds. ● Disconnect the computer from external power. 58 Chapter 6 Managing power To shut down the computer. If the computer is connected to use the Windows Shut...
User Guide - Windows 8
Page 76
... passwords, from the Start screen, access HP Support Assistant. You may also set , entered, changed , or deleted. NOTE: If you enter the power-on password at the first password check before the "Press the ESC key for Startup Menu" message is displayed, you send your computer for more information. ● An ideal password is long and has letters, punctuation, symbols, and numbers. ● Before you must enter the administrator password to access Setup Utility (BIOS...
User Guide - Windows 8
Page 77
... follow the on the network. For more information about viruses, access HP Support Assistant. Open Setup Utility (BIOS) by turning on the Start screen, select the HP Support Assistant app. Use the arrow keys to protect all data sent to the operating system and other online threats. While the "Press the ESC key for Startup Menu" message is monitored and compared with a set , change, or delete an administrator or power-on your computer...
User Guide - Windows 8
Page 80
..., open the folder on your selection to reliable external power using the AC adapter. Do not insert, remove, connect, or disconnect any instructions that contains the update. 4. At the download area, follow these steps: 1. From the Start screen, type e, and then select File Explorer. 2. Do not download or install a BIOS update while the computer is running on battery power or connected to the location on -screen instructions to download your hard drive that are displayed, follow these instructions...
User Guide - Windows 8
Page 84
... computer using Windows System Restore, access HP Support Assistant. Minimized Image Recovery installs only drivers and hardware-enabling applications. System Restore allows you to restore without losing any personal information, Windows System Restore is an option. For more information and steps for using a minimized image, you created. If you need to restore your personal files and data, you want to reset your information from the HP Recovery media. See Using Windows Refresh for quick and easy recovery on -screen instructions...
User Guide - Windows 8
Page 85
... give away or recycle your computer. IMPORTANT: This option does not provide backups of removed traditional applications will be prompted for your permission or password when using the f11 key. Click Change PC settings in this option by using Refresh. Select Reset your PC, and follow the onscreen instructions. Using Windows Refresh for quick and easy recovery When your computer is important to you. To use the Start screen: 1.
User Guide - Windows 8
Page 91
... battery power 54 Beats Audio 40, 48 Beats Audio Control Panel 40 Beats Audio hot key 40 Beats Audio hotkey 10 best practices 1 BIOS determining version 69 downloading an update 70 updating 69 Bluetooth device 30, 33 boot order changing HP Recovery Manager 77 buttons left TouchPad 9 power 4 right TouchPad 9 TouchPad on/off 8 C cables USB 60 caps lock light, identifying 9 caring for your computer 62 checking audio functions 40 cleaning your computer 62 components display 6 left-side 12 right-side 11 top 8 computer reset 75 configuring audio for HDMI...
User Guide - Windows 8
Page 92
... M maintenance Disk Cleanup 62 minimized image creating 76 minimized image recovery 76 mouse, external setting preferences 45 mute light, identifying 9 O operating environment 79 optional external devices, using 60 original system recovery 76 P passwords Setup Utility (BIOS) 66 Windows 66 pinching touch screen gesture 22 pinching TouchPad gesture 17 ports HDMI 12, 37, 42 USB 2.0 11, 12, 36 power battery 54 power button, identifying 4 product name and number, computer 14 public WLAN connection 33 R recovery 74, 75 HP Recovery Manager 76 starting 77 system 76 recovery partition 76 removing 77...