Battery For HP Dv7-1243cl - Pavilion Entertainment Turion X2 2 1 GHz
Battery For HP Dv7-1243cl
Related Manual Pages


Similar Questions

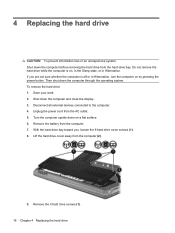
Hp Pavilion Dv7-1243cl Entertainment Notebook Pc Rtc Battery.
Mine is not a stanard CR2032 battery although it is a labeled as such. Mine has a black and red wire...
Mine is not a stanard CR2032 battery although it is a labeled as such. Mine has a black and red wire...
(Posted by oilcan 11 years ago)


Battery Charge
Does docking station stop charging battery when full? Should I take battery out of pc when on AC for...
Does docking station stop charging battery when full? Should I take battery out of pc when on AC for...
(Posted by kenbauman 12 years ago)
Related Terms
The following terms were also used when searching for Battery For HP Dv7-1243cl - Pavilion Entertainment Turion X2 2 1 GHz:- dv7 1243cl
- hp pavilion dv7 1243cl
- hp dv7 1243cl
- pavilion dv7 1243cl
- dv7-1243cl
- hp pavilion dv7-1243cl
- hp dv7-1243cl
- pavilion dv7-1243cl
- hp pavilion dv7 1243cl entertainment
- hp pavilion dv71243cl
- dv7 1243cl review
- pavilion dv7 1243cl entertainment
- pavilion dv7-1243cl entertainment
- dv7-1243cl review
- hp pavilion dv7-1243cl entertainment
- dv7 1243cl spec
- dv7 1243cl xp
- hp dv7 1243cl laptop
- hp nb234ua pavilion dv7 1243cl
- dv7 1243cl 17
- dv7 1243cl battery
- dv7 1243cl laptop
- dv7-1243cl reviews
- hp pavilion dv7 1243cl review
- hp pavilion dv7-1243cl review
- dv7 1243cl hp
- dv7 1243cl motherboard
- dv7 1243cl notebook pc
- dv7 1243cl reviews
- dv7 1243cl specs
- hp dv7 1243cl review
- hp dv71243cl laptop
- hp nb234ua pavilion dv7 1243cl 17
- hp pavilion dv7 1243cl entertainment laptop
- pavilion dv7 1243cl drivers
- pavilion dv7 1243cl review
- pavilion dv7-1243cl review
- pavilion dv7-1243cl specs
- dv7 1243cl amd turion
- dv7 1243cl price
- dv7-1243cl motherboard
- dv7-1243cl notebook pc
- hp dv7 1243cl motherboard
- hp dv7 1243cl reviews
- hp dv7 1243cl specs
- hp pavilion dv7 1243cl reviews
- hp pavilion dv7 1243cl specs
- pavilion dv7 1243cl entertainment laptop
- pavilion dv7 1243cl entertainment notebook pc
- pavilion dv7 1243cl forum
- pavilion dv7 1243cl nb234ua
- pavilion dv7 1243cl reviews
- pavilion dv7 1243cl specifications
- pavilion dv7 1243cl specs
- pavilion dv7 1243cl wireless
- pavilion dv7-1243cl drivers
- pavilion dv7-1243cl reviews
- battery dv7 1243cl
- battery dv7-1243cl
- battery for dv7 1243cl
- battery for dv7-1243cl
- battery for hp dv7 1243cl
- battery for hp dv7-1243cl
- battery for hp pavilion dv7-1243cl
- battery for pavilion dv7-1243cl
- best buy dv7 1243cl
- best buy hp dv7 1243cl
- dv7 1243cl amazon
- dv7 1243cl battery life
- dv7 1243cl blu ray
- dv7 1243cl blue screen
- dv7 1243cl buy
- dv7 1243cl disassembly
- dv7 1243cl driver
- dv7 1243cl drivers
- dv7 1243cl fan
- dv7 1243cl games
- dv7 1243cl hp pavilion
- dv7 1243cl inverter board
- dv7 1243cl keyboard
- dv7 1243cl media panel
- dv7 1243cl memory
- dv7 1243cl new
- dv7 1243cl parts
- dv7 1243cl power button
- dv7 1243cl product
- dv7 1243cl screen
- dv7 1243cl specifications
- dv7 1243cl xp drivers
- dv7- 1243cl motherboard
- dv7-1243cl 4gb ram
- dv7-1243cl amd turion
- dv7-1243cl battery
- dv7-1243cl battery life
- dv7-1243cl bios update
- dv7-1243cl bluetooth
- dv7-1243cl cpu
- dv7-1243cl cpu processor
- dv7-1243cl disassembly
- dv7-1243cl drivers
- dv7-1243cl fan
- dv7-1243cl full specs
- dv7-1243cl hdmi
- dv7-1243cl hp
- dv7-1243cl keyboard
- dv7-1243cl laptop
- dv7-1243cl lcd
- dv7-1243cl lcd screen
- dv7-1243cl maintenance and service guide
- dv7-1243cl manual
- dv7-1243cl manufactured date
- dv7-1243cl memory
- dv7-1243cl mother board
- dv7-1243cl northbridge
- dv7-1243cl part
- dv7-1243cl price
- dv7-1243cl ram
- dv7-1243cl replacement cord part number
- dv7-1243cl screen
- dv7-1243cl service manual
- dv7-1243cl spec
- dv7-1243cl specifications
- dv7-1243cl specs
- dv7-1243cl ssd
- dv7-1243cl upgrade
- dv7-1243cl weight
- dv7-1243cl windows 7
- dv7-1243cl wireless
- dv7-1243cl wireless driver
- dv7-1243cl wireless drivers
- dv7-1243cl xp drivers
- dv71243cl specs
- hp dv7 1243cl amd turion
- hp dv7 1243cl battery
- hp dv7 1243cl blue screen
- hp dv7 1243cl disassembly
- hp dv7 1243cl drivers
- hp dv7 1243cl media panel
- hp dv7 1243cl memory
- hp dv7 1243cl notebook pc
- hp dv7 1243cl parts
- hp dv7 1243cl power button
- hp dv7 1243cl price
- hp dv7 1243cl specifications
- hp dv7- 1243cl motherboard
- hp dv7-1243cl amd turion
- hp dv7-1243cl battery
- hp dv7-1243cl bios update
- hp dv7-1243cl drivers
- hp dv7-1243cl hdmi
- hp dv7-1243cl keyboard
- hp dv7-1243cl laptop
- hp dv7-1243cl manual
- hp dv7-1243cl manufactured date
- hp dv7-1243cl memory
- hp dv7-1243cl mother board
- hp dv7-1243cl motherboard
- hp dv7-1243cl price
- hp dv7-1243cl review
- hp dv7-1243cl reviews
- hp dv7-1243cl screen
- hp dv7-1243cl service manual
- hp dv7-1243cl specifications
- hp dv7-1243cl specs
- hp dv71243cl laptop computer
- hp dv71243cl specs
- hp laptop dv7 1243cl
- hp nb234ua pavilion dv7-1243cl
- hp nb234ua pavilion dv7-1243cl 17
- hp pavilion dv7 1243cl battery
- hp pavilion dv7 1243cl bluetooth
- hp pavilion dv7 1243cl buy
- hp pavilion dv7 1243cl drivers
- hp pavilion dv7 1243cl drivers wlan
- hp pavilion dv7 1243cl dvd driver
- hp pavilion dv7 1243cl entertainment notebook pc
- hp pavilion dv7 1243cl forum
- hp pavilion dv7 1243cl manual
- hp pavilion dv7 1243cl motherboard
- hp pavilion dv7 1243cl nb234ua
- hp pavilion dv7 1243cl notebook pc
- hp pavilion dv7 1243cl parts
- hp pavilion dv7 1243cl price
- hp pavilion dv7 1243cl specifications
- hp pavilion dv7 1243cl support forum
- hp pavilion dv7 1243cl turion
- hp pavilion dv7 1243cl warranty
- hp pavilion dv7 1243cl wireless
- hp pavilion dv7 1243cl wireless driver
- hp pavilion dv7 1243cl wireless icon
- hp pavilion dv7 1243cl wireless problems
- hp pavilion dv7-1243cl battery
- hp pavilion dv7-1243cl bios
- hp pavilion dv7-1243cl black screen
- hp pavilion dv7-1243cl disassembly
- hp pavilion dv7-1243cl drivers
- hp pavilion dv7-1243cl entertainment laptop
- hp pavilion dv7-1243cl entertainment notebook pc
- hp pavilion dv7-1243cl keyboard
- hp pavilion dv7-1243cl manual
- hp pavilion dv7-1243cl memory
- hp pavilion dv7-1243cl motherboard
- hp pavilion dv7-1243cl notebook pc
- hp pavilion dv7-1243cl parts
- hp pavilion dv7-1243cl price
- hp pavilion dv7-1243cl reviews
- hp pavilion dv7-1243cl service manual
- hp pavilion dv7-1243cl specs
- hp pavilion dv7-1243cl wireless driver
- hp pavilion nb234ua 17 notebook
- hp pavillion dv7 1243cl
- hp pavillion dv7-1243cl
- install xp on dv7 1243cl
- install xp on hp dv7 1243cl
- keyboard hp pavilion dv7 1243cl
- keyboard hp pavilion dv7-1243cl
- keyboard pavilion dv7 1243cl
- keyboard pavilion dv7-1243cl
- memory to dv7 1243cl
- nb234ua aba
- nb234ua aba hp
- nb234ua aba number
- nb234ua pavilion
- nb234ua pavilion dv7-1243cl
- nb234ua review
- nb234ua reviews
- nb234ua#aba
- pavilion dv7 1243cl battery
- pavilion dv7 1243cl bluetooth
- pavilion dv7 1243cl buy
- pavilion dv7 1243cl drivers wlan
- pavilion dv7 1243cl drivers xp
- pavilion dv7 1243cl dvd driver
- pavilion dv7 1243cl keyboard
- pavilion dv7 1243cl manual
- pavilion dv7 1243cl motherboard
- pavilion dv7 1243cl notebook
- pavilion dv7 1243cl notebook pc
- pavilion dv7 1243cl parts
- pavilion dv7 1243cl price
- pavilion dv7 1243cl service manual
- pavilion dv7 1243cl support forum
- pavilion dv7 1243cl turion
- pavilion dv7 1243cl warranty
- pavilion dv7 1243cl wireless driver
- pavilion dv7 1243cl wireless icon
- pavilion dv7 1243cl wireless problems
- pavilion dv7-1243cl battery
- pavilion dv7-1243cl bios
- pavilion dv7-1243cl black screen
- pavilion dv7-1243cl disassembly
- pavilion dv7-1243cl display
- pavilion dv7-1243cl entertainment laptop
- pavilion dv7-1243cl entertainment notebook pc
- pavilion dv7-1243cl hp
- pavilion dv7-1243cl keyboard
- pavilion dv7-1243cl manual
- pavilion dv7-1243cl memory
- pavilion dv7-1243cl motherboard
- pavilion dv7-1243cl notebook
- pavilion dv7-1243cl notebook pc
- pavilion dv7-1243cl parts
- pavilion dv7-1243cl price
- pavilion dv7-1243cl service manual
- pavilion dv7-1243cl windows 7 drivers
- pavilion dv7-1243cl wireless driver
- pavillion dv7 1243cl
- pavillion dv7 1243cl parts
- pavillion dv7-1243cl
- review dv7 1243cl
- review hp dv7 1243cl
- reviews on dv7 1243cl
- reviews on hp dv7 1243cl