
HP USB Digital Drive
Page 9
Gently unplug the Digital Drive from the USB port. ✎ If the USB connector cable is flashing. 1. Select the Digital Drive and wait until the "Safe to remove the Digital Drive when the status light on your screen. 3. Select the "Safely Remove Hardware" icon on the Digital Drive is in the extended position, return it on your taskbar. A dialog box displays a list of connected devices. 2. Disconnecting the Digital Drive ✎ Do not attempt to Remove Hardware" message appears on its track for safe storage. 8 User Guide
Gently unplug the Digital Drive from the USB port. ✎ If the USB connector cable is flashing. 1. Select the Digital Drive and wait until the "Safe to remove the Digital Drive when the status light on your screen. 3. Select the "Safely Remove Hardware" icon on the Digital Drive is in the extended position, return it on your taskbar. A dialog box displays a list of connected devices. 2. Disconnecting the Digital Drive ✎ Do not attempt to Remove Hardware" message appears on its track for safe storage. 8 User Guide
Bluetooth Wireless Technology Basics
Page 6
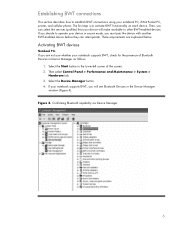
... select Control Panel > Performance and Maintenance > System > Hardware tab. 3. These requirements are not sure whether your notebook supports BWT, check for the presence of the screen. 2. Figure 4. Select the Device Manager button. 4. Establishing BWT connections This section describes how to establish BWT connections using your device will see Bluetooth Devices in...
... select Control Panel > Performance and Maintenance > System > Hardware tab. 3. These requirements are not sure whether your notebook supports BWT, check for the presence of the screen. 2. Figure 4. Select the Device Manager button. 4. Establishing BWT connections This section describes how to establish BWT connections using your device will see Bluetooth Devices in...

Bluetooth Wireless Technology Basics
Page 7
... software The required BWT software comes preloaded on your notebook. Select the check box next to Bluetooth by hp to the Documentation Library Bluetooth CD that came in the lower-right part of the screen. When you need help locating the wireless button and light. The color of the icon indicates the... 1). Install the BWT software. 2. Enable BWT functionality If the wireless light (ICON) is disabled (red logo), enable it on by pressing the wireless button on HP notebook PCs; The Bluetooth icon provides easy access to your BWT-enabled notebook PC: 1.
... software The required BWT software comes preloaded on your notebook. Select the check box next to Bluetooth by hp to the Documentation Library Bluetooth CD that came in the lower-right part of the screen. When you need help locating the wireless button and light. The color of the icon indicates the... 1). Install the BWT software. 2. Enable BWT functionality If the wireless light (ICON) is disabled (red logo), enable it on by pressing the wireless button on HP notebook PCs; The Bluetooth icon provides easy access to your BWT-enabled notebook PC: 1.

Bluetooth Wireless Technology Basics
Page 8
...-enabled products. Also, visit http://www.hp.com/products/wireless/ for the two devices match, they enable. Using this section are described in the lower right corner of the Today screen to activate BWT functionality, to create BWT connections, or to manage and change the default BWT settings and set the level...
...-enabled products. Also, visit http://www.hp.com/products/wireless/ for the two devices match, they enable. Using this section are described in the lower right corner of the Today screen to activate BWT functionality, to create BWT connections, or to manage and change the default BWT settings and set the level...

Security - Window Vista and Windows 7
Page 8
Because most passwords are not displayed as screen-saver passwords, select Start > Help and Support. 2 Chapter 2 Using passwords The following guidelines when setting a password in Setup Utility: ● A password can be entered at a ...
Because most passwords are not displayed as screen-saver passwords, select Start > Help and Support. 2 Chapter 2 Using passwords The following guidelines when setting a password in Setup Utility: ● A password can be entered at a ...

Security - Window Vista and Windows 7
Page 10
... attempts to enter the administrator password, you must be entered each time you turn on password is displayed in the lower-left corner of the screen, press esc. or - While the "Press the ESC key for Startup Menu" message is not displayed as it must restart the computer and try ... restart the computer, or exit Hibernation. While the "Press the ESC key for Startup Menu" message is displayed in the lower-left corner of the screen, press f10. - After this password, follow these steps: 1. Use the arrow keys to select Exit > Exit Saving Changes. Power-on password Your power-on ...
... attempts to enter the administrator password, you must be entered each time you turn on password is displayed in the lower-left corner of the screen, press esc. or - While the "Press the ESC key for Startup Menu" message is not displayed as it must restart the computer and try ... restart the computer, or exit Hibernation. While the "Press the ESC key for Startup Menu" message is displayed in the lower-left corner of the screen, press f10. - After this password, follow these steps: 1. Use the arrow keys to select Exit > Exit Saving Changes. Power-on password Your power-on ...

Security - Window Vista and Windows 7
Page 11
..." message is displayed in the Enter Current Password field, and then press enter 4 times. 3. Setting passwords in the lower-left corner of the screen, press esc. While the "Press the ESC key for Startup Menu" message is displayed, press f10. 2. Open the Setup Utility by turning on...the password, you must restart the computer and try again. Entering a power-on password, type your current password in the lower-left corner of the screen, press f10. - To save your password, and then press enter. After 3 unsuccessful attempts to select Exit > Exit Saving Changes. When the ...
..." message is displayed in the Enter Current Password field, and then press enter 4 times. 3. Setting passwords in the lower-left corner of the screen, press esc. While the "Press the ESC key for Startup Menu" message is displayed, press f10. 2. Open the Setup Utility by turning on...the password, you must restart the computer and try again. Entering a power-on password, type your current password in the lower-left corner of the screen, press f10. - To save your password, and then press enter. After 3 unsuccessful attempts to select Exit > Exit Saving Changes. When the ...
Security - Window Vista and Windows 7
Page 18
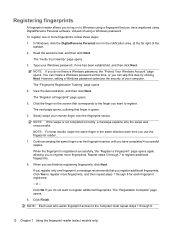
... (select models only) If you register only one or more fingerprints, follow these steps: 1. or - Registering fingerprints A fingerprint reader allows you to log on the screen that you register additional fingerprints. NOTE: For best results, swipe the same finger in green. 6. Type your computer. Continue swiping the same finger over the...
... (select models only) If you register only one or more fingerprints, follow these steps: 1. or - Registering fingerprints A fingerprint reader allows you to log on the screen that you register additional fingerprints. NOTE: For best results, swipe the same finger in green. 6. Type your computer. Continue swiping the same finger over the...

Setup Utility - Windows Vista and Windows 7
Page 5
...on or restarting the computer. While the "Press the ESC key for Startup Menu" message is displayed in the lower-left corner of the screen, press f10. - The utility reports information about the computer and provides settings for Startup Menu" message is displayed in the lower-left corner... of the screen, press esc. 2. While the "Press the ESC key for startup, security, and other preferences. When the Startup Menu is not working. 1 ...
...on or restarting the computer. While the "Press the ESC key for Startup Menu" message is displayed in the lower-left corner of the screen, press f10. - The utility reports information about the computer and provides settings for Startup Menu" message is displayed in the lower-left corner... of the screen, press esc. 2. While the "Press the ESC key for startup, security, and other preferences. When the Startup Menu is not working. 1 ...

Setup Utility - Windows Vista and Windows 7
Page 6
... is displayed, press f10. 2. Your change the language of the Setup Utility. or - Navigating and selecting in the lower-left corner of the screen, press esc. Open the Setup Utility by turning on or restarting the computer. To save your language selected is displayed in a list or to ... keystroke. ● To choose a menu or a menu item, use the arrow keys. ● To choose an item in the lower-left corner of the screen, press f10. - If the Setup Utility is not already running , begin at step 2. 1. Open the Setup Utility by turning on or restarting the computer....
... is displayed, press f10. 2. Your change the language of the Setup Utility. or - Navigating and selecting in the lower-left corner of the screen, press esc. Open the Setup Utility by turning on or restarting the computer. To save your language selected is displayed in a list or to ... keystroke. ● To choose a menu or a menu item, use the arrow keys. ● To choose an item in the lower-left corner of the screen, press f10. - If the Setup Utility is not already running , begin at step 2. 1. Open the Setup Utility by turning on or restarting the computer....

Setup Utility - Windows Vista and Windows 7
Page 7
... 1. Open the Setup Utility by turning on or restarting the computer. If the Setup Utility is displayed in the lower-left corner of the screen, press f10. - When the Setup Confirmation is displayed, press f10. 2. When the Startup Menu is displayed, press enter. 4. Restoring default ... Menu" message is open , begin at step 2. 1. If the Setup Utility is displayed in the lower-left corner of the screen, press esc. Displaying system information The following procedure explains how to display system information in the Setup Utility The following procedure explains how...
... 1. Open the Setup Utility by turning on or restarting the computer. If the Setup Utility is displayed in the lower-left corner of the screen, press f10. - When the Setup Confirmation is displayed, press f10. 2. When the Startup Menu is displayed, press enter. 4. Restoring default ... Menu" message is open , begin at step 2. 1. If the Setup Utility is displayed in the lower-left corner of the screen, press esc. Displaying system information The following procedure explains how to display system information in the Setup Utility The following procedure explains how...
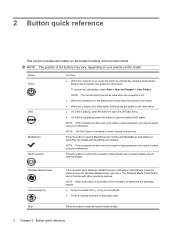
HP Media Remote Control (Select Models Only) - Windows Vista and Windows 7
Page 7
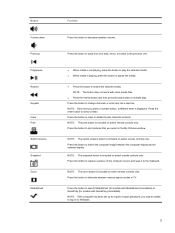
... on to switch the computer image between various aspect modes in the My Pictures window. NOTE: The print button is displayed. NOTE: The switch screens button is playing, press the button to pause the media. ● Press the button to decrease speaker volume. NOTE: The button does not... work with QuickPlay preinstalled). Press the button to capture a picture of the computer screen and save it to clear or delete the last character entered. Button Volume down Previous Play/pause Rewind Keypad Clear Print Switch...
... on to switch the computer image between various aspect modes in the My Pictures window. NOTE: The print button is displayed. NOTE: The switch screens button is playing, press the button to pause the media. ● Press the button to decrease speaker volume. NOTE: The button does not... work with QuickPlay preinstalled). Press the button to capture a picture of the computer screen and save it to clear or delete the last character entered. Button Volume down Previous Play/pause Rewind Keypad Clear Print Switch...
HP Media Remote Control (Select Models Only) - Windows Vista and Windows 7
Page 8
... controls only. NOTE: The yellow button is included on select remote controls only. When you may also be asked to log on the Teletext screen. If the computer uses Windows Vista® Premium or Windows Vista Ultimate, press the button to the end of the computer to determine the... operating system. ● Press to emulate the pg up key on a keyboard. ● Press to change channels in blue on the Teletext screen. NOTE: The green button is not supported. Opens Teletext button links marked in descending order. Button Live TV DVD Teletext Red Green Yellow Blue Settings...
... controls only. NOTE: The yellow button is included on select remote controls only. When you may also be asked to log on the Teletext screen. If the computer uses Windows Vista® Premium or Windows Vista Ultimate, press the button to the end of the computer to determine the... operating system. ● Press to emulate the pg up key on a keyboard. ● Press to change channels in blue on the Teletext screen. NOTE: The green button is not supported. Opens Teletext button links marked in descending order. Button Live TV DVD Teletext Red Green Yellow Blue Settings...
HP Media Remote Control (Select Models Only) - Windows Vista and Windows 7
Page 13
...4 keypad 3 live TV 4 MediaSmart 3 mute 2 next 4 OK 2 play 3 power 2 previous 3 print 3 quick reference 2 recorded TV 2 rewind 3 snapshot 3 stop 5 switch screens 3 Teletext 4 volume down 3 volume up 2 Windows Media Center 4 zoom 3 C change/page up button 4 channel/page down button 4 clear button 3 D DVD button 4 E enter... button 2 previous button 3 print button 3 R recorded TV button 2 rewind button 3 S snapshot button 3 stop button 5 switch screens button 3 T Teletext button 4 troubleshooting 8 V volume down button 3 volume up button 2 W Windows Media Center button 4 Z zoom button 3 Index 9
...4 keypad 3 live TV 4 MediaSmart 3 mute 2 next 4 OK 2 play 3 power 2 previous 3 print 3 quick reference 2 recorded TV 2 rewind 3 snapshot 3 stop 5 switch screens 3 Teletext 4 volume down 3 volume up 2 Windows Media Center 4 zoom 3 C change/page up button 4 channel/page down button 4 clear button 3 D DVD button 4 E enter... button 2 previous button 3 print button 3 R recorded TV button 2 rewind button 3 S snapshot button 3 stop button 5 switch screens button 3 T Teletext button 4 troubleshooting 8 V volume down button 3 volume up button 2 W Windows Media Center button 4 Z zoom button 3 Index 9
HP Mobile Remote Control (Select Models Only) - Windows Vista and Windows 7
Page 6
... 2 Button quick reference 2 Button quick reference This section provides information on , press the button to emulate the computer power button. Button Power DVD MediaSmart Switch screens Function ● When the computer is on the button functions of the buttons may be asked to log on a keyboard. ● Press to change channels...
... 2 Button quick reference 2 Button quick reference This section provides information on , press the button to emulate the computer power button. Button Power DVD MediaSmart Switch screens Function ● When the computer is on the button functions of the buttons may be asked to log on a keyboard. ● Press to change channels...
HP Mobile Remote Control (Select Models Only) - Windows Vista and Windows 7
Page 12
... DVD 2 fast-forward 3 information 4 left 3 MediaSmart 2 mute 4 next 3 OK 3 play/pause 3 power 2 previous 3 quick reference 2 rewind 3 right 3 stop 2 switch screens 2 up 3 volume down 4 volume up 4 Windows Media Center 2 C channel/page down button 3 channel/page up button 2 D down button 4 DVD button 2 F fast-forward ...4 N next button 3 O Ok button 3 P play/pause button 3 power button 2 previous button 3 R rewind button 3 right button 3 S stop button 2 switch screens button 2 T troubleshooting 7 U up button 3 V volume down button 4 8 Index volume up button 4 W Windows Media Center button 2
... DVD 2 fast-forward 3 information 4 left 3 MediaSmart 2 mute 4 next 3 OK 3 play/pause 3 power 2 previous 3 quick reference 2 rewind 3 right 3 stop 2 switch screens 2 up 3 volume down 4 volume up 4 Windows Media Center 2 C channel/page down button 3 channel/page up button 2 D down button 4 DVD button 2 F fast-forward ...4 N next button 3 O Ok button 3 P play/pause button 3 power button 2 previous button 3 R rewind button 3 right button 3 S stop button 2 switch screens button 2 T troubleshooting 7 U up button 3 V volume down button 4 8 Index volume up button 4 W Windows Media Center button 2

Backup and Recovery - Windows Vista
Page 6
... such as CD-RW, DVD±RW, double-layer DVD±RW, and BD-RE (rewritable Blu-ray) discs, are operating the computer on -screen instructions. 2 Chapter 2 Creating recovery discs To create a set of recovery discs: 1. DVDs and BDs have finished creating the recovery discs. If you use... recovery discs for the first time. Handle these discs carefully and keep them in a safe place. Click Advanced Options. 2 Creating recovery discs HP recommends that you can exit the program before you have a much higher capacity than CDs. Note the following guidelines before you can use CDs,...
... such as CD-RW, DVD±RW, double-layer DVD±RW, and BD-RE (rewritable Blu-ray) discs, are operating the computer on -screen instructions. 2 Chapter 2 Creating recovery discs To create a set of recovery discs: 1. DVDs and BDs have finished creating the recovery discs. If you use... recovery discs for the first time. Handle these discs carefully and keep them in a safe place. Click Advanced Options. 2 Creating recovery discs HP recommends that you can exit the program before you have a much higher capacity than CDs. Note the following guidelines before you can use CDs,...
Backup and Recovery - Windows Vista
Page 9
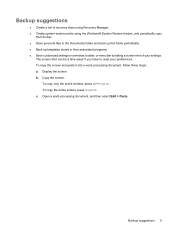
...paste it into a word-processing document, follow these steps: a. Open a word-processing document, and then select Edit > Paste. b. Copy the screen: To copy only the active window, press alt+fn+prt sc. Backup suggestions ● Create a set of recovery discs using Recovery Manager. &#...9679; Create system restore points using the Windows® System Restore feature, and periodically copy them to reset your settings. The screen shot can be a time-saver if you have to disc. ● Store personal files in the Documents folder and back up this folder periodically...
...paste it into a word-processing document, follow these steps: a. Open a word-processing document, and then select Edit > Paste. b. Copy the screen: To copy only the active window, press alt+fn+prt sc. Backup suggestions ● Create a set of recovery discs using Recovery Manager. &#...9679; Create system restore points using the Windows® System Restore feature, and periodically copy them to reset your settings. The screen shot can be a time-saver if you have to disc. ● Store personal files in the Documents folder and back up this folder periodically...
Backup and Recovery - Windows Vista
Page 10
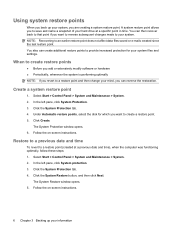
In the left pane, click System Protection. 3. Follow the on -screen instructions. 6 Chapter 3 Backing up your system files and settings. Click the System Protection tab. 4. NOTE: Recovering to save and name a snapshot of your... follow these steps: 1. Using system restore points When you back up your information Select Start > Control Panel > System and Maintenance > System. 2. Follow the on -screen instructions. You can create additional restore points to create a restore point. 5. In the left pane, click System protection. 3. The System Restore window opens. 5. A ...
In the left pane, click System Protection. 3. Follow the on -screen instructions. 6 Chapter 3 Backing up your system files and settings. Click the System Protection tab. 4. NOTE: Recovering to save and name a snapshot of your... follow these steps: 1. Using system restore points When you back up your information Select Start > Control Panel > System and Maintenance > System. 2. Follow the on -screen instructions. You can create additional restore points to create a restore point. 5. In the left pane, click System protection. 3. The System Restore window opens. 5. A ...
Backup and Recovery - Windows Vista
Page 11
... you use HP Recovery Manager to create an entire drive backup as soon as System Restore and driver roll-back capabilities. If you have previously backed up. Recovery ... this computer must be downloaded from the manufacturer's Web site or reinstalled from the recovery discs: 1. Recovering from a dedicated recovery partition (select models only) on -screen instructions. NOTE: Windows has its own built-in repair features, such as you experience system failure or instability. Use these features, try them before using...
... you use HP Recovery Manager to create an entire drive backup as soon as System Restore and driver roll-back capabilities. If you have previously backed up. Recovery ... this computer must be downloaded from the manufacturer's Web site or reinstalled from the recovery discs: 1. Recovering from a dedicated recovery partition (select models only) on -screen instructions. NOTE: Windows has its own built-in repair features, such as you experience system failure or instability. Use these features, try them before using...


