
Drives - Windows Vista
Page 14
Using AutoPlay To configure AutoPlay, follow these steps: 1. Click either Take no action or Ask me every time to confirm your selections. 8 Chapter 2 Using an optical drive Click Choose a default for all media and devices check box at the upper left of a CD or DVD. 5. Confirm that the Use AutoPlay for each media type listed. 4. Click Save to prevent the automatic playing of the computer screen is selected. 3. Select Start > Control Panel > Play CDs or other media automatically. 2.
Using AutoPlay To configure AutoPlay, follow these steps: 1. Click either Take no action or Ask me every time to confirm your selections. 8 Chapter 2 Using an optical drive Click Choose a default for all media and devices check box at the upper left of a CD or DVD. 5. Confirm that the Use AutoPlay for each media type listed. 4. Click Save to prevent the automatic playing of the computer screen is selected. 3. Select Start > Control Panel > Play CDs or other media automatically. 2.

Drives - Windows Vista
Page 12
Click either Take no action or Ask me every time to confirm your selections. 8 Chapter 2 Using an optical drive Select Start > Control Panel > Play CDs or other media automatically. 2. Confirm that the Use AutoPlay for each media type listed. 4. Click Save to prevent the automatic playing of the computer screen is selected. 3. Click Choose a default for all media and devices check box at the upper left of a CD or DVD. 5. Using AutoPlay To configure AutoPlay, follow these steps: 1.
Click either Take no action or Ask me every time to confirm your selections. 8 Chapter 2 Using an optical drive Select Start > Control Panel > Play CDs or other media automatically. 2. Confirm that the Use AutoPlay for each media type listed. 4. Click Save to prevent the automatic playing of the computer screen is selected. 3. Click Choose a default for all media and devices check box at the upper left of a CD or DVD. 5. Using AutoPlay To configure AutoPlay, follow these steps: 1.
Notebook Tour - Windows VIsta
Page 11
...ineffective, press and hold the power button for models with DVDPlay preinstalled). To learn more about your power settings, select Start > Control Panel > System and Maintenance > Power Options. ● Launches the QuickPlay program (for models with QuickPlay preinstalled). ● Launches the ...the Sleep state, press the button briefly to exit Hibernation. Buttons, speakers and fingerprint reader Component (1) Speakers (2) (2) Power button* (3) Media button Description Produce sound. ● When the computer is in Hibernation, press the button briefly to exit Sleep. ● When the...
...ineffective, press and hold the power button for models with DVDPlay preinstalled). To learn more about your power settings, select Start > Control Panel > System and Maintenance > Power Options. ● Launches the QuickPlay program (for models with QuickPlay preinstalled). ● Launches the ...the Sleep state, press the button briefly to exit Hibernation. Buttons, speakers and fingerprint reader Component (1) Speakers (2) (2) Power button* (3) Media button Description Produce sound. ● When the computer is in Hibernation, press the button briefly to exit Sleep. ● When the...
Notebook Tour - Windows Vista
Page 12
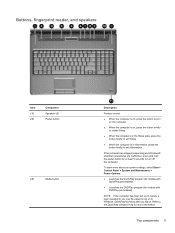
...the scroll zone to increase volume. ● Plays the previous track or chapter when the button is pressed once. ● Rewinds media when the button is pressed simultaneously with the fn key. (9) Stop button Stops playback. (10) Wireless button Turns the wireless ...create a wireless connection. Slide your power settings, select Start > Control Panel > System and Maintenance > Power Options. (3) MediaSmart button Launches the HP MediaSmart program when the computer is pressed once. ● Fast forwards media when pressed simultaneously with the fn key. (7) Play/pause button (8) Next...
...the scroll zone to increase volume. ● Plays the previous track or chapter when the button is pressed once. ● Rewinds media when the button is pressed simultaneously with the fn key. (9) Stop button Stops playback. (10) Wireless button Turns the wireless ...create a wireless connection. Slide your power settings, select Start > Control Panel > System and Maintenance > Power Options. (3) MediaSmart button Launches the HP MediaSmart program when the computer is pressed once. ● Fast forwards media when pressed simultaneously with the fn key. (7) Play/pause button (8) Next...
HP Pavilion dv7 Entertainment PC - Maintenance and Service Guide
Page 19
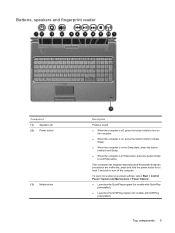
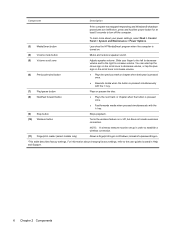
... to Windows. To learn more information. Refer to the QuickPlay software Help for more about your power settings, select Start > Control Panel > System and Maintenance > Power Options. ● Launches the QuickPlay program (for models with QuickPlay preinstalled). ● Launches the DVDPlay...button for models with DVDPlay preinstalled). Top components 9 Buttons, fingerprint reader, and speakers Item (1) (2) Component Speakers (2) Power button (3) Media button Description Produce sound. ● When the computer is off, press the button to turn off the computer. NOTE: If the ...
... to Windows. To learn more information. Refer to the QuickPlay software Help for more about your power settings, select Start > Control Panel > System and Maintenance > Power Options. ● Launches the QuickPlay program (for models with QuickPlay preinstalled). ● Launches the DVDPlay...button for models with DVDPlay preinstalled). Top components 9 Buttons, fingerprint reader, and speakers Item (1) (2) Component Speakers (2) Power button (3) Media button Description Produce sound. ● When the computer is off, press the button to turn off the computer. NOTE: If the ...
HP Pavilion dv7 Entertainment PC - Maintenance and Service Guide
Page 182
... removal 79 spare part number 29, 31, 40, 80, 82 display inverter cover illustrated 29 removal 79 spare part number 29, 43, 79 display panel illustrated 31 product description 2 removal 82 spare part numbers 31, 40, 83 Display Rubber Kit, spare part number 30, 32, 40, 45 Display Screw... 15 esc key 11 Ethernet, product description 4 exiting the Setup Utility 113 expansion port 3 15 ExpressCard slot 15 ExpressCard slot bezel, illustrated 33 external media cards, product description 5 external monitor port location 15 pin assignments 159 F f11 156 fan removal 99 spare part numbers 27, 41, 44, 99 ...
... removal 79 spare part number 29, 31, 40, 80, 82 display inverter cover illustrated 29 removal 79 spare part number 29, 43, 79 display panel illustrated 31 product description 2 removal 82 spare part numbers 31, 40, 83 Display Rubber Kit, spare part number 30, 32, 40, 45 Display Screw... 15 esc key 11 Ethernet, product description 4 exiting the Setup Utility 113 expansion port 3 15 ExpressCard slot 15 ExpressCard slot bezel, illustrated 33 external media cards, product description 5 external monitor port location 15 pin assignments 159 F f11 156 fan removal 99 spare part numbers 27, 41, 44, 99 ...
HP Pavilion dv7 Entertainment PC - Maintenance and Service Guide
Page 183
... 36, 37 L LAN Power Saving 114 language support 114 left-side components 15 lights battery 13 Digital Media Slot 15 drive 13 optical drive 14 power 13 M mass storage devices, spare part numbers 35 media button 9 memory map specifications 130, 131, 132 memory module location 16 product description 2 removal 67 spare part... previous/rewind button 10 processor product description 1 removal 95 spare part numbers 27, 41, 45, 95 Processor C4 State 114 product description audio 4 chipset 1 display panel 2 docking support 5 Ethernet 4 external media cards 5 Index 173
... 36, 37 L LAN Power Saving 114 language support 114 left-side components 15 lights battery 13 Digital Media Slot 15 drive 13 optical drive 14 power 13 M mass storage devices, spare part numbers 35 media button 9 memory map specifications 130, 131, 132 memory module location 16 product description 2 removal 67 spare part... previous/rewind button 10 processor product description 1 removal 95 spare part numbers 27, 41, 45, 95 Processor C4 State 114 product description audio 4 chipset 1 display panel 2 docking support 5 Ethernet 4 external media cards 5 Index 173
Multimedia - Windows Vista
Page 20
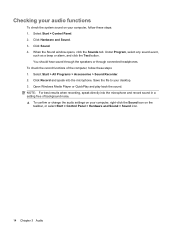
Click Hardware and Sound. 3. Open Windows Media Player or QuickPlay and play back the sound. When the Sound window opens, click the Sounds tab. To check the record functions of background noise. &#... > Accessories > Sound Recorder. 2. Checking your audio functions To check the system sound on the taskbar, or select Start > Control Panel > Hardware and Sound > Sound icon. 14 Chapter 3 Audio Select Start > Control Panel. 2. Under Program, select any sound event, such as a beep or alarm, and click the Test button. Save the file to...
Click Hardware and Sound. 3. Open Windows Media Player or QuickPlay and play back the sound. When the Sound window opens, click the Sounds tab. To check the record functions of background noise. &#... > Accessories > Sound Recorder. 2. Checking your audio functions To check the system sound on the taskbar, or select Start > Control Panel > Hardware and Sound > Sound icon. 14 Chapter 3 Audio Select Start > Control Panel. 2. Under Program, select any sound event, such as a beep or alarm, and click the Test button. Save the file to...

Multimedia - Windows Vista
Page 32
... if your computer includes an optional Blu-ray Disc ROM Drive or an optional HD DVD Drive. 1. Press the release button (1) on the control panel - NOTE: If the tray is not fully accessible, tilt the disc carefully to watch high-definition movies from a disc. Watching a movie Your... optical drive allows you must use QuickPlay software. 26 Chapter 5 Optical drive Pull out the tray (2). 4. or - Press the media button, and then click the DVD icon and follow the instructions on the computer. 2. Close the disc tray. 7. Gently press the disc (3) down onto...
... if your computer includes an optional Blu-ray Disc ROM Drive or an optional HD DVD Drive. 1. Press the release button (1) on the control panel - NOTE: If the tray is not fully accessible, tilt the disc carefully to watch high-definition movies from a disc. Watching a movie Your... optical drive allows you must use QuickPlay software. 26 Chapter 5 Optical drive Pull out the tray (2). 4. or - Press the media button, and then click the DVD icon and follow the instructions on the computer. 2. Close the disc tray. 7. Gently press the disc (3) down onto...

Multimedia - Windows Vista
Page 18
... or alarm, and click the Test button. Save the file to your computer, right-click the Sound icon on the taskbar, or select Start > Control Panel > Hardware and Sound > Sound icon. 14 Chapter 3 Audio NOTE: For best results when recording, speak directly into the microphone. Select Start > All...opens, click the Sounds tab. Click Hardware and Sound. 3. You should hear sound through the speakers or through connected headphones. Open Windows Media Player or MediaSmart and play back the sound. Click Record and speak into the microphone and record sound in a setting free of the computer...
... or alarm, and click the Test button. Save the file to your computer, right-click the Sound icon on the taskbar, or select Start > Control Panel > Hardware and Sound > Sound icon. 14 Chapter 3 Audio NOTE: For best results when recording, speak directly into the microphone. Select Start > All...opens, click the Sounds tab. Click Hardware and Sound. 3. You should hear sound through the speakers or through connected headphones. Open Windows Media Player or MediaSmart and play back the sound. Click Record and speak into the microphone and record sound in a setting free of the computer...
Power Management - Windows Vista
Page 7
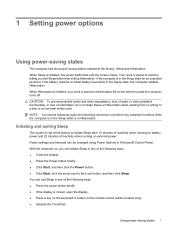
..., your work is set at the factory: Sleep and Hibernation. Initiating and exiting Sleep The system is saved to a disc or an external media card. When Sleep is in the Sleep state or in the Sleep state, the computer initiates Hibernation. NOTE: You cannot initiate any type of...state for an extended period or if the battery reaches a critical battery level while in Hibernation. You can exit Sleep in Windows® Control Panel. 1 Setting power options Using power-saving states The computer has two power-saving states enabled at the factory to initiate Sleep after 10 minutes...
..., your work is set at the factory: Sleep and Hibernation. Initiating and exiting Sleep The system is saved to a disc or an external media card. When Sleep is in the Sleep state or in the Sleep state, the computer initiates Hibernation. NOTE: You cannot initiate any type of...state for an extended period or if the battery reaches a critical battery level while in Hibernation. You can exit Sleep in Windows® Control Panel. 1 Setting power options Using power-saving states The computer has two power-saving states enabled at the factory to initiate Sleep after 10 minutes...
Power Management - Windows Vista
Page 23
Conserving battery power ● Select low power-use settings through Power Options in Windows Control Panel. ● Turn off wireless and local area network (LAN) connections and exit modem applications when you are not using them. ● Disconnect external devices that ...are not plugged into an external power source, when you are not using them. ● Stop, disable, or remove any external media cards that you are not using. ● Use the fn+f7 and fn+f8 hotkeys to adjust screen brightness as needed. ● If you leave...
Conserving battery power ● Select low power-use settings through Power Options in Windows Control Panel. ● Turn off wireless and local area network (LAN) connections and exit modem applications when you are not using them. ● Disconnect external devices that ...are not plugged into an external power source, when you are not using them. ● Stop, disable, or remove any external media cards that you are not using. ● Use the fn+f7 and fn+f8 hotkeys to adjust screen brightness as needed. ● If you leave...


