
Reference Guide
Page 1
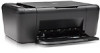
...contains important information on setting up the printer, including Push Button Method. • To increase your product usage experience, please take the time to start. Wireless Start Here HP Deskjet F4500 All-in [English] © ...2009 Hewlett-Packard Development Company, L.P. Do NOT connect the USB cable until prompted onscreen by the software! • Insert the software CD to register at: http://www.register.hp.com **CCBB775555--9900001144** CB755-90014 EN FR PT AR Black Cartridge 121/121XL Tri-color Cartridge 121/121XL Printed in -One...
...contains important information on setting up the printer, including Push Button Method. • To increase your product usage experience, please take the time to start. Wireless Start Here HP Deskjet F4500 All-in [English] © ...2009 Hewlett-Packard Development Company, L.P. Do NOT connect the USB cable until prompted onscreen by the software! • Insert the software CD to register at: http://www.register.hp.com **CCBB775555--9900001144** CB755-90014 EN FR PT AR Black Cartridge 121/121XL Tri-color Cartridge 121/121XL Printed in -One...
Reference Guide
Page 2
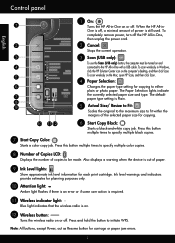
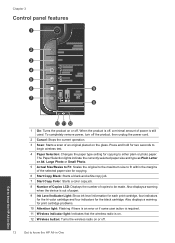
To completely remove power, turn off , a minimal amount of the selected paper size for each print cartridge. To scan wirelessly on the computer's desktop, and then click Scan. The Paper Selection lights indicate the currently selected paper size and type. Press and ... approximate ink level information for copying. 6 Start Copy Black: Starts a black-and-white copy job. Control panel English 1 On: Turns the HP All-in-One on and connected to the HP All-in-One with a USB cable. Wireless 3 Scan (USB only): To use the Scan (USB only) button, the computer must be made. Press...
To completely remove power, turn off , a minimal amount of the selected paper size for each print cartridge. To scan wirelessly on the computer's desktop, and then click Scan. The Paper Selection lights indicate the currently selected paper size and type. Press and ... approximate ink level information for copying. 6 Start Copy Black: Starts a black-and-white copy job. Control panel English 1 On: Turns the HP All-in-One on and connected to the HP All-in-One with a USB cable. Wireless 3 Scan (USB only): To use the Scan (USB only) button, the computer must be made. Press...
Reference Guide
Page 4
... appears onscreen. After software installation, click Start > All Programs > HP > Deskjet F4500 series > Readme. Ink usage Note: Ink from the pop-up menu. In the Help Viewer, hold down the Home button, and then select HP Product Help from the cartridges is automatically installed during printer software installation. It also provides product specifications, legal notices, environmental...
... appears onscreen. After software installation, click Start > All Programs > HP > Deskjet F4500 series > Readme. Ink usage Note: Ink from the pop-up menu. In the Help Viewer, hold down the Home button, and then select HP Product Help from the cartridges is automatically installed during printer software installation. It also provides product specifications, legal notices, environmental...
User Guide
Page 3
...HP All-in-One Printer parts...11 Control panel features...12 4 Print Print documents...13 Print photos...14 Print envelopes...16 Print on specialty media...17 Print a Web page...23 6 Scan Scan to a computer...33 7 Copy Copy text or mixed documents 35 Set the copy paper type...38 8 Work with cartridges... Check the estimated ink levels 39 Order ink supplies...40 Automatically clean print cartridges 41 Replace the cartridges...41 Cartridge warranty information 43 9 Solve a problem HP support...45 Setup troubleshooting...46 Print troubleshooting......
...HP All-in-One Printer parts...11 Control panel features...12 4 Print Print documents...13 Print photos...14 Print envelopes...16 Print on specialty media...17 Print a Web page...23 6 Scan Scan to a computer...33 7 Copy Copy text or mixed documents 35 Set the copy paper type...38 8 Work with cartridges... Check the estimated ink levels 39 Order ink supplies...40 Automatically clean print cartridges 41 Replace the cartridges...41 Cartridge warranty information 43 9 Solve a problem HP support...45 Setup troubleshooting...46 Print troubleshooting......
User Guide
Page 5
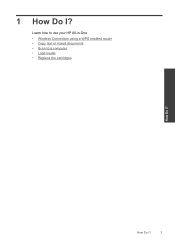
1 How Do I ? Learn how to use your HP All-in-One • Wireless Connection using a WPS enabled router • Copy text or mixed documents • Scan to a computer • Load media • Replace the cartridges How Do I ? How Do I? 3
1 How Do I ? Learn how to use your HP All-in-One • Wireless Connection using a WPS enabled router • Copy text or mixed documents • Scan to a computer • Load media • Replace the cartridges How Do I ? How Do I? 3
User Guide
Page 13
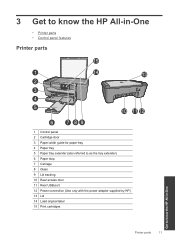
3 Get to know the HP All-in-One • Printer parts • Control panel features Printer parts 15 1 Control panel 2 Cartridge door 3 Paper-width guide for paper tray 4 Paper tray 5 Paper tray extender (also referred to as the tray extender) 6 Paper stop 7 Carriage 8 Glass 9 Lid backing 10 Rear access door 11 Rear USB port 12 Power connection (Use only with the power adapter supplied by HP.) 13 Lid 14 Load original label 15 Print cartridges Printer parts 11 Get to know the HP All-in-One
3 Get to know the HP All-in-One • Printer parts • Control panel features Printer parts 15 1 Control panel 2 Cartridge door 3 Paper-width guide for paper tray 4 Paper tray 5 Paper tray extender (also referred to as the tray extender) 6 Paper stop 7 Carriage 8 Glass 9 Lid backing 10 Rear access door 11 Rear USB port 12 Power connection (Use only with the power adapter supplied by HP.) 13 Lid 14 Load original label 15 Print cartridges Printer parts 11 Get to know the HP All-in-One
User Guide
Page 14
... cord. 2 Cancel: Stops the current operation. 3 Scan: Starts a scan of an original placed on or off. 12 Get to know the HP All-in-One Get to know the HP All-in-One The Paper Selection lights indicate the currently selected paper size and type as Plain Letter or A4, Large Photo or Small... Photo. 5 Actual Size/Resize to Fit: Scales the original to the maximum size to fit within the margins of the selected paper size for print cartridge problems...
... cord. 2 Cancel: Stops the current operation. 3 Scan: Starts a scan of an original placed on or off. 12 Get to know the HP All-in-One Get to know the HP All-in-One The Paper Selection lights indicate the currently selected paper size and type as Plain Letter or A4, Large Photo or Small... Photo. 5 Actual Size/Resize to Fit: Scales the original to the maximum size to fit within the margins of the selected paper size for print cartridge problems...

User Guide
Page 30
...weights and sizes from your digital photos. HP Premium Inkjet Transparency Film HP Premium Inkjet Transparency Film make your product, and then click one of the HP Web site are long lasting and vivid, print after print. Original HP inks and HP Advanced Photo Paper have been designed to select...If prompted, choose your country/region, follow the prompts to work together so your HP All-in English only. HP Photo Value Pack HP Photo Value Packs conveniently package original HP cartridges and HP Advanced Photo Paper to save you time and take the guesswork out of printing affordable ...
...weights and sizes from your digital photos. HP Premium Inkjet Transparency Film HP Premium Inkjet Transparency Film make your product, and then click one of the HP Web site are long lasting and vivid, print after print. Original HP inks and HP Advanced Photo Paper have been designed to select...If prompted, choose your country/region, follow the prompts to work together so your HP All-in English only. HP Photo Value Pack HP Photo Value Packs conveniently package original HP cartridges and HP Advanced Photo Paper to save you time and take the guesswork out of printing affordable ...
User Guide
Page 41
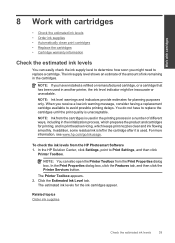
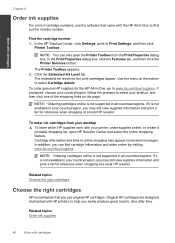
... levels • Order ink supplies • Automatically clean print cartridges • Replace the cartridges • Cartridge warranty information Check the estimated ink levels You can also open the Printer Toolbox from the Print Properties dialog box. In the HP Solution Center, click Settings, point to replace a cartridge. Click the Estimated Ink Level tab. In addition, some...
... levels • Order ink supplies • Automatically clean print cartridges • Replace the cartridges • Cartridge warranty information Check the estimated ink levels You can also open the Printer Toolbox from the Print Properties dialog box. In the HP Solution Center, click Settings, point to replace a cartridge. Click the Estimated Ink Level tab. In addition, some...
User Guide
Page 42
... Estimated Ink Level tab. If it is not available in your product, and then click one of cartridge numbers, use original HP cartridges. Original HP cartridges are designed and tested with HP printers to Print Settings, and then click Printer Toolbox. To order genuine HP supplies for reference when shopping at the bottom to online shopping also appear on the...
... Estimated Ink Level tab. If it is not available in your product, and then click one of cartridge numbers, use original HP cartridges. Original HP cartridges are designed and tested with HP printers to Print Settings, and then click Printer Toolbox. To order genuine HP supplies for reference when shopping at the bottom to online shopping also appear on the...
User Guide
Page 43
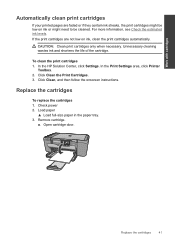
.... In the Print Settings area, click Printer Toolbox. 2. Replace the cartridges To replace the cartridges 1. a. Unnecessary cleaning wastes ink and shortens the life of the cartridge. Remove cartridge. For more information, see Check the estimated ink levels. CAUTION: Clean print cartridges only when necessary. In the HP Solution Center, click Settings. Open cartridge door. Check power 2. Click Clean...
.... In the Print Settings area, click Printer Toolbox. 2. Replace the cartridges To replace the cartridges 1. a. Unnecessary cleaning wastes ink and shortens the life of the cartridge. Remove cartridge. For more information, see Check the estimated ink levels. CAUTION: Clean print cartridges only when necessary. In the HP Solution Center, click Settings. Open cartridge door. Check power 2. Click Clean...

User Guide
Page 44
Press down to center of the product. b. Remove cartridge from slot. 4. b. Work with cartridges Insert new cartridge. a. Remove plastic tape using pink pull tab. 42 Work with cartridges Chapter 8 Wait for print carriage to move to release cartridge, then remove it from packaging.
Press down to center of the product. b. Remove cartridge from slot. 4. b. Work with cartridges Insert new cartridge. a. Remove plastic tape using pink pull tab. 42 Work with cartridges Chapter 8 Wait for print carriage to move to release cartridge, then remove it from packaging.

User Guide
Page 45
...is used in YYYY/ MM/DD format, may be found on the product as the HP ink is covered as long as indicated: Cartridge warranty information 43 Work with . Align cartridges. 6. During the warranty period the product is not depleted and the end of warranty ... date, in its designated HP printing device. View the animation for this topic. This warranty does not cover HP ink products that have been refilled, remanufactured, refurbished, misused, or tampered with cartridges c. Close cartridge door. 5. d. Line up colored shaped icons, then slide cartridge into slot until it clicks...
...is used in YYYY/ MM/DD format, may be found on the product as the HP ink is covered as long as indicated: Cartridge warranty information 43 Work with . Align cartridges. 6. During the warranty period the product is not depleted and the end of warranty ... date, in its designated HP printing device. View the animation for this topic. This warranty does not cover HP ink products that have been refilled, remanufactured, refurbished, misused, or tampered with cartridges c. Close cartridge door. 5. d. Line up colored shaped icons, then slide cartridge into slot until it clicks...

User Guide
Page 46
Work with cartridges 44 Work with the product. Chapter 8 For a copy of the HP Limited Warranty Statement, see the printed documentation that came with cartridges
Work with cartridges 44 Work with the product. Chapter 8 For a copy of the HP Limited Warranty Statement, see the printed documentation that came with cartridges
User Guide
Page 52
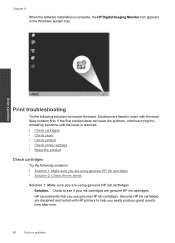
... remaining solutions until the issue is complete, the HP Digital Imaging Monitor icon appears in order, with HP printers to help you easily produce great results, time after time. 50 Solve a problem Genuine HP ink cartridges are genuine HP ink cartridges. Chapter 9 When the software installation is resolved. • Check cartridges • Check paper • Check product •...
... remaining solutions until the issue is complete, the HP Digital Imaging Monitor icon appears in order, with HP printers to help you easily produce great results, time after time. 50 Solve a problem Genuine HP ink cartridges are genuine HP ink cartridges. Chapter 9 When the software installation is resolved. • Check cartridges • Check paper • Check product •...
User Guide
Page 53
... be covered under warranty. If this did not solve the issue, try the next solution. When you purchased genuine HP ink cartridges, go to: www.hp.com/go/anticounterfeit Cause: Non-HP ink cartridges were being used. If this did not solve the issue, try the next solution. Solution 2: Check the ink... replace the cartridges until it stops at a time. Solution 2: Load the stack of paper correctly Solution: Remove the stack of the paper. Product service or repairs required as a result of non-HP supplies. If this did not solve the issue, try the next solution. Cause: More than one type of...
... be covered under warranty. If this did not solve the issue, try the next solution. When you purchased genuine HP ink cartridges, go to: www.hp.com/go/anticounterfeit Cause: Non-HP ink cartridges were being used. If this did not solve the issue, try the next solution. Solution 2: Check the ink... replace the cartridges until it stops at a time. Solution 2: Load the stack of paper correctly Solution: Remove the stack of the paper. Product service or repairs required as a result of non-HP supplies. If this did not solve the issue, try the next solution. Cause: More than one type of...
User Guide
Page 54
...paper tray when you align the print cartridges, the alignment will fail. In the HP Solution Center, click Settings. 3. In the Print Properties dialog box, click the Features tab, and then click Printer Services. Click Align the Print Cartridges. 6. If this did not solve the... the next solution. 52 Solve a problem Cause: The printer needed to scan the page. Solution 1: Align the print cartridges Solution: Aligning the print cartridges can be cleaned. NOTE: You can also open the Printer Toolbox from the HP Photosmart Software 1. Click the Device Services tab. 5. When...
...paper tray when you align the print cartridges, the alignment will fail. In the HP Solution Center, click Settings. 3. In the Print Properties dialog box, click the Features tab, and then click Printer Services. Click Align the Print Cartridges. 6. If this did not solve the... the next solution. 52 Solve a problem Cause: The printer needed to scan the page. Solution 1: Align the print cartridges Solution: Aligning the print cartridges can be cleaned. NOTE: You can also open the Printer Toolbox from the HP Photosmart Software 1. Click the Device Services tab. 5. When...
User Guide
Page 55
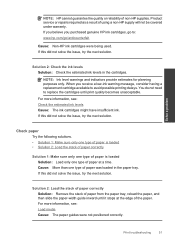
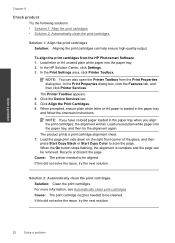
...in the paper tray. No further troubleshooting is nothing wrong with the product, print settings, or ink cartridges. If this did not solve the issue, try the next solution. Solve a problem Check printer settings Try the following solutions. • Solution 1: Check the print settings • Solution 2: ... were printing. Print troubleshooting 53 If this case, there is required. For example, check to see if advanced color settings such as HP Advanced Photo Paper, is loaded in the product. Or, check to see if the color settings are set incorrectly. You might appear...
...in the paper tray. No further troubleshooting is nothing wrong with the product, print settings, or ink cartridges. If this did not solve the issue, try the next solution. Solve a problem Check printer settings Try the following solutions. • Solution 1: Check the print settings • Solution 2: ... were printing. Print troubleshooting 53 If this case, there is required. For example, check to see if advanced color settings such as HP Advanced Photo Paper, is loaded in the product. Or, check to see if the color settings are set incorrectly. You might appear...
User Guide
Page 59
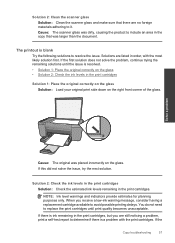
...estimated ink levels remaining in the copy that there are listed in order, with the print cartridges. When you receive a low-ink warning message, consider having a replacement cartridge available to replace the print cartridges until the issue is resolved. • Solution 1: Place the original correctly on the glass ...• Solution 2: Check the ink levels in the print cartridges, but you are still noticing a problem, print a self-test report to resolve the issue. Solution 2: Clean the scanner glass Solution:...
...estimated ink levels remaining in the copy that there are listed in order, with the print cartridges. When you receive a low-ink warning message, consider having a replacement cartridge available to replace the print cartridges until the issue is resolved. • Solution 1: Place the original correctly on the glass ...• Solution 2: Check the ink levels in the print cartridges, but you are still noticing a problem, print a self-test report to resolve the issue. Solution 2: Clean the scanner glass Solution:...

User Guide
Page 60
... following categories of paper. The tape was not removed from one or both print cartridges. Remove the print cartridge, remove tape, and reinsert the print cartridge. The print cartridge might need to replace the print cartridges. Errors This section contains the following table for use in ...button to be cleaned or there was not removed from one or both print cartridges. Both fast blinking The tape was insufficient ink. Install or remove and reinsert print cartridges. Both fast blinking The print cartridges are on or flashing on which lights are missing ...
... following categories of paper. The tape was not removed from one or both print cartridges. Remove the print cartridge, remove tape, and reinsert the print cartridge. The print cartridge might need to replace the print cartridges. Errors This section contains the following table for use in ...button to be cleaned or there was not removed from one or both print cartridges. Both fast blinking The tape was insufficient ink. Install or remove and reinsert print cartridges. Both fast blinking The print cartridges are on or flashing on which lights are missing ...


