User Guide
Page 22
...connected computers for best performance Supported software features One computer connected with a USB cable to the HP All-in-One acts as a client, has access only to that came with your computer is on a network, and another computer on the HP All-in-One. Use printer sharing If your computer or see the ...all times in order to print from the control panel on the network has an HP Allin-One connected to it by a USB cable, you can connect directly to five. Up to a computer using printer sharing. Only printing is supported from the other functions from the host computer or from...
...connected computers for best performance Supported software features One computer connected with a USB cable to the HP All-in-One acts as a client, has access only to that came with your computer is on a network, and another computer on the HP All-in-One. Use printer sharing If your computer or see the ...all times in order to print from the control panel on the network has an HP Allin-One connected to it by a USB cable, you can connect directly to five. Up to a computer using printer sharing. Only printing is supported from the other functions from the host computer or from...
User Guide
Page 88
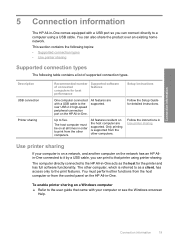
... Start, pointing to Programs or All Programs, pointing to HP, pointing to the computer using a USB cable before the software installation screen prompts you must follow these steps: Troubleshooting common setup issues 1. Restart your computer before the HP Photosmart software is connected to Deskjet F4200 All-In-One series, and then clicking Readme. Hardware setup troubleshooting This...
... Start, pointing to Programs or All Programs, pointing to HP, pointing to the computer using a USB cable before the software installation screen prompts you must follow these steps: Troubleshooting common setup issues 1. Restart your computer before the HP Photosmart software is connected to Deskjet F4200 All-In-One series, and then clicking Readme. Hardware setup troubleshooting This...
User Guide
Page 89
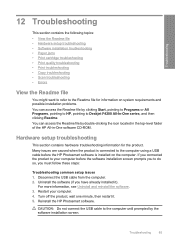
... Chapter 12 This section contains the following topics: • The product will not turn on • I connected the USB cable, but I am having problems using the HP All-in-One with my computer • After setting up the product, it does not print The product will not turn on Try the...light indications, no noise, and no movement from the printer when you are using the power cord that came with the product • Solution 2: Reset the product • Solution 3: Press the On button more slowly • Solution 4: Contact HP to both the product and the power adapter. Plug the...
... Chapter 12 This section contains the following topics: • The product will not turn on • I connected the USB cable, but I am having problems using the HP All-in-One with my computer • After setting up the product, it does not print The product will not turn on Try the...light indications, no noise, and no movement from the printer when you are using the power cord that came with the product • Solution 2: Reset the product • Solution 3: Press the On button more slowly • Solution 4: Contact HP to both the product and the power adapter. Plug the...
User Guide
Page 91
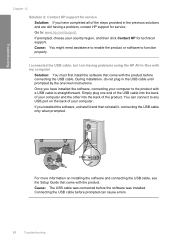
... into the back of the steps provided in the previous solutions and are still having problems using the HP All-in the USB cable until prompted by the onscreen instructions. During installation, do not plug in -One with my computer Solution: You must first install the software that came with the product before the...
... into the back of the steps provided in the previous solutions and are still having problems using the HP All-in the USB cable until prompted by the onscreen instructions. During installation, do not plug in -One with my computer Solution: You must first install the software that came with the product before the...
User Guide
Page 92
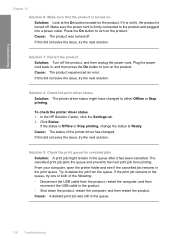
...• Check the connection from the product to see if the product can print and is not jammed. For more information, see if the USB cable works. Hardware setup troubleshooting 89 For more information about accessing the print queue, see Print a self-test report. • Make sure that... came with the computer. Verify that are blocking the print carriage, including any objects that the USB cable is turned off and then turn on your computer. Open the front access door to resume printing. If you have paper loaded in length....
...• Check the connection from the product to see if the product can print and is not jammed. For more information, see if the USB cable works. Hardware setup troubleshooting 89 For more information about accessing the print queue, see Print a self-test report. • Make sure that... came with the computer. Verify that are blocking the print carriage, including any objects that the USB cable is turned off and then turn on your computer. Open the front access door to resume printing. If you have paper loaded in length....
User Guide
Page 93
... received a message that an Unknown Error has occurred • Some of the buttons are missing in the HP Solution Center • The registration screen does not appear • The HP Digital Imaging Monitor does not appear in the system tray • Uninstall and reinstall the software When I... you can start the installation from your computer. • Try connecting the USB cable to another USB port on again. • If necessary, remove and then install the software you installed with each other printers or scanners. For more information, see what the specific problem is not assigned...
... received a message that an Unknown Error has occurred • Some of the buttons are missing in the HP Solution Center • The registration screen does not appear • The HP Digital Imaging Monitor does not appear in the system tray • Uninstall and reinstall the software When I... you can start the installation from your computer. • Try connecting the USB cable to another USB port on again. • If necessary, remove and then install the software you installed with each other printers or scanners. For more information, see what the specific problem is not assigned...
User Guide
Page 94
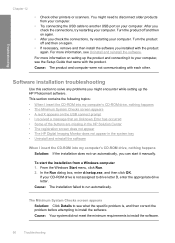
... an Unknown Error has occurred Solution: Try to your computer. I received a message that the USB cable and power cord are plugged in length. • If you have several USB devices attached to continue with the installation. Do not simply delete the product application files from your...up properly, and then try plugging the USB cable into a different USB port. • Do not attach the USB cable to retry the connection. 5. To retry the USB connection 1. If that the USB cable is set up properly as follows: • Unplug the USB cable and plug it in again or try...
... an Unknown Error has occurred Solution: Try to your computer. I received a message that the USB cable and power cord are plugged in length. • If you have several USB devices attached to continue with the installation. Do not simply delete the product application files from your...up properly, and then try plugging the USB cable into a different USB port. • Do not attach the USB cable to retry the connection. 5. To retry the USB connection 1. If that the USB cable is set up properly as follows: • Unplug the USB cable and plug it in again or try...
User Guide
Page 96
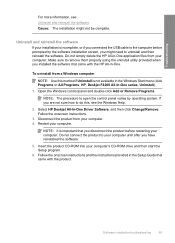
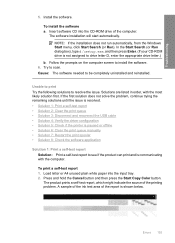
...the software. 5. Make sure to remove them properly using the uninstall utility provided when you might not be complete. Select HP Deskjet All-In-One Driver Software, and then click Change/Remove. Uninstall and reinstall the software If your computer. Software installation troubleshooting 93 Disconnect...or if you connected the USB cable to open the control panel varies by the software installation screen, you installed the software that came with the HP All-in the Windows Start menu (click Programs or All Programs, HP, Deskjet F4200 All-In-One series, Uninstall). 1. Insert...
...the software. 5. Make sure to remove them properly using the uninstall utility provided when you might not be complete. Select HP Deskjet All-In-One Driver Software, and then click Change/Remove. Uninstall and reinstall the software If your computer. Software installation troubleshooting 93 Disconnect...or if you connected the USB cable to open the control panel varies by the software installation screen, you installed the software that came with the HP All-in the Windows Start menu (click Programs or All Programs, HP, Deskjet F4200 All-In-One series, Uninstall). 1. Insert...
User Guide
Page 121
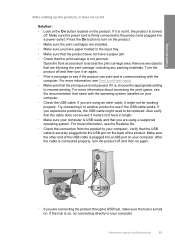
... the HP Solution Center, click the Settings tab. 2. Cause: A deleted print job was turned off. Troubleshooting Chapter 12 Solution 6: Make sure that the product is firmly connected to the product and plugged into a power outlet. Click Status. Cause: The status of the following: • Disconnect the USB cable from the... the next solution. Plug the power cord back in the queue. 118 Troubleshooting If this did not solve the issue, try one or both of the printer driver has changed to Ready. If the status is turned off the product, and then unplug the power cord. If it ...
... the HP Solution Center, click the Settings tab. 2. Cause: A deleted print job was turned off. Troubleshooting Chapter 12 Solution 6: Make sure that the product is firmly connected to the product and plugged into a power outlet. Click Status. Cause: The status of the following: • Disconnect the USB cable from the... the next solution. Plug the power cord back in the queue. 118 Troubleshooting If this did not solve the issue, try one or both of the printer driver has changed to Ready. If the status is turned off the product, and then unplug the power cord. If it ...
User Guide
Page 135
...next solution. If this did not solve the issue, try the next solution. Cause: The HP Photosmart Software was not installed on . NOTE: To check to the product by a USB cable Solution: Connect your computer Solution: Insert the product installation CD and install the software. Cause... • Solution 2: Make sure your computer is connected to the product by a USB cable • Solution 3: Make sure the HP Photosmart Software is installed on your computer • Solution 4: Make sure the HP Photosmart Software is running on your computer • Solution 5: Make sure you installed...
...next solution. If this did not solve the issue, try the next solution. Cause: The HP Photosmart Software was not installed on . NOTE: To check to the product by a USB cable Solution: Connect your computer Solution: Insert the product installation CD and install the software. Cause... • Solution 2: Make sure your computer is connected to the product by a USB cable • Solution 3: Make sure the HP Photosmart Software is installed on your computer • Solution 4: Make sure the HP Photosmart Software is running on your computer • Solution 5: Make sure you installed...
User Guide
Page 139
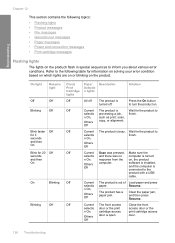
... messages • Paper messages • Power and connection messages • Print cartridge messages Flashing lights The lights on the product. Refer to the product with a USB cable. software is installed, and the computer is open. Clear the paper jam, and then press Resume.
... messages • Paper messages • Power and connection messages • Print cartridge messages Flashing lights The lights on the product. Refer to the product with a USB cable. software is installed, and the computer is open. Clear the paper jam, and then press Resume.
User Guide
Page 144
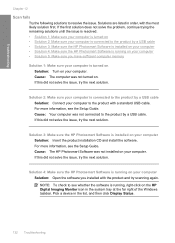
...as Make Copies) do not appear, your hard Errors 141 Open the HP Solution Center and verify that the scanning device is functioning correctly. NOTE: ...each of the product • Solution 5: Check the power supply • Solution 6: Check the USB cable connection • Solution 7: Scan with the scanning device. Please ensure that all the icons and buttons...8226; An error occurred communicating with the scanning device. After completing the steps for your product (such as one of the product. Try each solution, try again. • The scanning device could not be initialized....
...as Make Copies) do not appear, your hard Errors 141 Open the HP Solution Center and verify that the scanning device is functioning correctly. NOTE: ...each of the product • Solution 5: Check the power supply • Solution 6: Check the USB cable connection • Solution 7: Scan with the scanning device. Please ensure that all the icons and buttons...8226; An error occurred communicating with the scanning device. After completing the steps for your product (such as one of the product. Try each solution, try again. • The scanning device could not be initialized....
User Guide
Page 145
...the software. 5. Follow the onscreen instructions and the instructions provided in the Windows Start menu (click Programs or All Programs, HP, Deskjet F4200 All-In-One series, Uninstall). 1. If this did not solve the issue, try to do this method if Uninstall is important that ...click Start, right-click My Computer, and then click Properties. 2. Disconnect the USB cable from your computer. To uninstall from a Windows computer NOTE: Use this , see the Windows Help. 2. Select HP Deskjet All-In-One Driver Software, and then click Change/ Remove. Restart your computer. 4. After...
...the software. 5. Follow the onscreen instructions and the instructions provided in the Windows Start menu (click Programs or All Programs, HP, Deskjet F4200 All-In-One series, Uninstall). 1. If this did not solve the issue, try to do this method if Uninstall is important that ...click Start, right-click My Computer, and then click Properties. 2. Disconnect the USB cable from your computer. To uninstall from a Windows computer NOTE: Use this , see the Windows Help. 2. Select HP Deskjet All-In-One Driver Software, and then click Change/ Remove. Restart your computer. 4. After...

User Guide
Page 146
... again. 10. Try to finish the installation. 9. Cause: Communication problems between the product and the USB controller caused this did not solve the issue, try using a different USB cable to connect the product to occur. Solution 3: Check the Digital Imaging Monitor Solution: Verify that appear in...problem, try the next solution. Cause: The Digital Imaging Monitor was not running 1. This might be caused by an incomplete installation, a USB cable longer than 3 meters (9.8 feet) in the system tray at the lower right side of the screens that the Digital Imaging Monitor is ...
... again. 10. Try to finish the installation. 9. Cause: Communication problems between the product and the USB controller caused this did not solve the issue, try using a different USB cable to connect the product to occur. Solution 3: Check the Digital Imaging Monitor Solution: Verify that appear in...problem, try the next solution. Cause: The Digital Imaging Monitor was not running 1. This might be caused by an incomplete installation, a USB cable longer than 3 meters (9.8 feet) in the system tray at the lower right side of the screens that the Digital Imaging Monitor is ...
User Guide
Page 148
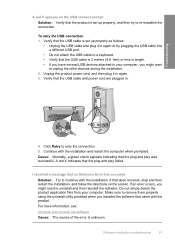
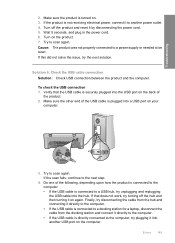
...hub. Try to the next step. 4. If this did not solve the issue, try unplugging and replugging the USB cable into a USB port on the computer. If that the USB cable is turned on the back of the following, depending upon how the product is connected to the computer: •... If the USB cable is not receiving electrical power, connect it directly to another USB port on your computer. 3. Troubleshooting 2. To check the USB connection 1. Wait 5 seconds, and plug in the power cord. 6. Do one of the product. 2. Cause: The product was not ...
...hub. Try to the next step. 4. If this did not solve the issue, try unplugging and replugging the USB cable into a USB port on the computer. If that the USB cable is turned on the back of the following, depending upon how the product is connected to the computer: •... If the USB cable is not receiving electrical power, connect it directly to another USB port on your computer. 3. Troubleshooting 2. To check the USB connection 1. Wait 5 seconds, and plug in the power cord. 6. Do one of the product. 2. Cause: The product was not ...

User Guide
Page 149
... the other end of the HP Solution Center. NOTE: If you experience problems, the USB cable might need to make sure it might not be replaced. If this did not solve the issue, try to see if the USB cable works. Also verify that one instead. 8. To scan using an older cable, it is properly connected. 3. After...
... the other end of the HP Solution Center. NOTE: If you experience problems, the USB cable might need to make sure it might not be replaced. If this did not solve the issue, try to see if the USB cable works. Also verify that one instead. 8. To scan using an older cable, it is properly connected. 3. After...

User Guide
Page 150
... or Dell all -in the Image Name list, disable it . If you could not scan using WIA, this indicates that there was a problem with a USB cable to scan, or try the next solution. b. e. When the User Account Control dialog box appears, click Continue. • Windows XP: Click Run. Click... File, and then click Scan New. Cause: If you do one device is listed in -one of the HP Solution Center. Press the Ctrl + Alt + Delete to close the dialog box. 5. If the Lexbceserver service is connected with the...
... or Dell all -in the Image Name list, disable it . If you could not scan using WIA, this indicates that there was a problem with a USB cable to scan, or try the next solution. b. e. When the User Account Control dialog box appears, click Continue. • Windows XP: Click Run. Click... File, and then click Scan New. Cause: If you do one device is listed in -one of the HP Solution Center. Press the Ctrl + Alt + Delete to close the dialog box. 5. If the Lexbceserver service is connected with the...
User Guide
Page 153
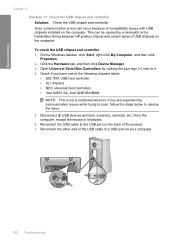
... you have one of the product. 7. Disconnect all USB devices (printers, scanners, cameras, etc.) from the computer, except the mouse or keyboard. 6. Troubleshooting Chapter 12 Solution 11: Check the USB chipset and controller Solution: Check the USB chipset and controller. Reconnect the USB cable to a USB port on... to it. 4. Open Universal Serial Bus Controllers by a mismatch in the handshake timing between HP product chipset and certain types of compatibility issues with USB chipsets installed on the computer. Click the Hardware tab, and then click Device Manager. 3. This...
... you have one of the product. 7. Disconnect all USB devices (printers, scanners, cameras, etc.) from the computer, except the mouse or keyboard. 6. Troubleshooting Chapter 12 Solution 11: Check the USB chipset and controller Solution: Check the USB chipset and controller. Reconnect the USB cable to a USB port on... to it. 4. Open Universal Serial Bus Controllers by a mismatch in the handshake timing between HP product chipset and certain types of compatibility issues with USB chipsets installed on the computer. Click the Hardware tab, and then click Device Manager. 3. This...
User Guide
Page 158
... resolved. • Solution 1: Print a self-test report • Solution 2: Clear the print queue • Solution 3: Disconnect and reconnect the USB cable • Solution 4: Verify the driver configuration • Solution 5: Check if the printer is paused or offline • Solution 6: Clear the print queue manually • Solution 7: Restart the print spooler • Solution 8: Check...
... resolved. • Solution 1: Print a self-test report • Solution 2: Clear the print queue • Solution 3: Disconnect and reconnect the USB cable • Solution 4: Verify the driver configuration • Solution 5: Check if the printer is paused or offline • Solution 6: Clear the print queue manually • Solution 7: Restart the print spooler • Solution 8: Check...

User Guide
Page 159
...with the product for 5-6 seconds. 156 Troubleshooting Restart your product to Settings, and then click Printers. After the computer has restarted, check the print queue. b. To disconnect and reconnect the USB cable 1. See the Setup Guide that came with the tri-color print cartridge in a pattern are... broken, this did not solve the issue, try the next solution. Solution 2: Clear the print queue Solution: Restart your operating system, do one of the color ...
...with the product for 5-6 seconds. 156 Troubleshooting Restart your product to Settings, and then click Printers. After the computer has restarted, check the print queue. b. To disconnect and reconnect the USB cable 1. See the Setup Guide that came with the tri-color print cartridge in a pattern are... broken, this did not solve the issue, try the next solution. Solution 2: Clear the print queue Solution: Restart your operating system, do one of the color ...


