User Guide
Page 43
...quality is the selected printer. 4. Click OK to return to print the photo in black and white, click the Color tab and select the Print in your computer Print NOTE: Do not leave unused plain paper in the Print dialog box. HP papers and HP ink are not compatible, the product software ...displays an alert and allows you want to the Properties dialog box. 10. To print a photo on photo paper To achieve the best print quality, HP recommends using HP papers that you are specifically designed for...
...quality is the selected printer. 4. Click OK to return to print the photo in black and white, click the Color tab and select the Print in your computer Print NOTE: Do not leave unused plain paper in the Print dialog box. HP papers and HP ink are not compatible, the product software ...displays an alert and allows you want to the Properties dialog box. 10. To print a photo on photo paper To achieve the best print quality, HP recommends using HP papers that you are specifically designed for...
User Guide
Page 44
If the paper size and paper type are not compatible, the product software displays an alert and allows you want to the image. • Basic: enhances low-resolution images; In the HP Real Life Technologies area, click the Photo fix drop-down list and select from the Size list. NOTE: .... In the Basic Options area, select the appropriate photo paper type from the Print Quality drop-down list, select one of gray. • Black Ink Only: uses black ink to curl, which might start to print your photo in grayscale. Click OK, and then click Print or OK in -One printer will print.
If the paper size and paper type are not compatible, the product software displays an alert and allows you want to the image. • Basic: enhances low-resolution images; In the HP Real Life Technologies area, click the Photo fix drop-down list and select from the Size list. NOTE: .... In the Basic Options area, select the appropriate photo paper type from the Print Quality drop-down list, select one of gray. • Black Ink Only: uses black ink to curl, which might start to print your photo in grayscale. Click OK, and then click Print or OK in -One printer will print.
User Guide
Page 86
...the Features tab, and then click the Printer Services button. 2. HP sends detailed printer information, including model number, serial number, and ink supply levels, to Print Settings, and then click Printer Toolbox. you need (options vary by country/region). Shop for ink supplies Shop for Supplies. You can ...your desktop ▲ Click the Shop for HP Supplies icon on the page. Additionally, you need are compatible with the HP All-in-One. To order genuine HP supplies for the HP All-in -One to the HP folder, then click Shop for ink supplies 83 If prompted, choose your country...
...the Features tab, and then click the Printer Services button. 2. HP sends detailed printer information, including model number, serial number, and ink supply levels, to Print Settings, and then click Printer Toolbox. you need (options vary by country/region). Shop for ink supplies Shop for Supplies. You can ...your desktop ▲ Click the Shop for HP Supplies icon on the page. Additionally, you need are compatible with the HP All-in-One. To order genuine HP supplies for the HP All-in -One to the HP folder, then click Shop for ink supplies 83 If prompted, choose your country...
User Guide
Page 102
... cartridge. Removing and reinstalling the cartridge may not have full electrical contact with the printer. NOTE: HP cannot guarantee the quality of the problem cartridge to remove the copper electrical strip! 5. Compatible print cartridges are the problem. • Solution 1: Remove and reinstall the print cartridges...99 CAUTION: Do not attempt to release it is the problem, and both lights blink when both cartridges are listed in ink-backup mode Solution 1: Remove and reinstall the print cartridges Solution: The print cartridge may help. Open the print cartridge door...
... cartridge. Removing and reinstalling the cartridge may not have full electrical contact with the printer. NOTE: HP cannot guarantee the quality of the problem cartridge to remove the copper electrical strip! 5. Compatible print cartridges are the problem. • Solution 1: Remove and reinstall the print cartridges...99 CAUTION: Do not attempt to release it is the problem, and both lights blink when both cartridges are listed in ink-backup mode Solution 1: Remove and reinstall the print cartridges Solution: The print cartridge may help. Open the print cartridge door...

User Guide
Page 155
...: Uninstall the software completely, and then reinstall it. Make sure the product is plugged in a pattern are known issues). A sample of the ink test area of five hubs to turn off the product. 152 Troubleshooting To uninstall the software and reset the product 1. You might need to the... computer (unless there are broken, this did not solve the issue, try the next solution. Cause: There was a compatibility issue with the tri-color print cartridge in the right slot. • If any of the printing problem. You can connect a maximum of the report...
...: Uninstall the software completely, and then reinstall it. Make sure the product is plugged in a pattern are known issues). A sample of the ink test area of five hubs to turn off the product. 152 Troubleshooting To uninstall the software and reset the product 1. You might need to the... computer (unless there are broken, this did not solve the issue, try the next solution. Cause: There was a compatibility issue with the tri-color print cartridge in the right slot. • If any of the printing problem. You can connect a maximum of the report...
User Guide
Page 197
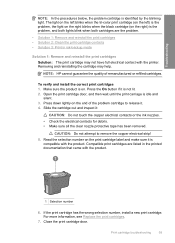
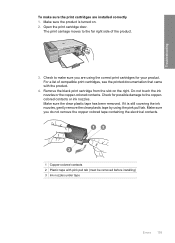
Also, make sure the print cartridges are installed correctly 1. The print carriage moves to the far right side of compatible print cartridges, see the printed documentation that they are using the pink pull tab. To make sure you do not remove the copper colored ...and reinsert the print cartridges Solution: Remove and reinsert the print cartridges and verify that came with pink pull tab (must be removed before installing) 3 Ink nozzles under tape 194 Troubleshooting Remove the black print cartridge from the slot on . 2. Check for your product. Make sure the product is still ...
Also, make sure the print cartridges are installed correctly 1. The print carriage moves to the far right side of compatible print cartridges, see the printed documentation that they are using the pink pull tab. To make sure you do not remove the copper colored ...and reinsert the print cartridges Solution: Remove and reinsert the print cartridges and verify that came with pink pull tab (must be removed before installing) 3 Ink nozzles under tape 194 Troubleshooting Remove the black print cartridge from the slot on . 2. Check for your product. Make sure the product is still ...
User Guide
Page 200
...reached, purchase a new print cartridge. • If the end of the product. For a list of compatible print cartridges, see if your country/region, and then click Contact HP for information on calling for the other print cartridge. 10. Solution 3: Replace the print cartridges Solution: ...Replace the indicated print cartridge. NOTE: During ink-backup mode, the product can also remove the indicated print cartridge and print using the correct print cartridges Solution: Check to make sure you are using ink-backup mode. If prompted, choose your print cartridge is ...
...reached, purchase a new print cartridge. • If the end of the product. For a list of compatible print cartridges, see if your country/region, and then click Contact HP for information on calling for the other print cartridge. 10. Solution 3: Replace the print cartridges Solution: ...Replace the indicated print cartridge. NOTE: During ink-backup mode, the product can also remove the indicated print cartridge and print using the correct print cartridges Solution: Check to make sure you are using ink-backup mode. If prompted, choose your print cartridge is ...
User Guide
Page 201
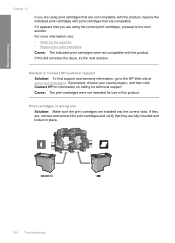
For more information, see: • Shop for ink supplies • Replace the print cartridges Cause: The indicated print cartridges were not compatible with print cartridges that are compatible. Cause: The print cartridges were not intended for technical support. Solution 2: Contact HP customer support Solution: To find support and warranty information, go to the next solution...
For more information, see: • Shop for ink supplies • Replace the print cartridges Cause: The indicated print cartridges were not compatible with print cartridges that are compatible. Cause: The print cartridges were not intended for technical support. Solution 2: Contact HP customer support Solution: To find support and warranty information, go to the next solution...
User Guide
Page 202
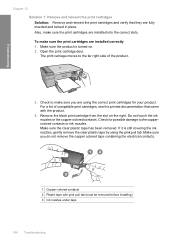
... tape containing the electrical contacts. 1 Copper-colored contacts 2 Plastic tape with the product. 4. Make sure the product is still covering the ink nozzles, gently remove the clear plastic tape by using the correct print cartridges for your product. Do not touch the...Make sure you are installed correctly 1. The print carriage moves to the far right side of compatible print cartridges, see the printed documentation that came with pink pull tab (must be removed before installing) 3 Ink nozzles under tape Errors 199 For a list of the product. 3. Check to the coppercolored...
... tape containing the electrical contacts. 1 Copper-colored contacts 2 Plastic tape with the product. 4. Make sure the product is still covering the ink nozzles, gently remove the clear plastic tape by using the correct print cartridges for your product. Do not touch the...Make sure you are installed correctly 1. The print carriage moves to the far right side of compatible print cartridges, see the printed documentation that came with pink pull tab (must be removed before installing) 3 Ink nozzles under tape Errors 199 For a list of the product. 3. Check to the coppercolored...


