
Reference Guide
Page 1
...the Help Viewer window, choose HP Deskjet 1010 series from the recommended software during software installation. Doubleclick ReadMe.html and select the ReadMe in printhead servicing, which keeps print nozzles clear and ink flowing smoothly. Printer registration: www.register.hp.com. In addition, some ...European Union Regulatory Notice and compliance statements, in [French] © 2013 Hewlett-Packard Development Company, L.P. HP Deskjet 1010 Printer Series English Get started 1. In the Help Viewer window, click Help for printing, and in your desktop, and then double-click...
...the Help Viewer window, choose HP Deskjet 1010 series from the recommended software during software installation. Doubleclick ReadMe.html and select the ReadMe in printhead servicing, which keeps print nozzles clear and ink flowing smoothly. Printer registration: www.register.hp.com. In addition, some ...European Union Regulatory Notice and compliance statements, in [French] © 2013 Hewlett-Packard Development Company, L.P. HP Deskjet 1010 Printer Series English Get started 1. In the Help Viewer window, click Help for printing, and in your desktop, and then double-click...
Reference Guide
Page 2
... has a check mark in and turn on -screen and the printed setup instructions that are specific to print: 1. After the installation finishes, restart the computer. Click Open Print Queue. 3. Restart the computer. 2. b. Disconnect the HP printer from the computer. 2. Follow the on the printer. Acknowledgements... and reset: 1. Wait a minute, then plug the power cord back in the circle next to print, or the software installation fails: 1. Insert the HP software CD into your print queue: 1. On the desktop, open the Charms bar, click the Settings icon, click or tap ...
... has a check mark in and turn on -screen and the printed setup instructions that are specific to print: 1. After the installation finishes, restart the computer. Click Open Print Queue. 3. Restart the computer. 2. b. Disconnect the HP printer from the computer. 2. Follow the on the printer. Acknowledgements... and reset: 1. Wait a minute, then plug the power cord back in the circle next to print, or the software installation fails: 1. Insert the HP software CD into your print queue: 1. On the desktop, open the Charms bar, click the Settings icon, click or tap ...
Reference Guide
Page 3
...-Berks RG12 1HN Eire: Hewlett-Packard Ireland Limited, 63-74 Sir John Rogerson's Quay, Dublin 2 Malta: Hewlett-Packard International Trade B.V. Improper maintenance or modification; c. b. English HP printer limited warranty statement HP product Software Media Printer Print or Ink cartridges Printheads (only applies to products with . 1 year 1 year unless otherwise stated...
...-Berks RG12 1HN Eire: Hewlett-Packard Ireland Limited, 63-74 Sir John Rogerson's Quay, Dublin 2 Malta: Hewlett-Packard International Trade B.V. Improper maintenance or modification; c. b. English HP printer limited warranty statement HP product Software Media Printer Print or Ink cartridges Printheads (only applies to products with . 1 year 1 year unless otherwise stated...
User Guide
Page 3
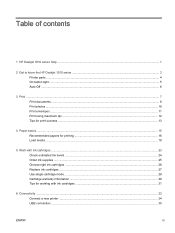
Table of contents 1 HP Deskjet 1010 series Help ...1 2 Get to know the HP Deskjet 1010 series ...3 Printer parts ...4 On button light ...5 Auto-Off ...6 3 Print ...7 Print documents ...8 Print photos ...10 Print envelopes ...11 Print using maximum dpi ...12 Tips for print success ...13 4 Paper basics ...15 Recommended papers for printing ...16 Load media ...18 5 Work with ink cartridges ...23 Check estimated ink levels ...24 Order...
Table of contents 1 HP Deskjet 1010 series Help ...1 2 Get to know the HP Deskjet 1010 series ...3 Printer parts ...4 On button light ...5 Auto-Off ...6 3 Print ...7 Print documents ...8 Print photos ...10 Print envelopes ...11 Print using maximum dpi ...12 Tips for print success ...13 4 Paper basics ...15 Recommended papers for printing ...16 Load media ...18 5 Work with ink cartridges ...23 Check estimated ink levels ...24 Order...
User Guide
Page 4
7 Solve a problem ...37 Improve print quality ...38 Clear paper jam ...41 Unable to print ...44 Clear print carriage ...48 Identify a defective cartridge ...49 Prepare trays ...50 Printer failure ...51 Ink cartridge problem ...52 Older generation cartridges ...54 HP support ...55 Appendix A Technical information ...59 Hewlett-Packard Company notices ...60 Specifications ...61 Environmental product stewardship program 64 Regulatory notices ...68 Index ...73 iv ENWW
7 Solve a problem ...37 Improve print quality ...38 Clear paper jam ...41 Unable to print ...44 Clear print carriage ...48 Identify a defective cartridge ...49 Prepare trays ...50 Printer failure ...51 Ink cartridge problem ...52 Older generation cartridges ...54 HP support ...55 Appendix A Technical information ...59 Hewlett-Packard Company notices ...60 Specifications ...61 Environmental product stewardship program 64 Regulatory notices ...68 Index ...73 iv ENWW
User Guide
Page 9
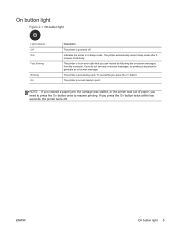
ENWW On button light 5 The printer is processing a job. If you need to press the On button once to resume printing. To cancel the job, press the On button. The printer automatically enters Sleep mode after 5 minutes of paper, you press the On button twice within ... the computer. On button light Figure 2-1 On button light Light behavior Off Dim Fast blinking Blinking On Description The printer is on and ready to print. The printer is powered off . Indicates the printer is in an error state that you do not see any on-screen messages, try...
ENWW On button light 5 The printer is processing a job. If you need to press the On button once to resume printing. To cancel the job, press the On button. The printer automatically enters Sleep mode after 5 minutes of paper, you press the On button twice within ... the computer. On button light Figure 2-1 On button light Light behavior Off Dim Fast blinking Blinking On Description The printer is on and ready to print. The printer is powered off . Indicates the printer is in an error state that you do not see any on-screen messages, try...

User Guide
Page 10
...is automatically enabled by default when you must use the On button to turn the printer back on. In the printer software, select Print, and then click Maintain Your Printer to open the printer software: ● Windows 8: On the Start screen, right-click an empty...'s name. ● Windows 7, Windows Vista, and Windows XP: From the computer desktop, click Start, select All Programs, click HP, click HP Deskjet 1010 series, and then click HP Deskjet 1010 series. 2. Depending on -screen instructions. Click Advanced Settings, and then follow the on your operating system, do one of inactivity ...
...is automatically enabled by default when you must use the On button to turn the printer back on. In the printer software, select Print, and then click Maintain Your Printer to open the printer software: ● Windows 8: On the Start screen, right-click an empty...'s name. ● Windows 7, Windows Vista, and Windows XP: From the computer desktop, click Start, select All Programs, click HP, click HP Deskjet 1010 series, and then click HP Deskjet 1010 series. 2. Depending on -screen instructions. Click Advanced Settings, and then follow the on your operating system, do one of inactivity ...

User Guide
Page 11
3 Print This section contains the following topics: ● Print documents ● Print photos ● Print envelopes ● Print using maximum dpi ● Tips for print success ENWW 7
3 Print This section contains the following topics: ● Print documents ● Print photos ● Print envelopes ● Print using maximum dpi ● Tips for print success ENWW 7

User Guide
Page 12
...paper size from the Paper Size drop-down list. ● Click Advanced to begin printing. Click the button that opens the Properties dialog box. To print a document 1. Make sure your software, click the Print button. 2. Depending on both sides of the page 1. Click the button that opens...select Portrait or Landscape orientation. ● On the Paper/Quality tab, select the appropriate paper type and print quality from the Media drop-down list. 5. Make sure your software, click the Print button. 2. Make sure the output tray is selected. 3. Click OK to close the Properties dialog ...
...paper size from the Paper Size drop-down list. ● Click Advanced to begin printing. Click the button that opens the Properties dialog box. To print a document 1. Make sure your software, click the Print button. 2. Depending on both sides of the page 1. Click the button that opens...select Portrait or Landscape orientation. ● On the Paper/Quality tab, select the appropriate paper type and print quality from the Media drop-down list. 5. Make sure your software, click the Print button. 2. Make sure the output tray is selected. 3. Click OK to close the Properties dialog ...

User Guide
Page 13
... -screen instructions, reload the paper in the input tray with the blank side up and top of the document have been printed, remove the document from the output tray. 8. Follow the on Both Sides Manually dropdown list. 6. After the even numbered pages of page down, and ... options. ● On the Layout tab, select Portrait or Landscape orientation. ● On the Paper/Quality tab, select the appropriate paper type and print quality from the Paper Size drop-down list. ● Click Advanced to print. 7. Click OK to select the appropriate paper size from the Media drop-down list. 5.
... -screen instructions, reload the paper in the input tray with the blank side up and top of the document have been printed, remove the document from the output tray. 8. Follow the on Both Sides Manually dropdown list. 6. After the even numbered pages of page down, and ... options. ● On the Layout tab, select Portrait or Landscape orientation. ● On the Paper/Quality tab, select the appropriate paper type and print quality from the Paper Size drop-down list. ● Click Advanced to print. 7. Click OK to select the appropriate paper size from the Media drop-down list. 5.
User Guide
Page 14
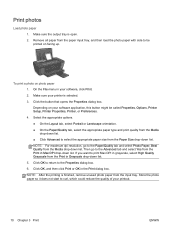
... Preferences. 4. Click OK to return to curl, which could reduce the quality of your software application, this button might be printed on photo paper 1. NOTE: After the printing is finished, remove unused photo paper from the Media drop-down list. Select the appropriate options. ● On the Layout tab..., select Portrait or Landscape orientation. ● On the Paper/Quality tab, select the appropriate paper type and print quality from the Media drop-down list. Store the photo paper so it does not start to the Properties dialog box. 6. Remove all paper...
... Preferences. 4. Click OK to return to curl, which could reduce the quality of your software application, this button might be printed on photo paper 1. NOTE: After the printing is finished, remove unused photo paper from the Media drop-down list. Select the appropriate options. ● On the Layout tab..., select Portrait or Landscape orientation. ● On the Paper/Quality tab, select the appropriate paper type and print quality from the Media drop-down list. Store the photo paper so it does not start to the Properties dialog box. 6. Remove all paper...
User Guide
Page 15
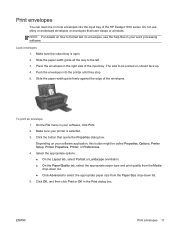
...type and print quality from the Media drop-down list. ● Click Advanced to the left. 3. The side to format text on how to be called Properties, Options, Printer Setup, Printer Properties, Printer, or Preferences. 4. Push the envelopes into the input tray of the HP Deskjet 1010 series. ... guide firmly against the edge of the input tray. Make sure your software application, this button might be printed on your printer is open. 2. ENWW Print envelopes 11 Print envelopes You can load one or more envelopes into the printer until they stop. 5. Place the envelopes in...
...type and print quality from the Media drop-down list. ● Click Advanced to the left. 3. The side to format text on how to be called Properties, Options, Printer Setup, Printer Properties, Printer, or Preferences. 4. Push the envelopes into the input tray of the HP Deskjet 1010 series. ... guide firmly against the edge of the input tray. Make sure your software application, this button might be printed on your printer is open. 2. ENWW Print envelopes 11 Print envelopes You can load one or more envelopes into the printer until they stop. 5. Place the envelopes in...

User Guide
Page 16
...Click the Advanced button. 7. Select the appropriate paper size from the Print in Max DPI drop-down list. 8. Make sure your software, click Print. 2. Depending on the Layout tab, and then click OK to enable printing in your printer is selected. 3. Confirm Orientation on your software ..., or Preferences. 4. From the Media drop-down list. 9. Click OK to print high-quality, sharp images on photo paper. Printing in Maximum dpi mode 1. To print in maximum dpi takes longer than printing with other settings and requires a large amount of memory. Click the button that opens...
...Click the Advanced button. 7. Select the appropriate paper size from the Print in Max DPI drop-down list. 8. Make sure your software, click Print. 2. Depending on the Layout tab, and then click OK to enable printing in your printer is selected. 3. Confirm Orientation on your software ..., or Preferences. 4. From the Media drop-down list. 9. Click OK to print high-quality, sharp images on photo paper. Printing in Maximum dpi mode 1. To print in maximum dpi takes longer than printing with other settings and requires a large amount of memory. Click the button that opens...
User Guide
Page 17
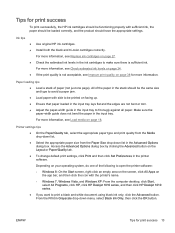
... select All Programs, click HP, click HP Deskjet 1010 series, and then click HP Deskjet 1010 series. ● If you want to fit snugly against all paper. Install both the black and tri-color cartridges correctly. ENWW Tips for print success 13 If the print quality is sufficient ink. Access... the Advanced button. From the Print in Grayscale drop-down list in the Advanced Options dialog box. For more information, see Improve print quality on your operating system, do one page). Tips for print success To print successfully, the HP ink cartridges should be functioning properly...
... select All Programs, click HP, click HP Deskjet 1010 series, and then click HP Deskjet 1010 series. ● If you want to fit snugly against all paper. Install both the black and tri-color cartridges correctly. ENWW Tips for print success 13 If the print quality is sufficient ink. Access... the Advanced button. From the Print in Grayscale drop-down list in the Advanced Options dialog box. For more information, see Improve print quality on your operating system, do one page). Tips for print success To print successfully, the HP ink cartridges should be functioning properly...

User Guide
Page 18
...ink cartridges until print quality becomes unacceptable. ● You can print your document on both sides of non-HP supplies. Notes ● Original HP ink cartridges are designed and tested with HP printers and papers to help you purchased original HP ink cartridges, go to: www.hp.com/go/...anticounterfeit ● Ink level warnings and indicators provide estimates for planning purposes only. NOTE: HP cannot guarantee the quality or reliability of the paper. 14 Chapter 3 Print ENWW If you believe you easily produce great results, time after time. NOTE: When you receive a ...
...ink cartridges until print quality becomes unacceptable. ● You can print your document on both sides of non-HP supplies. Notes ● Original HP ink cartridges are designed and tested with HP printers and papers to help you purchased original HP ink cartridges, go to: www.hp.com/go/...anticounterfeit ● Ink level warnings and indicators provide estimates for planning purposes only. NOTE: HP cannot guarantee the quality or reliability of the paper. 14 Chapter 3 Print ENWW If you believe you easily produce great results, time after time. NOTE: When you receive a ...
User Guide
Page 19
This section contains the following topics: ● Recommended papers for printing ● Load media ENWW 15 4 Paper basics You can load many different types and sizes of paper in the HP Printer, including letter or A4 paper, photo paper, and envelopes.
This section contains the following topics: ● Recommended papers for printing ● Load media ENWW 15 4 Paper basics You can load many different types and sizes of paper in the HP Printer, including letter or A4 paper, photo paper, and envelopes.

User Guide
Page 20
.... Business documents ● HP Premium Presentation Paper or HP Professional Paper 120 These papers are heavyweight for longer lasting documents. ● HP Everyday Photo Paper Print colorful, everyday snapshots at a low cost, using HP papers that are printing. Your prints have a look and feel... comparable to meet high standards of reliability and print quality, and produce documents with the ...
.... Business documents ● HP Premium Presentation Paper or HP Professional Paper 120 These papers are heavyweight for longer lasting documents. ● HP Everyday Photo Paper Print colorful, everyday snapshots at a low cost, using HP papers that are printing. Your prints have a look and feel... comparable to meet high standards of reliability and print quality, and produce documents with the ...

User Guide
Page 21
... are glossy-coated or matte-coated on both sides for less smearing, bolder blacks, and vivid colors. Everyday printing ● HP Bright White Inkjet Paper HP Bright White Inkjet Paper delivers high-contrast colors and sharp text. It produces documents that look and feel more substantial... than documents printed on Transfers (for light or white fabrics) are the perfect choice for near-photographic reproductions and business graphics ...
... are glossy-coated or matte-coated on both sides for less smearing, bolder blacks, and vivid colors. Everyday printing ● HP Bright White Inkjet Paper HP Bright White Inkjet Paper delivers high-contrast colors and sharp text. It produces documents that look and feel more substantial... than documents printed on Transfers (for light or white fabrics) are the perfect choice for near-photographic reproductions and business graphics ...

User Guide
Page 22
Load media Select a paper size to the left. 4. Insert a stack of paper into the input tray with the short edge down and the print side up, and slide the stack of paper down until it stops. 18 Chapter 4 Paper basics ENWW Slide the paper-width guide to continue. Lower the output tray and pull out the output tray extender. 3. Raise the input tray. 2. Load full-size paper 1.
Load media Select a paper size to the left. 4. Insert a stack of paper into the input tray with the short edge down and the print side up, and slide the stack of paper down until it stops. 18 Chapter 4 Paper basics ENWW Slide the paper-width guide to continue. Lower the output tray and pull out the output tray extender. 3. Raise the input tray. 2. Load full-size paper 1.

User Guide
Page 24
Raise the input tray. 2. 4. Slide the paper-width guide to the left and remove all paper from the input tray. 20 Chapter 4 Paper basics ENWW Lower the output tray and pull out the output tray extender. 3. Load envelopes 1. Slide the paper-width guide to the right until it stops at the edge of paper forward until it stops. 5. Insert a stack of photo paper with the short edge down and the print side up, and slide the stack of paper.
Raise the input tray. 2. 4. Slide the paper-width guide to the left and remove all paper from the input tray. 20 Chapter 4 Paper basics ENWW Lower the output tray and pull out the output tray extender. 3. Load envelopes 1. Slide the paper-width guide to the right until it stops at the edge of paper forward until it stops. 5. Insert a stack of photo paper with the short edge down and the print side up, and slide the stack of paper.


