User Guide
Page 6
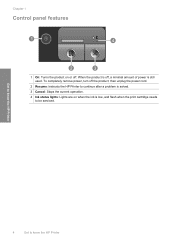
To completely remove power, turn off . Chapter 1 Control panel features 1 On: Turns the product on or off the product, then unplug the power cord. 2 Resume: Instructs the HP Printer to continue after a problem is solved. 3 Cancel: Stops the current operation. 4 Ink status lights: Lights are on when the ink is still used. Get to know the HP Printer 4 Get to be serviced. When the product is off, a minimal amount of power is low, and flash when the print cartridge needs to know the HP Printer
To completely remove power, turn off . Chapter 1 Control panel features 1 On: Turns the product on or off the product, then unplug the power cord. 2 Resume: Instructs the HP Printer to continue after a problem is solved. 3 Cancel: Stops the current operation. 4 Ink status lights: Lights are on when the ink is still used. Get to know the HP Printer 4 Get to be serviced. When the product is off, a minimal amount of power is low, and flash when the print cartridge needs to know the HP Printer
User Guide
Page 8
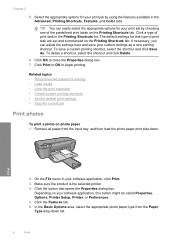
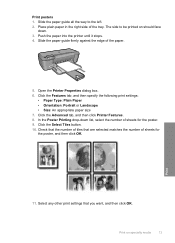
...; Create custom printing shortcuts • Set the default print settings • Stop the current job Print photos To print a photo on the Printing Shortcuts tab. To save your custom settings as a new printing shortcut. Related topics • Recommended papers for that opens the Properties dialog box. Make sure the product is the selected printer. 4. Click Print or OK to...
...; Create custom printing shortcuts • Set the default print settings • Stop the current job Print photos To print a photo on the Printing Shortcuts tab. To save your custom settings as a new printing shortcut. Related topics • Recommended papers for that opens the Properties dialog box. Make sure the product is the selected printer. 4. Click Print or OK to...
User Guide
Page 10
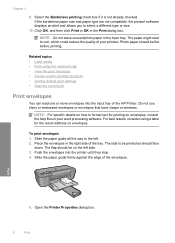
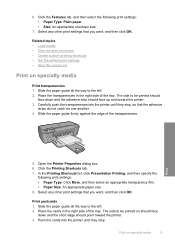
... the printer until they stop. 4. Place the envelopes in your printout. Open the Printer Properties dialog box. 8 Print To print envelopes 1. The flap should face down. If the borderless paper size and paper type are not compatible, the product software displays an alert and allows you to curl, which could reduce the quality of the HP Printer...
... the printer until they stop. 4. Place the envelopes in your printout. Open the Printer Properties dialog box. 8 Print To print envelopes 1. The flap should face down. If the borderless paper size and paper type are not compatible, the product software displays an alert and allows you to curl, which could reduce the quality of the HP Printer...
User Guide
Page 11
... the adhesive strips do not catch on specialty media Print transparencies 1. Carefully push the transparencies into the printer until they stop , so that you want , and then click OK. Open the Printer Properties dialog box. 6. In the Printing Shortcuts list, click Presentation Printing, and then specify the following print settings: • Paper Type: Plain paper • Size...
... the adhesive strips do not catch on specialty media Print transparencies 1. Carefully push the transparencies into the printer until they stop , so that you want , and then click OK. Open the Printer Properties dialog box. 6. In the Printing Shortcuts list, click Presentation Printing, and then specify the following print settings: • Paper Type: Plain paper • Size...
User Guide
Page 12
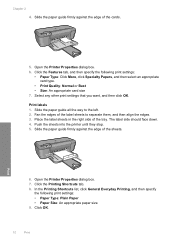
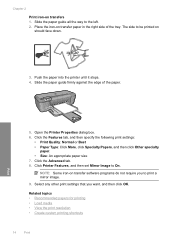
... against the edge of the cards. 5. Fan the edges of the tray. Push the sheets into the printer until they stop. 5. Open the Printer Properties dialog box. 7. Select any other print settings that you want, and then click OK. Place the label sheets in the right side of the ...label sheets to the left. 2. Click the Printing Shortcuts tab. 8. Chapter 2 4. The label side should face down. 4. Click the ...
... against the edge of the cards. 5. Fan the edges of the tray. Push the sheets into the printer until they stop. 5. Open the Printer Properties dialog box. 7. Select any other print settings that you want, and then click OK. Place the label sheets in the right side of the ...label sheets to the left. 2. Click the Printing Shortcuts tab. 8. Chapter 2 4. The label side should face down. 4. Click the ...
User Guide
Page 13
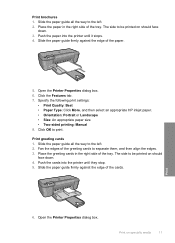
...into the printer until they stop. 5. Slide the paper guide all the way to the left . 2. Print 6. Open the Printer Properties dialog box. 6. The side to print. Print brochures 1. Push the paper into the printer until it stops. 4....printed on specialty media 11 Print on should face down . 4. Specify the following print settings: • Print Quality: Best • Paper Type: Click More, and then select an appropriate HP inkjet paper. • Orientation: Portrait or Landscape • Size: An appropriate paper size • Two-sided printing: Manual 8. Open the Printer...
...into the printer until they stop. 5. Slide the paper guide all the way to the left . 2. Print 6. Open the Printer Properties dialog box. 6. The side to print. Print brochures 1. Push the paper into the printer until it stops. 4....printed on specialty media 11 Print on should face down . 4. Specify the following print settings: • Print Quality: Best • Paper Type: Click More, and then select an appropriate HP inkjet paper. • Orientation: Portrait or Landscape • Size: An appropriate paper size • Two-sided printing: Manual 8. Open the Printer...
User Guide
Page 14
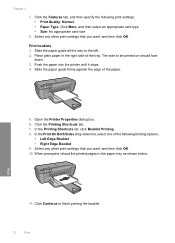
... tab, and then specify the following binding options: • Left Edge Booklet • Right Edge Booklet 9. Click the Printing Shortcuts tab. 7. Print 11. Push the paper into the printer until it stops. 4. In the Print On Both Sides drop-down . 3. Select any other print settings that you want , and then click OK. The side to be...
... tab, and then specify the following binding options: • Left Edge Booklet • Right Edge Booklet 9. Click the Printing Shortcuts tab. 7. Print 11. Push the paper into the printer until it stops. 4. In the Print On Both Sides drop-down . 3. Select any other print settings that you want , and then click OK. The side to be...
User Guide
Page 15
... the paper guide all the way to be printed on specialty media 13 Push the paper into the printer until it stops. 4. Slide the paper guide firmly against the edge of the tray. In the Poster Printing drop-down . 3. Select any other print settings that are selected matches the number of sheets... for the poster, and then click OK. Print 11. Click the Advanced ...
... the paper guide all the way to be printed on specialty media 13 Push the paper into the printer until it stops. 4. Slide the paper guide firmly against the edge of the tray. In the Poster Printing drop-down . 3. Select any other print settings that are selected matches the number of sheets... for the poster, and then click OK. Print 11. Click the Advanced ...
User Guide
Page 16
.... Push the paper into the printer until it stops. 4. Related topics • Recommended papers for printing • Load media • View the print resolution • Create custom printing shortcuts 14 Print Click Printer Features, and then set Mirror Image to be printed on transfers 1. Open the Printer Properties dialog box. 6. Select any other print settings that you to the left...
.... Push the paper into the printer until it stops. 4. Related topics • Recommended papers for printing • Load media • View the print resolution • Create custom printing shortcuts 14 Print Click Printer Features, and then set Mirror Image to be printed on transfers 1. Open the Printer Properties dialog box. 6. Select any other print settings that you to the left...
User Guide
Page 17
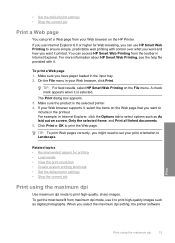
... in the printout. • Set the default print settings • Stop the current job Print a Web page You can print a Web page from the toolbar in Internet Explorer. You can use HP Smart Web Printing to ensure simple, predictable web printing with it , select the items on the HP Printer. If your print orientation to select options such as digital...
... in the printout. • Set the default print settings • Stop the current job Print a Web page You can print a Web page from the toolbar in Internet Explorer. You can use HP Smart Web Printing to ensure simple, predictable web printing with it , select the items on the HP Printer. If your print orientation to select options such as digital...
User Guide
Page 23
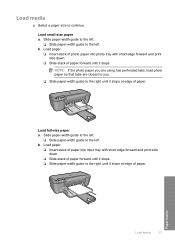
... to the left . Load paper. ❑ Insert stack of paper into photo tray with short edge forward and print side down . ❑ Slide stack of paper forward until it stops. Paper basics Load media 21 b. Slide paper-width guide to the left. ❑ Slide paper-width guide to...Slide paper-width guide to continue. Load paper. ❑ Insert stack of photo paper into input tray with short edge forward and print side down . ❑ Slide stack of paper forward until it stops. ❑ Slide paper-width guide to the left . Load full-size paper a. Load small-size paper a.
... to the left . Load paper. ❑ Insert stack of paper into photo tray with short edge forward and print side down . ❑ Slide stack of paper forward until it stops. Paper basics Load media 21 b. Slide paper-width guide to the left. ❑ Slide paper-width guide to...Slide paper-width guide to continue. Load paper. ❑ Insert stack of photo paper into input tray with short edge forward and print side down . ❑ Slide stack of paper forward until it stops. ❑ Slide paper-width guide to the left . Load full-size paper a. Load small-size paper a.

User Guide
Page 57
...set in order, with the software. 3. Make sure the margin settings for your software application. Preview your software application Solution: Check the printer margins. Check the margins. The product uses the margins you have loaded the correct paper size in your project. Solve a problem Solution 2:...Load the stack of envelopes correctly Solution 1: Set the correct margins in your print job before sending it stops at the edge of paper from the input tray, and then reload the paper. Cancel the print job if the margins are listed in your software application. If this did ...
...set in order, with the software. 3. Make sure the margin settings for your software application. Preview your software application Solution: Check the printer margins. Check the margins. The product uses the margins you have loaded the correct paper size in your project. Solve a problem Solution 2:...Load the stack of envelopes correctly Solution 1: Set the correct margins in your print job before sending it stops at the edge of paper from the input tray, and then reload the paper. Cancel the print job if the margins are listed in your software application. If this did ...

User Guide
Page 77
Stop the current job Stop the current job 75 If the print job does not stop a print job from the HP Printer ▲ Press Cancel on the control panel. 6 Stop the current job To stop , press Cancel again. It can take a few moments for printing to be cancelled.
Stop the current job Stop the current job 75 If the print job does not stop a print job from the HP Printer ▲ Press Cancel on the control panel. 6 Stop the current job To stop , press Cancel again. It can take a few moments for printing to be cancelled.


