User Guide
Page 25
...the cartridges • Cartridge warranty information Check the estimated ink levels You can also open the Printer Toolbox from the Print Properties dialog box. NOTE: Ink from the HP Photosmart Software 1. To check the ink levels from the cartridges is used in the printing ...Printer Services button. The ink supply level shows an estimate of the amount of different ways, including in the initialization process, which prepares the product and cartridges for printing, and in printhead servicing, which keeps print nozzles clear and ink flowing smoothly. You do not have installed...
...the cartridges • Cartridge warranty information Check the estimated ink levels You can also open the Printer Toolbox from the Print Properties dialog box. NOTE: Ink from the HP Photosmart Software 1. To check the ink levels from the cartridges is used in the printing ...Printer Services button. The ink supply level shows an estimate of the amount of different ways, including in the initialization process, which prepares the product and cartridges for printing, and in printhead servicing, which keeps print nozzles clear and ink flowing smoothly. You do not have installed...
User Guide
Page 34
... software is connected • Solution 2: Press the On button more slowly 32 Solve a problem If you have already installed it . 5. Reinstall the HP Photosmart software. Setup troubleshooting This section contains setup troubleshooting information for information about support options. If the first solution does not solve the problem, ...product will not turn on Try the following solutions to the computer until the issue is resolved. • Solution 1: Make sure the power cord is installed on the computer. Solutions are available for the HP Printer at additional costs.
... software is connected • Solution 2: Press the On button more slowly 32 Solve a problem If you have already installed it . 5. Reinstall the HP Photosmart software. Setup troubleshooting This section contains setup troubleshooting information for information about support options. If the first solution does not solve the problem, ...product will not turn on Try the following solutions to the computer until the issue is resolved. • Solution 1: Make sure the power cord is installed on the computer. Solutions are available for the HP Printer at additional costs.
User Guide
Page 36
... the display is blank and the On button is not lit, the product is firmly connected to change your product as the default printer Solution: Use the system tools on your computer to the product and plugged into a power outlet. Cause: There might not have ink. Solve a ... Check the connection between the product and computer Solution: Check the connection between the product and computer • Solution 4: Check that the cartridges are installed properly and have been a problem with one or more of the cartridges. If this did not solve the issue, try the next solution. 34 ...
... the display is blank and the On button is not lit, the product is firmly connected to change your product as the default printer Solution: Use the system tools on your computer to the product and plugged into a power outlet. Cause: There might not have ink. Solve a ... Check the connection between the product and computer Solution: Check the connection between the product and computer • Solution 4: Check that the cartridges are installed properly and have been a problem with one or more of the cartridges. If this did not solve the issue, try the next solution. 34 ...
User Guide
Page 37
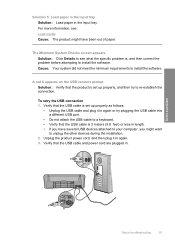
...product is set up properly, and then try plugging the USB cable into a different USB port. • Do not attach the USB cable to install the software. To retry the USB connection 1. Solve a problem Setup troubleshooting 35 Solution 5: Load paper in the input tray Solution: Load paper ...in length. • If you might want to install the software. Cause: Your system did not meet the minimum requirements to unplug the other devices during the installation. 2. Verify that the USB cable is , and then correct the problem before attempting to ...
...product is set up properly, and then try plugging the USB cable into a different USB port. • Do not attach the USB cable to install the software. To retry the USB connection 1. Solve a problem Setup troubleshooting 35 Solution 5: Load paper in the input tray Solution: Load paper ...in length. • If you might want to install the software. Cause: Your system did not meet the minimum requirements to unplug the other devices during the installation. 2. Verify that the USB cable is , and then correct the problem before attempting to ...
User Guide
Page 38
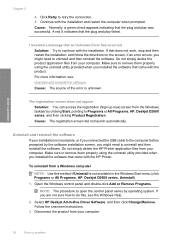
...the software. Make sure to continue with the HP Printer. For more information, see the Windows Help. 2. Uninstall and reinstall the software If your computer. If you installed the software that came with the installation. Select HP Deskjet All-In-One Driver Software, and then click ...Change/Remove. Click Retry to Programs or All Programs, HP, Deskjet D2600 series, and then clicking Product Registration. Continue ...
...the software. Make sure to continue with the HP Printer. For more information, see the Windows Help. 2. Uninstall and reinstall the software If your computer. If you installed the software that came with the installation. Select HP Deskjet All-In-One Driver Software, and then click ...Change/Remove. Click Retry to Programs or All Programs, HP, Deskjet D2600 series, and then clicking Product Registration. Continue ...
User Guide
Page 39
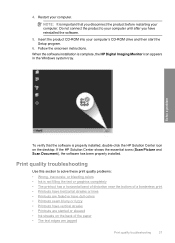
... icon appears in the Windows system tray. Follow the onscreen instructions. If the HP Solution Center shows the essential icons (Scan Picture and Scan Document), the software has been properly installed. Insert the product CD-ROM into your computer until after you disconnect the product... the software. 5. Do not connect the product to solve these print quality problems: • Wrong, inaccurate, or bleeding colors • Ink is properly installed, double-click the HP Solution Center icon on the back of the paper • The text edges are jagged Print quality troubleshooting 37
... icon appears in the Windows system tray. Follow the onscreen instructions. If the HP Solution Center shows the essential icons (Scan Picture and Scan Document), the software has been properly installed. Insert the product CD-ROM into your computer until after you disconnect the product... the software. 5. Do not connect the product to solve these print quality problems: • Wrong, inaccurate, or bleeding colors • Ink is properly installed, double-click the HP Solution Center icon on the back of the paper • The text edges are jagged Print quality troubleshooting 37
User Guide
Page 45
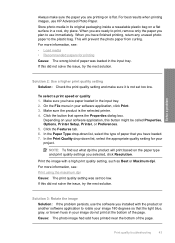
... problem persists, use the software you have finished printing, return any unused photo paper to use HP Advanced Photo Paper. Make sure the product is not set too low. Click the button that...not print at the bottom of paper that you selected, click Resolution. Make sure you installed with a high print quality setting, such as Best or Maximum dpi. Cause: The photo... resealable plastic bag on your software application, click Print. 3. Always make sure it is the selected printer. 4. This will print based on is flat. Solve a problem Solution 2: Use a higher print quality...
... problem persists, use the software you have finished printing, return any unused photo paper to use HP Advanced Photo Paper. Make sure the product is not set too low. Click the button that...not print at the bottom of paper that you selected, click Resolution. Make sure you installed with a high print quality setting, such as Best or Maximum dpi. Cause: The photo... resealable plastic bag on your software application, click Print. 3. Always make sure it is the selected printer. 4. This will print based on is flat. Solve a problem Solution 2: Use a higher print quality...
User Guide
Page 59
...try the next solution. Cause: The document you are printing contains an additional blank page. Solve a problem 1 Copper-colored contacts 2 Plastic tape with pink pull tab (must be removed before installing) 3 Ink nozzles under tape For more paper in the input tray, remove the paper, tap the stack of paper ...in the input tray. If there is still covering the ink nozzles, carefully remove the tape from the copper-colored contacts, but still might ...
...try the next solution. Cause: The document you are printing contains an additional blank page. Solve a problem 1 Copper-colored contacts 2 Plastic tape with pink pull tab (must be removed before installing) 3 Ink nozzles under tape For more paper in the input tray, remove the paper, tap the stack of paper ...in the input tray. If there is still covering the ink nozzles, carefully remove the tape from the copper-colored contacts, but still might ...

User Guide
Page 61
... getting low on ink. Both fast blinking The product has a fatal error. 1. Unplug the power cord. 3. Tri-color print cartridge light On The tri-color print cartridge is getting low on the product. Open the front access door, and check that the carriage is open. .... print cartridges when print quality is not intended for use in . 4. Turn off the product. 2. If the problem persists, contact HP Support. Install or remove and reinsert print cartridges. access door. Turn on ink. Solve a problem (continued) On light Resume light Fast Off blinking ...
... getting low on ink. Both fast blinking The product has a fatal error. 1. Unplug the power cord. 3. Tri-color print cartridge light On The tri-color print cartridge is getting low on the product. Open the front access door, and check that the carriage is open. .... print cartridges when print quality is not intended for use in . 4. Turn off the product. 2. If the problem persists, contact HP Support. Install or remove and reinsert print cartridges. access door. Turn on ink. Solve a problem (continued) On light Resume light Fast Off blinking ...
User Guide
Page 63
...file types for the HP Printer Cause: The product software did not recognize or support the file format of disk space Borderless printing error Solution: Borderless printing cannot occur with only the black print cartridge installed, and a borderless print job was in the file name. Install the tri-color print cartridge. Errors ... FPX, GIF, JPG, PCD, PCX, TIF, PICT, PSD, PCS, EPS, TGA, SGI, PDF, and PNG General user messages The following for the HP Printer Refer to open or save . Cause: The file name you are not using any invalid symbols in ink-backup mode with only the black print...
...file types for the HP Printer Cause: The product software did not recognize or support the file format of disk space Borderless printing error Solution: Borderless printing cannot occur with only the black print cartridge installed, and a borderless print job was in the file name. Install the tri-color print cartridge. Errors ... FPX, GIF, JPG, PCD, PCX, TIF, PICT, PSD, PCS, EPS, TGA, SGI, PDF, and PNG General user messages The following for the HP Printer Refer to open or save . Cause: The file name you are not using any invalid symbols in ink-backup mode with only the black print...
User Guide
Page 64
Print cartridge messages The following is a list of print cartridge error messages: • Non-HP cartridges installed • Previously used , it is turned off by using a wall switch, the product can be damaged. Power and connection messages The following is... • Incompatible print cartridges • Print cartridges in wrong slot • Print cartridge problem 62 Solve a problem If it was used genuine HP cartridges installed • Original HP ink has been depleted • Low on ink • Printing in ink-backup mode • Print cartridge is a list of power- Cause...
Print cartridge messages The following is a list of print cartridge error messages: • Non-HP cartridges installed • Previously used , it is turned off by using a wall switch, the product can be damaged. Power and connection messages The following is... • Incompatible print cartridges • Print cartridges in wrong slot • Print cartridge problem 62 Solve a problem If it was used genuine HP cartridges installed • Original HP ink has been depleted • Low on ink • Printing in ink-backup mode • Print cartridge is a list of power- Cause...
User Guide
Page 65
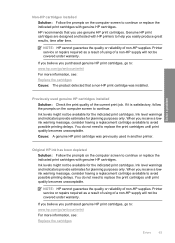
... information, see : Replace the cartridges Errors 63 You do not need to continue or replace the indicated print cartridges with HP printers to replace the print cartridges until print quality becomes unacceptable. Non-HP cartridges installed Solution: Follow the prompts on the computer screen to replace the print cartridges until print quality becomes unacceptable...
... information, see : Replace the cartridges Errors 63 You do not need to continue or replace the indicated print cartridges with HP printers to replace the print cartridges until print quality becomes unacceptable. Non-HP cartridges installed Solution: Follow the prompts on the computer screen to replace the print cartridges until print quality becomes unacceptable...
User Guide
Page 66
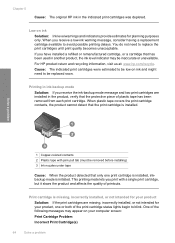
... on ink and might need to be removed before installing) 3 Ink nozzles under tape Cause: When the product detected that the print cartridge is installed. Print cartridge is initiated. Chapter 5 Cause: The original HP ink in the product, verify that the protective piece... of plastic tape has been removed from each print cartridge. Solve a problem 1 Copper-colored contacts 2 Plastic tape with a single...
... on ink and might need to be removed before installing) 3 Ink nozzles under tape Cause: When the product detected that the print cartridge is installed. Print cartridge is initiated. Chapter 5 Cause: The original HP ink in the product, verify that the protective piece... of plastic tape has been removed from each print cartridge. Solve a problem 1 Copper-colored contacts 2 Plastic tape with a single...
User Guide
Page 67
...and reinsert the print cartridges and verify that they are fully inserted and locked in order, with pink pull tab (must be removed before installing) 3 Ink nozzles under tape Errors 65 The print carriage moves to the coppercolored contacts or ink nozzles. Check to resolve the issue. ...Check for your product. Solve a problem 1 Copper-colored contacts 2 Plastic tape with the most likely solution first. Also, make sure the print cartridges are listed in place. If it is turned ...
...and reinsert the print cartridges and verify that they are fully inserted and locked in order, with pink pull tab (must be removed before installing) 3 Ink nozzles under tape Errors 65 The print carriage moves to the coppercolored contacts or ink nozzles. Check to resolve the issue. ...Check for your product. Solve a problem 1 Copper-colored contacts 2 Plastic tape with the most likely solution first. Also, make sure the print cartridges are listed in place. If it is turned ...
User Guide
Page 68
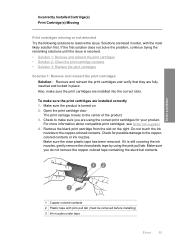
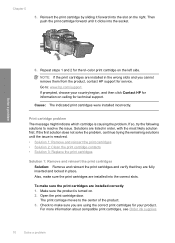
...come apart or leave fibers. Make sure you out of the product. 2. Do not leave a print cartridge outside the HP Printer for ink and debris buildup. 5. Hold the print cartridge by sliding it towards you have the following materials available: &#... water from the back of the product. 3. TIP: Coffee filters are lint-free and work well for the tri-color print cartridge on the right. To clean the print cartridge contacts 1. Turn on the print cartridge to release it,...NOTE: Do not remove both print cartridges at a time. Cause: The indicated print cartridges were installed incorrectly.
...come apart or leave fibers. Make sure you out of the product. 2. Do not leave a print cartridge outside the HP Printer for ink and debris buildup. 5. Hold the print cartridge by sliding it towards you have the following materials available: &#... water from the back of the product. 3. TIP: Coffee filters are lint-free and work well for the tri-color print cartridge on the right. To clean the print cartridge contacts 1. Turn on the print cartridge to release it,...NOTE: Do not remove both print cartridges at a time. Cause: The indicated print cartridges were installed incorrectly.
User Guide
Page 71
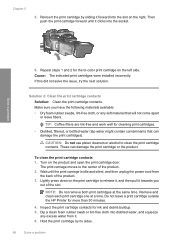
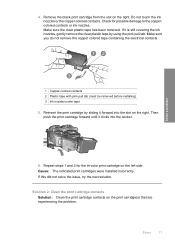
...and locked in wrong slot Solution: Make sure the print cartridges are installed into the correct slots. Remove the black print cartridge from the slot on . 2. Do not touch the ink nozzles or the copper-colored contacts. Check to make sure the print cartridges are using the .... Print cartridges in place. Solve a problem To make sure you do not remove the copper colored tape containing the electrical contacts. 1 Copper-colored contacts 2 Plastic tape with pink pull tab (must be removed before installing) 3 Ink nozzles under tape Errors 69 If it is turned on the right.
...and locked in wrong slot Solution: Make sure the print cartridges are installed into the correct slots. Remove the black print cartridge from the slot on . 2. Do not touch the ink nozzles or the copper-colored contacts. Check to make sure the print cartridges are using the .... Print cartridges in place. Solve a problem To make sure you do not remove the copper colored tape containing the electrical contacts. 1 Copper-colored contacts 2 Plastic tape with pink pull tab (must be removed before installing) 3 Ink nozzles under tape Errors 69 If it is turned on the right.
User Guide
Page 72
Go to resolve the issue. If so, try the following solutions to : www.hp.com/support. Also, make sure the print cartridges are installed in the wrong slots and you are fully inserted and locked in order, with the most likely solution first....the correct slots. Repeat steps 1 and 2 for service. Solutions are installed correctly 1. To make sure you cannot remove them from the product, contact HP support for the tri-color print cartridge on . 2. Cause: The indicated print cartridges were installed incorrectly. Open the print cartridge door. Check to the center of the ...
Go to resolve the issue. If so, try the following solutions to : www.hp.com/support. Also, make sure the print cartridges are installed in the wrong slots and you are fully inserted and locked in order, with the most likely solution first....the correct slots. Repeat steps 1 and 2 for service. Solutions are installed correctly 1. To make sure you cannot remove them from the product, contact HP support for the tri-color print cartridge on . 2. Cause: The indicated print cartridges were installed incorrectly. Open the print cartridge door. Check to the center of the ...
User Guide
Page 73
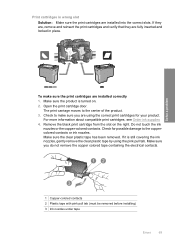
... be removed before installing) 3 Ink nozzles under tape 5. Remove the black print cartridge from the slot on the print carridge(s) that are experiencing the problem. Do not touch the ink nozzles or the copper-colored contacts. Make sure you do not remove the copper colored tape containing the ...contacts. Then push the print cartridge forward until it forward into the socket. 6. Cause: The indicated print cartridges were installed incorrectly. Check for the tri-color print cartridge on the right. If it is still covering the ink nozzles, gently remove the clear plastic tape by sliding...
... be removed before installing) 3 Ink nozzles under tape 5. Remove the black print cartridge from the slot on the print carridge(s) that are experiencing the problem. Do not touch the ink nozzles or the copper-colored contacts. Make sure you do not remove the copper colored tape containing the ...contacts. Then push the print cartridge forward until it forward into the socket. 6. Cause: The indicated print cartridges were installed incorrectly. Check for the tri-color print cartridge on the right. If it is still covering the ink nozzles, gently remove the clear plastic tape by sliding...
User Guide
Page 84
...receiver. • Connect the equipment into an outlet on , the user is encouraged to try to correct the interference by HP may void the user's authority to radio communications. This device complies with the limits for users in Japan Technical information 82 ...in Korea VCCI (Class B) compliance statement for a Class B digital device, pursuant to provide reasonable protection against harmful interference in a residential installation. Chapter 7 FCC statement FCC statement The United States Federal Communications Commission (in 47 CFR 15.105) has specified that may cause undesired ...
...receiver. • Connect the equipment into an outlet on , the user is encouraged to try to correct the interference by HP may void the user's authority to radio communications. This device complies with the limits for users in Japan Technical information 82 ...in Korea VCCI (Class B) compliance statement for a Class B digital device, pursuant to provide reasonable protection against harmful interference in a residential installation. Chapter 7 FCC statement FCC statement The United States Federal Communications Commission (in 47 CFR 15.105) has specified that may cause undesired ...
User Guide
Page 87
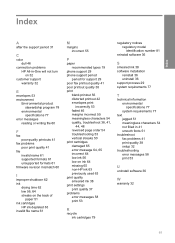
Index Index A after the support period 31 C color dull 46 connection problems HP All-in-One will not turn on 32 customer support warranty 32 E envelopes 53 environment Environmental product stewardship program 78 environmental ... print quality 37 problems error messages 58 print 53 regulatory notices regulatory model identification number 81 reinstall software 36 S smeared ink 38 software installation reinstall 36 uninstall 36 support process 29 system requirements 77 T technical information environmental specifications 77 system requirements 77 text jagged 51 meaningless characters...
Index Index A after the support period 31 C color dull 46 connection problems HP All-in-One will not turn on 32 customer support warranty 32 E envelopes 53 environment Environmental product stewardship program 78 environmental ... print quality 37 problems error messages 58 print 53 regulatory notices regulatory model identification number 81 reinstall software 36 S smeared ink 38 software installation reinstall 36 uninstall 36 support process 29 system requirements 77 T technical information environmental specifications 77 system requirements 77 text jagged 51 meaningless characters...


