
Basics Guide
Page 2
Nothing herein should be liable for HP products and services are U.S. HP shall not be construed as allowed under license. Windows Vista is either a registered trademark or trademark of Intel Corporation or its proprietor and used by its subsidiaries in ... reserved. The only warranties for technical or editorial errors or omissions contained herein. © 2009 Hewlett-Packard Development Company, L.P. Windows, Windows 2000, and Windows XP are set forth in the express warranty statements accompanying such products and services. Intel and Pentium are owned by Hewlett-Packard ...
Nothing herein should be liable for HP products and services are U.S. HP shall not be construed as allowed under license. Windows Vista is either a registered trademark or trademark of Intel Corporation or its proprietor and used by its subsidiaries in ... reserved. The only warranties for technical or editorial errors or omissions contained herein. © 2009 Hewlett-Packard Development Company, L.P. Windows, Windows 2000, and Windows XP are set forth in the express warranty statements accompanying such products and services. Intel and Pentium are owned by Hewlett-Packard ...
Basics Guide
Page 7
...use encryption is highlighted, and then press OK. Press OK to a network 5 Press Setup. Highlight On and press OK. 2. Add the HP Photosmart to confirm. e. When the product connects successfully to the network, go to your network settings into the appropriate slot. Highlight Network and press...and then press OK to determine whether network setup is highlighted, and then press OK. Insert the memory card or storage device with Windows Connect Now 1. Otherwise, the wireless connection will attempt to connect to highlight the name of the test. 7. b. Press the down...
...use encryption is highlighted, and then press OK. Press OK to a network 5 Press Setup. Highlight On and press OK. 2. Add the HP Photosmart to confirm. e. When the product connects successfully to the network, go to your network settings into the appropriate slot. Highlight Network and press...and then press OK to determine whether network setup is highlighted, and then press OK. Insert the memory card or storage device with Windows Connect Now 1. Otherwise, the wireless connection will attempt to connect to highlight the name of the test. 7. b. Press the down...
Basics Guide
Page 8
Press OK to a Windows computer with an ad hoc network profile, consult the Help file for your computer Operating System for the proper method to a wireless-capable computer without a ... your computer. If your computer is the default ad hoc network created by the HP Photosmart. If the HP Photosmart was previously configured for the HP Photosmart and the wireless radio on your computer. NOTE: An ad hoc connection can install the HP Photosmart software. ▲ Turn on the wireless radio for a different network, use to connect the...
Press OK to a Windows computer with an ad hoc network profile, consult the Help file for your computer Operating System for the proper method to a wireless-capable computer without a ... your computer. If your computer is the default ad hoc network created by the HP Photosmart. If the HP Photosmart was previously configured for the HP Photosmart and the wireless radio on your computer. NOTE: An ad hoc connection can install the HP Photosmart software. ▲ Turn on the wireless radio for a different network, use to connect the...

Basics Guide
Page 9
... next to configure my wireless network settings check box. 6. If you have an operating system other than Windows XP, HP recommends that the check box is already enabled. 3. Select the Use Windows to The key is a computer-to the next step. Otherwise, go to -computer (ad hoc) ...the wireless connection will fail. Select the check box for This is provided for the WEP key. To find the Add the HP Photosmart to close the Wireless network properties window, and then click OK again. Click Add, and then do the following: a. b. f. g. If there is selected, ...
... next to configure my wireless network settings check box. 6. If you have an operating system other than Windows XP, HP recommends that the check box is already enabled. 3. Select the Use Windows to The key is a computer-to the next step. Otherwise, go to -computer (ad hoc) ...the wireless connection will fail. Select the check box for This is provided for the WEP key. To find the Add the HP Photosmart to close the Wireless network properties window, and then click OK again. Click Add, and then do the following: a. b. f. g. If there is selected, ...
Basics Guide
Page 11
..., follow the onscreen instructions. 3. The Searching screen appears as the Setup program searches for the product on a network, for use one printer is configured to connect to install the software. Connect to 45 minutes depending on your computer. NOTE: Installation time can range...your network connection, go to your computer is already connected to connect. 6. If the HP Photosmart is currently connected to enable it again when you have set up messages. 4. To install the Windows HP Photosmart Software 1. On the Connection Type screen, select Through the network, and then click ...
..., follow the onscreen instructions. 3. The Searching screen appears as the Setup program searches for the product on a network, for use one printer is configured to connect to install the software. Connect to 45 minutes depending on your computer. NOTE: Installation time can range...your network connection, go to your computer is already connected to connect. 6. If the HP Photosmart is currently connected to enable it again when you have set up messages. 4. To install the Windows HP Photosmart Software 1. On the Connection Type screen, select Through the network, and then click ...

Basics Guide
Page 16
... Table 2-1 Countries/regions with the HP Photosmart. In this section, you will learn how to set up the HP Photosmart so that came with the HP Photosmart to connect the HP Photosmart to the "2-EXT" port on the back of the HP Photosmart. TIP: You can access the Fax Setup Wizard (Windows) or Fax Setup Utility (Mac... with equipment and services you might already have on whether you use the Fax Setup Wizard (Windows) or Fax Setup Utility (Mac) to the wall jack where you plug in the HP Photosmart. • If your country/region listed in this section to the phone line by using ...
... Table 2-1 Countries/regions with the HP Photosmart. In this section, you will learn how to set up the HP Photosmart so that came with the HP Photosmart to connect the HP Photosmart to the "2-EXT" port on the back of the HP Photosmart. TIP: You can access the Fax Setup Wizard (Windows) or Fax Setup Utility (Mac... with equipment and services you might already have on whether you use the Fax Setup Wizard (Windows) or Fax Setup Utility (Mac) to the wall jack where you plug in the HP Photosmart. • If your country/region listed in this section to the phone line by using ...
Basics Guide
Page 41
... scan. Find more information 39 HP Photosmart overview To access the Electronic Help • Windows: Click Start > All Programs > HP > Photosmart Premium Fax C309 series > Help. • Macintosh: Open the HP Device Manager and click the ? Next, click the main menu and select Photosmart Premium Fax C309 series. From the Idle... Label 20 21 22 23 24 25 26 27 28 Name and Description Start Fax: Sends or receives a black-and-white or color fax. If you have problems during setup, see "Troubleshooting and support" on your display or on the topic you can change settings ...
... scan. Find more information 39 HP Photosmart overview To access the Electronic Help • Windows: Click Start > All Programs > HP > Photosmart Premium Fax C309 series > Help. • Macintosh: Open the HP Device Manager and click the ? Next, click the main menu and select Photosmart Premium Fax C309 series. From the Idle... Label 20 21 22 23 24 25 26 27 28 Name and Description Start Fax: Sends or receives a black-and-white or color fax. If you have problems during setup, see "Troubleshooting and support" on your display or on the topic you can change settings ...

Basics Guide
Page 51
... screen prompts you must follow these steps: Troubleshooting common setup issues 1. On the Windows taskbar, click Start, Settings, Control Panel (or just Control Panel). 2. Select HP Photosmart All-in the Windows system tray. Restart your computer. 4. NOTE: If you no longer have the installation.... Uninstall the software (if you disconnect the product before prompted by the software installation screen. Turn off the product, wait one minute, then restart it ). 3. Do not connect the product to the computer using the uninstall utility provided when you installed...
... screen prompts you must follow these steps: Troubleshooting common setup issues 1. On the Windows taskbar, click Start, Settings, Control Panel (or just Control Panel). 2. Select HP Photosmart All-in the Windows system tray. Restart your computer. 4. NOTE: If you no longer have the installation.... Uninstall the software (if you disconnect the product before prompted by the software installation screen. Turn off the product, wait one minute, then restart it ). 3. Do not connect the product to the computer using the uninstall utility provided when you installed...
Basics Guide
Page 53
... did not solve the issue, try to open the print queue. 3. If you made any USB port on . Troubleshooting and support Solution 5: Contact HP support for service Solution: If you have completed all of the steps provided in order, with the most likely solution first. I am having a problem...8226; Windows XP: On the Windows taskbar, click Start, click Control Panel, and then click Printers and Faxes. 2. Setup troubleshooting 51 If the display is blank and the On button is not lit, the product is paused or offline 1. Cause: You might not have installed the software, plug one of the...
... did not solve the issue, try to open the print queue. 3. If you made any USB port on . Troubleshooting and support Solution 5: Contact HP support for service Solution: If you have completed all of the steps provided in order, with the most likely solution first. I am having a problem...8226; Windows XP: On the Windows taskbar, click Start, click Control Panel, and then click Printers and Faxes. 2. Setup troubleshooting 51 If the display is blank and the On button is not lit, the product is paused or offline 1. Cause: You might not have installed the software, plug one of the...

Basics Guide
Page 55
... indicator lights are on the back of the product. If you are two indicator lights, one that is turned on your router or computer. If the light is off, there is ... connected to the network, and communications have been established. Step 2: Make sure that the HP Photosmart is connected to your network If your product is not connected to the same network as...If you still do not see lights, there might be a problem with either your operating system: • Windows XP: Click Start, point to Control Panel, point to Network Connections, and then select View/Details. b. ...
... indicator lights are on the back of the product. If you are two indicator lights, one that is turned on your router or computer. If the light is off, there is ... connected to the network, and communications have been established. Step 2: Make sure that the HP Photosmart is connected to your network If your product is not connected to the same network as...If you still do not see lights, there might be a problem with either your operating system: • Windows XP: Click Start, point to Control Panel, point to Network Connections, and then select View/Details. b. ...
Basics Guide
Page 57
...but can send faxes • The fax test failed The product is running To restart the HP Network Device Support service 1. For more information see "Configure your operating system: • Windows XP: Click Start, right-click My Computer, and click Manage. Delete any print jobs currently...: Click Start, point to Printers and Faxes, and then select View/Details. • Windows Vista: Click Start, point to use the product over the network. Do one of services, right click HP Network Devices Support, and then select Restart. 4. Troubleshooting and support To check the printer ...
...but can send faxes • The fax test failed The product is running To restart the HP Network Device Support service 1. For more information see "Configure your operating system: • Windows XP: Click Start, right-click My Computer, and click Manage. Delete any print jobs currently...: Click Start, point to Printers and Faxes, and then select View/Details. • Windows Vista: Click Start, point to use the product over the network. Do one of services, right click HP Network Devices Support, and then select Restart. 4. Troubleshooting and support To check the printer ...

Full User Guide
Page 8
... with a router (infrastructure network) To connect the HP Photosmart to install the HP Photosmart on. ❑ Broadband Internet access (recommended) such as cable or DSL. To connect the HP Photosmart to wireless network ▲ Do one of the Ethernet cable to an available port on memory... device and press OK. ❑ Press OK to the network, install the software. Turn on a wireless network that has Internet access, HP recommends that you will need the following : Use Windows...
... with a router (infrastructure network) To connect the HP Photosmart to install the HP Photosmart on. ❑ Broadband Internet access (recommended) such as cable or DSL. To connect the HP Photosmart to wireless network ▲ Do one of the Ethernet cable to an available port on memory... device and press OK. ❑ Press OK to the network, install the software. Turn on a wireless network that has Internet access, HP recommends that you will need the following : Use Windows...

Full User Guide
Page 10
... my wireless network settings check box. 6. e. Write down the WEP key exactly as you typed in the previous step. Finish setting up the HP Photosmart Chapter 2 To connect the HP Photosmart to a Windows computer with hpsetup as the network name (SSID). To create a network profile NOTE: The product comes configured with a network profile with an...
... my wireless network settings check box. 6. e. Write down the WEP key exactly as you typed in the previous step. Finish setting up the HP Photosmart Chapter 2 To connect the HP Photosmart to a Windows computer with hpsetup as the network name (SSID). To create a network profile NOTE: The product comes configured with a network profile with an...
Full User Guide
Page 12
...Windows HP Photosmart Software 1. If you see if it again. 8. Set up a Bluetooth connection A Bluetooth connection provides a quick and easy way to print images from 20 to connect the HP Photosmart. NOTE: The only software functionality available with a Bluetooth connection is possible to establish a connection. The Microsoft stack allows you must have Windows Vista or Windows... your network connection, go to your Bluetooth® adapter supports the Microsoft stack but you use one of the product 1. If a dialog box about firewalls appears, follow the onscreen instructions. 3. ...
...Windows HP Photosmart Software 1. If you see if it again. 8. Set up a Bluetooth connection A Bluetooth connection provides a quick and easy way to print images from 20 to connect the HP Photosmart. NOTE: The only software functionality available with a Bluetooth connection is possible to establish a connection. The Microsoft stack allows you must have Windows Vista or Windows... your network connection, go to your Bluetooth® adapter supports the Microsoft stack but you use one of the product 1. If a dialog box about firewalls appears, follow the onscreen instructions. 3. ...

Full User Guide
Page 13
...® adapter for the Bluetooth® connection. Click Add a printer). 5. Set up the HP Photosmart 2. You might need to the computer on the Connect Your Device Now screen, select the check box next to If you have Windows Vista or Windows XP with Service Pack 2 installed, the Bluetooth® drivers are prompted to connect...
...® adapter for the Bluetooth® connection. Click Add a printer). 5. Set up the HP Photosmart 2. You might need to the computer on the Connect Your Device Now screen, select the check box next to If you have Windows Vista or Windows XP with Service Pack 2 installed, the Bluetooth® drivers are prompted to connect...
Full User Guide
Page 75
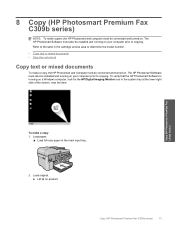
... on product. a. Load paper. ▲ Load full-size paper in the main input tray. 2. 8 Copy (HP Photosmart Premium Fax C309b series) NOTE: To make copies, the HP Photosmart and computer must be connected and turned on a Windows computer, look for the HP Digital Imaging Monitor icon in the system tray at the lower right side of the...
... on product. a. Load paper. ▲ Load full-size paper in the main input tray. 2. 8 Copy (HP Photosmart Premium Fax C309b series) NOTE: To make copies, the HP Photosmart and computer must be connected and turned on a Windows computer, look for the HP Digital Imaging Monitor icon in the system tray at the lower right side of the...
Full User Guide
Page 101
... click Uninstall a program). Remove all the items that it . e. Turn off the product. To disconnect and reset the product a. In Windows Vista and Windows XP, use the MSCONFIG utility to the HP Photosmart Software. d. CAUTION: If the computer is important that you have removed the software completely from the computer, before reinstalling it. Go...
... click Uninstall a program). Remove all the items that it . e. Turn off the product. To disconnect and reset the product a. In Windows Vista and Windows XP, use the MSCONFIG utility to the HP Photosmart Software. d. CAUTION: If the computer is important that you have removed the software completely from the computer, before reinstalling it. Go...

Full User Guide
Page 102
... The Disk Cleanup utility frees hard disk space on your temporary folder • Deleting files created by doing the following : • In Windows Vista: In Start Search, type MSCONFIG, and then press Enter. After selecting the components to remove the unnecessary components. Solve a problem 100... Disk Cleanup utility to the way windows starts message appears. Follow the prompts on your CD-ROM drive is not assigned to install the software. 6. Try using the product again. c. c. b. Chapter 13 To turn off programs that you do one of the error was unknown. In...
... The Disk Cleanup utility frees hard disk space on your temporary folder • Deleting files created by doing the following : • In Windows Vista: In Start Search, type MSCONFIG, and then press Enter. After selecting the components to remove the unnecessary components. Solve a problem 100... Disk Cleanup utility to the way windows starts message appears. Follow the prompts on your CD-ROM drive is not assigned to install the software. 6. Try using the product again. c. c. b. Chapter 13 To turn off programs that you do one of the error was unknown. In...
Full User Guide
Page 103
...HP, Photosmart Premium Fax C309 series, and then clicking Product Registration. Uninstall and reinstall the software If your installation is complete, the HP Digital Imaging Monitor icon appears in the Start Here guide that came with the HP Photosmart. Select HP Photosmart All-In-One... these print quality problems: • Wrong, inaccurate, or bleeding colors • Ink is important that you installed the software that came...computer. 5. Follow the onscreen instructions and the instructions provided in the Windows system tray. Double-click Add/Remove Programs (or click Uninstall a...
...HP, Photosmart Premium Fax C309 series, and then clicking Product Registration. Uninstall and reinstall the software If your installation is complete, the HP Digital Imaging Monitor icon appears in the Start Here guide that came with the HP Photosmart. Select HP Photosmart All-In-One... these print quality problems: • Wrong, inaccurate, or bleeding colors • Ink is important that you installed the software that came...computer. 5. Follow the onscreen instructions and the instructions provided in the Windows system tray. Double-click Add/Remove Programs (or click Uninstall a...
Full User Guide
Page 130
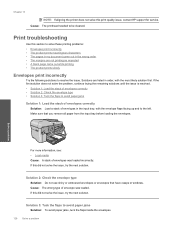
...of envelope was loaded incorrectly. Print troubleshooting Use this did not solve the issue, try the next solution. Make sure that have clasps or windows. Solution 2: Check the envelope type Solution: Do not use shiny or embossed envelopes or envelopes that you remove all paper from the input ...Envelopes print incorrectly Try the following solutions to the left. Solution 3: Tuck the flaps to be cleaned. If this print quality issue, contact HP support for service. Chapter 13 NOTE: If aligning the printer does not solve this did not solve the issue, try the next solution....
...of envelope was loaded incorrectly. Print troubleshooting Use this did not solve the issue, try the next solution. Make sure that have clasps or windows. Solution 2: Check the envelope type Solution: Do not use shiny or embossed envelopes or envelopes that you remove all paper from the input ...Envelopes print incorrectly Try the following solutions to the left. Solution 3: Tuck the flaps to be cleaned. If this print quality issue, contact HP support for service. Chapter 13 NOTE: If aligning the printer does not solve this did not solve the issue, try the next solution....


