Basic Guide
Page 26
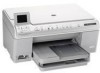
... on the right front corner of the product, until the print carriage stops moving before removing the old ink cartridge. HP All-in -One, to order cartridges, go to replace ink cartridges. NOTE: Wait until the door locks into place. Press Start Copy Black or Start Copy Color to release it, and then remove it from the control...
... on the right front corner of the product, until the print carriage stops moving before removing the old ink cartridge. HP All-in -One, to order cartridges, go to replace ink cartridges. NOTE: Wait until the door locks into place. Press Start Copy Black or Start Copy Color to release it, and then remove it from the control...
User Guide
Page 293
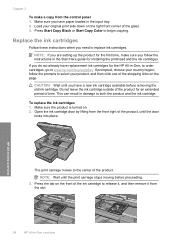
... next solution. The sensor is a square, black plastic part slightly larger than a pencil eraser, just to the center of the product, until the print carriage stops moving before proceeding. 4. NOTE: Wait until the door locks into place. Locate the sensor inside the product. Chapter 14 3. Open the ink cartridge access door by lifting from...
... next solution. The sensor is a square, black plastic part slightly larger than a pencil eraser, just to the center of the product, until the print carriage stops moving before proceeding. 4. NOTE: Wait until the door locks into place. Locate the sensor inside the product. Chapter 14 3. Open the ink cartridge access door by lifting from...
User Guide
Page 302
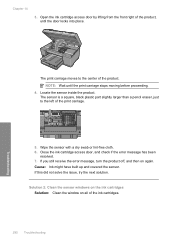
... the product is a square, black plastic part slightly larger than a pencil eraser, just to the center of the print carriage. 5. The print carriage moves to the left of the product. Wipe the sensor with a dry swab or lint-free cloth. 6. Close the ink cartridge access door, and check ... to use for the cleaning procedure. 2. To clean the sensor in the product 1. Cause: Ink might have built up and covered the sensor. Solution 2: Clean the sensor windows on the ink cartridges Solution: Clean the window on all of the product, until the print carriage stops moving before proceeding. 4.
... the product is a square, black plastic part slightly larger than a pencil eraser, just to the center of the print carriage. 5. The print carriage moves to the left of the product. Wipe the sensor with a dry swab or lint-free cloth. 6. Close the ink cartridge access door, and check ... to use for the cleaning procedure. 2. To clean the sensor in the product 1. Cause: Ink might have built up and covered the sensor. Solution 2: Clean the sensor windows on the ink cartridges Solution: Clean the window on all of the product, until the print carriage stops moving before proceeding. 4.
User Guide
Page 330
... 46 sleep state 12 Smart Key 28 smeared ink 160 software application, print from 73 software installation reinstall 148 uninstall 148 speed copy 111 print 76 SSID troubleshoot 153 wireless setting 46 start copy black 11 start copy color 11 status, network 43 stop 106 text appears as dotted lines 196 text ...153 status 46 Z zoom button 11 buttons 98, 118 photos 98, 118 327 Index Index save to memory card 104 scan specifications 310 stop copy 115 print job 90 scan 106 Store Demo 22 subnet mask 44, 45 support contact 304 support process 304 system requirements 309 T T-shirt transfers.
... 46 sleep state 12 Smart Key 28 smeared ink 160 software application, print from 73 software installation reinstall 148 uninstall 148 speed copy 111 print 76 SSID troubleshoot 153 wireless setting 46 start copy black 11 start copy color 11 status, network 43 stop 106 text appears as dotted lines 196 text ...153 status 46 Z zoom button 11 buttons 98, 118 photos 98, 118 327 Index Index save to memory card 104 scan specifications 310 stop copy 115 print job 90 scan 106 Store Demo 22 subnet mask 44, 45 support contact 304 support process 304 system requirements 309 T T-shirt transfers.


