
Setup Guide
Page 6
...à l'écran pour compléter l'installation du logiciel. PT a. Turn on the back of the HP All-in -One e a qualquer porta USB no ícone de CD-ROM com o logotipo da HP e duas vezes em setup.exe. Once the USB prompt appears, connect the USB...logo HP et double-cliquez sur setup.exe. Allumez l'ordinateur, connectez-vous si nécessaire et attendez que le bureau s'affiche. b. 11 - AR USB My Computer HP .setup.exe AR USB USB a HP All-in-One USB b 6 • HP Photosmart C4600 All-in-One series / HP Photosmart ...
...à l'écran pour compléter l'installation du logiciel. PT a. Turn on the back of the HP All-in -One e a qualquer porta USB no ícone de CD-ROM com o logotipo da HP e duas vezes em setup.exe. Once the USB prompt appears, connect the USB...logo HP et double-cliquez sur setup.exe. Allumez l'ordinateur, connectez-vous si nécessaire et attendez que le bureau s'affiche. b. 11 - AR USB My Computer HP .setup.exe AR USB USB a HP All-in-One USB b 6 • HP Photosmart C4600 All-in-One series / HP Photosmart ...
Basics Guide
Page 4
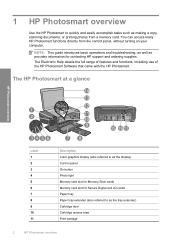
... quickly and easily accomplish tasks such as making a copy, scanning documents, or printing photos from the control panel, without turning on your computer. The HP Photosmart at a glance HP Photosmart overview Label 1 2 3 4 5 6 7 8 9 10 11 Description Color graphics display (also referred to as the display) Control panel On button Photo light Memory card slot for Memory Stick...
... quickly and easily accomplish tasks such as making a copy, scanning documents, or printing photos from the control panel, without turning on your computer. The HP Photosmart at a glance HP Photosmart overview Label 1 2 3 4 5 6 7 8 9 10 11 Description Color graphics display (also referred to as the display) Control panel On button Photo light Memory card slot for Memory Stick...
Basics Guide
Page 12
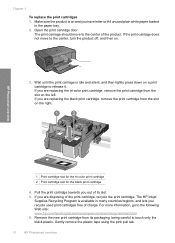
..., go to release it. HP Photosmart overview 1 Print cartridge slot for the tri-color print cartridge 2 Print cartridge slot...hp.com/hpinfo/globalcitizenship/environment/recycle/inkjet.html 6. Open the print cartridge door. Gently remove the plastic tape using the pink pull tab. 10 HP Photosmart... overview Wait until the print carriage is idle and silent, and then lightly press down on the left. If you out of the print cartridge, recycle the print cartridge. Pull the print cartridge towards you are disposing of its packaging, being careful to the center, turn...
..., go to release it. HP Photosmart overview 1 Print cartridge slot for the tri-color print cartridge 2 Print cartridge slot...hp.com/hpinfo/globalcitizenship/environment/recycle/inkjet.html 6. Open the print cartridge door. Gently remove the plastic tape using the pink pull tab. 10 HP Photosmart... overview Wait until the print carriage is idle and silent, and then lightly press down on the left. If you out of the print cartridge, recycle the print cartridge. Pull the print cartridge towards you are disposing of its packaging, being careful to the center, turn...
Basics Guide
Page 14
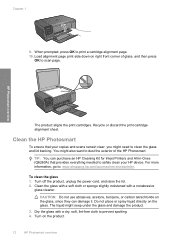
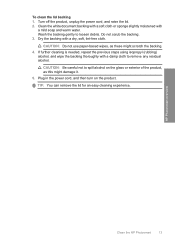
...HP Cleaning Kit for Inkjet Printers and All-in-Ones (Q6260A) that your HP device. Dry the glass with a nonabrasive glass cleaner. Load alignment page print side down on the product. 12 HP Photosmart overview To clean the glass 1. HP Photosmart overview The product aligns the print cartridges. Clean the HP Photosmart... clean the glass and lid backing. The liquid might also want to print a cartridge alignment page. 10. Turn on right front corner of the HP Photosmart. Chapter 1 9. You might seep under the glass and damage the product. 3. TIP: You can damage it.
...HP Cleaning Kit for Inkjet Printers and All-in-Ones (Q6260A) that your HP device. Dry the glass with a nonabrasive glass cleaner. Load alignment page print side down on the product. 12 HP Photosmart overview To clean the glass 1. HP Photosmart overview The product aligns the print cartridges. Clean the HP Photosmart... clean the glass and lid backing. The liquid might also want to print a cartridge alignment page. 10. Turn on right front corner of the HP Photosmart. Chapter 1 9. You might seep under the glass and damage the product. 3. TIP: You can damage it.
Basics Guide
Page 15
...this might scratch the backing. 4. Dry the backing with a damp cloth to remove any residual alcohol. CAUTION: Be careful not to loosen debris. Turn off the product, unplug the power cord, and raise the lid. 2. To clean the lid backing 1. Wash the backing gently to spill alcohol on... the product. TIP: You can remove the lid for an easy cleaning experience. HP Photosmart overview Clean the HP Photosmart 13 Plug in the power cord, and then turn on the glass or exterior of the product, as these might damage it. 5. Do not scrub the backing....
...this might scratch the backing. 4. Dry the backing with a damp cloth to remove any residual alcohol. CAUTION: Be careful not to loosen debris. Turn off the product, unplug the power cord, and raise the lid. 2. To clean the lid backing 1. Wash the backing gently to spill alcohol on... the product. TIP: You can remove the lid for an easy cleaning experience. HP Photosmart overview Clean the HP Photosmart 13 Plug in the power cord, and then turn on the glass or exterior of the product, as these might damage it. 5. Do not scrub the backing....
Basics Guide
Page 16
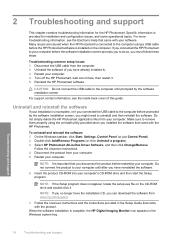
... before the HP Photosmart software is provided for the HP Photosmart. NOTE: If the Setup program does not appear, locate the setup.exe file on the computer. Turn off the HP Photosmart, wait one minute, then restart it ). 3. Do not simply delete the HP Photosmart application files ...from the computer. 2. Restart your software. NOTE: It is complete, the HP Digital Imaging Monitor icon appears in...
... before the HP Photosmart software is provided for the HP Photosmart. NOTE: If the Setup program does not appear, locate the setup.exe file on the computer. Turn off the HP Photosmart, wait one minute, then restart it ). 3. Do not simply delete the HP Photosmart application files ...from the computer. 2. Restart your software. NOTE: It is complete, the HP Digital Imaging Monitor icon appears in...
Basics Guide
Page 17
... quickly. Cause: The product experienced an error. Follow the onscreen instructions. 4. Follow the onscreen instructions and the instructions provided in -One Installer. 7. Hardware setup troubleshooting Use this did not solve the issue, try the next solution. Solution 1: Make sure you know works... troubleshooting 15 To uninstall from your computer's CD-ROM drive. 6. The product will not turn the product off the product, and then unplug the power cord. Disconnect the HP Photosmart from a Mac and then reinstall 1. On the desktop, open the CD-ROM and then...
... quickly. Cause: The product experienced an error. Follow the onscreen instructions. 4. Follow the onscreen instructions and the instructions provided in -One Installer. 7. Hardware setup troubleshooting Use this did not solve the issue, try the next solution. Solution 1: Make sure you know works... troubleshooting 15 To uninstall from your computer's CD-ROM drive. 6. The product will not turn the product off the product, and then unplug the power cord. Disconnect the HP Photosmart from a Mac and then reinstall 1. On the desktop, open the CD-ROM and then...
User Guide
Page 50
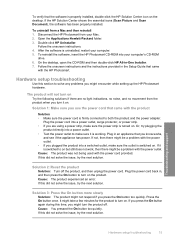
...computer is available from HP at an additional cost. Occasionally, TSR's prevent the HP software from your computer...product from loading so that came with the HP Photosmart. Insert the product CD-ROM into your ... the software. 6. Contact your HP dealer or call the support phone... HP Photosmart at the HP online support Web site: www.hp.com/support. Select HP Photosmart ...HP Photosmart application files from starting up. 7. Follow the onscreen instructions and the instructions provided in -One... you connected the USB cable to www.hp.com/support, select your installation is important...
...computer is available from HP at an additional cost. Occasionally, TSR's prevent the HP software from your computer...product from loading so that came with the HP Photosmart. Insert the product CD-ROM into your ... the software. 6. Contact your HP dealer or call the support phone... HP Photosmart at the HP online support Web site: www.hp.com/support. Select HP Photosmart ...HP Photosmart application files from starting up. 7. Follow the onscreen instructions and the instructions provided in -One... you connected the USB cable to www.hp.com/support, select your installation is important...
User Guide
Page 51
...; I connected the USB cable, but I received a message that the software is complete, the HP Digital Imaging Monitor icon appears in the Windows system tray. Turn off the product, wait one minute, then restart it ). 3. Reinstall the HP Photosmart software. If the HP Solution Center shows the essential icons (Scan Picture and Scan Document), the software has...
...; I connected the USB cable, but I received a message that the software is complete, the HP Digital Imaging Monitor icon appears in the Windows system tray. Turn off the product, wait one minute, then restart it ). 3. Reinstall the HP Photosmart software. If the HP Solution Center shows the essential icons (Scan Picture and Scan Document), the software has...
User Guide
Page 57
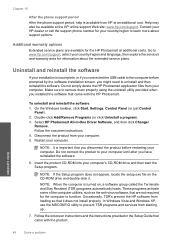
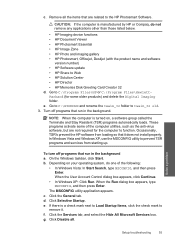
...Selective Startup. If there is turned on your operating system, do not remove any applications other than those listed below. • HP Imaging device functions • HP Document Viewer • HP Photosmart Essential • HP Image Zone • HP Photo and imaging gallery • HP Photosmart, Officejet, Deskjet (with ... older products) and delete the Digital Imaging folder. Occasionally, TSR's prevent the HP software from starting up. CAUTION: If the computer is manufactured by HP or Compaq, do one of the computer utilities, such as the anti-virus software, but are related ...
...Selective Startup. If there is turned on your operating system, do not remove any applications other than those listed below. • HP Imaging device functions • HP Document Viewer • HP Photosmart Essential • HP Image Zone • HP Photo and imaging gallery • HP Photosmart, Officejet, Deskjet (with ... older products) and delete the Digital Imaging folder. Occasionally, TSR's prevent the HP software from starting up. CAUTION: If the computer is manufactured by HP or Compaq, do one of the computer utilities, such as the anti-virus software, but are related ...
User Guide
Page 59
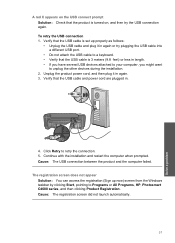
...cable and plug it in . 4. To retry the USB connection 1. A red X appears on the USB connect prompt Solution: Check that the product is turned on, and then try plugging the USB cable into a different USB port. • Do not attach the USB cable to a keyboard. • Verify... that the USB cable is set up now) screen from the Windows taskbar by clicking Start, pointing to Programs or All Programs, HP, Photosmart C4600 series, and then clicking Product Registration. Cause: The registration screen did not launch automatically. 57 Solve a problem Unplug the product power cord, ...
...cable and plug it in . 4. To retry the USB connection 1. A red X appears on the USB connect prompt Solution: Check that the product is turned on, and then try plugging the USB cable into a different USB port. • Do not attach the USB cable to a keyboard. • Verify... that the USB cable is set up now) screen from the Windows taskbar by clicking Start, pointing to Programs or All Programs, HP, Photosmart C4600 series, and then clicking Product Registration. Cause: The registration screen did not launch automatically. 57 Solve a problem Unplug the product power cord, ...
User Guide
Page 90
Memory is resolved. • Solution 1: Install the HP Photosmart Software • Solution 2: Turn on the product • Solution 3: Turn on calling for technical support. Scanner failure Solution: Turn off the product and then turn it is installed, restart your scan. Go to install the HP Photosmart Software. 3. If it on calling for service. Follow the onscreen instructions and the...
Memory is resolved. • Solution 1: Install the HP Photosmart Software • Solution 2: Turn on the product • Solution 3: Turn on calling for technical support. Scanner failure Solution: Turn off the product and then turn it is installed, restart your scan. Go to install the HP Photosmart Software. 3. If it on calling for service. Follow the onscreen instructions and the...
User Guide
Page 91
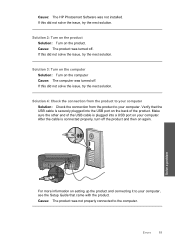
If this did not solve the issue, try the next solution. Solution 3: Turn on the computer Solution: Turn on the computer Cause: The computer was not properly connected to the computer. Solution 4: Check the connection from the product to your computer Solution:... the product and then on the product. Cause: The product was turned off. Cause: The product was not installed. Cause: The HP Photosmart Software was turned off. Verify that came with the product. Solution 2: Turn on the product Solution: Turn on again. If this did not solve the issue, try the next solution. If ...
If this did not solve the issue, try the next solution. Solution 3: Turn on the computer Solution: Turn on the computer Cause: The computer was not properly connected to the computer. Solution 4: Check the connection from the product to your computer Solution:... the product and then on the product. Cause: The product was turned off. Cause: The product was not installed. Cause: The HP Photosmart Software was turned off. Verify that came with the product. Solution 2: Turn on the product Solution: Turn on again. If this did not solve the issue, try the next solution. If ...
User Guide
Page 103
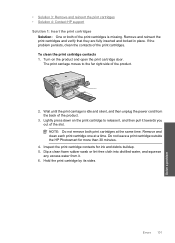
..., and then unplug the power cord from it towards you out of the product. 2. Remove and clean each print cartridge one at the same time. To clean the print cartridge contacts 1. Turn on the print cartridge to the far right side of the slot. Lightly press down on the product and open... or lint-free cloth into distilled water, and squeeze any excess water from the back of the product. 3. Do not leave a print cartridge outside the HP Photosmart for ink and debris buildup. 5. Wait until the print carriage is missing. Errors 101 Solve a problem
..., and then unplug the power cord from it towards you out of the product. 2. Remove and clean each print cartridge one at the same time. To clean the print cartridge contacts 1. Turn on the print cartridge to the far right side of the slot. Lightly press down on the product and open... or lint-free cloth into distilled water, and squeeze any excess water from the back of the product. 3. Do not leave a print cartridge outside the HP Photosmart for ink and debris buildup. 5. Wait until the print carriage is missing. Errors 101 Solve a problem
User Guide
Page 110
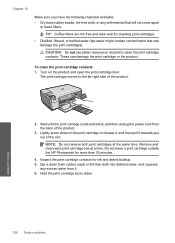
... the product. 3. To clean the print cartridge contacts 1. Do not leave a print cartridge outside the HP Photosmart for cleaning print cartridges. • Distilled, filtered, or bottled water (tap water might contain contaminants that... will not come apart or leave fibers. Remove and clean each print cartridge one at the same time. TIP: Coffee filters are lint-free and work well for more than 30... damage the print cartridge or the product. Turn on the print cartridge to clean the print cartridge contacts. Hold the print cartridge by its sides...
... the product. 3. To clean the print cartridge contacts 1. Do not leave a print cartridge outside the HP Photosmart for cleaning print cartridges. • Distilled, filtered, or bottled water (tap water might contain contaminants that... will not come apart or leave fibers. Remove and clean each print cartridge one at the same time. TIP: Coffee filters are lint-free and work well for more than 30... damage the print cartridge or the product. Turn on the print cartridge to clean the print cartridge contacts. Hold the print cartridge by its sides...

User Guide
Page 119
Turn on the print cartridge to release it, and then pull it . 6. Inspect the print ... not remove both print cartridges at a time. Errors 117 Solve a problem Do not leave a print cartridge outside the HP Photosmart for ink and debris buildup. 5. These can damage the print cartridges). The print carriage moves to clean the print cartridge...water from the back of the product. 2. Hold the print cartridge by its sides. Remove and clean each print cartridge one at the same time. TIP: Coffee filters are lint-free and work well for cleaning print cartridges. • Distilled...
Turn on the print cartridge to release it, and then pull it . 6. Inspect the print ... not remove both print cartridges at a time. Errors 117 Solve a problem Do not leave a print cartridge outside the HP Photosmart for ink and debris buildup. 5. These can damage the print cartridges). The print carriage moves to clean the print cartridge...water from the back of the product. 2. Hold the print cartridge by its sides. Remove and clean each print cartridge one at the same time. TIP: Coffee filters are lint-free and work well for cleaning print cartridges. • Distilled...


