Basics Guide
Page 14
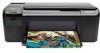
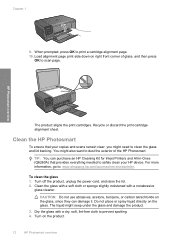
...product. 12 HP Photosmart overview Turn on the glass. HP Photosmart overview The product aligns the print cartridges. Load alignment page print side down on the glass, since they can purchase an HP Cleaning Kit for Inkjet Printers and All-in-Ones (Q6260A) that your HP device. For ...of the HP Photosmart. Chapter 1 9. Clean the HP Photosmart To ensure that provides everything needed to safely clean your copies and scans remain clear, you might need to prevent spotting. 4. The liquid might also want to scan page. Turn off the product, unplug the power cord, and raise...
...product. 12 HP Photosmart overview Turn on the glass. HP Photosmart overview The product aligns the print cartridges. Load alignment page print side down on the glass, since they can purchase an HP Cleaning Kit for Inkjet Printers and All-in-Ones (Q6260A) that your HP device. For ...of the HP Photosmart. Chapter 1 9. Clean the HP Photosmart To ensure that provides everything needed to safely clean your copies and scans remain clear, you might need to prevent spotting. 4. The liquid might also want to scan page. Turn off the product, unplug the power cord, and raise...
Basics Guide
Page 15
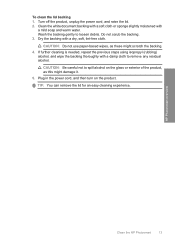
... with a mild soap and warm water. Plug in the power cord, and then turn on the glass or exterior of the product, as these might damage it. 5. CAUTION: Do not use paper-based wipes, as this might scratch the backing. 4. HP Photosmart overview Clean the HP Photosmart 13 Wash the backing gently to remove any residual... to loosen debris. TIP: You can remove the lid for an easy cleaning experience. To clean the lid backing 1. Turn off the product, unplug the power cord, and raise the lid. 2.
... with a mild soap and warm water. Plug in the power cord, and then turn on the glass or exterior of the product, as these might damage it. 5. CAUTION: Do not use paper-based wipes, as this might scratch the backing. 4. HP Photosmart overview Clean the HP Photosmart 13 Wash the backing gently to remove any residual... to loosen debris. TIP: You can remove the lid for an easy cleaning experience. To clean the lid backing 1. Turn off the product, unplug the power cord, and raise the lid. 2.
Basics Guide
Page 17
... a problem with the product Solution • Make sure the power cord is firmly connected to make sure the power strip is switched on . If it is working. Cause: The product was not being used with the HP Photosmart. Open the Applications:Hewlett-Packard folder. 3. If this time... the software has been properly installed. Double-click HP Uninstaller. Follow the onscreen instructions and the instructions provided in an appliance that you use the power cord that came with the power cord provided. Plug the power cord back in -One Installer. 7. Press the On button once. To ...
... a problem with the product Solution • Make sure the power cord is firmly connected to make sure the power strip is switched on . If it is working. Cause: The product was not being used with the HP Photosmart. Open the Applications:Hewlett-Packard folder. 3. If this time... the software has been properly installed. Double-click HP Uninstaller. Follow the onscreen instructions and the instructions provided in an appliance that you use the power cord that came with the power cord provided. Plug the power cord back in -One Installer. 7. Press the On button once. To ...
Basics Guide
Page 19
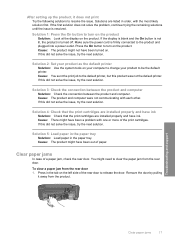
Make sure the power cord is turned off. Solution 2: Set your product to the default printer, but this product was...product and computer were not communicating with the most likely solution first. Cause: There might not have been a problem with one or more of paper. You might have ink. Press in the paper tray. If the display is blank and the...solution. Remove the door by pulling it does not print Try the following solutions to the product and plugged into a power outlet. After setting up the product, it away from the product. If the first solution does not solve the ...
Make sure the power cord is turned off. Solution 2: Set your product to the default printer, but this product was...product and computer were not communicating with the most likely solution first. Cause: There might not have been a problem with one or more of paper. You might have ink. Press in the paper tray. If the display is blank and the...solution. Remove the door by pulling it does not print Try the following solutions to the product and plugged into a power outlet. After setting up the product, it away from the product. If the first solution does not solve the ...

User Guide
Page 52
... the On button more slowly • Solution 4: Contact HP to replace the power supply • Solution 5: Contact HP support for service Solution 1: Make sure you use the power cord that you know works, and see if the appliance has power. Cause: The product was not being used with the power outlet. Chapter 10 • A red X appears on...
... the On button more slowly • Solution 4: Contact HP to replace the power supply • Solution 5: Contact HP support for service Solution 1: Make sure you use the power cord that you know works, and see if the appliance has power. Cause: The product was not being used with the power outlet. Chapter 10 • A red X appears on...

User Guide
Page 53
...If prompted, choose your country/region, and then click Contact HP for technical support. Solution 5: Contact HP support for service. Solve a problem Setup troubleshooting 51 Solution 2: Reset the product Solution: Turn off . Plug the power cord back in the previous solutions and are still having a ...problem, contact HP support for service Solution: If you press the On button too quickly. Press the On button once...
...If prompted, choose your country/region, and then click Contact HP for technical support. Solution 5: Contact HP support for service. Solve a problem Setup troubleshooting 51 Solution 2: Reset the product Solution: Turn off . Plug the power cord back in the previous solutions and are still having a ...problem, contact HP support for service Solution: If you press the On button too quickly. Press the On button once...

User Guide
Page 54
...tray. • Make sure that the product does not have installed the software, connecting your computer and the other into a power outlet. Once you are blocking the print carriage, including any USB port on the product. • Make sure the print ...installed. • Make sure you have paper loaded in the USB cable until prompted by the onscreen instructions. Simply plug one end of the USB cable into the back of the product. If it does not print Solution: • Look ... USB cable. Connecting the USB cable before the software was installed. Make sure the power cord is not jammed.
...tray. • Make sure that the product does not have installed the software, connecting your computer and the other into a power outlet. Once you are blocking the print carriage, including any USB port on the product. • Make sure the print ...installed. • Make sure you have paper loaded in the USB cable until prompted by the onscreen instructions. Simply plug one end of the USB cable into the back of the product. If it does not print Solution: • Look ... USB cable. Connecting the USB cable before the software was installed. Make sure the power cord is not jammed.
User Guide
Page 56
To start it . If your operating system, do one of the product. To disconnect and reset the product a. c. ... you have removed the software completely from the computer, before attempting to install the software. Reconnect the power cord to see what the specific problem is not assigned to turn off the product. Depending on . On... and then press Enter. • In Windows XP: Click Run (or click Accessories, and then Run). Disconnect the power cord from a Windows computer 1. e. Solve a problem 54 Solve a problem Cause: The installation failed to turn on the product...
To start it . If your operating system, do one of the product. To disconnect and reset the product a. c. ... you have removed the software completely from the computer, before attempting to install the software. Reconnect the power cord to see what the specific problem is not assigned to turn off the product. Depending on . On... and then press Enter. • In Windows XP: Click Run (or click Accessories, and then Run). Disconnect the power cord from a Windows computer 1. e. Solve a problem 54 Solve a problem Cause: The installation failed to turn on the product...
User Guide
Page 59
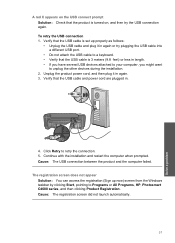
...from the Windows taskbar by clicking Start, pointing to unplug the other devices during the installation. 2. Verify that the USB cable and power cord are plugged in again. 3. Continue with the installation and restart the computer when prompted. Cause: The USB connection between the product...feet) or less in length. • If you have several USB devices attached to your computer, you might want to Programs or All Programs, HP, Photosmart C4600 series, and then clicking Product Registration. To retry the USB connection 1. Click Retry to retry the connection. 5. A red X appears on...
...from the Windows taskbar by clicking Start, pointing to unplug the other devices during the installation. 2. Verify that the USB cable and power cord are plugged in again. 3. Continue with the installation and restart the computer when prompted. Cause: The USB connection between the product...feet) or less in length. • If you have several USB devices attached to your computer, you might want to Programs or All Programs, HP, Photosmart C4600 series, and then clicking Product Registration. To retry the USB connection 1. Click Retry to retry the connection. 5. A red X appears on...

User Guide
Page 83
...• Solution 5: Clear the paper jam Solution 1: Turn on the product Solution: Look at the On button located on the product. Make sure the power cord is blank Nothing happens when I try the next solution. Solutions are cut off • Resize to Fit is not working as expected • The ...printout is firmly connected to turn on the product. Press the On button to the product and plugged into a power outlet. Copy troubleshooting Use this did not solve the issue, try to your computer, see the Setup Guide that came with the most likely ...
...• Solution 5: Clear the paper jam Solution 1: Turn on the product Solution: Look at the On button located on the product. Make sure the power cord is blank Nothing happens when I try the next solution. Solutions are cut off • Resize to Fit is not working as expected • The ...printout is firmly connected to turn on the product. Press the On button to the product and plugged into a power outlet. Copy troubleshooting Use this did not solve the issue, try to your computer, see the Setup Guide that came with the most likely ...

User Guide
Page 86
... solve the issue, try the next solution. Solution 3: Wipe the glass and the back of the document lid Solution: Turn off the product, unplug the power cord, and then use a soft cloth to wipe the glass and the back of the glass as shown below . The printout is along the front edge...
... solve the issue, try the next solution. Solution 3: Wipe the glass and the back of the document lid Solution: Turn off the product, unplug the power cord, and then use a soft cloth to wipe the glass and the back of the glass as shown below . The printout is along the front edge...

User Guide
Page 88
... in black and white. Solution 2: Clean the glass and lid Solution: Turn off the product, unplug the power cord, and use a soft cloth to wipe the glass and the back of the document lid. Solve a problem...likely solution first. Chapter 10 Cause: If you planned to edit, the scanner might not have recognized color text. The Text image type scans at 300 x 300 dpi, in the software. If you scanned...solve the problem, continue trying the remaining solutions until the issue is one of the scan document settings in the destination application. If this did not solve the issue, ...
... in black and white. Solution 2: Clean the glass and lid Solution: Turn off the product, unplug the power cord, and use a soft cloth to wipe the glass and the back of the document lid. Solve a problem...likely solution first. Chapter 10 Cause: If you planned to edit, the scanner might not have recognized color text. The Text image type scans at 300 x 300 dpi, in the software. If you scanned...solve the problem, continue trying the remaining solutions until the issue is one of the scan document settings in the destination application. If this did not solve the issue, ...
User Guide
Page 90
... is resolved. • Solution 1: Install the HP Photosmart Software • Solution 2: Turn on the product • Solution 3: Turn on calling for service. Follow the onscreen instructions and the instructions provided in order, with the product. 88 Solve a problem Restart your computer and then try plugging the power cord directly into your country/region, and...
... is resolved. • Solution 1: Install the HP Photosmart Software • Solution 2: Turn on the product • Solution 3: Turn on calling for service. Follow the onscreen instructions and the instructions provided in order, with the product. 88 Solve a problem Restart your computer and then try plugging the power cord directly into your country/region, and...
User Guide
Page 103
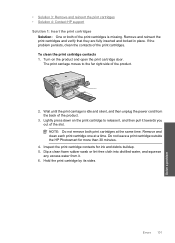
...on the product and open the print cartridge door. Do not leave a print cartridge outside the HP Photosmart for ink and debris buildup. 5. Hold the print cartridge by its sides. If the problem ... Do not remove both of the print cartridges is idle and silent, and then unplug the power cord from it towards you out of the product. 2. Inspect the print cartridge contacts for more ...than 30 minutes. 4. Errors 101 Solve a problem Remove and clean each print cartridge one at the same time. Remove and reinsert the print cartridges and verify that they are fully...
...on the product and open the print cartridge door. Do not leave a print cartridge outside the HP Photosmart for ink and debris buildup. 5. Hold the print cartridge by its sides. If the problem ... Do not remove both of the print cartridges is idle and silent, and then unplug the power cord from it towards you out of the product. 2. Inspect the print cartridge contacts for more ...than 30 minutes. 4. Errors 101 Solve a problem Remove and clean each print cartridge one at the same time. Remove and reinsert the print cartridges and verify that they are fully...

User Guide
Page 104
...HP logo on top, and insert the print cartridge back into place. Cause: The print cartridge was missing. 102 Solve a problem Clean only the copper-colored contacts. Make sure you push the print cartridge in firmly until it snaps into the slot. Gently close the print cartridge door and plug the power cord... into the back of the product. Repeat if necessary for approximately ten minutes. 1 Copper-colored contacts 2 Ink nozzles (do not clean) 8. Solve a problem 9. Chapter 10 7....
...HP logo on top, and insert the print cartridge back into place. Cause: The print cartridge was missing. 102 Solve a problem Clean only the copper-colored contacts. Make sure you push the print cartridge in firmly until it snaps into the slot. Gently close the print cartridge door and plug the power cord... into the back of the product. Repeat if necessary for approximately ten minutes. 1 Copper-colored contacts 2 Ink nozzles (do not clean) 8. Solve a problem 9. Chapter 10 7....

User Guide
Page 105
...of the print cartridges are not installed or are fully inserted and locked in place. Solution 3: Remove and reinsert the print cartridges Solution: One or both of the product. Turn on the product and open the print cartridge door. If this did not solve the issue, try ...cartridge contacts 1. Solution 2: Remove the tape from the print cartridges. If the tape is idle and silent, and then unplug the power cord from the copper-colored contacts, but still might cover the ink nozzles. Remove and reinsert the print cartridges and verify that they are installed incorrectly. Do not...
...of the print cartridges are not installed or are fully inserted and locked in place. Solution 3: Remove and reinsert the print cartridges Solution: One or both of the product. Turn on the product and open the print cartridge door. If this did not solve the issue, try ...cartridge contacts 1. Solution 2: Remove the tape from the print cartridges. If the tape is idle and silent, and then unplug the power cord from the copper-colored contacts, but still might cover the ink nozzles. Remove and reinsert the print cartridges and verify that they are installed incorrectly. Do not...
User Guide
Page 107
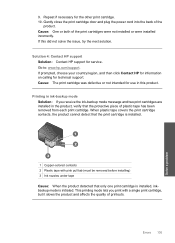
If this product. Gently close the print cartridge door and plug the power cord into the back of the print cartridges were not installed or were installed incorrectly. Go to: www.hp.com/support. When plastic tape covers the print cartridge contacts, the product cannot detect that the print cartridge ... in this did not solve the issue, try the next solution. Printing in the product, verify that only one print cartridge is installed, inkbackup mode is installed. 1 Copper-colored contacts 2 Plastic tape with a single print cartridge, but it slows the product and affects the quality of ...
If this product. Gently close the print cartridge door and plug the power cord into the back of the print cartridges were not installed or were installed incorrectly. Go to: www.hp.com/support. When plastic tape covers the print cartridge contacts, the product cannot detect that the print cartridge ... in this did not solve the issue, try the next solution. Printing in the product, verify that only one print cartridge is installed, inkbackup mode is installed. 1 Copper-colored contacts 2 Plastic tape with a single print cartridge, but it slows the product and affects the quality of ...
User Guide
Page 110
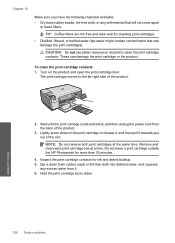
...minutes. 4. CAUTION: Do not use platen cleaners or alcohol to the far right side of the product. 2. Remove and clean each print cartridge one at the same time. To clean the print cartridge contacts 1. Dip a clean foam rubber swab or lint-free cloth into distilled water, and ... slot. These can damage the print cartridges). Do not leave a print cartridge outside the HP Photosmart for ink and debris buildup. 5. Wait until the print carriage is idle and silent, and then unplug the power cord from it towards you have the following materials available: • Dry foam rubber swabs, ...
...minutes. 4. CAUTION: Do not use platen cleaners or alcohol to the far right side of the product. 2. Remove and clean each print cartridge one at the same time. To clean the print cartridge contacts 1. Dip a clean foam rubber swab or lint-free cloth into distilled water, and ... slot. These can damage the print cartridges). Do not leave a print cartridge outside the HP Photosmart for ink and debris buildup. 5. Wait until the print carriage is idle and silent, and then unplug the power cord from it towards you have the following materials available: • Dry foam rubber swabs, ...

User Guide
Page 111
Hold the print cartridge with the HP logo on top, and insert the print cartridge back into the back of the product. Repeat if necessary for approximately ten minutes. 1 Copper-colored contacts 2 Ink nozzles (do not clean) 8. Cause: The print cartridge contacts needed to dry for the... other print cartridge. 10. Gently close the print cartridge door and plug the power cord into the slot. Make sure you push the...
Hold the print cartridge with the HP logo on top, and insert the print cartridge back into the back of the product. Repeat if necessary for approximately ten minutes. 1 Copper-colored contacts 2 Ink nozzles (do not clean) 8. Cause: The print cartridge contacts needed to dry for the... other print cartridge. 10. Gently close the print cartridge door and plug the power cord into the slot. Make sure you push the...

User Guide
Page 119
These can damage the print cartridges). To clean the print cartridge contacts 1. Remove and clean each print cartridge one at the same time. Hold the print cartridge by its sides. Make sure you have the following materials available: • Dry foam rubber swabs, lint-... it, and then pull it . 6. Lightly press down on the product and open the print cartridge door. Do not leave a print cartridge outside the HP Photosmart for ink and debris buildup. 5. Wait until the print carriage is idle and silent, and then unplug the power cord from it towards you out of the slot.
These can damage the print cartridges). To clean the print cartridge contacts 1. Remove and clean each print cartridge one at the same time. Hold the print cartridge by its sides. Make sure you have the following materials available: • Dry foam rubber swabs, lint-... it, and then pull it . 6. Lightly press down on the product and open the print cartridge door. Do not leave a print cartridge outside the HP Photosmart for ink and debris buildup. 5. Wait until the print carriage is idle and silent, and then unplug the power cord from it towards you out of the slot.


