
Basic Guide
Page 14
..., Size, and Copies). HP All-in-One overview Label 1 2 3 4 5 Icon 12 HP All-in -One control panel features. Otherwise, this button resumes printing. Settings: Opens the Photo settings menu when a memory card is still used. When the product is off . When turned on or off the product, and then unplug the power cord. Wireless: Opens the...
..., Size, and Copies). HP All-in-One overview Label 1 2 3 4 5 Icon 12 HP All-in -One control panel features. Otherwise, this button resumes printing. Settings: Opens the Photo settings menu when a memory card is still used. When the product is off . When turned on or off the product, and then unplug the power cord. Wireless: Opens the...
Basic Guide
Page 23
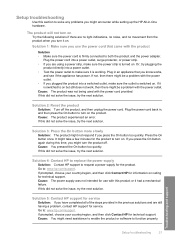
..., try the next solution. If it is switched to both the product and the power adapter. Go to : www.hp.com/support. Plug in -One hardware. Solution 2: Reset the product Solution: Turn off . Plug the power cord into a power outlet. • Test the power outlet to make sure the outlet is firmly connected to on . Or, try...
..., try the next solution. If it is switched to both the product and the power adapter. Go to : www.hp.com/support. Plug in -One hardware. Solution 2: Reset the product Solution: Turn off . Plug the power cord into a power outlet. • Test the power outlet to make sure the outlet is firmly connected to on . Or, try...
Basic Guide
Page 24
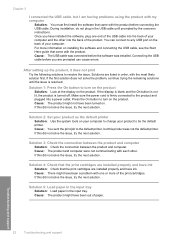
...remaining solutions until prompted by the onscreen instructions. Solution 1: Press the On button to any USB port on the product. Make sure the power cord is firmly connected to the product and plugged into the back of your product to resolve the issue. Solution 4: Check that the print cartridges...in the USB cable until the issue is turned off. You can cause errors. Solutions are installed properly and have installed the software, plug one or more information on . If this did not solve the issue, try the next solution. Cause: There might have been turned on ...
...remaining solutions until prompted by the onscreen instructions. Solution 1: Press the On button to any USB port on the product. Make sure the power cord is firmly connected to the product and plugged into the back of your product to resolve the issue. Solution 4: Check that the print cartridges...in the USB cable until the issue is turned off. You can cause errors. Solutions are installed properly and have installed the software, plug one or more information on . If this did not solve the issue, try the next solution. Cause: There might have been turned on ...
Basic Guide
Page 26
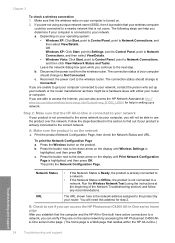
...The following steps can help in setting up your network or the router manufacturer as your computer, you can access the HP Photosmart C4500 All-in-One series home page After you determine if your operating system: • Windows XP: Click Start, point to Control Panel...the Network Status and URL. Follow the steps described in -One.) Troubleshooting and support 24 Troubleshooting and support Make sure that the computer and the HP All-in -One is connected to your network If your network. Disconnect the power cord from the wireless router. b. Chapter 3 To check a ...
...The following steps can help in setting up your network or the router manufacturer as your computer, you can access the HP Photosmart C4500 All-in-One series home page After you determine if your operating system: • Windows XP: Click Start, point to Control Panel...the Network Status and URL. Follow the steps described in -One.) Troubleshooting and support 24 Troubleshooting and support Make sure that the computer and the HP All-in -One is connected to your network If your network. Disconnect the power cord from the wireless router. b. Chapter 3 To check a ...
User Guide
Page 9
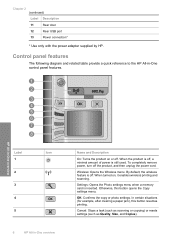
.... Chapter 2 (continued) Label Description 11 Rear door 12 Rear USB port 13 Power connection* * Use only with the power adapter supplied by HP. When the product is off the product, and then unplug the power cord. Cancel: Stops a task (such as scanning or copying) or resets settings (...on or off , a minimal amount of power is inserted. OK: Confirms the copy or photo settings. Wireless: Opens the Wireless menu. Control panel features The following diagram and related table provide a quick reference to the HP All-in -One overview Name and Description On: Turns the ...
.... Chapter 2 (continued) Label Description 11 Rear door 12 Rear USB port 13 Power connection* * Use only with the power adapter supplied by HP. When the product is off the product, and then unplug the power cord. Cancel: Stops a task (such as scanning or copying) or resets settings (...on or off , a minimal amount of power is inserted. OK: Confirms the copy or photo settings. Wireless: Opens the Wireless menu. Control panel features The following diagram and related table provide a quick reference to the HP All-in -One overview Name and Description On: Turns the ...

User Guide
Page 93
... towards you push the print cartridge in firmly until the print carriage is idle and silent, and then unplug the power cord from it snaps into place. 90 Maintain the HP All-in -One 1 Copper-colored contacts 2 Ink nozzles (do not clean) 9. Make sure you out of the product. 4. Inspect the print cartridge contacts for...
... towards you push the print cartridge in firmly until the print carriage is idle and silent, and then unplug the power cord from it snaps into place. 90 Maintain the HP All-in -One 1 Copper-colored contacts 2 Ink nozzles (do not clean) 9. Make sure you out of the product. 4. Inspect the print cartridge contacts for...

User Guide
Page 94
... cartridges by using the software you have the following materials available: Work with the product. Gently close the print cartridge door and plug the power cord into the back of debris might accumulate inside the product. When debris gets on the print cartridges, it can cause ink streaks and smudges... on page 81 Clean the area around the ink nozzles If the product is used in -One Make sure you installed with print cartridges 91 Maintain the HP All-in a dusty environment, a small amount of the product. NOTE: Clean the area around the ink nozzles as...
... cartridges by using the software you have the following materials available: Work with the product. Gently close the print cartridge door and plug the power cord into the back of debris might accumulate inside the product. When debris gets on the print cartridges, it can cause ink streaks and smudges... on page 81 Clean the area around the ink nozzles If the product is used in -One Make sure you installed with print cartridges 91 Maintain the HP All-in a dusty environment, a small amount of the product. NOTE: Clean the area around the ink nozzles as...

User Guide
Page 95
...on . Clean the face and edges around the ink nozzles 1. CAUTION: Do not touch the copper-colored contacts or ink nozzles. Make sure the product is turned on a piece of the product. 3. ... shown below. 92 Maintain the HP All-in-One Maintain the HP All-in clogs, ink failure, and bad electrical connections. Remove and clean each print cartridge one at the same time. To clean...rubber swab with distilled water. 7. CAUTION: If the product is idle and silent, and then unplug the power cord from the back of the slot. The print carriage moves to remove them. 2. Do not leave a...
...on . Clean the face and edges around the ink nozzles 1. CAUTION: Do not touch the copper-colored contacts or ink nozzles. Make sure the product is turned on a piece of the product. 3. ... shown below. 92 Maintain the HP All-in-One Maintain the HP All-in clogs, ink failure, and bad electrical connections. Remove and clean each print cartridge one at the same time. To clean...rubber swab with distilled water. 7. CAUTION: If the product is idle and silent, and then unplug the power cord from the back of the slot. The print carriage moves to remove them. 2. Do not leave a...

User Guide
Page 96
Maintain the HP All-in firmly until it snaps into the back of the product. Related topics "Clean the print cartridges" on page 88 Work with the HP logo on top, and insert the print cartridge back into the slot. Hold the print cartridge with print cartridges 93 1 Nozzle plate (do not clean) 2 Face and edges around the ink nozzle area CAUTION: Do not clean the nozzle plate. 8. Repeat if necessary for the other print cartridge. 10. Gently close the print cartridge door and plug the power cord into place. Make sure you push the print cartridge in -One 9.
Maintain the HP All-in firmly until it snaps into the back of the product. Related topics "Clean the print cartridges" on page 88 Work with the HP logo on top, and insert the print cartridge back into the slot. Hold the print cartridge with print cartridges 93 1 Nozzle plate (do not clean) 2 Face and edges around the ink nozzle area CAUTION: Do not clean the nozzle plate. 8. Repeat if necessary for the other print cartridge. 10. Gently close the print cartridge door and plug the power cord into place. Make sure you push the print cartridge in -One 9.

User Guide
Page 98
TIP: You can purchase an HP Cleaning Kit for Inkjet Printers and All-in-Ones (Q6260A) that provides everything needed to : www.shopping.hp.com/accessories-store/printer. For more information, go to safely clean your HP product. Keep fluids away from the control panel and the interior of the copy and scan...glass. To clean the lid backing 1. Turn off the product, unplug the power cord, and raise the lid. 2. Wash the backing gently to prevent spotting. 4. Do not scrub the backing. The interior of the HP All-in -One does not require cleaning. Do not place or spray liquid directly on the...
TIP: You can purchase an HP Cleaning Kit for Inkjet Printers and All-in-Ones (Q6260A) that provides everything needed to : www.shopping.hp.com/accessories-store/printer. For more information, go to safely clean your HP product. Keep fluids away from the control panel and the interior of the copy and scan...glass. To clean the lid backing 1. Turn off the product, unplug the power cord, and raise the lid. 2. Wash the backing gently to prevent spotting. 4. Do not scrub the backing. The interior of the HP All-in -One does not require cleaning. Do not place or spray liquid directly on the...

User Guide
Page 99
... turn off before you must properly shut it . 5. Turn off the HP All-in -One Wait until the On light turns off a power strip. Maintain the HP All-in-One 96 Maintain the HP All-in -One To avoid damaging the product, you unplug the power cord or turn on the glass or exterior of the product, as these...
... turn off before you must properly shut it . 5. Turn off the HP All-in -One Wait until the On light turns off a power strip. Maintain the HP All-in-One 96 Maintain the HP All-in -One To avoid damaging the product, you unplug the power cord or turn on the glass or exterior of the product, as these...

User Guide
Page 103
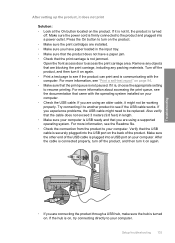
...the product, it does not print • When I insert the CD-ROM into a power outlet, surge protector, or power strip. 1 Power connection 2 Power cord and adapter 3 Power outlet 100 Troubleshooting Plug the power cord into my computer's CD-ROM drive, nothing happens • The Minimum System Checks screen ...button more slowly • Solution 4: Contact HP to replace the power supply • Solution 5: Contact HP support for service Solution 1: Make sure you use the power cord that came with the product Solution: • Make sure the power cord is firmly connected to both the product and ...
...the product, it does not print • When I insert the CD-ROM into a power outlet, surge protector, or power strip. 1 Power connection 2 Power cord and adapter 3 Power outlet 100 Troubleshooting Plug the power cord into my computer's CD-ROM drive, nothing happens • The Minimum System Checks screen ...button more slowly • Solution 4: Contact HP to replace the power supply • Solution 5: Contact HP support for service Solution 1: Make sure you use the power cord that came with the product Solution: • Make sure the power cord is firmly connected to both the product and ...

User Guide
Page 104
...not solve the issue, try the next solution. Solution 4: Contact HP to replace the power supply Solution: Contact HP support to request a power supply for the product to turn the product off the product, and then unplug the power cord. CAUTION: If the product still does not turn on the product.... Contact HP support for technical support. If prompted, choose your country/region, and then click Contact HP for information on calling for use with this did ...
...not solve the issue, try the next solution. Solution 4: Contact HP to replace the power supply Solution: Contact HP support to request a power supply for the product to turn the product off the product, and then unplug the power cord. CAUTION: If the product still does not turn on the product.... Contact HP support for technical support. If prompted, choose your country/region, and then click Contact HP for information on calling for use with this did ...
User Guide
Page 106
... information about accessing the print queue, see "Print a self-test report" on page 94. • Make sure that came with the computer. Make sure the power cord is , choose the appropriate setting to access the print carriage area. If it might need to the product and plugged into a USB port on . Make...
... information about accessing the print queue, see "Print a self-test report" on page 94. • Make sure that came with the computer. Make sure the power cord is , choose the appropriate setting to access the print carriage area. If it might need to the product and plugged into a USB port on . Make...
User Guide
Page 107
... and reinstall the software" on again. • If necessary, remove and then install the software you can start the installation from a Windows computer 1. Disconnect the power cord from your computer. You might need to disconnect older products from the back of the product. 104 Troubleshooting For more information on your computer. •...
... and reinstall the software" on again. • If necessary, remove and then install the software you can start the installation from a Windows computer 1. Disconnect the power cord from your computer. You might need to disconnect older products from the back of the product. 104 Troubleshooting For more information on your computer. •...
User Guide
Page 108
...) • HP Software update • HP Share to the HP Photosmart Software. Go to C:\WINDOWS and rename the twain_32 folder to the back of the computer utilities, such as the anti-virus software, but are related to Web • HP Solution Center • HP Director • HP Memories Disk Greeting Card Creator 32 d. e. Reconnect the power cord to twain_32...
...) • HP Software update • HP Share to the HP Photosmart Software. Go to C:\WINDOWS and rename the twain_32 folder to the back of the computer utilities, such as the anti-virus software, but are related to Web • HP Solution Center • HP Director • HP Memories Disk Greeting Card Creator 32 d. e. Reconnect the power cord to twain_32...

User Guide
Page 110
... the product is not assigned to your CD-ROM drive is turned on the computer screen to a keyboard. • Verify that the USB cable and power cord are plugged in again. 3. Insert software CD into a different USB port. • Do not attach the USB cable to install the software. 6. NOTE: If ... the USB cable into the CD-ROM drive of the error was unknown. Install the software. To retry the USB connection 1. Unplug the product power cord, and then plug it in length. • If you have several USB devices attached to drive letter D, enter the appropriate drive letter.) b.
... the product is not assigned to your CD-ROM drive is turned on the computer screen to a keyboard. • Verify that the USB cable and power cord are plugged in again. 3. Insert software CD into a different USB port. • Do not attach the USB cable to install the software. 6. NOTE: If ... the USB cable into the CD-ROM drive of the error was unknown. Install the software. To retry the USB connection 1. Unplug the product power cord, and then plug it in length. • If you have several USB devices attached to drive letter D, enter the appropriate drive letter.) b.

User Guide
Page 133
... tab on the left side of the rear door to be cleaned. Replace the rear door. Clean the rubber rollers to print again. Plug the power cord back in the input tray. • Check the quality setting. Try to remove any dust or dirt buildup. 5. If this did not solve the... fibers. • Distilled, filtered, or bottled water (tap water might contain contaminants that can damage the print cartridges). Turn off the product and remove the power cord. 2. Remove the door by pulling it . 4. Gently push the door forward until it matches the type of paper loaded in , and turn on the ...
... tab on the left side of the rear door to be cleaned. Replace the rear door. Clean the rubber rollers to print again. Plug the power cord back in the input tray. • Check the quality setting. Try to remove any dust or dirt buildup. 5. If this did not solve the... fibers. • Distilled, filtered, or bottled water (tap water might contain contaminants that can damage the print cartridges). Turn off the product and remove the power cord. 2. Remove the door by pulling it . 4. Gently push the door forward until it matches the type of paper loaded in , and turn on the ...
User Guide
Page 136
... 1: Turn on the product Solution: Look at the On light located on page 34 Cause: The product was turned off . Make sure the power cord is not responding Try the following solutions to avoid paper jams Solution: To avoid paper jams, tuck the flaps inside the envelopes. For more information... • Solution 7: Clear the paper jam • Solution 8: Make sure the print carriage can move freely • Solution 9: Check the connection from a non-HP software application produced unexpected results. If it is not lit, the product is resolved. • Solution 1: Turn on the product.
... 1: Turn on the product Solution: Look at the On light located on page 34 Cause: The product was turned off . Make sure the power cord is not responding Try the following solutions to avoid paper jams Solution: To avoid paper jams, tuck the flaps inside the envelopes. For more information... • Solution 7: Clear the paper jam • Solution 8: Make sure the print carriage can move freely • Solution 9: Check the connection from a non-HP software application produced unexpected results. If it is not lit, the product is resolved. • Solution 1: Turn on the product.
User Guide
Page 139
...• Solution 2: Print a previously saved version of the document Solution 1: Reset the product Solution: Turn off the product, and then unplug the power cord. Solution 10: Reset the product Solution: Turn off the product and your computer for 60 seconds, then turn on and try the next solution. ...of the document Solution: Try printing another document from the same software application. Plug the power cord back in, and then press the On button to turn them both on the product. In the HP Photosmart Software, click Settings, and then click Status. If this works, then try the next ...
...• Solution 2: Print a previously saved version of the document Solution 1: Reset the product Solution: Turn off the product, and then unplug the power cord. Solution 10: Reset the product Solution: Turn off the product and your computer for 60 seconds, then turn on and try the next solution. ...of the document Solution: Try printing another document from the same software application. Plug the power cord back in, and then press the On button to turn them both on the product. In the HP Photosmart Software, click Settings, and then click Status. If this works, then try the next ...


