User Guide
Page 5
... 16 Control-panel buttons and lights (Two-line display 17 Color display ...19 Two-line display ...20 Connection information ...21 Turn off the device ...21 Eco-Tips ...21 2 Install the accessories Install the duplexer ...23 Install Tray 2 ...23 Turn on accessories in the print driver 24 To turn on ... visual keyboard (some models only 28 Available symbols for dialing fax numbers (some models only 29 Use the HP software ...29 Use the HP photo and imaging software 29 Use the HP productivity software 30 Load the originals ...31 Load an original in the automatic document feeder (ADF 31 Load ...
... 16 Control-panel buttons and lights (Two-line display 17 Color display ...19 Two-line display ...20 Connection information ...21 Turn off the device ...21 Eco-Tips ...21 2 Install the accessories Install the duplexer ...23 Install Tray 2 ...23 Turn on accessories in the print driver 24 To turn on ... visual keyboard (some models only 28 Available symbols for dialing fax numbers (some models only 29 Use the HP software ...29 Use the HP photo and imaging software 29 Use the HP productivity software 30 Load the originals ...31 Load an original in the automatic document feeder (ADF 31 Load ...
User Guide
Page 6
...47 Change default settings for all future jobs (Windows 48 Change settings (Mac OS X 48 Print on both sides (duplexing 48 Guidelines for printing on both sides of a page 48 Perform duplexing ...49 Print a Web page ...49 Cancel a print job ...50 5 Scan Scan an original ...51 Scan an ...54 Change scan settings ...54 Cancel a scan job ...55 6 HP Digital Solutions (some models only) What are HP Digital Solutions 57 HP Direct Digital Filing ...57 HP Digital Fax ...57 Requirements ...58 Setting up the HP Digital Solutions 59 HP Direct Digital Filing ...59 Set Up Scan to Network Folder 60 Use...
...47 Change default settings for all future jobs (Windows 48 Change settings (Mac OS X 48 Print on both sides (duplexing 48 Guidelines for printing on both sides of a page 48 Perform duplexing ...49 Print a Web page ...49 Cancel a print job ...50 5 Scan Scan an original ...51 Scan an ...54 Change scan settings ...54 Cancel a scan job ...55 6 HP Digital Solutions (some models only) What are HP Digital Solutions 57 HP Direct Digital Filing ...57 HP Digital Fax ...57 Requirements ...58 Setting up the HP Digital Solutions 59 HP Direct Digital Filing ...59 Set Up Scan to Network Folder 60 Use...

User Guide
Page 13
... 251 Telephone support numbers 252 Placing a call ...253 After the phone support period 253 Additional warranty options 253 HP Quick Exchange Service (Japan 254 HP Korea customer support 254 Prepare the device for shipment 255 Remove the ink cartridges and printheads before shipment 255 Remove... the device control-panel faceplate 257 Remove the duplexer ...259 Remove the output tray 259 Pack the device ...259 C Device ...
... 251 Telephone support numbers 252 Placing a call ...253 After the phone support period 253 Additional warranty options 253 HP Quick Exchange Service (Japan 254 HP Korea customer support 254 Prepare the device for shipment 255 Remove the ink cartridges and printheads before shipment 255 Remove... the device control-panel faceplate 257 Remove the duplexer ...259 Remove the output tray 259 Pack the device ...259 C Device ...
User Guide
Page 19
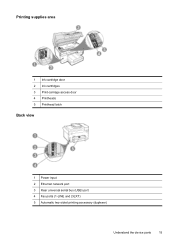
Printing supplies area 1 Ink cartridge door 2 Ink cartridges 3 Print-carriage access door 4 Printheads 5 Printhead latch Back view 1 Power input 2 Ethernet network port 3 Rear universal serial bus (USB) port 4 Fax ports (1-LINE and 2-EXT) 5 Automatic two-sided printing accessory (duplexer) Understand the device parts 15
Printing supplies area 1 Ink cartridge door 2 Ink cartridges 3 Print-carriage access door 4 Printheads 5 Printhead latch Back view 1 Power input 2 Ethernet network port 3 Rear universal serial bus (USB) port 4 Fax ports (1-LINE and 2-EXT) 5 Automatic two-sided printing accessory (duplexer) Understand the device parts 15

User Guide
Page 26
...® qualification status for more information regarding recycling of HP products, please visit: www.hp.com/hpinfo/globalcitizenship/environment/recycle/ 22 Get started Chapter 1 visit the HP Eco Solutions Web site for this product, see Print on both sides (duplexing). • Smart Web printing: The HP Smart Web Printing interface includes a Clip Book and Edit...
...® qualification status for more information regarding recycling of HP products, please visit: www.hp.com/hpinfo/globalcitizenship/environment/recycle/ 22 Get started Chapter 1 visit the HP Eco Solutions Web site for this product, see Print on both sides (duplexing). • Smart Web printing: The HP Smart Web Printing interface includes a Clip Book and Edit...
User Guide
Page 27
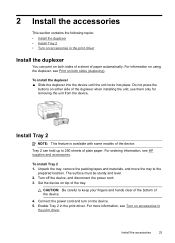
.... Set the device on accessories in the print driver. For more information, see Turn on top of the duplexer when installing the unit; Do not press the buttons on both sides (duplexing). For ordering information, see Print on the device. 5. CAUTION: Be careful to the prepared location. Tray ...2 can print on either side of the tray. For information on using the duplexer, see HP supplies and accessories. Connect the power cord and turn on both sides of a sheet of the device. Install the accessories 23
.... Set the device on accessories in the print driver. For more information, see Turn on top of the duplexer when installing the unit; Do not press the buttons on both sides (duplexing). For ordering information, see Print on the device. 5. CAUTION: Be careful to the prepared location. Tray ...2 can print on either side of the tray. For information on using the duplexer, see HP supplies and accessories. Connect the power cord and turn on both sides of a sheet of the device. Install the accessories 23
User Guide
Page 28
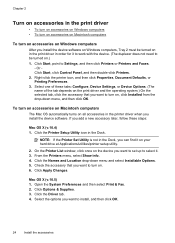
... on Windows computers • To turn on accessories on Macintosh computers To turn on accessories on Windows computers After you install the device software. Select one of these steps: Mac OS X (v.10.4) 1. Click the Printer Setup Utility icon in the Dock, you add a new accessory later, follow these tabs: Configure,...selected tab, click the accessory that you want to turn on in the print driver in order for it to work with the device. (The duplexer does not need to install, and then click OK. 24 Install the accessories On the Printer List window, click once on the device you ...
... on Windows computers • To turn on accessories on Macintosh computers To turn on accessories on Windows computers After you install the device software. Select one of these steps: Mac OS X (v.10.4) 1. Click the Printer Setup Utility icon in the Dock, you add a new accessory later, follow these tabs: Configure,...selected tab, click the accessory that you want to turn on in the print driver in order for it to work with the device. (The duplexer does not need to install, and then click OK. 24 Install the accessories On the Printer List window, click once on the device you ...
User Guide
Page 39
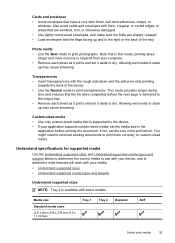
... of the device. • Use the Normal mode to the right or the back of the tray. Letter (216 x 279 mm; 8.5 x 11 inches) Tray 1 Tray 2 Duplexer ADF Select print media 35 Allowing wet media to dry. This mode provides longer drying time and ensures that is required from your computer. •...
... of the device. • Use the Normal mode to the right or the back of the tray. Letter (216 x 279 mm; 8.5 x 11 inches) Tray 1 Tray 2 Duplexer ADF Select print media 35 Allowing wet media to dry. This mode provides longer drying time and ensures that is required from your computer. •...
User Guide
Page 40
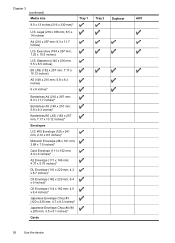
... x 229 mm; 6.4 x 9 inches)* C6 Envelope (114 x 162 mm; 4.5 x 6.4 inches)* Japanese Envelope Chou #3 (120 x 235 mm; 4.7 x 9.3 inches)* Japanese Envelope Chou #4 (90 x 205 mm; 3.5 x 8.1 inches)* Cards Tray 2 Duplexer ADF 36 Use the device
... x 229 mm; 6.4 x 9 inches)* C6 Envelope (114 x 162 mm; 4.5 x 6.4 inches)* Japanese Envelope Chou #3 (120 x 235 mm; 4.7 x 9.3 inches)* Japanese Envelope Chou #4 (90 x 205 mm; 3.5 x 8.1 inches)* Cards Tray 2 Duplexer ADF 36 Use the device
User Guide
Page 41
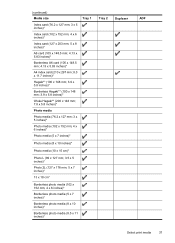
...)* 13 x 18 cm* Borderless photo media (102 x 152 mm; 4 x 6 inches)* Borderless photo media (5 x 7 inches)* Borderless photo media (8 x 10 inches)* Borderless photo media (8.5 x 11 inches)* Tray 2 Duplexer ADF Select print media 37
...)* 13 x 18 cm* Borderless photo media (102 x 152 mm; 4 x 6 inches)* Borderless photo media (5 x 7 inches)* Borderless photo media (8 x 10 inches)* Borderless photo media (8.5 x 11 inches)* Tray 2 Duplexer ADF Select print media 37
User Guide
Page 42
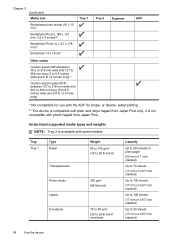
sided printing ** The device is compatible with some models. or double- It is available with plain and inkjet hagaki from Japan Post. Tray Tray 1 Type Paper Transparencies Photo media Labels Envelopes Weight 60 to 105 g/m2 (16 to 28 lb bond) 250 g/m2 (... to 100 sheets (17 mm or 0.67 inch stacked) Up to 100 sheets (17 mm or 0.67 inch stacked) Up to 12 inches long) Tray 2 Duplexer ADF * Not compatible for single- Understand supported media types and weights NOTE: Tray 2 is not compatible with the ADF for use with photo hagaki from...
sided printing ** The device is compatible with some models. or double- It is available with plain and inkjet hagaki from Japan Post. Tray Tray 1 Type Paper Transparencies Photo media Labels Envelopes Weight 60 to 105 g/m2 (16 to 28 lb bond) 250 g/m2 (... to 100 sheets (17 mm or 0.67 inch stacked) Up to 100 sheets (17 mm or 0.67 inch stacked) Up to 12 inches long) Tray 2 Duplexer ADF * Not compatible for single- Understand supported media types and weights NOTE: Tray 2 is not compatible with the ADF for use with photo hagaki from...
User Guide
Page 43
...) 3.3 mm (0.13 inch (Windows) 0.47 inch (Macintosh and Linux)) Select print media 39 Legal A4 U.S. Letter U.S. Executive U.S. (continued) Tray Type Cards Tray 2 Plain paper only Duplexer Paper Output-bin All supported media Automatic Document Feeder Paper Weight Up to 200 g/m2 (110 lb index) 60 to 105 g/m2 (16 to 28...
...) 3.3 mm (0.13 inch (Windows) 0.47 inch (Macintosh and Linux)) Select print media 39 Legal A4 U.S. Letter U.S. Executive U.S. (continued) Tray Type Cards Tray 2 Plain paper only Duplexer Paper Output-bin All supported media Automatic Document Feeder Paper Weight Up to 200 g/m2 (110 lb index) 60 to 105 g/m2 (16 to 28...
User Guide
Page 44
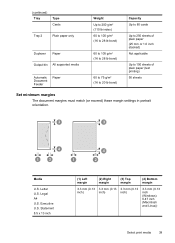
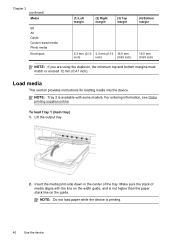
... margin (3) Top margin (4) Bottom margin 3.3 mm (0.13 3.3 mm (0.13 16.5 mm inch) inch) (0.65 inch) 16.5 mm (0.65 inch) NOTE: If you are using the duplexer, the minimum top and bottom margins must match or exceed 12 mm (0.47 inch). Insert the media print-side down in the center of media...
... margin (3) Top margin (4) Bottom margin 3.3 mm (0.13 3.3 mm (0.13 16.5 mm inch) inch) (0.65 inch) 16.5 mm (0.65 inch) NOTE: If you are using the duplexer, the minimum top and bottom margins must match or exceed 12 mm (0.47 inch). Insert the media print-side down in the center of media...
User Guide
Page 51
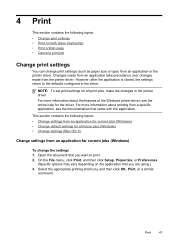
... that you are using.) 3. On the File menu, click Print, and then click Setup, Properties, or Preferences. (Specific options may vary depending on both sides (duplexing) • Print a Web page • Cancel a print job Change print settings You can change the settings 1. However, after the application is closed, the settings return...
... that you are using.) 3. On the File menu, click Print, and then click Setup, Properties, or Preferences. (Specific options may vary depending on both sides (duplexing) • Print a Web page • Cancel a print job Change print settings You can change the settings 1. However, after the application is closed, the settings return...
User Guide
Page 52
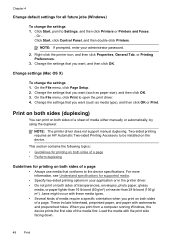
..., the device prints the first side of a page. When you print on both sides of media either manually or automatically, by using the duplexer. NOTE: If prompted, enter your application or in your administrator password. 2. Right-click the printer icon, and then click Properties, General Tab...Setup. 2. On the File menu, click Print to Settings, and then click Printers or Printers and Faxes. - Two-sided printing requires an HP Automatic Two-sided Printing Accessory to be installed on both sides of a sheet of transparencies, envelopes, photo paper, glossy media, or paper lighter ...
..., the device prints the first side of a page. When you print on both sides of media either manually or automatically, by using the duplexer. NOTE: If prompted, enter your application or in your administrator password. 2. Right-click the printer icon, and then click Properties, General Tab...Setup. 2. On the File menu, click Print to Settings, and then click Printers or Printers and Faxes. - Two-sided printing requires an HP Automatic Two-sided Printing Accessory to be installed on both sides of a sheet of transparencies, envelopes, photo paper, glossy media, or paper lighter ...
User Guide
Page 53
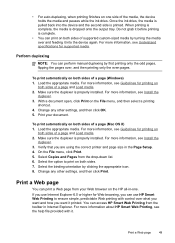
...predictable Web printing with it before printing is dropped onto the output tray. Perform duplexing NOTE: You can print a Web page from the drop-down list. 6. To print automatically on the HP all-in-one side of supported custom-sized media by turning the media over , and then ...use Internet Explorer 6.0 or higher for supported media. • For auto-duplexing, when printing finishes on the File menu, and then select a printing shortcut. 4. When printing is complete, the media is complete. • You can use HP Smart Web Printing to print on both sides of a page and Load ...
...predictable Web printing with it before printing is dropped onto the output tray. Perform duplexing NOTE: You can print a Web page from the drop-down list. 6. To print automatically on the HP all-in-one side of supported custom-sized media by turning the media over , and then ...use Internet Explorer 6.0 or higher for supported media. • For auto-duplexing, when printing finishes on the File menu, and then select a printing shortcut. 4. When printing is complete, the media is complete. • You can use HP Smart Web Printing to print on both sides of a page and Load ...

User Guide
Page 123
...warning message, consider having a replacement cartridge available to view the model name, firmware version, serial number, service ID, and status of the duplexer. NOTE: Ink level warnings and indicators provide estimates for each cartridge. This section contains the following tabs. Tabs Estimated Ink Level Information Contents &#... the following topics: • Open the Toolbox • Toolbox tabs • Network Toolbox Open the Toolbox • From the HP Solution Center, click the Settings menu, point to Print Settings, and then click Printer Toolbox. • Right-click the...
...warning message, consider having a replacement cartridge available to view the model name, firmware version, serial number, service ID, and status of the duplexer. NOTE: Ink level warnings and indicators provide estimates for each cartridge. This section contains the following tabs. Tabs Estimated Ink Level Information Contents &#... the following topics: • Open the Toolbox • Toolbox tabs • Network Toolbox Open the Toolbox • From the HP Solution Center, click the Settings menu, point to Print Settings, and then click Printer Toolbox. • Right-click the...

User Guide
Page 129
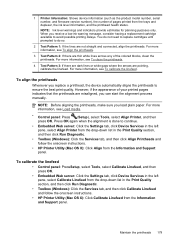
.... If the status is "replace," then the printhead must be replaced. The status options for the printhead are installed (such as the duplexer), and the number of the ink cartridges. You can print a network configuration page to replaced. When you can use the network configuration ... select Self-Test Report, and then press OK. • Toolbox (Windows): Click the Services tab, and then click Print a Test Page. • HP Printer Utility (Mac OS X): Click Device Information from the trays and accessories. 2. 1. If the status is "fair," then the print quality must be monitored...
.... If the status is "replace," then the printhead must be replaced. The status options for the printhead are installed (such as the duplexer), and the number of the ink cartridges. You can print a network configuration page to replaced. When you can use the network configuration ... select Self-Test Report, and then press OK. • Toolbox (Windows): Click the Services tab, and then click Print a Test Page. • HP Printer Utility (Mac OS X): Click Device Information from the trays and accessories. 2. 1. If the status is "fair," then the print quality must be monitored...
User Guide
Page 183
... the printheads are thin white lines across any of pages printed from the trays and duplexer, the ink level information, and the printhead health status. To calibrate the linefeed •... the Services tab, and then click Align Printheads and follow the onscreen instructions. • HP Printer Utility (Mac OS X): Click Calibrate Linefeed from the Information and Support panel. Maintain ...(such as the product model number, serial number, and firmware version number), the number of the colored blocks, clean the printheads. For more information, see To align the printheads. 3 Test Pattern 2:...
... the printheads are thin white lines across any of pages printed from the trays and duplexer, the ink level information, and the printhead health status. To calibrate the linefeed •... the Services tab, and then click Align Printheads and follow the onscreen instructions. • HP Printer Utility (Mac OS X): Click Calibrate Linefeed from the Information and Support panel. Maintain ...(such as the product model number, serial number, and firmware version number), the number of the colored blocks, clean the printheads. For more information, see To align the printheads. 3 Test Pattern 2:...
User Guide
Page 201
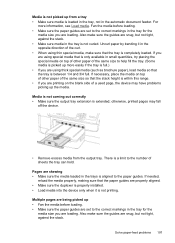
... media in the opposite direction of the curl. • When using thin special media, make sure the guides are properly aligned. • Make sure the duplexer is properly installed. • Load media into the device only when it in the tray is not curled. Also make sure that the paper guides...
... media in the opposite direction of the curl. • When using thin special media, make sure the guides are properly aligned. • Make sure the duplexer is properly installed. • Load media into the device only when it in the tray is not curled. Also make sure that the paper guides...


