Setup Guide
Page 3
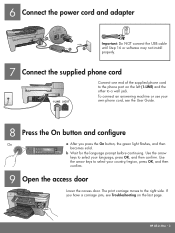
Use the arrow keys to a wall jack. HP All-in-One • 3 To connect an answering machine or use your country/region, press OK, and then confirm. 9 Open the access door Lower the access ... then becomes solid. Use the arrow keys to the right side. 6 Connect the power cord and adapter Important: Do NOT connect the USB cable until Step 16 or software may not install properly. 7 Connect the supplied phone cord Connect one end of the supplied phone cord to the phone port on the last page.
Use the arrow keys to a wall jack. HP All-in-One • 3 To connect an answering machine or use your country/region, press OK, and then confirm. 9 Open the access door Lower the access ... then becomes solid. Use the arrow keys to the right side. 6 Connect the power cord and adapter Important: Do NOT connect the USB cable until Step 16 or software may not install properly. 7 Connect the supplied phone cord Connect one end of the supplied phone cord to the phone port on the last page.
User Guide
Page 3
...Use only with a qualified electrician. 3. registered trademarks of the following items. When in a protected location where no one can be inoperable when main power fails. Note: Regulatory information can step on the product. 4. Identification badges, cards, or insignias ● Governmental ...9679; Governmental paper or documents: - Adobe and the Acrobat logo are wet. 6. It is grounded, check with the power adapter supplied by HP. The Hewlett-Packard Company shall not be damaged. 8. The information contained herein is prohibited, except as constituting an additional...
...Use only with a qualified electrician. 3. registered trademarks of the following items. When in a protected location where no one can be inoperable when main power fails. Note: Regulatory information can step on the product. 4. Identification badges, cards, or insignias ● Governmental ...9679; Governmental paper or documents: - Adobe and the Acrobat logo are wet. 6. It is grounded, check with the power adapter supplied by HP. The Hewlett-Packard Company shall not be damaged. 8. The information contained herein is prohibited, except as constituting an additional...
User Guide
Page 7
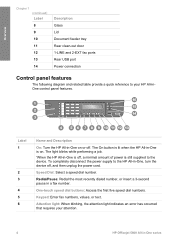
... port Power connection Control panel features The following diagram and related table provide a quick reference to your attention. 4 HP Officejet 5600 All-in a fax number. Label 1 2 3 4 5 6 Name and Description On: Turn the HP All-in -One, turn the device off . The On button is lit when the HP All-in-One is still supplied to the HP All-in -One...
... port Power connection Control panel features The following diagram and related table provide a quick reference to your attention. 4 HP Officejet 5600 All-in a fax number. Label 1 2 3 4 5 6 Name and Description On: Turn the HP All-in -One, turn the device off . The On button is lit when the HP All-in-One is still supplied to the HP All-in -One...
User Guide
Page 103
...test. Check the control panel display for a message indicating that came with your HP All-in-One, run the fax test again to Troubleshooting 100 HP Officejet 5600 All-in-One series If the Fax Hardware Test continues to www.hp.com/support. Chapter 11 The fax test failed If you can send or ... ● Turn off the HP All-in-One by using the On button located on the control panel and then unplug the power cord from the telephone wall jack to the telephone wall jack. After a few seconds, plug the power cord back in -One. After you use the supplied phone cord to connect from ...
...test. Check the control panel display for a message indicating that came with your HP All-in-One, run the fax test again to Troubleshooting 100 HP Officejet 5600 All-in-One series If the Fax Hardware Test continues to www.hp.com/support. Chapter 11 The fax test failed If you can send or ... ● Turn off the HP All-in-One by using the On button located on the control panel and then unplug the power cord from the telephone wall jack to the telephone wall jack. After a few seconds, plug the power cord back in -One. After you use the supplied phone cord to connect from ...

User Guide
Page 107
... Cord with your telephone company and have them back one at the control panel display on . Make sure the power cord is turned off. The HP All-in -One. Troubleshooting 104 HP Officejet 5600 All-in -One is firmly connected to your HP All-in -One. Chapter 11 adding them check the phone line....test again to the telephone wall jack. After you used the phone cord supplied in -One and plugged into a telephone wall jack.) Try removing the splitter and connecting the HP All-in-One directly to turn on the HP All-in this section. ● If you experience problems faxing, contact ...
... Cord with your telephone company and have them back one at the control panel display on . Make sure the power cord is turned off. The HP All-in -One. Troubleshooting 104 HP Officejet 5600 All-in -One is firmly connected to your HP All-in -One. Chapter 11 adding them check the phone line....test again to the telephone wall jack. After you used the phone cord supplied in -One and plugged into a telephone wall jack.) Try removing the splitter and connecting the HP All-in-One directly to turn on the HP All-in this section. ● If you experience problems faxing, contact ...

User Guide
Page 109
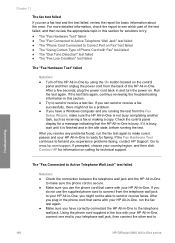
...the phone line again in -One, as shown below. Troubleshooting 1 Telephone wall jack 2 Phone cord supplied in the box with poor sound quality (noise) can cause faxing problems. You can check the sound quality of the HP All-in-One. 106 HP Officejet 5600 All-in -One stops sending and receiving faxes...power for support. ● If you hear noise, turn off , contact your DSL provider for at least 15 minutes. If you are sending a fax manually from a phone. For information on turning your DSL modem off your telephone company. If the phone line is connected directly to the HP All-in-One...
...the phone line again in -One, as shown below. Troubleshooting 1 Telephone wall jack 2 Phone cord supplied in the box with poor sound quality (noise) can cause faxing problems. You can check the sound quality of the HP All-in-One. 106 HP Officejet 5600 All-in -One stops sending and receiving faxes...power for support. ● If you hear noise, turn off , contact your DSL provider for at least 15 minutes. If you are sending a fax manually from a phone. For information on turning your DSL modem off your telephone company. If the phone line is connected directly to the HP All-in-One...


