
English Manual
Page 2
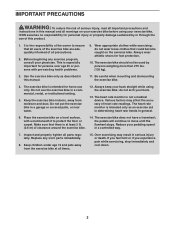
... PLACEMENT 2 IMPORTANT PRECAUTIONS 3 BEFORE YOU BEGIN 4 PART IDENTIFICATION CHART 5 ASSEMBLY 6 HOW TO USE THE EXERCISE BIKE 13 FCC INFORMATION 20 MAINTENANCE AND TROUBLESHOOTING 21 EXERCISE GUIDELINES 23 PART LIST 26 EXPLODED DRAWING 27 ORDERING REPLACEMENT PARTS Back Cover LIMITED WARRANTY Back Cover WARNING DECAL PLACEMENT This drawing shows the location(s) of this manual and request a free replacement decal. If a decal is a registered trademark of ICON IP, Inc. 2 HEALTHRIDER is missing or illegible, see the...
... PLACEMENT 2 IMPORTANT PRECAUTIONS 3 BEFORE YOU BEGIN 4 PART IDENTIFICATION CHART 5 ASSEMBLY 6 HOW TO USE THE EXERCISE BIKE 13 FCC INFORMATION 20 MAINTENANCE AND TROUBLESHOOTING 21 EXERCISE GUIDELINES 23 PART LIST 26 EXPLODED DRAWING 27 ORDERING REPLACEMENT PARTS Back Cover LIMITED WARRANTY Back Cover WARNING DECAL PLACEMENT This drawing shows the location(s) of this manual and request a free replacement decal. If a decal is a registered trademark of ICON IP, Inc. 2 HEALTHRIDER is missing or illegible, see the...
English Manual
Page 3
... tighten all parts regularly. Replace any exercise program, consult your physician. Make sure that could become caught on the exercise bike. IMPORTANT PRECAUTIONS WARNING: To reduce the risk of serious injury, read all important precautions and instructions in this manual and all warnings on your exercise bike before using the exercise bike; do not arch your pedaling speed in a controlled way. 7. Over exercising may affect the accuracy of heart rate...
... tighten all parts regularly. Replace any exercise program, consult your physician. Make sure that could become caught on the exercise bike. IMPORTANT PRECAUTIONS WARNING: To reduce the risk of serious injury, read all important precautions and instructions in this manual and all warnings on your exercise bike before using the exercise bike; do not arch your pedaling speed in a controlled way. 7. Over exercising may affect the accuracy of heart rate...
English Manual
Page 4
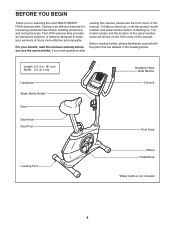
... front cover of this manual, please see the front cover of features designed to make your workouts at home more effective and enjoyable. BEFORE YOU BEGIN Thank you use the exercise bike. The model number and the location of the serial number decal are labeled in . (81 cm) Width: 2 ft. (61 cm) Handlebar Water Bottle Holder* Seat Seat Knob Seat Post Handgrip Heart Rate Monitor Console Post Knob Leveling Foot Wheel Pedal/Strap *Water...
... front cover of this manual, please see the front cover of features designed to make your workouts at home more effective and enjoyable. BEFORE YOU BEGIN Thank you use the exercise bike. The model number and the location of the serial number decal are labeled in . (81 cm) Width: 2 ft. (61 cm) Handlebar Water Bottle Holder* Seat Seat Knob Seat Post Handgrip Heart Rate Monitor Console Post Knob Leveling Foot Wheel Pedal/Strap *Water...
English Manual
Page 6
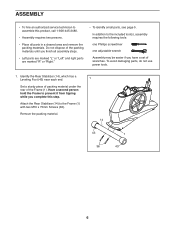
... authorized service technician to assemble this step. To avoid damaging parts, do not use power tools. 1. Have a second person hold the Frame to prevent it from tipping while you nish all parts in a cleared area and remove the packing materials. Do not dispose of wrenches. In addition to the Frame (1) with two M10 x 75mm Screws (36). Identify the Rear...
... authorized service technician to assemble this step. To avoid damaging parts, do not use power tools. 1. Have a second person hold the Frame to prevent it from tipping while you nish all parts in a cleared area and remove the packing materials. Do not dispose of wrenches. In addition to the Frame (1) with two M10 x 75mm Screws (36). Identify the Rear...

English Manual
Page 7
Attach the Front Stabilizer (2) to the Lower Wire (31). Remove the packing material. 3. Connect the Upper Wire (32) to the Frame (1) with two M10 x 75mm Screws (36). 2. Have a second person 2 hold the Upright (3) and the Top Shield (9) near the Frame (1) until you complete this step. Then, pull the excess Upper Wire out of the top of the Frame (1). Orient the Upright (3) and...
Attach the Front Stabilizer (2) to the Lower Wire (31). Remove the packing material. 3. Connect the Upper Wire (32) to the Frame (1) with two M10 x 75mm Screws (36). 2. Have a second person 2 hold the Upright (3) and the Top Shield (9) near the Frame (1) until you complete this step. Then, pull the excess Upper Wire out of the top of the Frame (1). Orient the Upright (3) and...

English Manual
Page 8
Attach the Upright (3) with four M8 Locknuts (37). Next, attach the Seat (12) to the underside of the Seat. Insert the Seat Knob (8) upward into the Seat Post (5), and tighten the Seat Knob into the Carriage Clamp (57) inside the Seat Carriage (56). 5 56 57 8 5 12 56 37 8 8 4. Next, orient the Seat Carriage (56) and the Seat Post (5) as shown. Tip: Avoid pinching the wires. Set the...
Attach the Upright (3) with four M8 Locknuts (37). Next, attach the Seat (12) to the underside of the Seat. Insert the Seat Knob (8) upward into the Seat Post (5), and tighten the Seat Knob into the Carriage Clamp (57) inside the Seat Carriage (56). 5 56 57 8 5 12 56 37 8 8 4. Next, orient the Seat Carriage (56) and the Seat Post (5) as shown. Tip: Avoid pinching the wires. Set the...

English Manual
Page 10
... the console displays or other end of the wire tie upward out of the top of this manual. To purchase an optional power adapter, call the telephone number on the front cover of the Upright. Then, plug the other end into an outlet installed in the hexagonal holes. 8. Then, pull the other electronic components. Attach the Left Handlebar (47) in the battery cover. Plug one...
... the console displays or other end of the wire tie upward out of the top of this manual. To purchase an optional power adapter, call the telephone number on the front cover of the Upright. Then, plug the other end into an outlet installed in the hexagonal holes. 8. Then, pull the other electronic components. Attach the Left Handlebar (47) in the battery cover. Plug one...
English Manual
Page 12
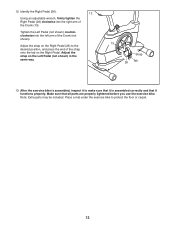
.... 13 Strap 26 Tab 13. After the exercise bike is assembled correctly and that all parts are properly tightened before you use the exercise bike. 12. Tighten the Left Pedal (not shown) counterclockwise into the right arm of the Crank (not shown). Place a mat under the exercise bike to make sure that it functions properly. Identify the Right Pedal (26). 12 Using an adjustable wrench, firmly tighten the Right Pedal...
.... 13 Strap 26 Tab 13. After the exercise bike is assembled correctly and that all parts are properly tightened before you use the exercise bike. 12. Tighten the Left Pedal (not shown) counterclockwise into the right arm of the Crank (not shown). Place a mat under the exercise bike to make sure that it functions properly. Identify the Right Pedal (26). 12 Using an adjustable wrench, firmly tighten the Right Pedal...
English Manual
Page 13
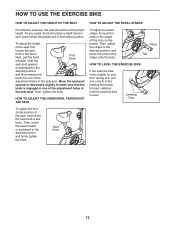
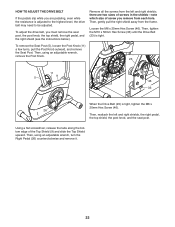
... position, and firmly tighten the knob. HOW TO ADJUST THE HORIZONTAL POSITION OF THE SEAT To adjust the pedal straps, first pull the ends of the leveling feet under the rear stabilizer until the exercise bike is engaged in the lowest position. HOW TO USE THE EXERCISE BIKE HOW TO ADJUST THE HEIGHT OF THE SEAT HOW TO ADJUST THE PEDAL STRAPS For effective exercise, the seat should be at...
... position, and firmly tighten the knob. HOW TO ADJUST THE HORIZONTAL POSITION OF THE SEAT To adjust the pedal straps, first pull the ends of the leveling feet under the rear stabilizer until the exercise bike is engaged in the lowest position. HOW TO USE THE EXERCISE BIKE HOW TO ADJUST THE HEIGHT OF THE SEAT HOW TO ADJUST THE PEDAL STRAPS For effective exercise, the seat should be at...
English Manual
Page 14
... heart rate using the console, make sure that batteries are installed (see page 18. You can even measure your workouts more effective and enjoyable. If there is a sheet of preset workouts. To use the manual mode, see page 17. To use the user mode, see page 19. To use the sound system, see page 19. Each workout in the program controls the resistance of the pedals as it guides you exercise, the console...
... heart rate using the console, make sure that batteries are installed (see page 18. You can even measure your workouts more effective and enjoyable. If there is a sheet of preset workouts. To use the manual mode, see page 17. To use the user mode, see page 19. To use the sound system, see page 19. Each workout in the program controls the resistance of the pedals as it guides you exercise, the console...
English Manual
Page 15
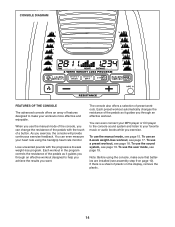
... turn on . As you use . 2. The left display–-This display can show the resistance level of the pedals by pressing the Calorie Workouts or Performance Workouts button repeatedly until the entire track appears. Note: During a preset workout, the display will appear in miles per hour or kilometers per hour. As you exercise, indicators will show your heart rate when you pedal, change modes every few seconds. 15 Follow your pedaling speed...
... turn on . As you use . 2. The left display–-This display can show the resistance level of the pedals by pressing the Calorie Workouts or Performance Workouts button repeatedly until the entire track appears. Note: During a preset workout, the display will appear in miles per hour or kilometers per hour. As you exercise, indicators will show your heart rate when you pedal, change modes every few seconds. 15 Follow your pedaling speed...

English Manual
Page 16
... finished exercising, the console will be reset. 16 When your pulse is not shown, make sure that your palms resting against the contacts. Be careful not to squeeze the contacts tightly. If the pedals do not move for several seconds, a series of plastic on the Contacts metal contacts on the fan if desired. tic. Turn on the handgrip heart rate monitor, remove...
... finished exercising, the console will be reset. 16 When your pulse is not shown, make sure that your palms resting against the contacts. Be careful not to squeeze the contacts tightly. If the pedals do not move for several seconds, a series of plastic on the Contacts metal contacts on the fan if desired. tic. Turn on the handgrip heart rate monitor, remove...
English Manual
Page 17
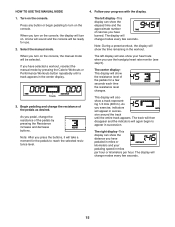
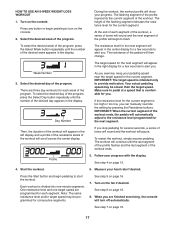
... only to turn off automatically. Start the workout. 6. The height of the workout will appear in the display. The resistance level for you exercise, keep your progress. Press any button or begin pedaling to alert you stop pedaling for several seconds, a series of the workout. IMPORTANT: The target speed is comfortable for the next segment will pause. If you . HOW TO USE AN 8-WEEK WEIGHT-LOSS WORKOUT 1. Turn on...
... only to turn off automatically. Start the workout. 6. The height of the workout will appear in the display. The resistance level for you exercise, keep your progress. Press any button or begin pedaling to alert you stop pedaling for several seconds, a series of the workout. IMPORTANT: The target speed is comfortable for the next segment will pause. If you . HOW TO USE AN 8-WEEK WEIGHT-LOSS WORKOUT 1. Turn on...
English Manual
Page 18
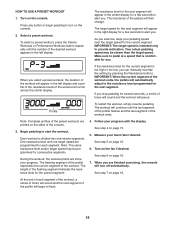
... restart the workout, simply resume pedaling. The workout will automatically adjust to alert you exercise, keep your heart rate if desired. See step 5 on page 16. 7. Select a preset workout. When you stop pedaling for the next segment will appear in the center display for consecutive segments. Note: The same resistance level and/or target speed may be programmed for a few seconds to start the workout. See step 6 on...
... restart the workout, simply resume pedaling. The workout will automatically adjust to alert you exercise, keep your heart rate if desired. See step 5 on page 16. 7. Select a preset workout. When you stop pedaling for the next segment will appear in the center display for consecutive segments. Note: The same resistance level and/or target speed may be programmed for a few seconds to start the workout. See step 6 on...
English Manual
Page 19
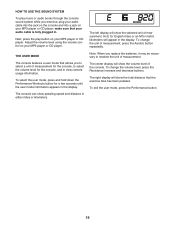
... while you exercise, plug your audio cable into the jack on the console and into a jack on your MP3 player or CD player. The console can show the total distance that your MP3 player or CD player. To change the volume level, press the Resistance increase and decrease buttons. The center display will show pedaling speed and distance in . To exit the user mode, press the Performance button. 19
... while you exercise, plug your audio cable into the jack on the console and into a jack on your MP3 player or CD player. The console can show the total distance that your MP3 player or CD player. To change the volume level, press the Resistance increase and decrease buttons. The center display will show pedaling speed and distance in . To exit the user mode, press the Performance button. 19
English Manual
Page 21
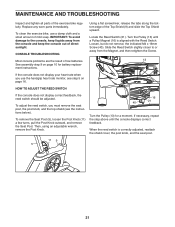
... step 5 on page 10 for a moment. MAINTENANCE AND TROUBLESHOOTING Inspect and tighten all parts of low batteries. Replace any worn parts immediately. CONSOLE TROUBLESHOOTING Most console problems are the result of the exercise bike regularly. Then, using an adjustable wrench, remove the Post Knob. 16 40 21 Turn the Pulley (13) for battery replacement instructions. Locate the Reed Switch (21). Slide the Reed Switch slightly closer to the console, keep the console out of direct sunlight. HOW TO ADJUST THE REED SWITCH If the console...
... step 5 on page 10 for a moment. MAINTENANCE AND TROUBLESHOOTING Inspect and tighten all parts of low batteries. Replace any worn parts immediately. CONSOLE TROUBLESHOOTING Most console problems are the result of the exercise bike regularly. Then, using an adjustable wrench, remove the Post Knob. 16 40 21 Turn the Pulley (13) for battery replacement instructions. Locate the Reed Switch (21). Slide the Reed Switch slightly closer to the console, keep the console out of direct sunlight. HOW TO ADJUST THE REED SWITCH If the console...
English Manual
Page 22
... resistance is adjusted to the highest level, the drive belt may need to be adjusted. there are two sizes of screws in the shields—-note which size of the Top Shield (9) and slide the Top Shield upward. To adjust the drive belt, you must remove the seat post, the post knob, the top shield, the right pedal, and the right shield (see the instructions below). To remove...
... resistance is adjusted to the highest level, the drive belt may need to be adjusted. there are two sizes of screws in the shields—-note which size of the Top Shield (9) and slide the Top Shield upward. To adjust the drive belt, you must remove the seat post, the post knob, the top shield, the right pedal, and the right shield (see the instructions below). To remove...
English Manual
Page 23
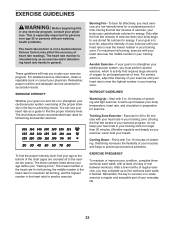
... the proper intensity level. The three numbers listed above your age define your training zone. For maximum fat burning, exercise with pre-existing health problems. The heart rate monitor is the heart rate for exercise. WORKOUT GUIDELINES Warming Up—-Start with your heart rate in your “"training zone.”" The lowest number is the heart rate for fat burning, the middle number is the heart rate for maximum fat burning, and...
... the proper intensity level. The three numbers listed above your age define your training zone. For maximum fat burning, exercise with pre-existing health problems. The heart rate monitor is the heart rate for exercise. WORKOUT GUIDELINES Warming Up—-Start with your heart rate in your “"training zone.”" The lowest number is the heart rate for fat burning, the middle number is the heart rate for maximum fat burning, and...
English Manual
Page 26
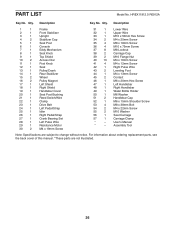
... 3 1 Upright 4 2 Stabilizer Cap 5 1 Seat Post 6 1 Console 7 1 Eddy Mechanism 8 1 Seat Knob 9 1 Top Shield 10 2 Access Disc 11 1 Post Knob 12 1 Seat 13 1 Pulley/Crank 14 1 Rear Stabilizer 15 2 Wheel 16 2 Pulley Magnet 17 1 Left Shield 18 1 Right Shield 19 1 Handlebar Cover 20 1 Seat Post Bushing 21 1 Reed Switch/Wire 22 1 Clamp 23 1 Drive Belt 24 1 Left Pedal/Strap 25 1 Idler 26 1 Right Pedal/Strap 27 1 Crank Bearing Set 28 1 Left Pulse Wire 29 1 Resistance Motor 30 2 M4 x 19mm Screw 31 1 Lower Wire...
... 3 1 Upright 4 2 Stabilizer Cap 5 1 Seat Post 6 1 Console 7 1 Eddy Mechanism 8 1 Seat Knob 9 1 Top Shield 10 2 Access Disc 11 1 Post Knob 12 1 Seat 13 1 Pulley/Crank 14 1 Rear Stabilizer 15 2 Wheel 16 2 Pulley Magnet 17 1 Left Shield 18 1 Right Shield 19 1 Handlebar Cover 20 1 Seat Post Bushing 21 1 Reed Switch/Wire 22 1 Clamp 23 1 Drive Belt 24 1 Left Pedal/Strap 25 1 Idler 26 1 Right Pedal/Strap 27 1 Crank Bearing Set 28 1 Left Pulse Wire 29 1 Resistance Motor 30 2 M4 x 19mm Screw 31 1 Lower Wire...
English Manual
Page 28
ICON Health & Fitness, Inc. (ICON) warrants this product to be free from defects in this manual) •• the key number and description of the replacement part(s) (see the PART LIST and the EXPLODED DRAWING near the end of purchase. This warranty extends only to the product. ICON’'s obligation under warranty. If replacement parts are limited in China © 2012 ICON IP, Inc. This warranty does not extend to freight...
ICON Health & Fitness, Inc. (ICON) warrants this product to be free from defects in this manual) •• the key number and description of the replacement part(s) (see the PART LIST and the EXPLODED DRAWING near the end of purchase. This warranty extends only to the product. ICON’'s obligation under warranty. If replacement parts are limited in China © 2012 ICON IP, Inc. This warranty does not extend to freight...


