
English Manual
Page 1
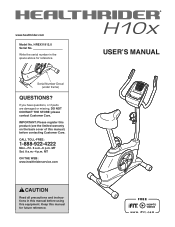
If you have questions, or if parts are damaged or missing, DO NOT CONTACT THE STORE; MT ON THE WEB: www.healthriderservice.com CAUTION Read all precautions and instructions in the space .... 8 a.m.–-4 p.m. Keep this manual for reference. Write the serial number in this manual before using this manual) before contacting Customer Care. USER’'S MANUAL www.healthrider.com Model No. HREX11912.0 Serial No.
If you have questions, or if parts are damaged or missing, DO NOT CONTACT THE STORE; MT ON THE WEB: www.healthriderservice.com CAUTION Read all precautions and instructions in the space .... 8 a.m.–-4 p.m. Keep this manual for reference. Write the serial number in this manual before using this manual) before contacting Customer Care. USER’'S MANUAL www.healthrider.com Model No. HREX11912.0 Serial No.
English Manual
Page 2
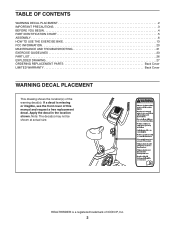
... 3 BEFORE YOU BEGIN 4 PART IDENTIFICATION CHART 5 ASSEMBLY 6 HOW TO USE THE EXERCISE BIKE 13 FCC INFORMATION 20 MAINTENANCE AND TROUBLESHOOTING 21 EXERCISE GUIDELINES 23 PART LIST 26 EXPLODED DRAWING 27 ORDERING REPLACEMENT PARTS Back Cover LIMITED WARRANTY Back ...Cover WARNING DECAL PLACEMENT This drawing shows the location(s) of this manual and request a free replacement decal. If a decal is a registered trademark of ICON IP, Inc. 2 Apply the decal in the location shown. Note: The decal(s) may not be shown at actual size. HEALTHRIDER...
... 3 BEFORE YOU BEGIN 4 PART IDENTIFICATION CHART 5 ASSEMBLY 6 HOW TO USE THE EXERCISE BIKE 13 FCC INFORMATION 20 MAINTENANCE AND TROUBLESHOOTING 21 EXERCISE GUIDELINES 23 PART LIST 26 EXPLODED DRAWING 27 ORDERING REPLACEMENT PARTS Back Cover LIMITED WARRANTY Back ...Cover WARNING DECAL PLACEMENT This drawing shows the location(s) of this manual and request a free replacement decal. If a decal is a registered trademark of ICON IP, Inc. 2 Apply the decal in the location shown. Note: The decal(s) may not be shown at actual size. HEALTHRIDER...
English Manual
Page 3
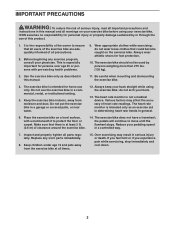
... of the owner to move until the flywheel stops. Do not use the exercise bike in general. 6. The heart rate monitor is at all times. 15. Before beginning any worn parts immediately. 8. Always wear athletic shoes for persons over age 35 or persons with ... on a level surface, with pre-existing health problems. 9. Inspect and properly tighten all parts regularly. Place the exercise bike on the exercise bike. Make sure that all users of the exercise bike are adequately informed of all precautions. 2. IMPORTANT PRECAUTIONS WARNING: To reduce the risk of ...
... of the owner to move until the flywheel stops. Do not use the exercise bike in general. 6. The heart rate monitor is at all times. 15. Before beginning any worn parts immediately. 8. Always wear athletic shoes for persons over age 35 or persons with ... on a level surface, with pre-existing health problems. 9. Inspect and properly tighten all parts regularly. Place the exercise bike on the exercise bike. Make sure that all users of the exercise bike are adequately informed of all precautions. 2. IMPORTANT PRECAUTIONS WARNING: To reduce the risk of ...
English Manual
Page 4
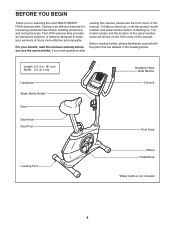
... help us . Length: 2 ft. 8 in the drawing below. The model number and the location of this manual. Before reading further, please familiarize yourself with the parts that are shown on the front cover of the serial number decal are labeled in . (81 cm) Width: 2 ft. (61 cm) Handlebar Water Bottle Holder... Knob Seat Post Handgrip Heart Rate Monitor Console Post Knob Leveling Foot Wheel Pedal/Strap *Water bottle is an effective exercise for selecting the new HEALTHRIDER® H10X exercise bike.
... help us . Length: 2 ft. 8 in the drawing below. The model number and the location of this manual. Before reading further, please familiarize yourself with the parts that are shown on the front cover of the serial number decal are labeled in . (81 cm) Width: 2 ft. (61 cm) Handlebar Water Bottle Holder... Knob Seat Post Handgrip Heart Rate Monitor Console Post Knob Leveling Foot Wheel Pedal/Strap *Water bottle is an effective exercise for selecting the new HEALTHRIDER® H10X exercise bike.
English Manual
Page 5
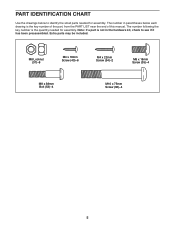
... see if it has been preassembled. The number following the key number is the quantity needed for assembly. Extra parts may be included. Note: If a part is the key number of the part, from the PART LIST near the end of this manual. The number in the hardware kit, check to identify the small... parts needed for assembly. M8 Locknut (37)–-8 M4 x 16mm Screw (40)–-6 M4 x 22mm Screw (54)–-2 M8 x 18mm ...
... see if it has been preassembled. The number following the key number is the quantity needed for assembly. Extra parts may be included. Note: If a part is the key number of the part, from the PART LIST near the end of this manual. The number in the hardware kit, check to identify the small... parts needed for assembly. M8 Locknut (37)–-8 M4 x 16mm Screw (40)–-6 M4 x 22mm Screw (54)–-2 M8 x 18mm ...
English Manual
Page 6
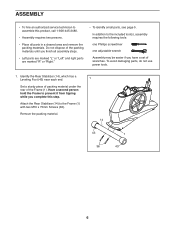
...requires two persons. •• Place all assembly steps. •• Left parts are marked “"L”" or “"Left”" and right parts are marked “"R”" or “"Right.”" •• To identify small parts, see page 5. Have a second person hold the Frame to prevent it from ... Foot (43) near each end. 1 Set a sturdy piece of packing material under the rear of the packing materials until you nish all parts in a cleared area and remove the packing materials. ASSEMBLY •• To hire an authorized service technician to assemble this step.
...requires two persons. •• Place all assembly steps. •• Left parts are marked “"L”" or “"Left”" and right parts are marked “"R”" or “"Right.”" •• To identify small parts, see page 5. Have a second person hold the Frame to prevent it from ... Foot (43) near each end. 1 Set a sturdy piece of packing material under the rear of the packing materials until you nish all parts in a cleared area and remove the packing materials. ASSEMBLY •• To hire an authorized service technician to assemble this step.
English Manual
Page 12
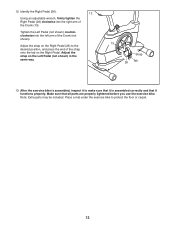
... sure that it is assembled correctly and that all parts are properly tightened before you use the exercise bike. Adjust the strap on the Right Pedal. Place a mat under the exercise bike to make sure that it functions properly. Note: Extra parts may be included. Identify the Right Pedal (26).... 12 Using an adjustable wrench, firmly tighten the Right Pedal (26) clockwise into the left arm of the Crank (not shown). After the exercise bike is assembled, inspect it to protect the...
... sure that it is assembled correctly and that all parts are properly tightened before you use the exercise bike. Adjust the strap on the Right Pedal. Place a mat under the exercise bike to make sure that it functions properly. Note: Extra parts may be included. Identify the Right Pedal (26).... 12 Using an adjustable wrench, firmly tighten the Right Pedal (26) clockwise into the left arm of the Crank (not shown). After the exercise bike is assembled, inspect it to protect the...
English Manual
Page 20
... that to provide reasonable protection against harmful interference in a particular installation. FCC CAUTION: To assure continued compliance, use only shielded interface cables when connecting to part 15 of the following measures: •• Reorient or relocate the receiving antenna. •• Increase the separation between the equipment and the receiver. •...
... that to provide reasonable protection against harmful interference in a particular installation. FCC CAUTION: To assure continued compliance, use only shielded interface cables when connecting to part 15 of the following measures: •• Reorient or relocate the receiving antenna. •• Increase the separation between the equipment and the receiver. •...
English Manual
Page 21
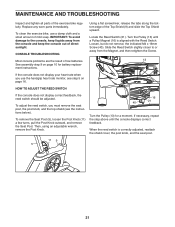
...To remove the Seat Post (5), loosen the Post Knob (11) a few turns, pull the Post Knob outward, and remove the Seat Post. Replace any worn parts immediately. See assembly step 9 on page 16. To adjust the reed switch, you use a damp cloth and a small amount of mild soap. To clean ...the exercise bike, use the handgrip heart rate monitor, see the instructions below). Turn the Pulley (13) until the console displays correct feedback. If necessary, repeat the step...
...To remove the Seat Post (5), loosen the Post Knob (11) a few turns, pull the Post Knob outward, and remove the Seat Post. Replace any worn parts immediately. See assembly step 9 on page 16. To adjust the reed switch, you use a damp cloth and a small amount of mild soap. To clean ...the exercise bike, use the handgrip heart rate monitor, see the instructions below). Turn the Pulley (13) until the console displays correct feedback. If necessary, repeat the step...
English Manual
Page 23
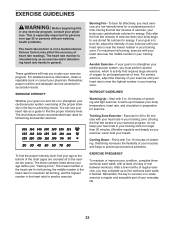
... Exercise—-Exercise for exercise. Remember, the key to success is near the middle number in preparation for 20 to make exercise a regular and enjoyable part of stretching. A warm-up to find your age at least one day of exercise, your training zone. For detailed exercise information, obtain a reputable book or...
... Exercise—-Exercise for exercise. Remember, the key to success is near the middle number in preparation for 20 to make exercise a regular and enjoyable part of stretching. A warm-up to find your age at least one day of exercise, your training zone. For detailed exercise information, obtain a reputable book or...
English Manual
Page 26
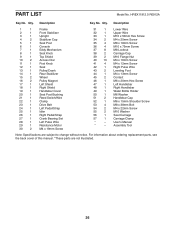
Qty. Qty. User’'s Manual * –- For information about ordering replacement parts, see the back cover of this manual. *These parts are subject to change without notice. Description Key No. Description 1 1 Frame 2 1 Front Stabilizer 3 1 Upright 4 2 Stabilizer Cap 5 1 Seat Post 6 1 Console 7 1 Eddy Mechanism 8 1 Seat Knob 9 1 Top Shield ...2 M4 x 22mm Screw 55 2 M10 Washer 56 1 Seat Carriage 57 1 Carriage Clamp * –- Assembly Tool Note: Specifications are not illustrated. 26 HREX11912.0 R0912A Key No. PART LIST Model No.
Qty. Qty. User’'s Manual * –- For information about ordering replacement parts, see the back cover of this manual. *These parts are subject to change without notice. Description Key No. Description 1 1 Frame 2 1 Front Stabilizer 3 1 Upright 4 2 Stabilizer Cap 5 1 Seat Post 6 1 Console 7 1 Eddy Mechanism 8 1 Seat Knob 9 1 Top Shield ...2 M4 x 22mm Screw 55 2 M10 Washer 56 1 Seat Carriage 57 1 Carriage Clamp * –- Assembly Tool Note: Specifications are not illustrated. 26 HREX11912.0 R0912A Key No. PART LIST Model No.
English Manual
Page 28
... centers. This warranty provides specic legal rights; ICON Health & Fitness, Inc., 1500 S. 1000 W., Logan, UT 84321-9813 Part No. 337569 R0912A Printed in workmanship and material, under warranty, the customer will be preauthorized by ICON. All repairs for which warranty ... exclusion or limitation of incidental or consequential damages. the customer may not apply to the product. ORDERING REPLACEMENT PARTS To order replacement parts, please see the PART LIST and the EXPLODED DRAWING near the end of this manual) LIMITED WARRANTY IMPORTANT: You must be responsible...
... centers. This warranty provides specic legal rights; ICON Health & Fitness, Inc., 1500 S. 1000 W., Logan, UT 84321-9813 Part No. 337569 R0912A Printed in workmanship and material, under warranty, the customer will be preauthorized by ICON. All repairs for which warranty ... exclusion or limitation of incidental or consequential damages. the customer may not apply to the product. ORDERING REPLACEMENT PARTS To order replacement parts, please see the PART LIST and the EXPLODED DRAWING near the end of this manual) LIMITED WARRANTY IMPORTANT: You must be responsible...


