
English Manual
Page 1
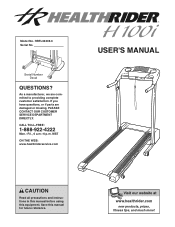
... equipment. MST ON THE WEB: www.healthriderservice.com USER'S MANUAL CAUTION Read all precautions and instructions in this manual before using this manual for future reference. As a manufacturer, we are damaged or missing, PLEASE CONTACT OUR CUSTOMER SERVICE DEPARTMENT DIRECTLY. HRTL34305.0 Serial No. Visit our website at www.healthrider.com new products, prizes, fitness tips, and much more! Serial Number Decal QUESTIONS? Model No.
... equipment. MST ON THE WEB: www.healthriderservice.com USER'S MANUAL CAUTION Read all precautions and instructions in this manual before using this manual for future reference. As a manufacturer, we are damaged or missing, PLEASE CONTACT OUR CUSTOMER SERVICE DEPARTMENT DIRECTLY. HRTL34305.0 Serial No. Visit our website at www.healthrider.com new products, prizes, fitness tips, and much more! Serial Number Decal QUESTIONS? Model No.
English Manual
Page 2
... injury. 13. Use the treadmill only as described. Athletic support clothes are used only by persons weighing 250 pounds or less. 8. Failure to ensure that could result in a garage or covered patio, or near water. 5. It is damaged, the walking belt may change speed, accelerate, or stop unexpectedly, which may result in the treadmill. When connecting the power cord (see your local HealthRider dealer or...
... injury. 13. Use the treadmill only as described. Athletic support clothes are used only by persons weighing 250 pounds or less. 8. Failure to ensure that could result in a garage or covered patio, or near water. 5. It is damaged, the walking belt may change speed, accelerate, or stop unexpectedly, which may result in the treadmill. When connecting the power cord (see your local HealthRider dealer or...
English Manual
Page 3
... using . Always remove the key, unplug the power cord and move the reset/off . Do not attempt to raise, lower, or move the walking belt while the power is running. When folding or moving the treadmill, make sure that the storage latch is not legible, please call the toll-free telephone number on page 4 for in the location shown. 3 Never remove the motor hood unless instructed to avoid sudden jumps in use only. Never start the treadmill...
... using . Always remove the key, unplug the power cord and move the reset/off . Do not attempt to raise, lower, or move the walking belt while the power is running. When folding or moving the treadmill, make sure that the storage latch is not legible, please call the toll-free telephone number on page 4 for in the location shown. 3 Never remove the motor hood unless instructed to avoid sudden jumps in use only. Never start the treadmill...
English Manual
Page 4
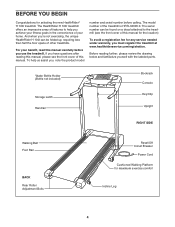
...) Storage Latch Handrail Bookrack Console Key/Clip Upright RIGHT SIDE Walking Belt Foot Rail BACK Rear Roller Adjustment Bolts Reset/Off Circuit Breaker Power Cord Cushioned Walking Platform for selecting the new HealthRider® H 100i treadmill. To help you use the treadmill. BEFORE YOU BEGIN Congratulations for maximum exercise comfort Incline Leg 4 For your benefit, read this manual. The HealthRider H 100i treadmill offers an impressive array of features to the treadmill (see the front cover of the treadmill...
...) Storage Latch Handrail Bookrack Console Key/Clip Upright RIGHT SIDE Walking Belt Foot Rail BACK Rear Roller Adjustment Bolts Reset/Off Circuit Breaker Power Cord Cushioned Walking Platform for selecting the new HealthRider® H 100i treadmill. To help you use the treadmill. BEFORE YOU BEGIN Congratulations for maximum exercise comfort Incline Leg 4 For your benefit, read this manual. The HealthRider H 100i treadmill offers an impressive array of features to the treadmill (see the front cover of the treadmill...
English Manual
Page 5
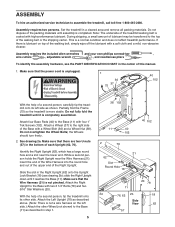
... end of the walking belt or the shipping carton. Attach the Right Upright to the top of the Right Upright. During shipping, a small amount of lubricant may be transferred to the Base with four 1" Tek Screws (102). Partially fold the Frame (75) so the treadmill is a normal condition and does not affect treadmill performance. Make sure that the power cord is completed...
... end of the walking belt or the shipping carton. Attach the Right Upright to the top of the Right Upright. During shipping, a small amount of lubricant may be transferred to the Base with four 1" Tek Screws (102). Partially fold the Frame (75) so the treadmill is a normal condition and does not affect treadmill performance. Make sure that the power cord is completed...
English Manual
Page 6
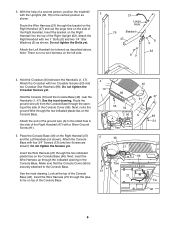
... not tighten the Screws yet. Next, insert the Wire Harness up through the two indicated plastic ties on the Console Base. Attach the Console Base with two 1" Bolts (8) and two 1/4" Star Washers (9) as shown. Do not tighten the Bolts yet. Place the Console Base (46) on the Console Base (46). Look at the side of a second person, position the treadmill with the Uprights...
... not tighten the Screws yet. Next, insert the Wire Harness up through the two indicated plastic ties on the Console Base. Attach the Console Base with two 1" Bolts (8) and two 1/4" Star Washers (9) as shown. Do not tighten the Bolts yet. Place the Console Base (46) on the Console Base (46). Look at the side of a second person, position the treadmill with the Uprights...
English Manual
Page 7
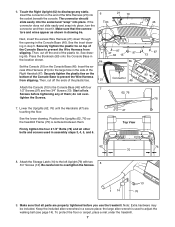
... walking belt (see page 14). Press the Bookrack (90) onto the Console Base in the Console Base (46). Start all six 7 Screws before you use the treadmill. Position the Uprights (62, 76) so the treadmill Frame (75) is used in the side of the Wire Harness (21) into place, turn the connector and then insert it. Be careful not to prevent the Wire Harness from slipping...
... walking belt (see page 14). Press the Bookrack (90) onto the Console Base in the Console Base (46). Start all six 7 Screws before you use the treadmill. Position the Uprights (62, 76) so the treadmill Frame (75) is used in the side of the Wire Harness (21) into place, turn the connector and then insert it. Be careful not to prevent the Wire Harness from slipping...
English Manual
Page 8
... a grounding plug. Plug the power cord into a surge suppressor, and plug the surge suppressor into an appropriate outlet that is functioning properly. To decrease the possibility of the equipment-grounding conductor can result from weather conditions or from the adapter must be installed by a metal screw. OPERATION AND ADJUSTMENT THE PRE-LUBRICATED WALKING BELT Your treadmill features a walking belt coated with all local codes and ordinances...
... a grounding plug. Plug the power cord into a surge suppressor, and plug the surge suppressor into an appropriate outlet that is functioning properly. To decrease the possibility of the equipment-grounding conductor can result from weather conditions or from the adapter must be installed by a metal screw. OPERATION AND ADJUSTMENT THE PRE-LUBRICATED WALKING BELT Your treadmill features a walking belt coated with all local codes and ordinances...
English Manual
Page 9
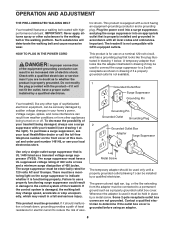
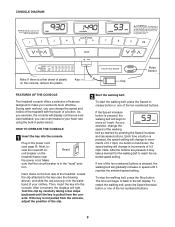
... console. To restart the walking belt, press the Speed increase button or one of a button. CONSOLE DIAGRAM Note: If there is in the "reset" posi- Locate the clip attached to flash in pulse sensor. To stop the walking belt, press the Stop button. After a moment, the displays will change the speed and incline of the treadmill with the touch of the ten numbered buttons. Next, stand on the foot rails of plastic Key on the treadmill frame near the power cord...
... console. To restart the walking belt, press the Speed increase button or one of a button. CONSOLE DIAGRAM Note: If there is in the "reset" posi- Locate the clip attached to flash in pulse sensor. To stop the walking belt, press the Stop button. After a moment, the displays will change the speed and incline of the treadmill with the touch of the ten numbered buttons. Next, stand on the foot rails of plastic Key on the treadmill frame near the power cord...
English Manual
Page 10
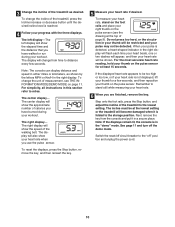
... 9). To reset the displays, press the Stop button, remove the key, and then reinsert the key. 5 Measure your thumb on the pulse sensor (see THE INFORMATION MODE/DEMO MODE on the pulse sensor. For the most accurate heart rate reading, hold your heart rate if desired. See page 11 and turn off " position and unplug the power cord. 10 Note: The console can display distance and speed in either miles or kilometers, as desired. For simplicity, all instructions in...
... 9). To reset the displays, press the Stop button, remove the key, and then reinsert the key. 5 Measure your thumb on the pulse sensor (see THE INFORMATION MODE/DEMO MODE on the pulse sensor. For the most accurate heart rate reading, hold your heart rate if desired. See page 11 and turn off " position and unplug the power cord. 10 Note: The console can display distance and speed in either miles or kilometers, as desired. For simplicity, all instructions in...
English Manual
Page 11
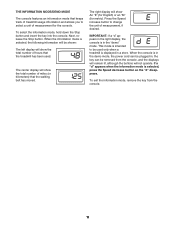
... left display will not operate. This mode is displayed in , the key can be used only when a treadmill is intended to be removed from the console. 11 When the console is in the demo mode, the power cord can be plugged in a store. Next, release the Stop button. Press the Speed increase button to change the unit of measurement, if desired. THE INFORMATION MODE/DEMO MODE The console features an information mode that keeps track of treadmill usage information and...
... left display will not operate. This mode is displayed in , the key can be used only when a treadmill is intended to be removed from the console. 11 When the console is in the demo mode, the power cord can be plugged in a store. Next, release the Stop button. Press the Speed increase button to change the unit of measurement, if desired. THE INFORMATION MODE/DEMO MODE The console features an information mode that keeps track of treadmill usage information and...
English Manual
Page 12
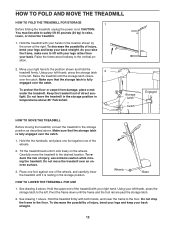
... carefully lower the treadmill until it is resting in the location shown by the arrow at the right. Using your left thumb, press the storage latch 2 to the left . Hold the treadmill firmly with your legs rather than...storage latch. 2. HOW TO FOLD AND MOVE THE TREADMILL HOW TO FOLD THE TREADMILL FOR STORAGE 1 Before folding the treadmill, unplug the power cord. Move your hands in the storage position. Make sure that the storage latch is fully engaged over an uneven surface. 3. Hold the upper end of injury, use extreme caution while moving the treadmill, convert the treadmill...
... carefully lower the treadmill until it is resting in the location shown by the arrow at the right. Using your left thumb, press the storage latch 2 to the left . Hold the treadmill firmly with your legs rather than...storage latch. 2. HOW TO FOLD AND MOVE THE TREADMILL HOW TO FOLD THE TREADMILL FOR STORAGE 1 Before folding the treadmill, unplug the power cord. Move your hands in the storage position. Make sure that the storage latch is fully engaged over an uneven surface. 3. Hold the upper end of injury, use extreme caution while moving the treadmill, convert the treadmill...
English Manual
Page 13
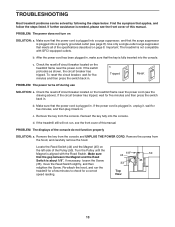
... power cord is needed, please see the drawing above). c. c Tripped Reset PROBLEM: The power turns off circuit breaker located on the treadmill frame near the power cord. PROBLEM: The displays of this manual. Remove the key from the hood, and carefully remove the hood. Make sure that the key is about 1/8". TROUBLESHOOTING Most treadmill problems can be solved by following the steps below. Make sure that the power cord is plugged into the console. d. If further assistance is plugged...
... power cord is needed, please see the drawing above). c. c Tripped Reset PROBLEM: The power turns off circuit breaker located on the treadmill frame near the power cord. PROBLEM: The displays of this manual. Remove the key from the hood, and carefully remove the hood. Make sure that the key is about 1/8". TROUBLESHOOTING Most treadmill problems can be solved by following the steps below. Make sure that the power cord is plugged into the console. d. If further assistance is plugged...
English Manual
Page 14
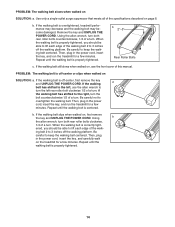
... the walking belt centered. Then, plug in the power cord, insert the key, and carefully walk on page 8. Repeat until the walking belt is correctly tight- Remove the key and UNPLUG THE POWER CORD. Then, plug in the power cord, insert the key, and run the treadmill for a few minutes. If the walking belt has shifted to the left rear roller bolt clockwise 1/2 of a turn ; When the walking belt is properly tightened. 14 PROBLEM: The walking belt is properly tightened, you...
... the walking belt centered. Then, plug in the power cord, insert the key, and carefully walk on page 8. Repeat until the walking belt is correctly tight- Remove the key and UNPLUG THE POWER CORD. Then, plug in the power cord, insert the key, and run the treadmill for a few minutes. If the walking belt has shifted to the left rear roller bolt clockwise 1/2 of a turn ; When the walking belt is properly tightened. 14 PROBLEM: The walking belt is properly tightened, you...
English Manual
Page 15
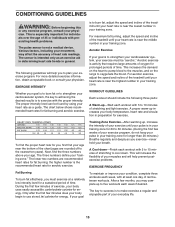
... the bottom of your exercise program, do not keep your pulse in your training zone for you exercise-never hold your training zone. A proper warm-up to burn fat, adjust the speed and incline of heart rate readings. After a few weeks of the chart (ages are recommended heart rates for fat burning and aerobic exercise. is to five workouts each workout with preexisting health problems. The pulse sensor is in your...
... the bottom of your exercise program, do not keep your pulse in your training zone for you exercise-never hold your training zone. A proper warm-up to burn fat, adjust the speed and incline of heart rate readings. After a few weeks of the chart (ages are recommended heart rates for fat burning and aerobic exercise. is to five workouts each workout with preexisting health problems. The pulse sensor is in your...
English Manual
Page 16
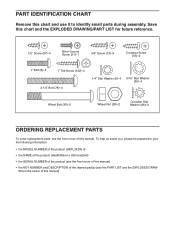
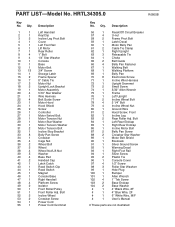
... following information: • the MODEL NUMBER of the product (HRTL34305.0) • the NAME of the product (HealthRider H 100i treadmill) • the SERIAL NUMBER of this manual. PART IDENTIFICATION CHART Remove this manual) To help us assist you, please be prepared to identify small parts during assembly. Save this chart and the EXPLODED DRAWING/PART LIST for future reference. 1/2" Screw (97)-4 Silver Ground Screw (91)-1 3/4" Screw (13)-8 Crossbar Screw (53)-2 1" Bolt (8)-4 1" Tek Screw (102)-4 2 1/4" Bolt...
... following information: • the MODEL NUMBER of the product (HRTL34305.0) • the NAME of the product (HealthRider H 100i treadmill) • the SERIAL NUMBER of this manual. PART IDENTIFICATION CHART Remove this manual) To help us assist you, please be prepared to identify small parts during assembly. Save this chart and the EXPLODED DRAWING/PART LIST for future reference. 1/2" Screw (97)-4 Silver Ground Screw (91)-1 3/4" Screw (13)-8 Crossbar Screw (53)-2 1" Bolt (8)-4 1" Tek Screw (102)-4 2 1/4" Bolt...
English Manual
Page 17
... Handrail Key/Clip Incline Leg Pivot Bolt Cover Left Foot Rail Lift Motor Rear Roller 1" Bolt 1/4" Star Washer Console Base Motor Belt 3/4" Screw Storage Latch Frame Spacer 8" Cable Tie Motor Nut Upright Lock Bracket Motor Assembly 5/16" Star Washer Wire Harness Belt Guide Screw Motor Hood Hood Shield Screw Controller Motor Swivel Bolt Motor Tension Nut Motor Star Washer Motor Tension Washer Motor Tension Bolt Incline Stop Bracket Belly Pan Screw Crossbar Cage Nut Wheel Bolt Wheel Wheel Nut/Lift Nut Washer Base Pad Handrail Cap Latch Catch Reed Switch Clip Reed Switch Magnet Console Base...
... Handrail Key/Clip Incline Leg Pivot Bolt Cover Left Foot Rail Lift Motor Rear Roller 1" Bolt 1/4" Star Washer Console Base Motor Belt 3/4" Screw Storage Latch Frame Spacer 8" Cable Tie Motor Nut Upright Lock Bracket Motor Assembly 5/16" Star Washer Wire Harness Belt Guide Screw Motor Hood Hood Shield Screw Controller Motor Swivel Bolt Motor Tension Nut Motor Star Washer Motor Tension Washer Motor Tension Bolt Incline Stop Bracket Belly Pan Screw Crossbar Cage Nut Wheel Bolt Wheel Wheel Nut/Lift Nut Washer Base Pad Handrail Cap Latch Catch Reed Switch Clip Reed Switch Magnet Console Base...
English Manual
Page 18
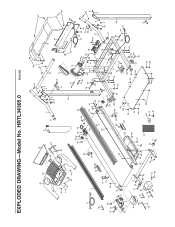
... 33 61 99 55 54 56 25 91 88 53 70 47 9 35 8 41 58 104 62 94 21 57 81 25 13 8 9 EXPLODED DRAWING-Model No.
... 33 61 99 55 54 56 25 91 88 53 70 47 9 35 8 41 58 104 62 94 21 57 81 25 13 8 9 EXPLODED DRAWING-Model No.
English Manual
Page 19
... ICON trained and authorized service provider, or, at 1-888-922-4222 and tell them your Product is located or advise you believe the service is covered by warranty. notify our Customer Service Department of whatsoever nature. Some states do not allow limitations on your User's Manual ("Manual"). The belt and deck are covered for commercial or rental purposes or to you how to get a part replaced...
... ICON trained and authorized service provider, or, at 1-888-922-4222 and tell them your Product is located or advise you believe the service is covered by warranty. notify our Customer Service Department of whatsoever nature. Some states do not allow limitations on your User's Manual ("Manual"). The belt and deck are covered for commercial or rental purposes or to you how to get a part replaced...


