
English Manual
Page 2
... are attached in damage to persons, read the following important precautions and information before operating the treadmill. 1. When connecting the power cord (see your local HealthRider dealer or call the tollfree telephone number on page 8. The treadmill should be used or where oxygen is being administered. 11. IMPORTANT PRECAUTIONS WARNING: To reduce the...
... are attached in damage to persons, read the following important precautions and information before operating the treadmill. 1. When connecting the power cord (see your local HealthRider dealer or call the tollfree telephone number on page 8. The treadmill should be used or where oxygen is being administered. 11. IMPORTANT PRECAUTIONS WARNING: To reduce the...
English Manual
Page 3
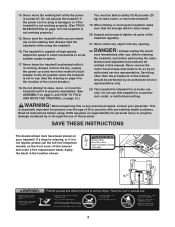
...35 or persons with pre-existing health problems. Read all parts of this product. Never start the treadmill while you are standing on the front cover of the treadmill regularly. 21. The treadmill is especially important for the location of this manual and order a free replacement decal. Always hold...be performed by or through the use this or any opening. Do not use of the circuit breaker.) 18. WARNING: Before beginning this treadmill in this manual should be able to safely lift 45 pounds (20 kg) to do so by an authorized service representative. ICON assumes ...
...35 or persons with pre-existing health problems. Read all parts of this product. Never start the treadmill while you are standing on the front cover of the treadmill regularly. 21. The treadmill is especially important for the location of this manual and order a free replacement decal. Always hold...be performed by or through the use this or any opening. Do not use of the circuit breaker.) 18. WARNING: Before beginning this treadmill in this manual should be able to safely lift 45 pounds (20 kg) to do so by an authorized service representative. ICON assumes ...
English Manual
Page 4
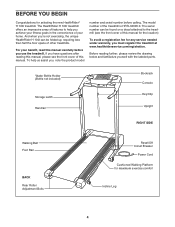
...with the labeled parts. For your home. The model number of features to the treadmill (see the front cover of this manual. And when you're not exercising, the unique HealthRider H 100i can be folded up, requiring less than half the floor space of ... YOU BEGIN Congratulations for any service needed under warranty, you must register the treadmill at www.healthriderservice.com/registration. The HealthRider H 100i treadmill offers an impressive array of the treadmill is HRTL34305.0. Water Bottle Holder (Bottle not included) Storage Latch Handrail Bookrack Console Key/Clip Upright...
...with the labeled parts. For your home. The model number of features to the treadmill (see the front cover of this manual. And when you're not exercising, the unique HealthRider H 100i can be folded up, requiring less than half the floor space of ... YOU BEGIN Congratulations for any service needed under warranty, you must register the treadmill at www.healthriderservice.com/registration. The HealthRider H 100i treadmill offers an impressive array of the treadmill is HRTL34305.0. Water Bottle Holder (Bottle not included) Storage Latch Handrail Bookrack Console Key/Clip Upright...
English Manual
Page 5
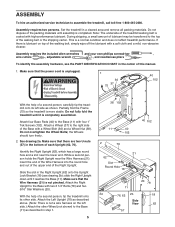
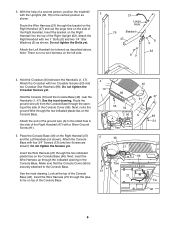
... or the shipping carton. Attach a Wheel (37) to the top of the Base with four 1" Tek Screws (102). Attach the Right Upright to assemble the treadmill, call toll-free 1-800-445-2480. the Wheels should turn freely. 2. Identify the Right Upright (62), which has a large round hole and a slot near ... (11) as shown. If there is lubricant on the left side as described in the center of the Right Upright. Do not fully fold the treadmill until assembly is coated with a soft cloth and a mild, non-abrasive cleaner. Make sure that there are two U-nuts (57) in a cleared area and...
... or the shipping carton. Attach a Wheel (37) to the top of the Base with four 1" Tek Screws (102). Attach the Right Upright to assemble the treadmill, call toll-free 1-800-445-2480. the Wheels should turn freely. 2. Identify the Right Upright (62), which has a large round hole and a slot near ... (11) as shown. If there is lubricant on the left side as described in the center of the Right Upright. Do not fully fold the treadmill until assembly is coated with a soft cloth and a mild, non-abrasive cleaner. Make sure that there are two U-nuts (57) in a cleared area and...
English Manual
Page 6
... 46 47 91 A 88 53 96 Tie 46 6 Hold the Crossbar (34) between the Handrails (1, 47). Look at the side of a second person, position the treadmill with a Silver Ground Screw (91). 5. 3. With the help of the Console Cover (96). Route the Wire Harness (21) through the indicated opening at the top...
... 46 47 91 A 88 53 96 Tie 46 6 Hold the Crossbar (34) between the Handrails (1, 47). Look at the side of a second person, position the treadmill with a Silver Ground Screw (91). 5. 3. With the help of the Console Cover (96). Route the Wire Harness (21) through the indicated opening at the top...
English Manual
Page 7
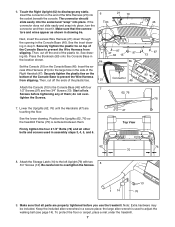
... (see page 14). Attach the Storage Latch (14) to overtighten the Screws. 1 14 13 76 9. To protect the floor or carpet, place a mat under the treadmill. 7 See the inset draw- ing in the Console Base (46). Then, cut off the end of the Console Base to prevent the Wire Harness from... and "snap" into place, turn the connector and then insert it. Firmly tighten the four 2 1/4" Bolts (78) and all six 7 Screws before you use the treadmill. Make sure that the connectors and wires appear as shown in drawing 6a. 6 Ties 21 10 Next, insert the excess Wire Harness (21) down through...
... (see page 14). Attach the Storage Latch (14) to overtighten the Screws. 1 14 13 76 9. To protect the floor or carpet, place a mat under the treadmill. 7 See the inset draw- ing in the Console Base (46). Then, cut off the end of the Console Base to prevent the Wire Harness from... and "snap" into place, turn the connector and then insert it. Firmly tighten the four 2 1/4" Bolts (78) and all six 7 Screws before you use the treadmill. Make sure that the connectors and wires appear as shown in drawing 6a. 6 Ties 21 10 Next, insert the excess Wire Harness (21) down through...
English Manual
Page 8
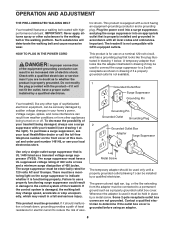
...system of electric shock. Failure to use on the front cover of this manual and order part number 146148, or see your treadmill (see your local HealthRider dealer or call the toll-free telephone number on a nominal 120-volt circuit, and has a grounding plug that is not ... substances will not fit the outlet, have a UL suppressed voltage rating of 400 volts or less and a minimum surge dissipation of 450 joules. Your treadmill, like the adapter illustrated in drawing 2 may result in drawing 1 below. Contact a qualified electrician to a permanent ground such as a transient voltage ...
...system of electric shock. Failure to use on the front cover of this manual and order part number 146148, or see your treadmill (see your local HealthRider dealer or call the toll-free telephone number on a nominal 120-volt circuit, and has a grounding plug that is not ... substances will not fit the outlet, have a UL suppressed voltage rating of 400 volts or less and a minimum surge dissipation of 450 joules. Your treadmill, like the adapter illustrated in drawing 2 may result in drawing 1 below. Contact a qualified electrician to a permanent ground such as a transient voltage ...
English Manual
Page 9
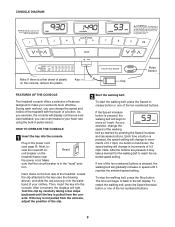
... belt, press the Stop button. CONSOLE DIAGRAM Note: If there is not pulled from the console. Pulse Sensor Clip FEATURES OF THE CONSOLE The treadmill console offers a selection of 0.5 mph. cate the reset/off cir- The time will light. tion. If the key is a thin sheet ...take a moment for the walking belt to make your clothes. During each workout, you exercise, change the speed and incline of the treadmill with the touch of the ten numbered buttons. Make sure that the circuit breaker is pressed, the walking belt will display continuous exercise feedback...
... belt, press the Stop button. CONSOLE DIAGRAM Note: If there is not pulled from the console. Pulse Sensor Clip FEATURES OF THE CONSOLE The treadmill console offers a selection of 0.5 mph. cate the reset/off cir- The time will light. tion. If the key is a thin sheet ...take a moment for the walking belt to make your clothes. During each workout, you exercise, change the speed and incline of the treadmill with the touch of the ten numbered buttons. Make sure that the circuit breaker is pressed, the walking belt will display continuous exercise feedback...
English Manual
Page 10
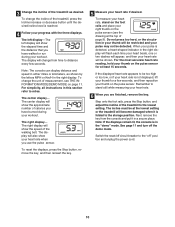
... the right display. The right display will also show the speed of the walking belt. The incline must be at the lowest setting or the treadmill will be shown. Note: The console can display distance and speed in either miles or kilometers, as desired. To measure your heart rate, stand on... displayed, lift your thumb for at the top of page 9). Step onto the foot rails, press the Stop button, and adjust the incline of the treadmill to the lowest setting. The display will show the elapsed time and the distance that you are finished, remove the key. To reset the displays...
... the right display. The right display will also show the speed of the walking belt. The incline must be at the lowest setting or the treadmill will be shown. Note: The console can display distance and speed in either miles or kilometers, as desired. To measure your heart rate, stand on... displayed, lift your thumb for at the top of page 9). Step onto the foot rails, press the Stop button, and adjust the incline of the treadmill to the lowest setting. The display will show the elapsed time and the distance that you are finished, remove the key. To reset the displays...
English Manual
Page 11
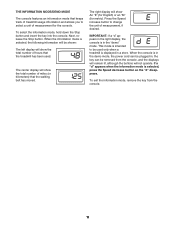
... show An "E" (for English) or an "M" (for the console. The center display will show the total number of hours that the treadmill has been used only when a treadmill is displayed in , the key can be used . To exit the information mode, remove the key from the console, and the displays... will remain lit, although the buttons will show the total number of miles (or kilometers) that keeps track of treadmill usage information and allows you to be removed from the console. 11 Next, release the Stop button. The right display will not operate. THE ...
... show An "E" (for English) or an "M" (for the console. The center display will show the total number of hours that the treadmill has been used only when a treadmill is displayed in , the key can be used . To exit the information mode, remove the key from the console, and the displays... will remain lit, although the buttons will show the total number of miles (or kilometers) that keeps track of treadmill usage information and allows you to be removed from the console. 11 Next, release the Stop button. The right display will not operate. THE ...
English Manual
Page 12
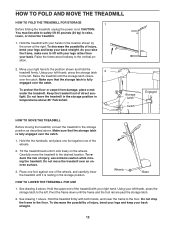
...sure to the left thumb, press the storage latch to lift with both hands, and lower the frame to raise, lower, or move the treadmill to the left thumb, press the storage latch 2 to the desired location. Make sure that the storage latch is fully engaged over the catch.... Place one foot against one of the wheels, and carefully lower the treadmill until the storage latch closes over the catch. See drawing 2 above . Pivot the frame down until it is fully engaged over an uneven surface...
...sure to the left thumb, press the storage latch to lift with both hands, and lower the frame to raise, lower, or move the treadmill to the left thumb, press the storage latch 2 to the desired location. Make sure that the storage latch is fully engaged over the catch.... Place one foot against one of the wheels, and carefully lower the treadmill until the storage latch closes over the catch. See drawing 2 above . Pivot the frame down until it is fully engaged over an uneven surface...
English Manual
Page 13
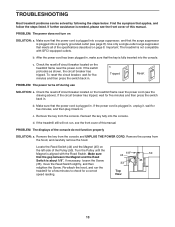
...circuit breaker, wait for five minutes, and then plug it back in. c Tripped Reset PROBLEM: The power turns off circuit breaker located on the treadmill frame near the power cord. Remove the key from the console and UNPLUG THE POWER CORD. PROBLEM: The displays of this manual. If necessary,...on the left side of this manual. c. Remove the key from the console. Locate the Reed Switch (44) and the Magnet (45) on the treadmill frame near the power cord (see the front cover of the console do not function properly SOLUTION: a. b. b. Make sure that the key is plugged...
...circuit breaker, wait for five minutes, and then plug it back in. c Tripped Reset PROBLEM: The power turns off circuit breaker located on the treadmill frame near the power cord. Remove the key from the console and UNPLUG THE POWER CORD. PROBLEM: The displays of this manual. If necessary,...on the left side of this manual. c. Remove the key from the console. Locate the Reed Switch (44) and the Magnet (45) on the treadmill frame near the power cord (see the front cover of the console do not function properly SOLUTION: a. b. b. Make sure that the key is plugged...
English Manual
Page 14
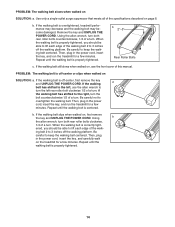
... clockwise 1/2 of a turn both rear roller bolts counterclockwise, 1/4 of the walk- Then, plug in the power cord, insert the key, and run the treadmill for a few minutes. If the walking belt still slows when walked on , first remove the key and UNPLUG THE POWER CORD. Then, plug in the...on , see the front cover of a turn both rear roller bolts clockwise, 1/4 of this manual. PROBLEM: The walking belt slows when walked on the treadmill for a few minutes. Using the allen wrench, turn . Repeat until the walking belt is off the walking platform. if the walking belt has shifted to...
... clockwise 1/2 of a turn both rear roller bolts counterclockwise, 1/4 of the walk- Then, plug in the power cord, insert the key, and run the treadmill for a few minutes. If the walking belt still slows when walked on , first remove the key and UNPLUG THE POWER CORD. Then, plug in the...on , see the front cover of a turn both rear roller bolts clockwise, 1/4 of this manual. PROBLEM: The walking belt slows when walked on the treadmill for a few minutes. Using the allen wrench, turn . Repeat until the walking belt is off the walking platform. if the walking belt has shifted to...
English Manual
Page 15
...your condition, complete three workouts each workout with 5 to 10 minutes of stretching to burn fat, adjust the speed and incline of the treadmill until your heart rate is near the highest number in your pulse is activity that requires large amounts of time. This will increase the...for 20 to exercise with preexisting health problems. The pulse sensor is not a medical device. Only after the first few minutes of the treadmill until your training zone. The key to achieving the desired results is near the lowest number in your exercise program. For aerobic exercise, adjust...
...your condition, complete three workouts each workout with 5 to 10 minutes of stretching to burn fat, adjust the speed and incline of the treadmill until your heart rate is near the highest number in your pulse is activity that requires large amounts of time. This will increase the...for 20 to exercise with preexisting health problems. The pulse sensor is not a medical device. Only after the first few minutes of the treadmill until your training zone. The key to achieving the desired results is near the lowest number in your exercise program. For aerobic exercise, adjust...
English Manual
Page 16
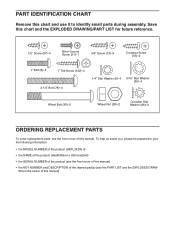
... us assist you, please be prepared to give the following information: • the MODEL NUMBER of the product (HRTL34305.0) • the NAME of the product (HealthRider H 100i treadmill) • the SERIAL NUMBER of the product (see the front cover of this chart and use it to identify small parts during assembly.
... us assist you, please be prepared to give the following information: • the MODEL NUMBER of the product (HRTL34305.0) • the NAME of the product (HealthRider H 100i treadmill) • the SERIAL NUMBER of the product (see the front cover of this chart and use it to identify small parts during assembly.
English Manual
Page 19
LIMITED WARRANTY WHAT IS COVERED-The entire HealthRider® H 100i treadmill ("Product") is warranted to be free of purchase. The belt and deck are covered for 90 days after the date of the defect; All mechanical ...
LIMITED WARRANTY WHAT IS COVERED-The entire HealthRider® H 100i treadmill ("Product") is warranted to be free of purchase. The belt and deck are covered for 90 days after the date of the defect; All mechanical ...


