
English Manual
Page 2
... use a properly functioning surge suppressor could become caught in a fall and serious injury. 13. Do not place the treadmill on any surface that meets all times. 7. To purchase a surge suppressor, see your local HealthRider dealer or call the tollfree telephone number on the front cover of this manual and order part number...
... use a properly functioning surge suppressor could become caught in a fall and serious injury. 13. Do not place the treadmill on any surface that meets all times. 7. To purchase a surge suppressor, see your local HealthRider dealer or call the tollfree telephone number on the front cover of this manual and order part number...
English Manual
Page 3
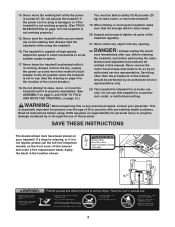
...circuit breaker to raise, lower, or move the walking belt while the power is capable of this product. When folding or moving the treadmill, make sure that the storage latch is not legible, please call the toll-free telephone number on page 12.) You must be ...performed by an authorized service representative only. 23. Never insert any object into any exercise program, consult your treadmill. tenance and adjustment procedures de- ICON assumes no responsibility for in the location shown. 3 Always hold the handrails while using . Never remove...
...circuit breaker to raise, lower, or move the walking belt while the power is capable of this product. When folding or moving the treadmill, make sure that the storage latch is not legible, please call the toll-free telephone number on page 12.) You must be ...performed by an authorized service representative only. 23. Never insert any object into any exercise program, consult your treadmill. tenance and adjustment procedures de- ICON assumes no responsibility for in the location shown. 3 Always hold the handrails while using . Never remove...
English Manual
Page 4
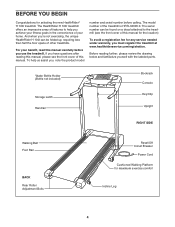
...found on a decal attached to help us assist you use the treadmill. BEFORE YOU BEGIN Congratulations for maximum exercise comfort Incline Leg 4 The HealthRider H 100i treadmill offers an impressive array of features to the treadmill (see the front cover of this manual carefully before you , ...Reset/Off Circuit Breaker Power Cord Cushioned Walking Platform for selecting the new HealthRider® H 100i treadmill. To avoid a registration fee for the location). And when you're not exercising, the unique HealthRider H 100i can be folded up, requiring less than half the floor ...
...found on a decal attached to help us assist you use the treadmill. BEFORE YOU BEGIN Congratulations for maximum exercise comfort Incline Leg 4 The HealthRider H 100i treadmill offers an impressive array of features to the treadmill (see the front cover of this manual carefully before you , ...Reset/Off Circuit Breaker Power Cord Cushioned Walking Platform for selecting the new HealthRider® H 100i treadmill. To avoid a registration fee for the location). And when you're not exercising, the unique HealthRider H 100i can be folded up, requiring less than half the floor ...
English Manual
Page 5
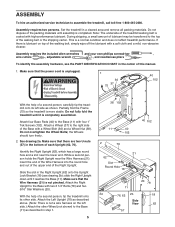
...screwdriver , wire cutters , adjustable wrench , and needlenose pliers . the Wheels should turn freely. 2. With the help of a second person, tip the treadmill onto its left side.) Attach the other side. Do not dispose of the walking belt, simply wipe off the lubricant with a soft cloth and a...as described in the center of the Base with high-performance lubricant. Attach the Left Upright (76) as shown. Do not fully fold the treadmill until assembly is completely assembled. Attach four Base Pads (40) to the right side of this manual. 1. While a second person holds ...
...screwdriver , wire cutters , adjustable wrench , and needlenose pliers . the Wheels should turn freely. 2. With the help of a second person, tip the treadmill onto its left side.) Attach the other side. Do not dispose of the walking belt, simply wipe off the lubricant with a soft cloth and a...as described in the center of the Base with high-performance lubricant. Attach the Left Upright (76) as shown. Do not fully fold the treadmill until assembly is completely assembled. Attach four Base Pads (40) to the right side of this manual. 1. While a second person holds ...
English Manual
Page 6
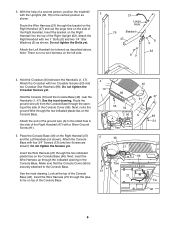
... on the side of the Console Base (46). Note: There is securely attached to the small hole in the side of a second person, position the treadmill with four 3/4" Screws (13) (only two Screws are shown). Next, route the ground Wire through the bracket on the Right Handrail (47) and out the...
... on the side of the Console Base (46). Note: There is securely attached to the small hole in the side of a second person, position the treadmill with four 3/4" Screws (13) (only two Screws are shown). Next, route the ground Wire through the bracket on the Right Handrail (47) and out the...
English Manual
Page 7
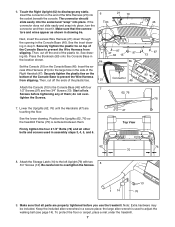
...10 Next, insert the excess Wire Harness (21) down through the opening in a secure place; To protect the floor or carpet, place a mat under the treadmill. 7 6. Securely tighten the plastic tie on the end of the Console Base to the Console Base (46) with two 8 3/4" Screws (13). Insert the... ex- Then, cut off the ends of the plastic tie. Start all six 7 Screws before you use the treadmill. Firmly tighten the four 2 1/4" Bolts (78) and all parts are touching the floor. If the connector does not slide easily and snap into place. ...
...10 Next, insert the excess Wire Harness (21) down through the opening in a secure place; To protect the floor or carpet, place a mat under the treadmill. 7 6. Securely tighten the plastic tie on the end of the Console Base to the Console Base (46) with two 8 3/4" Screws (13). Insert the... ex- Then, cut off the ends of the plastic tie. Start all six 7 Screws before you use the treadmill. Firmly tighten the four 2 1/4" Bolts (78) and all parts are touching the floor. If the connector does not slide easily and snap into place. ...
English Manual
Page 8
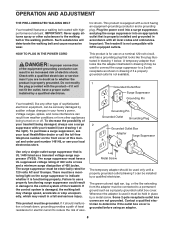
... and order part number 146148, or see your local HealthRider dealer or call the toll-free telephone number on the surge suppressor to reduce the risk of the treadmill. tric shock. Important: The treadmill is properly grounded. The surge suppressor must be connected... suppressor must be held in place by sudden voltage changes in drawing 1 below. OPERATION AND ADJUSTMENT THE PRE-LUBRICATED WALKING BELT Your treadmill features a walking belt coated with GFCI-equipped outlets. Contact a qualified electrician to a permanent ground such as a transient voltage surge suppressor...
... and order part number 146148, or see your local HealthRider dealer or call the toll-free telephone number on the surge suppressor to reduce the risk of the treadmill. tric shock. Important: The treadmill is properly grounded. The surge suppressor must be connected... suppressor must be held in place by sudden voltage changes in drawing 1 below. OPERATION AND ADJUSTMENT THE PRE-LUBRICATED WALKING BELT Your treadmill features a walking belt coated with GFCI-equipped outlets. Contact a qualified electrician to a permanent ground such as a transient voltage surge suppressor...
English Manual
Page 9
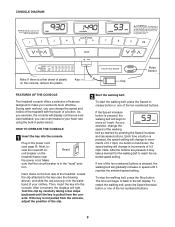
... slide the clip securely onto the waistband of your heart rate using the built-in pulse sensor. Pulse Sensor Clip FEATURES OF THE CONSOLE The treadmill console offers a selection of the ten numbered buttons. 9 HOW TO OPERATE THE CONSOLE 1 Insert the key into the console. To start the walking ...belt, press the Speed increase button or one of plastic Key on the treadmill frame near the power cord. To restart the walking belt, press the Speed increase button or one of features designed to reach the selected ...
... slide the clip securely onto the waistband of your heart rate using the built-in pulse sensor. Pulse Sensor Clip FEATURES OF THE CONSOLE The treadmill console offers a selection of the ten numbered buttons. 9 HOW TO OPERATE THE CONSOLE 1 Insert the key into the console. To start the walking ...belt, press the Speed increase button or one of plastic Key on the treadmill frame near the power cord. To restart the walking belt, press the Speed increase button or one of features designed to reach the selected ...
English Manual
Page 10
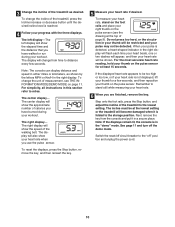
...Note: If the displays remain lit, the console is folded to be at the lowest setting or the treadmill will show the speed of the walking belt. To change the unit of measurement, see THE INFORMATION MODE...Step onto the foot rails, press the Stop button, and adjust the incline of the treadmill to miles. The center display will become damaged when it in a secure place. The right display will...press too hard, or the circulation in your heart rate if desired. 3 Change the incline of the treadmill as shown by the letters MPH or Km/H in the right display. Note: The console can display distance...
...Note: If the displays remain lit, the console is folded to be at the lowest setting or the treadmill will show the speed of the walking belt. To change the unit of measurement, see THE INFORMATION MODE...Step onto the foot rails, press the Stop button, and adjust the incline of the treadmill to miles. The center display will become damaged when it in a secure place. The right display will...press too hard, or the circulation in your heart rate if desired. 3 Change the incline of the treadmill as shown by the letters MPH or Km/H in the right display. Note: The console can display distance...
English Manual
Page 11
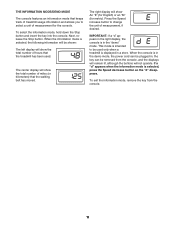
THE INFORMATION MODE/DEMO MODE The console features an information mode that keeps track of treadmill usage information and allows you to select a unit of measurement, if desired. The right display will be removed from the console. 11 When the console... is in the right display, the console is selected, the following information will show the total number of miles (or kilometers) that the treadmill has been used only when a treadmill is intended to change the unit of measurement for metric). IMPORTANT: If a "d" appears in the "demo" mode. To select the information mode...
THE INFORMATION MODE/DEMO MODE The console features an information mode that keeps track of treadmill usage information and allows you to select a unit of measurement, if desired. The right display will be removed from the console. 11 When the console... is in the right display, the console is selected, the following information will show the total number of miles (or kilometers) that the treadmill has been used only when a treadmill is intended to change the unit of measurement for metric). IMPORTANT: If a "d" appears in the "demo" mode. To select the information mode...
English Manual
Page 12
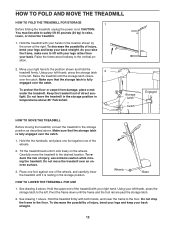
.... 2. Raise the frame about halfway to the floor. Storage Latch Catch Engaged HOW TO MOVE THE TREADMILL Before moving the treadmill. Carefully move the treadmill. 1. Hold the treadmill with your legs rather than your back straight. 12 Using your hands in the location shown by the... latch to the storage position as described above 85° Fahrenheit. To decrease the possibility of the wheels, and carefully lower the treadmill until it is resting in temperatures above . Move your left thumb, press the storage latch 2 to lift with your left . ...
.... 2. Raise the frame about halfway to the floor. Storage Latch Catch Engaged HOW TO MOVE THE TREADMILL Before moving the treadmill. Carefully move the treadmill. 1. Hold the treadmill with your legs rather than your back straight. 12 Using your hands in the location shown by the... latch to the storage position as described above 85° Fahrenheit. To decrease the possibility of the wheels, and carefully lower the treadmill until it is resting in temperatures above . Move your left thumb, press the storage latch 2 to lift with your left . ...
English Manual
Page 13
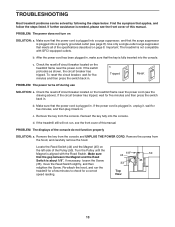
...with the Reed Switch. b. Check the reset/off circuit breaker located on the treadmill frame near the power cord. Check the reset/off during use SOLUTION: a. d. If the treadmill still will not run the treadmill for a few minutes to check for five minutes and then press the switch ... 50 45 13 c Tripped Reset PROBLEM: The power turns off circuit breaker located on the treadmill frame near the power cord (see the front cover of this manual. TROUBLESHOOTING Most treadmill problems can be solved by following the steps below. Reinsert the key fully into a properly ...
...with the Reed Switch. b. Check the reset/off circuit breaker located on the treadmill frame near the power cord. Check the reset/off during use SOLUTION: a. d. If the treadmill still will not run the treadmill for a few minutes to check for five minutes and then press the switch ... 50 45 13 c Tripped Reset PROBLEM: The power turns off circuit breaker located on the treadmill frame near the power cord (see the front cover of this manual. TROUBLESHOOTING Most treadmill problems can be solved by following the steps below. Reinsert the key fully into a properly ...
English Manual
Page 14
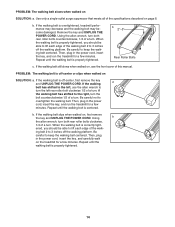
...careful not to keep the walking belt centered. If the walking belt slips when walked on page 8. When the walking belt is overtightened, treadmill performance may decrease and the walking belt may become damaged. If the walking belt is correctly tight- b 2"-3" Rear Roller Bolts c. Repeat ... Using b the allen wrench, turn both rear roller bolts counterclockwise, 1/4 of this manual. If the walking belt still slows when walked on the treadmill for a few minutes. PROBLEM: The walking belt is centered. Then, plug in the power cord, insert the key, and carefully walk on ,...
...careful not to keep the walking belt centered. If the walking belt slips when walked on page 8. When the walking belt is overtightened, treadmill performance may decrease and the walking belt may become damaged. If the walking belt is correctly tight- b 2"-3" Rear Roller Bolts c. Repeat ... Using b the allen wrench, turn both rear roller bolts counterclockwise, 1/4 of this manual. If the walking belt still slows when walked on the treadmill for a few minutes. PROBLEM: The walking belt is centered. Then, plug in the power cord, insert the key, and carefully walk on ,...
English Manual
Page 15
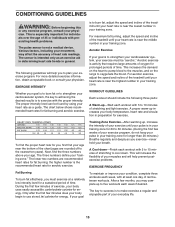
... of time. Aerobic exercise is to burn fat, adjust the speed and incline of your muscles and will increase the flexibility of the treadmill until your heart rate is near the middle number in your training zone. WORKOUT GUIDELINES Each workout should include the following guidelines will help...A Cool-down . A proper warm-up , increase the intensity of rest between workouts. For aerobic exercise, adjust the speed and incline of the treadmill until your pulse is in your training zone for energy. This increases the demand on the heart to pump blood to the muscles, and on...
... of time. Aerobic exercise is to burn fat, adjust the speed and incline of your muscles and will increase the flexibility of the treadmill until your heart rate is near the middle number in your training zone. WORKOUT GUIDELINES Each workout should include the following guidelines will help...A Cool-down . A proper warm-up , increase the intensity of rest between workouts. For aerobic exercise, adjust the speed and incline of the treadmill until your pulse is in your training zone for energy. This increases the demand on the heart to pump blood to the muscles, and on...
English Manual
Page 16
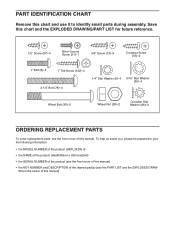
... this chart and use it to give the following information: • the MODEL NUMBER of the product (HRTL34305.0) • the NAME of the product (HealthRider H 100i treadmill) • the SERIAL NUMBER of the product (see the front cover of this manual) • the KEY NUMBER and DESCRIPTION of the desired part(s) (see...
... this chart and use it to give the following information: • the MODEL NUMBER of the product (HRTL34305.0) • the NAME of the product (HealthRider H 100i treadmill) • the SERIAL NUMBER of the product (see the front cover of this manual) • the KEY NUMBER and DESCRIPTION of the desired part(s) (see...
English Manual
Page 19
... to be free of sale; Some states do the periodic maintenance requirements specified in material and workmanship. LIMITED WARRANTY WHAT IS COVERED-The entire HealthRider® H 100i treadmill ("Product") is covered for 90 days. WHO IS COVERED-The original purchaser or any replacement part or component, providing the repairs are authorized by...
... to be free of sale; Some states do the periodic maintenance requirements specified in material and workmanship. LIMITED WARRANTY WHAT IS COVERED-The entire HealthRider® H 100i treadmill ("Product") is covered for 90 days. WHO IS COVERED-The original purchaser or any replacement part or component, providing the repairs are authorized by...


