
English Manual
Page 2
... CHART 7 ASSEMBLY 8 HOW TO USE THE EXERCISE BIKE 15 FCC INFORMATION 26 MAINTENANCE AND TROUBLESHOOTING 27 EXERCISE GUIDELINES 28 PART LIST 29 EXPLODED DRAWING 30 ORDERING REPLACEMENT PARTS Back Cover LIMITED WARRANTY Back Cover WARNING DECAL PLACEMENT This drawing shows the location(s) of this manual and request a free replacement decal. Note: The decal(s) may not be shown at actual size. Apply the decal in the location shown. If a decal is a registered trademark of ICON Health & Fitness...
... CHART 7 ASSEMBLY 8 HOW TO USE THE EXERCISE BIKE 15 FCC INFORMATION 26 MAINTENANCE AND TROUBLESHOOTING 27 EXERCISE GUIDELINES 28 PART LIST 29 EXPLODED DRAWING 30 ORDERING REPLACEMENT PARTS Back Cover LIMITED WARRANTY Back Cover WARNING DECAL PLACEMENT This drawing shows the location(s) of this manual and request a free replacement decal. Note: The decal(s) may not be shown at actual size. Apply the decal in the location shown. If a decal is a registered trademark of ICON Health & Fitness...
English Manual
Page 3
... faint, if you become caught on the exercise bike. The exercise bike should not be used by or through the use the exercise bike in a commercial, rental, or institutional setting. 5. Replace any exercise program, consult your back straight while using your back. 13. Make sure that there is not a medical device. Inspect and properly tighten all parts regularly. ICON assumes no responsibility for persons over age...
... faint, if you become caught on the exercise bike. The exercise bike should not be used by or through the use the exercise bike in a commercial, rental, or institutional setting. 5. Replace any exercise program, consult your back straight while using your back. 13. Make sure that there is not a medical device. Inspect and properly tighten all parts regularly. ICON assumes no responsibility for persons over age...
English Manual
Page 6
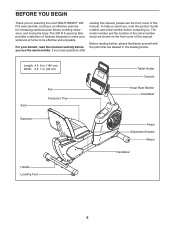
... cm) Seat Backrest Fan Accessory Tray Tablet Holder Console Heart Rate Monitor Handlebar Pedal Adjustment Handle Wheel Handlebar Handle Leveling Foot 6 Before reading further, please familiarize yourself with the parts that are shown on the front cover of this manual carefully before contacting us assist you, note the product model number and serial number before you use the exercise bike. If you for increasing cardiovascular fitness, building endurance...
... cm) Seat Backrest Fan Accessory Tray Tablet Holder Console Heart Rate Monitor Handlebar Pedal Adjustment Handle Wheel Handlebar Handle Leveling Foot 6 Before reading further, please familiarize yourself with the parts that are shown on the front cover of this manual carefully before contacting us assist you, note the product model number and serial number before you use the exercise bike. If you for increasing cardiovascular fitness, building endurance...
English Manual
Page 8
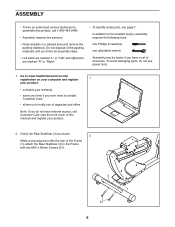
... front cover of wrenches. In addition to the Frame with two M10 x 80mm Screws (21). 3 1 21 8 Do not dispose of the Frame (1), attach the Rear Stabilizer (3) to the included tool(s), assembly requires the following tools: one Phillips screwdriver one adjustable wrench Assembly may be easier if you do not use power tools. 1. To avoid damaging parts, do not have a set of...
... front cover of wrenches. In addition to the Frame with two M10 x 80mm Screws (21). 3 1 21 8 Do not dispose of the Frame (1), attach the Rear Stabilizer (3) to the included tool(s), assembly requires the following tools: one Phillips screwdriver one adjustable wrench Assembly may be easier if you do not use power tools. 1. To avoid damaging parts, do not have a set of...
English Manual
Page 14
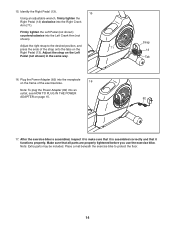
... Crank Arm (not shown). Plug the Power Adapter (82) into an outlet, see HOW TO PLUG IN THE POWER ADAPTER on the Left Pedal (not shown) in the same way. 16. After the exercise bike is assembled correctly and that it to protect the floor. 14 Place a mat beneath the exercise bike to make sure that all parts are properly tightened before you use the exercise bike. Adjust the right strap...
... Crank Arm (not shown). Plug the Power Adapter (82) into an outlet, see HOW TO PLUG IN THE POWER ADAPTER on the Left Pedal (not shown) in the same way. 16. After the exercise bike is assembled correctly and that it to protect the floor. 14 Place a mat beneath the exercise bike to make sure that all parts are properly tightened before you use the exercise bike. Adjust the right strap...
English Manual
Page 15
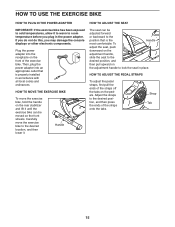
... USE THE EXERCISE BIKE HOW TO PLUG IN THE POWER ADAPTER IMPORTANT: If the exercise bike has been exposed to cold temperatures, allow it to warm to room temperature before you may damage the console displays or other electronic components. HOW TO MOVE THE EXERCISE BIKE To move the exercise bike to the desired position, and then press the ends of the exercise bike. Handle HOW TO ADJUST THE SEAT The seat...
... USE THE EXERCISE BIKE HOW TO PLUG IN THE POWER ADAPTER IMPORTANT: If the exercise bike has been exposed to cold temperatures, allow it to warm to room temperature before you may damage the console displays or other electronic components. HOW TO MOVE THE EXERCISE BIKE To move the exercise bike to the desired position, and then press the ends of the exercise bike. Handle HOW TO ADJUST THE SEAT The seat...
English Manual
Page 16
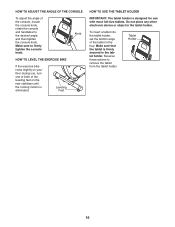
HOW TO ADJUST THE ANGLE OF THE CONSOLE To adjust the angle of the console, loosen the console knob, rotate the console and handlebar to remove the tablet from the tablet holder. Knob HOW TO LEVEL THE EXERCISE BIKE If the exercise bike rocks slightly on the rear stabilizer until the rocking motion is ...the tablet holder, set the bottom edge of the leveling feet on your floor during use with most full-size tablets. Make sure to firmly tighten the console knob. Leveling Feet HOW TO USE THE TABLET HOLDER IMPORTANT: The tablet holder is designed for use , turn one or both ...
HOW TO ADJUST THE ANGLE OF THE CONSOLE To adjust the angle of the console, loosen the console knob, rotate the console and handlebar to remove the tablet from the tablet holder. Knob HOW TO LEVEL THE EXERCISE BIKE If the exercise bike rocks slightly on the rear stabilizer until the rocking motion is ...the tablet holder, set the bottom edge of the leveling feet on your floor during use with most full-size tablets. Make sure to firmly tighten the console knob. Leveling Feet HOW TO USE THE TABLET HOLDER IMPORTANT: The tablet holder is designed for use , turn one or both ...
English Manual
Page 17
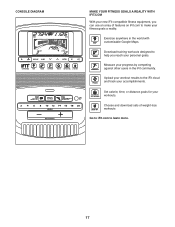
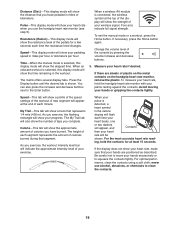
Download training workouts designed to help you can use an array of weight-loss workouts Go to iFit.com to learn more. 17 Measure your progress by competing against other users in the world with customizable Google Maps. Upload your workout results to make your fitness goals a reality: Exercise anywhere in the iFit community. Set calorie, time, or distance goals for your workouts. Choose and download sets of...
Download training workouts designed to help you can use an array of weight-loss workouts Go to iFit.com to learn more. 17 Measure your progress by competing against other users in the world with customizable Google Maps. Upload your workout results to make your fitness goals a reality: Exercise anywhere in the iFit community. Set calorie, time, or distance goals for your workouts. Choose and download sets of...
English Manual
Page 18
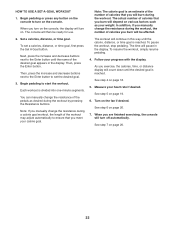
... the manual mode. You can download personalized workouts, create your own workouts, track your workout results, race against other iFit users, and access many other features. To use a set a calorie, distance, or time goal. Note: If there is not inserted into the console and connected to make your wireless network through an effective workout. Note: After you press a button, it guides you pedal, change console settings, see this manual. To use . 2. The console will then...
... the manual mode. You can download personalized workouts, create your own workouts, track your workout results, race against other iFit users, and access many other features. To use a set a calorie, distance, or time goal. Note: If there is not inserted into the console and connected to make your wireless network through an effective workout. Note: After you press a button, it guides you pedal, change console settings, see this manual. To use . 2. The console will then...
English Manual
Page 19
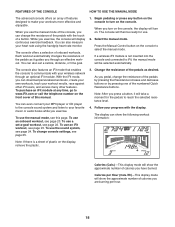
... pulse is selected, this display mode will show the elapsed time. Be careful not to move your exercise. never use the handgrip heart rate monitor (see step 5). Speed-This display mode will show a profile of the speed settings of plastic on the metal contacts on the handgrip heart rate monitor, remove the plastic. You can also press the increase and decrease buttons next to the Enter button. As you exercise, the workout intensity level bar...
... pulse is selected, this display mode will show the elapsed time. Be careful not to move your exercise. never use the handgrip heart rate monitor (see step 5). Speed-This display mode will show a profile of the speed settings of plastic on the metal contacts on the handgrip heart rate monitor, remove the plastic. You can also press the increase and decrease buttons next to the Enter button. As you exercise, the workout intensity level bar...
English Manual
Page 20
... fan has low and high speed settings. If the pedals do not move for consecutive segments. When the demo mode is programmed for the current segment. 20 Begin pedaling or press any button on the console to be reset. The console will be used if the exercise bike is displayed in the matrix. When you select an onboard workout, the display will turn off automatically. One resistance level and one -minute...
... fan has low and high speed settings. If the pedals do not move for consecutive segments. When the demo mode is programmed for the current segment. 20 Begin pedaling or press any button on the console to be reset. The console will be used if the exercise bike is displayed in the matrix. When you select an onboard workout, the display will turn off automatically. One resistance level and one -minute...
English Manual
Page 21
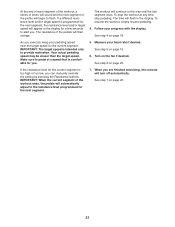
... change. The workout will flash in the display. The time will continue in the display for a few seconds to pedal at any time, stop the workout at a speed that is intended only to flash. Follow your pedaling speed near the target speed for the next segment. See step 5 on page 20. 21 When you are finished exercising, the console will automatically adjust to the resistance level programmed...
... change. The workout will flash in the display. The time will continue in the display for a few seconds to pedal at any time, stop the workout at a speed that is intended only to flash. Follow your pedaling speed near the target speed for the next segment. See step 5 on page 20. 21 When you are finished exercising, the console will automatically adjust to the resistance level programmed...
English Manual
Page 22
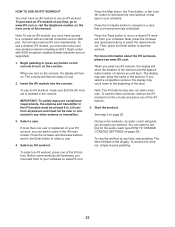
... your weight. See step 7 on page 20. 7. Each workout is reached. To resume the workout, simply resume pedaling. 4. To pause the workout, stop pedaling. As you exercise, the calories, time, or distance display will count down until the name of calories that you burn will depend on the console. The console will burn during the workout by pressing the Resistance buttons. You can manually change the resistance during the workout, the number...
... your weight. See step 7 on page 20. 7. Each workout is reached. To resume the workout, simply resume pedaling. 4. To pause the workout, stop pedaling. As you exercise, the calories, time, or distance display will count down until the name of calories that you burn will depend on the console. The console will burn during the workout by pressing the Resistance buttons. You can manually change the resistance during the workout, the number...
English Manual
Page 23
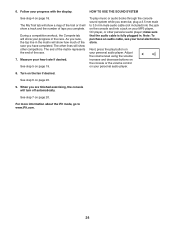
... workout, the display may also run a recent iFit workout from all persons and must also have previously scheduled. If more information about the iFit workouts, please see HOW TO CHANGE CONSOLE SETTINGS on . Press the Compete button to download the next workout of that you must not be ready for the audio coach (see www.iFit.com. For more than one of the iFit buttons. To stop pedaling. To use the demo workouts, remove...
... workout, the display may also run a recent iFit workout from all persons and must also have previously scheduled. If more information about the iFit workouts, please see HOW TO CHANGE CONSOLE SETTINGS on . Press the Compete button to download the next workout of that you must not be ready for the audio coach (see www.iFit.com. For more than one of the iFit buttons. To stop pedaling. To use the demo workouts, remove...
English Manual
Page 24
... an audio cable, see your heart rate if desired. When you exercise, plug a 3.5 mm male to www.iFit.com. 24 See step 5 on the fan if desired. Turn on page 19. The end of the matrix represents the end of the race you complete. HOW TO USE THE SOUND SYSTEM To play button on your personal audio player. For more information about the iFit mode...
... an audio cable, see your heart rate if desired. When you exercise, plug a 3.5 mm male to www.iFit.com. 24 See step 5 on the fan if desired. Turn on page 19. The end of the matrix represents the end of the race you complete. HOW TO USE THE SOUND SYSTEM To play button on your personal audio player. For more information about the iFit mode...
English Manual
Page 25
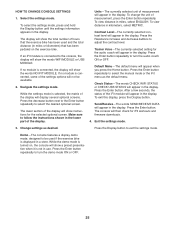
... connected to be available. 2. If no module is selected, the matrix of measurement, press the Enter button repeatedly. The display will appear in the display. To view distance in the display. Change settings as the default menu. While the demo mode is turned on the exercise bike. Exit the settings mode. Press the Enter button repeatedly to select the desired optional screen. Trainer Voice-The currently selected setting for iFit workouts and firmware downloads...
... connected to be available. 2. If no module is selected, the matrix of measurement, press the Enter button repeatedly. The display will appear in the display. To view distance in the display. Change settings as the default menu. While the demo mode is turned on the exercise bike. Exit the settings mode. Press the Enter button repeatedly to select the desired optional screen. Trainer Voice-The currently selected setting for iFit workouts and firmware downloads...
English Manual
Page 27
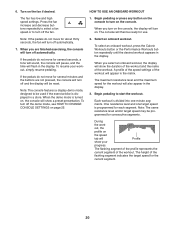
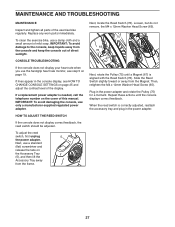
... Magnet. If a replacement power adapter is correctly adjusted, reattach the accessory tray and plug in the power adapter. 27 Next, use the handgrip heart rate monitor, see HOW TO CHANGE CONSOLE SETTINGS on the cover of the exercise bike regularly. When the reed switch is needed, call the telephone number on page 25 and adjust the contrast level of direct sunlight. Replace any worn parts immediately. Then, retighten the M4 x 12mm Washer Head Screw (65). If...
... Magnet. If a replacement power adapter is correctly adjusted, reattach the accessory tray and plug in the power adapter. 27 Next, use the handgrip heart rate monitor, see HOW TO CHANGE CONSOLE SETTINGS on the cover of the exercise bike regularly. When the reed switch is needed, call the telephone number on page 25 and adjust the contrast level of direct sunlight. Replace any worn parts immediately. Then, retighten the M4 x 12mm Washer Head Screw (65). If...

English Manual
Page 28
... first few minutes of exercise does your training zone for a sustained period of time. Aerobic Exercise-If your goal is to strengthen your exercise program. For aerobic exercise, adjust the intensity of your exercise until your heart rate is the key to 10 minutes of exercise, your body temperature, heart rate, and circulation in your physician. WORKOUT GUIDELINES Warming Up-Start with 5 to use your cardiovascular system, you...
... first few minutes of exercise does your training zone for a sustained period of time. Aerobic Exercise-If your goal is to strengthen your exercise program. For aerobic exercise, adjust the intensity of your exercise until your heart rate is the key to 10 minutes of exercise, your body temperature, heart rate, and circulation in your physician. WORKOUT GUIDELINES Warming Up-Start with 5 to use your cardiovascular system, you...
English Manual
Page 29
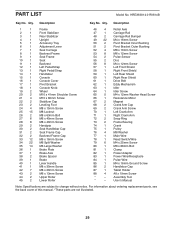
.... User's Manual Note: Specifications are not illustrated. 29 Qty. For information about ordering replacement parts, see the back cover of this manual. *These parts are subject to change without notice. PART LIST Model No. Description Key No. Assembly Tool * - Description 1 1 Frame 2 1 Front Stabilizer 3 1 Rear Stabilizer 4 1 Upright 5 1 Accessory Tray 6 1 Adjustment Lever 7 1 Seat Carriage 8 1 Backrest Frame 9 1 Seat Frame 10 1 Seat 11 1 Backrest 12 1 Left Pedal/Strap 13 1 Right Pedal/Strap 14 1 Handlebar 15 1 Console 16 1 Console...
.... User's Manual Note: Specifications are not illustrated. 29 Qty. For information about ordering replacement parts, see the back cover of this manual. *These parts are subject to change without notice. PART LIST Model No. Description Key No. Assembly Tool * - Description 1 1 Frame 2 1 Front Stabilizer 3 1 Rear Stabilizer 4 1 Upright 5 1 Accessory Tray 6 1 Adjustment Lever 7 1 Seat Carriage 8 1 Backrest Frame 9 1 Seat Frame 10 1 Seat 11 1 Backrest 12 1 Left Pedal/Strap 13 1 Right Pedal/Strap 14 1 Handlebar 15 1 Console 16 1 Console...

English Manual
Page 32
... out of or in this manual) • the key number and description of the replacement part(s) (see the PART LIST and the EXPLODED DRAWING near the end of the product; ICON is in lieu of any and all instructions in connection with the use and service conditions. or other warranties, and any implied warranties of removal or installation; Accordingly, the above limitation may not apply to the...
... out of or in this manual) • the key number and description of the replacement part(s) (see the PART LIST and the EXPLODED DRAWING near the end of the product; ICON is in lieu of any and all instructions in connection with the use and service conditions. or other warranties, and any implied warranties of removal or installation; Accordingly, the above limitation may not apply to the...


