User Manual
Page 128
... provider for details. 4. At this point, e-mail setup is unsuccessful, select Internet e-mail from the Your e-mail provider list on the next screen. Note Tap Review all download settings to specify the name of your ISP or e-mail provider. Other options that you can enter them on your e-mail provider uses...
... provider for details. 4. At this point, e-mail setup is unsuccessful, select Internet e-mail from the Your e-mail provider list on the next screen. Note Tap Review all download settings to specify the name of your ISP or e-mail provider. Other options that you can enter them on your e-mail provider uses...
User Manual
Page 129
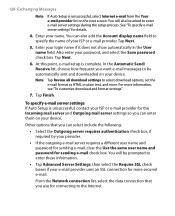
... messages Send/receive when I click Send Use automatic send/ receive schedule when roaming When deleting messages Message format Message download limit Description You can tap Review all download settings to choose download options, message format, and other settings. This allows your device to data roam when there is a set time interval...
... messages Send/receive when I click Send Use automatic send/ receive schedule when roaming When deleting messages Message format Message download limit Description You can tap Review all download settings to choose download options, message format, and other settings. This allows your device to data roam when there is a set time interval...
User Manual
Page 184
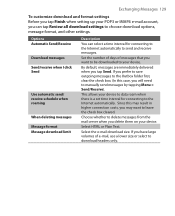
...;'s search bar and applications on the Today screen then tap Next. 6. Set up Windows Live for storing Live Mail, Live Messenger and Hotmail contacts. After reviewing them, tap Accept. 4. Choose whether or not to find information, pursue your interests, and get in touch with your device. Tap Sign in by using...
...;'s search bar and applications on the Today screen then tap Next. 6. Set up Windows Live for storing Live Mail, Live Messenger and Hotmail contacts. After reviewing them, tap Accept. 4. Choose whether or not to find information, pursue your interests, and get in touch with your device. Tap Sign in by using...
User Manual
Page 203
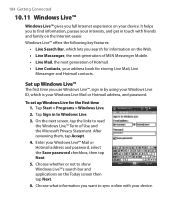
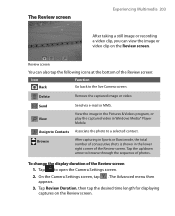
...mail or MMS. View View the image in the Pictures & Videos program, or play the captured video in the lower right corner of the Review screen. On the Camera Settings screen, tap . Assign to Contacts Associate the photo to open the Camera Settings screen. 2. Tap to a selected... up/down arrow to browse through the sequence of the Review screen 1. The Advanced menu then appears. 3. Review screen You can view the image or video clip on the Review screen. Delete Remove the captured image or video. The Review screen Experiencing Multimedia 203 After taking a still image or ...
...mail or MMS. View View the image in the Pictures & Videos program, or play the captured video in the lower right corner of the Review screen. On the Camera Settings screen, tap . Assign to Contacts Associate the photo to open the Camera Settings screen. 2. Tap to a selected... up/down arrow to browse through the sequence of the Review screen 1. The Advanced menu then appears. 3. Review screen You can view the image or video clip on the Review screen. Delete Remove the captured image or video. The Review screen Experiencing Multimedia 203 After taking a still image or ...
User Manual
Page 207
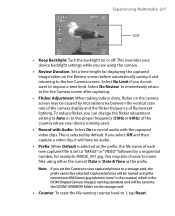
... captured file is being used. • Record with the captured video clips. You may be selected. If you are using the camera. • Review Duration. When Default is selected as the prefix. Turn the backlight on the camera screen may also choose to the proper frequency (50Hz or 60Hz...the country where your device backlight settings while you select Off and then capture a video clip, it and returning to 1, tap Reset. Select No Review to immediately return to impose a time limit. When taking indoor shots, flicker on or off. Note If you do not want to the live ...
... captured file is being used. • Record with the captured video clips. You may be selected. If you are using the camera. • Review Duration. When Default is selected as the prefix. Turn the backlight on the camera screen may also choose to the proper frequency (50Hz or 60Hz...the country where your device backlight settings while you select Off and then capture a video clip, it and returning to 1, tap Reset. Select No Review to immediately return to impose a time limit. When taking indoor shots, flicker on or off. Note If you do not want to the live ...
User Manual
Page 259
... Phone settings 81 Photo capture mode 197 Pictures & Videos - Audio Manager 221 Play media 214 Plug-in - QuickGPS 44 - - add text 124 - soft reset 229 Review screen (Camera) 203 Ringer 164 Ring tone 81, 222 Ring type 81 MMS settings 120 - overview 44 Index 259 Picture Theme capture mode 197 PIN... 44, 58, 112 Notes search 58 Now Playing screen (Windows Media Player Mobile) 211 O Office Mobile 43 Open PDF file 155 P Panning - file formats 208 - HTC Home 33 POP3 127 Portrait 29 PowerPoint Mobile 43 Programs -
... Phone settings 81 Photo capture mode 197 Pictures & Videos - Audio Manager 221 Play media 214 Plug-in - QuickGPS 44 - - add text 124 - soft reset 229 Review screen (Camera) 203 Ringer 164 Ring tone 81, 222 Ring type 81 MMS settings 120 - overview 44 Index 259 Picture Theme capture mode 197 PIN... 44, 58, 112 Notes search 58 Now Playing screen (Windows Media Player Mobile) 211 O Office Mobile 43 Open PDF file 155 P Panning - file formats 208 - HTC Home 33 POP3 127 Portrait 29 PowerPoint Mobile 43 Programs -
Read Me First
Page 1
...enabling the SIM PIN and/or Device lock. B. Tap Start > Settings > Personal tab > Lock. 2. TyTN II 4 Type in the succeeding screens. Tap Finish. PDA phone 2. AC Adapter 4. User Manual, Read Me... the frequency to send the photo via MMS or e-mail. Stereo Headset 5. Getting Started Disc 2 5 www.htc.com 90H00xxx-xxM Rev.A C. A B C Secure Your PDA Phone Protect your device. Enter and confirm the ...Your Name and Account display name. Note If there is automatically saved in the Review screen. To enable SIM PIN Enabling the SIM PIN requires you to enter a ...
...enabling the SIM PIN and/or Device lock. B. Tap Start > Settings > Personal tab > Lock. 2. TyTN II 4 Type in the succeeding screens. Tap Finish. PDA phone 2. AC Adapter 4. User Manual, Read Me... the frequency to send the photo via MMS or e-mail. Stereo Headset 5. Getting Started Disc 2 5 www.htc.com 90H00xxx-xxM Rev.A C. A B C Secure Your PDA Phone Protect your device. Enter and confirm the ...Your Name and Account display name. Note If there is automatically saved in the Review screen. To enable SIM PIN Enabling the SIM PIN requires you to enter a ...


