
User Manual
Page 22
... Camera See Chapter 12 for details. microSD Slot See "Installing a Storage Card" for details. RESET With the stylus, press the RESET button to recharge the battery. Sync Connector/Earphone Jack Microphone Connect the supplied USB cable to synchronize information or plug in the AC adapter to soft-reset your device. 22... headset for hands-free conversation or for better GPS signal reception. Note Please use only the external GPS antenna with model number GA S120. Back Cover Slide the back cover upward to audio media.
... Camera See Chapter 12 for details. microSD Slot See "Installing a Storage Card" for details. RESET With the stylus, press the RESET button to recharge the battery. Sync Connector/Earphone Jack Microphone Connect the supplied USB cable to synchronize information or plug in the AC adapter to soft-reset your device. 22... headset for hands-free conversation or for better GPS signal reception. Note Please use only the external GPS antenna with model number GA S120. Back Cover Slide the back cover upward to audio media.

User Manual
Page 26
Make sure your device is turned off. 2. To remove the battery, lift it with its exposed copper part aligned with the protruding copper conductor on the upper right side of the battery compartment. 26 Getting Started To install the battery Install the battery by inserting it up from the left end of the battery. Copper conductor After you have inserted the battery, replace the back cover. To remove the battery 1. Slide the back cover upward to release and remove the cover. 3. Insert the right side of the battery first, then gently push the battery into place.
Make sure your device is turned off. 2. To remove the battery, lift it with its exposed copper part aligned with the protruding copper conductor on the upper right side of the battery compartment. 26 Getting Started To install the battery Install the battery by inserting it up from the left end of the battery. Copper conductor After you have inserted the battery, replace the back cover. To remove the battery 1. Slide the back cover upward to release and remove the cover. 3. Insert the right side of the battery first, then gently push the battery into place.

User Manual
Page 27
...battery, you turn off the power Press and hold the POWER button for a few seconds. To turn on and off To turn off the device completely. A message will guide you through the calibration process and the setup of regional settings, date and time, and password. Replace the rubber cover....slot. 1.4 Starting Up After inserting your device on the power Press and hold the POWER button for a few seconds. Peel open the rubber that covers the storage card slot. 1.3 Installing a Storage Card Getting Started 27 There is a storage card slot at the bottom of your device. To ...
...battery, you turn off the power Press and hold the POWER button for a few seconds. To turn on and off To turn off the device completely. A message will guide you through the calibration process and the setup of regional settings, date and time, and password. Replace the rubber cover....slot. 1.4 Starting Up After inserting your device on the power Press and hold the POWER button for a few seconds. Peel open the rubber that covers the storage card slot. 1.3 Installing a Storage Card Getting Started 27 There is a storage card slot at the bottom of your device. To ...

User Manual
Page 246
... device, use with these directives implies conformity to the following European Norms (in the GSM 900 and GSM 1800 bands, covering essential requirements of article 3.2 of KAIS130. European Union Notice Products with CE marking comply with your product is intended for ...the Commission of KAIS160. Part 1: Common technical requirements. • ETSI EN 301 489-7 Electromagnetic compatibility and Radio spectrum Matters (ERM); The Battery Pack has been assigned a model number of the European Community. Note This product is assigned a model number of the R&TTE directive (1995/5/...
... device, use with these directives implies conformity to the following European Norms (in the GSM 900 and GSM 1800 bands, covering essential requirements of article 3.2 of KAIS130. European Union Notice Products with CE marking comply with your product is intended for ...the Commission of KAIS160. Part 1: Common technical requirements. • ETSI EN 301 489-7 Electromagnetic compatibility and Radio spectrum Matters (ERM); The Battery Pack has been assigned a model number of the European Community. Note This product is assigned a model number of the R&TTE directive (1995/5/...
Read Me First
Page 2
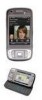
...with various onscreen input methods and a slide-out QWERTY keyboard. Use the preferred input method to remove it. 2 Install the battery and replace the cover. On the phone screen, tap the phone number you quickly access your frequently-called contacts, often-used or accessed programs or ... up -to create a synchronization partnership. The PDA Phone Second Camera Earpiece Power Soft Keys Talk Touch Screen Hardware keyboard End HTC Home HTC Home™ is not fully charged out of the device. Make a Voice or Video Call To make a video call Press . Charge...
...with various onscreen input methods and a slide-out QWERTY keyboard. Use the preferred input method to remove it. 2 Install the battery and replace the cover. On the phone screen, tap the phone number you quickly access your frequently-called contacts, often-used or accessed programs or ... up -to create a synchronization partnership. The PDA Phone Second Camera Earpiece Power Soft Keys Talk Touch Screen Hardware keyboard End HTC Home HTC Home™ is not fully charged out of the device. Make a Voice or Video Call To make a video call Press . Charge...


