User Manual
Page 11
...to Know Your Device and Accessories 16 1.2 Installing the USIM/SIM Card, Battery, and Storage Card 20 1.3 Starting Up 23 1.4 The Today Screen 25 1.5 The Start Menu 26 1.6 Quick Menu 27 1.7 QuickTasks 28 1.8 HTC Home 28 1.9 TouchFLO 33 1.10 Status Icons 40 1.11 ...Programs 42 1.12 Settings 45 Chapter 2 Entering and Searching Information 49 2.1 Entering Information 50 2.2 Using the 20-key QWERTY Hardware Keyboard 52 2.3 Using the Onscreen Keyboard 54 2.4 Using Touch Keyboard 54 2.5 Using Touch Keypad...
...to Know Your Device and Accessories 16 1.2 Installing the USIM/SIM Card, Battery, and Storage Card 20 1.3 Starting Up 23 1.4 The Today Screen 25 1.5 The Start Menu 26 1.6 Quick Menu 27 1.7 QuickTasks 28 1.8 HTC Home 28 1.9 TouchFLO 33 1.10 Status Icons 40 1.11 ...Programs 42 1.12 Settings 45 Chapter 2 Entering and Searching Information 49 2.1 Entering Information 50 2.2 Using the 20-key QWERTY Hardware Keyboard 52 2.3 Using the Onscreen Keyboard 54 2.4 Using Touch Keyboard 54 2.5 Using Touch Keypad...

User Manual
Page 12
... 5.4 Synchronizing With Your Computer 86 5.5 Synchronizing via Bluetooth 87 5.6 Synchronizing Music and Video 88 Chapter 6 Organizing Contacts, Appointments, Tasks, and Other Information 89 6.1 Contacts 90 6.2 SIM Manager 94 6.3 Calendar 96 6.4 Tasks...99 6.5 Notes 101 6.6 Voice Recorder 103 Chapter 7 Exchanging Messages 105 7.1 Messaging 106 7.2 Text Messages 107 7.3 MMS...111 7.4 Types of E-mail...
... 5.4 Synchronizing With Your Computer 86 5.5 Synchronizing via Bluetooth 87 5.6 Synchronizing Music and Video 88 Chapter 6 Organizing Contacts, Appointments, Tasks, and Other Information 89 6.1 Contacts 90 6.2 SIM Manager 94 6.3 Calendar 96 6.4 Tasks...99 6.5 Notes 101 6.6 Voice Recorder 103 Chapter 7 Exchanging Messages 105 7.1 Messaging 106 7.2 Text Messages 107 7.3 MMS...111 7.4 Types of E-mail...
User Manual
Page 15
Chapter 1 Getting Started 1.1 Getting to Know Your Device and Accessories 1.2 Installing the USIM/SIM Card, Battery, and Storage Card 1.3 Starting Up 1.4 The Today Screen 1.5 The Start Menu 1.6 Quick Menu 1.7 QuickTasks 1.8 HTC Home™ 1.9 TouchFLO™ 1.10 Status Icons 1.11 Programs 1.12 Settings
Chapter 1 Getting Started 1.1 Getting to Know Your Device and Accessories 1.2 Installing the USIM/SIM Card, Battery, and Storage Card 1.3 Starting Up 1.4 The Today Screen 1.5 The Start Menu 1.6 Quick Menu 1.7 QuickTasks 1.8 HTC Home™ 1.9 TouchFLO™ 1.10 Status Icons 1.11 Programs 1.12 Settings

User Manual
Page 18
... connect the supplied USB cable to synchronize information or plug in the AC adapter to access the RESET button. Back Cover Remove to install the SIM card and battery.
... connect the supplied USB cable to synchronize information or plug in the AC adapter to access the RESET button. Back Cover Remove to install the SIM card and battery.
User Manual
Page 20
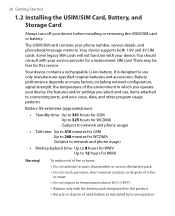
... Li-ion battery. Your device supports both 1.8V and 3V SIM cards. There may be fees for this service. Battery life estimates (approximations): • Standby time: Up to 361 hours for GSM Up to 325 hours for WCDMA (Subject to network and phone usage) • Talk time:...strength, the temperature of in which you select and use only manufacturer-specified original batteries and accessories. 20 Getting Started 1.2 Installing the USIM/SIM Card, Battery, and Storage Card Always turn off your phone number, service details, and phonebook/message memory. To reduce risk of fire or...
... Li-ion battery. Your device supports both 1.8V and 3V SIM cards. There may be fees for this service. Battery life estimates (approximations): • Standby time: Up to 361 hours for GSM Up to 325 hours for WCDMA (Subject to network and phone usage) • Talk time:...strength, the temperature of in which you select and use only manufacturer-specified original batteries and accessories. 20 Getting Started 1.2 Installing the USIM/SIM Card, Battery, and Storage Card Always turn off your phone number, service details, and phonebook/message memory. To reduce risk of fire or...

User Manual
Page 21
...;nger to pry open the slot cover with its gold contacts facing down and its cut-off corner facing toward the inside of the slot. SIM Note To remove the USIM/SIM card, press it to remove the back cover. 1. Getting Started 21 To remove the back cover Before installing the USIM... or battery, you have to pop it open the slot cover easier, pry it out of the slot. 4. To install the USIM/SIM card 1. To open from both ends. 2. Close the slot cover. Use your device is turned off. 2. Slide the back cover upward as shown in the ...
...;nger to pry open the slot cover with its gold contacts facing down and its cut-off corner facing toward the inside of the slot. SIM Note To remove the USIM/SIM card, press it to remove the back cover. 1. Getting Started 21 To remove the back cover Before installing the USIM... or battery, you have to pop it open the slot cover easier, pry it out of the slot. 4. To install the USIM/SIM card 1. To open from both ends. 2. Close the slot cover. Use your device is turned off. 2. Slide the back cover upward as shown in the ...
User Manual
Page 23
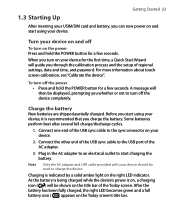
For more information about touch screen calibration, see "Calibrate the device". To turn off To turn on the power Press and hold the POWER button for a few seconds. Some batteries ... for the first time, a Quick Start Wizard will be used to start using your device. Getting Started 23 1.3 Starting Up After inserting your USIM/SIM card and battery, you can now power on and start using your device, it is recommended that you charge the battery.
For more information about touch screen calibration, see "Calibrate the device". To turn off To turn on the power Press and hold the POWER button for a few seconds. Some batteries ... for the first time, a Quick Start Wizard will be used to start using your device. Getting Started 23 1.3 Starting Up After inserting your USIM/SIM card and battery, you can now power on and start using your device, it is recommended that you charge the battery.
User Manual
Page 34
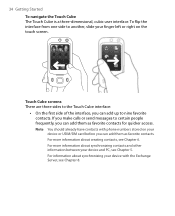
Note You should already have contacts with phone numbers stored on the touch screen. For more information about creating contacts, see Chapter 6. For more information about synchronizing your device or USIM/SIM card before you can add them as favorite contacts. For information about synchronizing contacts ... If you can add up to certain people frequently, you make calls or send messages to nine favorite contacts. Touch Cube screens There are three sides to the Touch Cube interface: • On the first side of the interface, you can add them as favorite contacts...
Note You should already have contacts with phone numbers stored on the touch screen. For more information about creating contacts, see Chapter 6. For more information about synchronizing your device or USIM/SIM card before you can add them as favorite contacts. For information about synchronizing contacts ... If you can add up to certain people frequently, you make calls or send messages to nine favorite contacts. Touch Cube screens There are three sides to the Touch Cube interface: • On the first side of the interface, you can add them as favorite contacts...
User Manual
Page 41
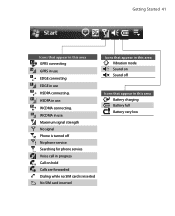
HSDPA in this area Battery charging Battery full Battery very low WCDMA connecting. Searching for phone service Voice call in progress Call on hold Calls are forwarded Dialing while no SIM card is turned off Icons that appear in use. Maximum signal strength No signal Phone is inserted No SIM card inserted Icons that appear in this area Vibration mode Sound on Sound off No phone service. WCDMA in use HSDPA connecting. Getting Started 41 Icons that appear in this area GPRS connecting GPRS in use EDGE connecting EDGE in use.
HSDPA in this area Battery charging Battery full Battery very low WCDMA connecting. Searching for phone service Voice call in progress Call on hold Calls are forwarded Dialing while no SIM card is turned off Icons that appear in use. Maximum signal strength No signal Phone is inserted No SIM card inserted Icons that appear in this area Vibration mode Sound on Sound off No phone service. WCDMA in use HSDPA connecting. Getting Started 41 Icons that appear in this area GPRS connecting GPRS in use EDGE connecting EDGE in use.
User Manual
Page 44
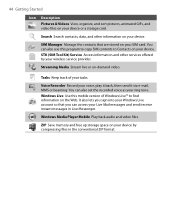
.../receive instant messages in the conventional ZIP format. ZIP Save memory and free up storage space on your device by your ring tone. SIM Manager Manage the contacts that you can also set the recorded voice as your wireless service provider. It also lets you sign into your...contacts, data, and other services offered by compressing files in Live Messenger. Voice Recorder Record your SIM card. Streaming Media Stream live or on the Web. Windows Live Use this program to copy SIM contents to find information on -demand video. Tasks Keep track of Windows Live™ to ...
.../receive instant messages in the conventional ZIP format. ZIP Save memory and free up storage space on your device by your ring tone. SIM Manager Manage the contacts that you can also set the recorded voice as your wireless service provider. It also lets you sign into your...contacts, data, and other services offered by compressing files in Live Messenger. Voice Recorder Record your SIM card. Streaming Media Stream live or on the Web. Windows Live Use this program to copy SIM contents to find information on -demand video. Tasks Keep track of Windows Live™ to ...
User Manual
Page 45
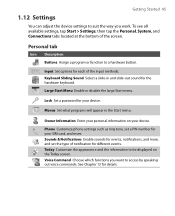
... for each of the screen. Personal tab Icon Description Buttons Assign a program or function to suit the way you want to be displayed on your SIM card, and more , and set a PIN number for the hardware keyboard. Lock Set a password for details. Owner Information Enter your device. Large Start Menu Enable...
... for each of the screen. Personal tab Icon Description Buttons Assign a program or function to suit the way you want to be displayed on your SIM card, and more , and set a PIN number for the hardware keyboard. Lock Set a password for details. Owner Information Enter your device. Large Start Menu Enable...

User Manual
Page 62
...is provided by your wireless service provider. 2. To enable or disable the phone function 1. When enabled, the ON indicator is entered incorrectly three times, the SIM card will be blocked. Tap Start > Settings > Connections tab > Comm Manager. 2. To open button the keyboard and then press a numeric key. Enter... on board an aircraft. The Phone screen From the Phone screen, you are preset with the PUK (PIN Unblocking Key) obtained from your SIM card to enable or disable the phone function. TALK • While on and off the phone while on your device. Enter the preset ...
...is provided by your wireless service provider. 2. To enable or disable the phone function 1. When enabled, the ON indicator is entered incorrectly three times, the SIM card will be blocked. Tap Start > Settings > Connections tab > Comm Manager. 2. To open button the keyboard and then press a numeric key. Enter... on board an aircraft. The Phone screen From the Phone screen, you are preset with the PUK (PIN Unblocking Key) obtained from your SIM card to enable or disable the phone function. TALK • While on and off the phone while on your device. Enter the preset ...
User Manual
Page 64
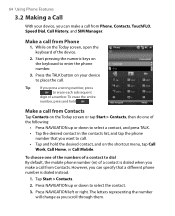
... Tap Contacts on the shortcut menu, tap Call Work, Call Home, or Call Mobile. Make a call from Phone, Contacts, TouchFLO, Speed Dial, Call History, and SIM Manager. The letters representing the number will change as you want to call . Make a call from Contacts. Press NAVIGATION up or down to dial By...
... Tap Contacts on the shortcut menu, tap Call Work, Call Home, or Call Mobile. Make a call from Phone, Contacts, TouchFLO, Speed Dial, Call History, and SIM Manager. The letters representing the number will change as you want to call . Make a call from Contacts. Press NAVIGATION up or down to dial By...

User Manual
Page 66
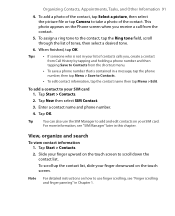
... you want to add to load. 2. To call voicemail. Tap Start > Programs > SIM Manager. 66 Using Phone Features To create a Speed Dial entry 1. Tap Menu > New. 3. Tap a contact. To call from... your SIM card, transfer SIM phonebook entries to Contacts on the hardware keyboard to place a phone number in the Speed Dial list,...The number 1 key is already there. • To create a Speed Dial entry from SIM Manager SIM Manager allows you to view the contents of the person you want to use as the speed dial key.
... you want to add to load. 2. To call voicemail. Tap Start > Programs > SIM Manager. 66 Using Phone Features To create a Speed Dial entry 1. Tap Menu > New. 3. Tap a contact. To call from... your SIM card, transfer SIM phonebook entries to Contacts on the hardware keyboard to place a phone number in the Speed Dial list,...The number 1 key is already there. • To create a Speed Dial entry from SIM Manager SIM Manager allows you to view the contents of the person you want to use as the speed dial key.

User Manual
Page 70
... down to dial a phone number. If the matching list is associated with [d, e, f ], the matching list will automatically search and sort the contact entries on the SIM card, in Contacts, and the phone numbers in a contact name. Tip You can also use the hardware keyboard to dial. When you tap number "2" on...
... down to dial a phone number. If the matching list is associated with [d, e, f ], the matching list will automatically search and sort the contact entries on the SIM card, in Contacts, and the phone numbers in a contact name. Tip You can also use the hardware keyboard to dial. When you tap number "2" on...

User Manual
Page 71
In the Smart Dial panel, browse the list by sliding your SIM card. Tip Additional emergency numbers may be included in your finger or the stylus up or down or by pressing NAVIGATION up or down. 4. Contact ...
In the Smart Dial panel, browse the list by sliding your SIM card. Tip Additional emergency numbers may be included in your finger or the stylus up or down or by pressing NAVIGATION up or down. 4. Contact ...

User Manual
Page 79
Do any of the following: • Under Display number of, select the type of tasks you want . 4.3 Protecting Your Device Protect your SIM card with a PIN You can protect your wireless service provider. For more information about creating tasks on the Today screen. • In the Category list,... the PIN at any time, tap Change PIN. Select the check boxes of your device, then create the folders and shortcuts that you by your SIM card from unauthorized use by assigning a PIN (personal identification number). You can select up to seven items. Tip You can also create folders and ...
Do any of the following: • Under Display number of, select the type of tasks you want . 4.3 Protecting Your Device Protect your SIM card with a PIN You can protect your wireless service provider. For more information about creating tasks on the Today screen. • In the Category list,... the PIN at any time, tap Change PIN. Select the check boxes of your device, then create the folders and shortcuts that you by your SIM card from unauthorized use by assigning a PIN (personal identification number). You can select up to seven items. Tip You can also create folders and ...

User Manual
Page 89
Chapter 6 Organizing Contacts, Appointments, Tasks, and Other Information 6.1 Contacts 6.2 SIM Manager 6.3 Calendar 6.4 Tasks 6.5 Notes 6.6 Voice Recorder
Chapter 6 Organizing Contacts, Appointments, Tasks, and Other Information 6.1 Contacts 6.2 SIM Manager 6.3 Calendar 6.4 Tasks 6.5 Notes 6.6 Voice Recorder

User Manual
Page 90
... To add a contact on your device, which can create the following types of contacts on your PC or the Exchange Server. • SIM contacts. Tap Start > Contacts. 2. Contacts that are stored on your device: • Outlook contacts. Contacts that you have set up Windows Live... on the SIM card. For more information, see "Add Windows Live contacts" in the contact list. 90 Organizing Contacts, Appointments, Tasks, and Other Information 6.1 Contacts...
... To add a contact on your device, which can create the following types of contacts on your PC or the Exchange Server. • SIM contacts. Tap Start > Contacts. 2. Contacts that are stored on your device: • Outlook contacts. Contacts that you have set up Windows Live... on the SIM card. For more information, see "Add Windows Live contacts" in the contact list. 90 Organizing Contacts, Appointments, Tasks, and Other Information 6.1 Contacts...
User Manual
Page 91
.... Slide your finger upward on the touch screen to add and edit contacts on how to take a photo of the contact, tap Select a picture, then select the picture file or tap Camera to use the SIM Manager to scroll down the contact list. Enter a contact name and phone number. 4. Note...
.... Slide your finger upward on the touch screen to add and edit contacts on how to take a photo of the contact, tap Select a picture, then select the picture file or tap Camera to use the SIM Manager to scroll down the contact list. Enter a contact name and phone number. 4. Note...


