User Manual
Page 15
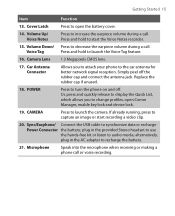
... the camera. Sync/Earphone/ Connect the USB cable to open Comm Manager, enable key lock and device lock. 19. alternatively, plug in the provided Stereo headset to use the hands-free kit or listen to increase the earpiece volume during a call. Volume Up/ Voice Notes Press to audio media; Camera Lens 1.3 Megapixels CMOS lens. 17. Microphone Speak into the microphone when receiving or making a phone call . Or, press and quickly release to display the Quick List...
... the camera. Sync/Earphone/ Connect the USB cable to open Comm Manager, enable key lock and device lock. 19. alternatively, plug in the provided Stereo headset to use the hands-free kit or listen to increase the earpiece volume during a call. Volume Up/ Voice Notes Press to audio media; Camera Lens 1.3 Megapixels CMOS lens. 17. Microphone Speak into the microphone when receiving or making a phone call . Or, press and quickly release to display the Quick List...

User Manual
Page 19
...-used . Click to display all program icons. 8. Click to see the time of a missed call. 4. Click to change the profile. 6. Displays the current profile. Displays the network signal strength. 12. Displays the current date and time. 13. Getting Started 19 1.3 The Home Screen The Home screen displays important information, such as missed 13 calls or new messages. 9. Click to view the details of your wireless 10 service provider and click to open the Comm Manager. 11 3. Displays notifications...
...-used . Click to display all program icons. 8. Click to see the time of a missed call. 4. Click to change the profile. 6. Displays the current profile. Displays the network signal strength. 12. Displays the current date and time. 13. Getting Started 19 1.3 The Home Screen The Home screen displays important information, such as missed 13 calls or new messages. 9. Click to view the details of your wireless 10 service provider and click to open the Comm Manager. 11 3. Displays notifications...
User Manual
Page 20
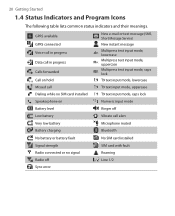
... GPRS connected Voice call in progress Data call in progress Calls forwarded Call on hold New e-mail or text message (SMS, Short Message Service) New instant message Multipress text input mode, lowercase Multipress text input mode, uppercase Multipress text input mode, caps lock T9 text input mode, lowercase Missed call T9 text input mode, uppercase Dialing while no SIM card installed T9 text input mode, caps lock Speakerphone on Numeric input mode Battery level Ringer off Low battery Vibrate call alert Very low battery Microphone muted Battery charging Bluetooth No battery or...
... GPRS connected Voice call in progress Data call in progress Calls forwarded Call on hold New e-mail or text message (SMS, Short Message Service) New instant message Multipress text input mode, lowercase Multipress text input mode, uppercase Multipress text input mode, caps lock T9 text input mode, lowercase Missed call T9 text input mode, uppercase Dialing while no SIM card installed T9 text input mode, caps lock Speakerphone on Numeric input mode Battery level Ringer off Low battery Vibrate call alert Very low battery Microphone muted Battery charging Bluetooth No battery or...

User Manual
Page 22
... wireless service provider. Voice Notes Allows you play back video and audio files. Pocket MSN Lets you manage the contacts that supports the SIM SAP Settings Access Profile (SAP) to make or receive phone calls. Allows you to access information and other services offered by using a Bluetooth port or USB port. Enables your device as games and tools, on your tasks. This allows you to use it. MIDlet Manager Lets you send and receive e-mails and text messages...
... wireless service provider. Voice Notes Allows you play back video and audio files. Pocket MSN Lets you manage the contacts that supports the SIM SAP Settings Access Profile (SAP) to make or receive phone calls. Allows you to access information and other services offered by using a Bluetooth port or USB port. Enables your device as games and tools, on your tasks. This allows you to use it. MIDlet Manager Lets you send and receive e-mails and text messages...
User Manual
Page 30
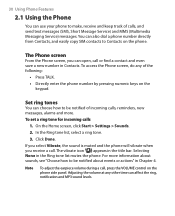
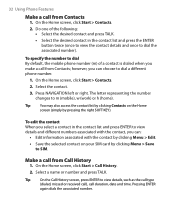
To access the Phone screen, do any other time can open, call or find a contact and even save a new number in Chapter 4. On the Home screen, click Start > Settings > Sounds. 2. In the Ring tone list, select a ring tone. 3. The vibrate icon ( ) appears in the Ring tone list mutes the phone. Selecting None in the title bar. 30 Using Phone Features 2.1 Using the Phone You can also dial a phone number directly from Contacts, and easily copy SIM contacts to Contacts on the phone. To set a ring tone for incoming calls 1. If you select Vibrate, the sound is muted and...
To access the Phone screen, do any other time can open, call or find a contact and even save a new number in Chapter 4. On the Home screen, click Start > Settings > Sounds. 2. In the Ring tone list, select a ring tone. 3. The vibrate icon ( ) appears in the Ring tone list mutes the phone. Selecting None in the title bar. 30 Using Phone Features 2.1 Using the Phone You can also dial a phone number directly from Contacts, and easily copy SIM contacts to Contacts on the phone. To set a ring tone for incoming calls 1. If you select Vibrate, the sound is muted and...
User Manual
Page 32
... the contact, you make a call duration, date and time. To edit the contact When you select a contact in the contact list and press the ENTER button twice (once to view the contact details and once to dial By default, the mobile phone number (m) of a contact is dialed when you can choose to SIM. Tip On the Call History screen, press ENTER to m (mobile), w (work) or h (home). The letter representing the number changes to view details, such as the call type (dialed, missed or received call), call from Call History...
... the contact, you make a call duration, date and time. To edit the contact When you select a contact in the contact list and press the ENTER button twice (once to view the contact details and once to dial By default, the mobile phone number (m) of a contact is dialed when you can choose to SIM. Tip On the Call History screen, press ENTER to m (mobile), w (work) or h (home). The letter representing the number changes to view details, such as the call type (dialed, missed or received call), call from Call History...

User Manual
Page 46
... network such as contacts, calendar and tasks are also immediately updated onto your phone when these items have been changed or new entries have been added on Exchange Server. To make Direct Push work, you to set up a GPRS connection on your phone. 46 Synchronizing Information and Setting Up E-mail Security To receive e-mails and synchronize other information instantly The Direct Push technology (Push E-Mail feature) enables you need to receive new e-mails...
... network such as contacts, calendar and tasks are also immediately updated onto your phone when these items have been changed or new entries have been added on Exchange Server. To make Direct Push work, you to set up a GPRS connection on your phone. 46 Synchronizing Information and Setting Up E-mail Security To receive e-mails and synchronize other information instantly The Direct Push technology (Push E-Mail feature) enables you need to receive new e-mails...
User Manual
Page 48
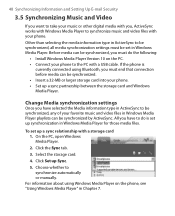
...; Set up Sync. 5. Click Set up a sync partnership between the storage card and Windows Media Player. If the phone is set in Chapter 7. Choose whether to synchronize music and video files with your phone. On the PC, open Windows Media Player. 2. Other than selecting the media information type in ActiveSync to be synchronized, all media synchronization settings must end that connection before media can be synchronized by ActiveSync. All you must be set up a sync relationship with a USB...
...; Set up Sync. 5. Click Set up a sync partnership between the storage card and Windows Media Player. If the phone is set in Chapter 7. Choose whether to synchronize music and video files with your phone. On the PC, open Windows Media Player. 2. Other than selecting the media information type in ActiveSync to be synchronized, all media synchronization settings must end that connection before media can be synchronized by ActiveSync. All you must be set up a sync relationship with a USB...
User Manual
Page 49
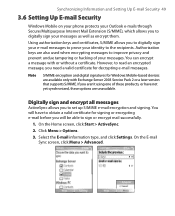
.... Select the E-mail information type, and click Settings. Click Menu > Options. 3. However, to sign or encrypt mail successfully. 1. On the E-mail Sync screen, click Menu > Advanced. If you aren't using one of your messages. On the Home screen, click Start > ActiveSync. 2. Authorization keys are available only with or without a certificate. Synchronizing Information and Setting Up E-mail Security 49 3.6 Setting Up E-mail Security Windows Mobile on your phone protects your Outlook e-mails through Secure/Multipurpose Internet Mail Extension (S/MIME...
.... Select the E-mail information type, and click Settings. Click Menu > Options. 3. However, to sign or encrypt mail successfully. 1. On the E-mail Sync screen, click Menu > Advanced. If you aren't using one of your messages. On the Home screen, click Start > ActiveSync. 2. Authorization keys are available only with or without a certificate. Synchronizing Information and Setting Up E-mail Security 49 3.6 Setting Up E-mail Security Windows Mobile on your phone protects your Outlook e-mails through Secure/Multipurpose Internet Mail Extension (S/MIME...

User Manual
Page 52
... the picture as number and currency formatting options. 1. 52 Managing your Phone 4.1 Personalizing your Phone Set up with the regional settings that are appropriate for your locale. You can specify the language, locale, date and time style, as well as the background image through Start > Settings > Home Screen > Background image. • Capture a photo using the phone's camera. When viewing the photo in Chapter 7 for details. The center of new messages (voice mail, text, e-mail or MMS...
... the picture as number and currency formatting options. 1. 52 Managing your Phone 4.1 Personalizing your Phone Set up with the regional settings that are appropriate for your locale. You can specify the language, locale, date and time style, as well as the background image through Start > Settings > Home Screen > Background image. • Capture a photo using the phone's camera. When viewing the photo in Chapter 7 for details. The center of new messages (voice mail, text, e-mail or MMS...

User Manual
Page 54
... a key. 3. In Keypad control, select a sound. On the Home screen, click Profile [Type]. To set sounds for an event 1. On the Home screen, click Start > Settings > Sounds. 2. On your PC, click Explore and double-click My Windows Mobile-Based Device. Example: Profile Normal. 2. Tip To revert to the default profile settings, click Menu > Reset to edit. 3. Select None if you can be used. 1. In ActiveSync on your phone, you...
... a key. 3. In Keypad control, select a sound. On the Home screen, click Profile [Type]. To set sounds for an event 1. On the Home screen, click Start > Settings > Sounds. 2. On your PC, click Explore and double-click My Windows Mobile-Based Device. Example: Profile Normal. 2. Tip To revert to the default profile settings, click Menu > Reset to edit. 3. Select None if you can be used. 1. In ActiveSync on your phone, you...
User Manual
Page 60
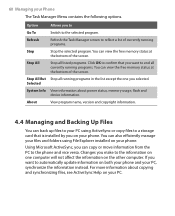
... more information about power status, memory usage, flash and device information. Selected System Info View information about copying and synchronizing files, see ActiveSync Help on the other computer. Option Allows you want to reflect a list of currently running programs. You can also efficiently manage your files and folders using ActiveSync or copy files to confirm that is installed by you can view the free memory status at the...
... more information about power status, memory usage, flash and device information. Selected System Info View information about copying and synchronizing files, see ActiveSync Help on the other computer. Option Allows you want to reflect a list of currently running programs. You can also efficiently manage your files and folders using ActiveSync or copy files to confirm that is installed by you can view the free memory status at the...
User Manual
Page 70
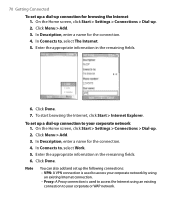
Click Menu > Add. 3. In Description, enter a name for browsing the Internet 1. On the Home screen, click Start > Settings > Connections > Dial-up . 2. Note You can also add and set up the following connections: • VPN: A VPN connection is used to access your corporate network by using an existing Internet connection. • Proxy: A Proxy connection is used to access the Internet using an existing connection to , select The Internet. 5. In Connects to your corporate network 1. To set up a dial-up connection to , select Work. 5. Click Done...
Click Menu > Add. 3. In Description, enter a name for browsing the Internet 1. On the Home screen, click Start > Settings > Connections > Dial-up . 2. Note You can also add and set up the following connections: • VPN: A VPN connection is used to access your corporate network by using an existing Internet connection. • Proxy: A Proxy connection is used to access the Internet using an existing connection to , select The Internet. 5. In Connects to your corporate network 1. To set up a dial-up connection to , select Work. 5. Click Done...
User Manual
Page 74
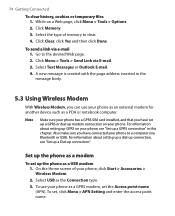
... device such as a USB modem 1. Go to a computer (via Bluetooth or USB). Select Text Messages or Outlook E-mail. 4. To use your phone, see "Set up a Dial-up GPRS on a Web page, click Menu > Tools > Options. 2. Select the type of your phone as the Connection type. 3. Click Menu > Tools > Send Link via e-mail 1. Click Memory. 3. To send a link via E-mail. 3. A new message is created with the page address inserted in this chapter. For information about setting up a dial-up connection, see "Set...
... device such as a USB modem 1. Go to a computer (via Bluetooth or USB). Select Text Messages or Outlook E-mail. 4. To use your phone, see "Set up a Dial-up GPRS on a Web page, click Menu > Tools > Options. 2. Select the type of your phone as the Connection type. 3. Click Menu > Tools > Send Link via e-mail 1. Click Memory. 3. To send a link via E-mail. 3. A new message is created with the page address inserted in this chapter. For information about setting up a dial-up connection, see "Set...
User Manual
Page 76
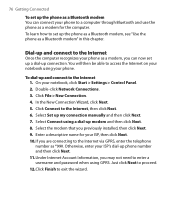
... Network Connections. 3. Click File > New Connection. 4. Enter a descriptive name for the computer. Otherwise, enter your phone to access the Internet on your notebook using a dial-up and connect to set up the phone as a Bluetooth modem, see "Use the phone as a Bluetooth modem" in this chapter. You will then be able to a computer through Bluetooth and use the phone as a modem for your phone as a modem, you may not need to the Internet via GPRS, enter...
... Network Connections. 3. Click File > New Connection. 4. Enter a descriptive name for the computer. Otherwise, enter your phone to access the Internet on your notebook using a dial-up and connect to set up the phone as a Bluetooth modem, see "Use the phone as a Bluetooth modem" in this chapter. You will then be able to a computer through Bluetooth and use the phone as a modem for your phone as a modem, you may not need to the Internet via GPRS, enter...
User Manual
Page 91
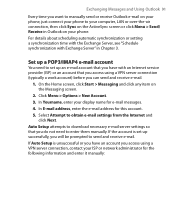
... Home screen, click Start > Messaging and click any item on your phone. In E-mail address, enter the e-mail address for e-mail messages. 4. Select Attempt to enter them manually. If Auto Setup is set up successfully, you will be prompted to send and receive e-mail. For details about scheduling automatic synchronization or setting a synchronization time with the Exchange Server, see "Schedule synchronization with an Internet service provider (ISP) or an account that you access using a VPN server connection, contact your ISP or network...
... Home screen, click Start > Messaging and click any item on your phone. In E-mail address, enter the e-mail address for e-mail messages. 4. Select Attempt to enter them manually. If Auto Setup is set up successfully, you will be prompted to send and receive e-mail. For details about scheduling automatic synchronization or setting a synchronization time with the Exchange Server, see "Schedule synchronization with an Internet service provider (ISP) or an account that you access using a VPN server connection, contact your ISP or network...
User Manual
Page 100
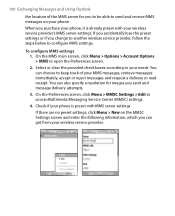
... a resolution for you change to another wireless service provider, follow the steps below to your phone is already preset with MMS server settings. Check if your needs. You can choose to send and receive MMS messages on the MMSC Settings screen and enter the following information, which you purchase your phone, it is preset with your phone. On the Preferences screen, click Menu > MMSC Settings > Edit to open the Preferences screen. 2. If you accidentally...
... a resolution for you change to another wireless service provider, follow the steps below to your phone is already preset with MMS server settings. Check if your needs. You can choose to send and receive MMS messages on the MMSC Settings screen and enter the following information, which you purchase your phone, it is preset with your phone. On the Preferences screen, click Menu > MMSC Settings > Edit to open the Preferences screen. 2. If you accidentally...
User Manual
Page 101
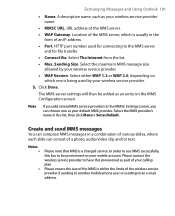
... MMS messages in the form of the MMS server, which one as an entry on your calling plan. Notes • • Please note that MMS is being used for connecting to an e-mail address. A descriptive name, such as Default. URL address of the wireless service provider if sending to another mobile phone user or sending to the MMS server and for file transfer. • Connect Via. Note If you add several MMS service providers to the MMSC Settings screen...
... MMS messages in the form of the MMS server, which one as an entry on your calling plan. Notes • • Please note that MMS is being used for connecting to an e-mail address. A descriptive name, such as Default. URL address of the wireless service provider if sending to another mobile phone user or sending to the MMS server and for file transfer. • Connect Via. Note If you add several MMS service providers to the MMSC Settings screen...

User Manual
Page 169
... 60 - media files from PC to phone 54 Currency setting 52 Customize Home screen 52 Customize picture options 132 D Date setting 53 Default view (Web page) 72 Delete pictures and videos 130 Desktop view (Web page) 72 Dial-up connection 69 Digitally sign messages 49, 96 Digital Rights Management (DRM) 136 Digital signature - security 49, 96 - send and receive 93 Index 169 Edit picture 130 Emergency call 36 Encrypt messages 49, 96 Enter text and numbers 24 Error reporting...
... 60 - media files from PC to phone 54 Currency setting 52 Customize Home screen 52 Customize picture options 132 D Date setting 53 Default view (Web page) 72 Delete pictures and videos 130 Desktop view (Web page) 72 Dial-up connection 69 Digitally sign messages 49, 96 Digital Rights Management (DRM) 136 Digital signature - security 49, 96 - send and receive 93 Index 169 Edit picture 130 Emergency call 36 Encrypt messages 49, 96 Enter text and numbers 24 Error reporting...
User Manual
Page 171
Calculator 21 - ClearVue PDF 21 - ClearVue PPT 21 - ClearVue Worksheet 21 - Clear Storage 21 - Comm Manager 21 - Voice Notes 22, 115 - Call History 21 - Games 21 - Phone 29 - SIM Tool Kit 22 - Task Manager 22, 59 - Windows Media Player Mobile 22, 133 Put call 34 - MMS message 105 Regional settings 52 Reply - set as Home screen background 130 Pictures & Videos 22, 128 Picture theme (capture mode) 119, 123 PIN 63 Play media 139 Pocket MSN 22, 106...
Calculator 21 - ClearVue PDF 21 - ClearVue PPT 21 - ClearVue Worksheet 21 - Clear Storage 21 - Comm Manager 21 - Voice Notes 22, 115 - Call History 21 - Games 21 - Phone 29 - SIM Tool Kit 22 - Task Manager 22, 59 - Windows Media Player Mobile 22, 133 Put call 34 - MMS message 105 Regional settings 52 Reply - set as Home screen background 130 Pictures & Videos 22, 128 Picture theme (capture mode) 119, 123 PIN 63 Play media 139 Pocket MSN 22, 106...


