Manual
Page 2
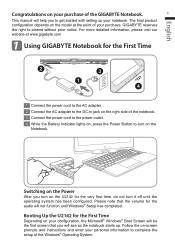
... your personal information to get started with setting up . The final product configuration depends on the model at www.gigabyte.com 1 Using GIGABYTE Notebook for the very first time, do not turn on the U2142 for the First Time 2 3 1 4 1 Connect the power cord to the AC adapter. 2 Connect the ...AC adapter to the DC-in jack on the right side of the notebook. 3 Connect the power cord to the power outlet. 4 While the Battery...
... your personal information to get started with setting up . The final product configuration depends on the model at www.gigabyte.com 1 Using GIGABYTE Notebook for the very first time, do not turn on the U2142 for the First Time 2 3 1 4 1 Connect the power cord to the AC adapter. 2 Connect the ...AC adapter to the DC-in jack on the right side of the notebook. 3 Connect the power cord to the power outlet. 4 While the Battery...
Manual
Page 3
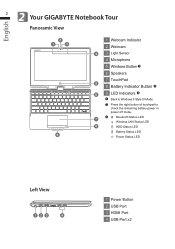
English 2 2 Your GIGABYTE Notebook Tour Panoramic View 2 1 3 9 1 Webcam Indicator 2 Webcam 4 3 Light Sensor 4 Microphone 5 Windows Button 6 Speakers 7 TouchPad 5 8 Battery Indicator Button 6 9 LED Indicators Back to Windows 8 Style UI Mode. Press the right button of touchpad to check the remaining battery power in power off mode. 7 Bluetooth Status LED Wireless LAN Status LED 8 HDD Status LED Battery Status LED Power Status LED Left View 123 4 1 Power Button 2 USB Port 3 HDMI Port 4 USB Port x2
English 2 2 Your GIGABYTE Notebook Tour Panoramic View 2 1 3 9 1 Webcam Indicator 2 Webcam 4 3 Light Sensor 4 Microphone 5 Windows Button 6 Speakers 7 TouchPad 5 8 Battery Indicator Button 6 9 LED Indicators Back to Windows 8 Style UI Mode. Press the right button of touchpad to check the remaining battery power in power off mode. 7 Bluetooth Status LED Wireless LAN Status LED 8 HDD Status LED Battery Status LED Power Status LED Left View 123 4 1 Power Button 2 USB Port 3 HDMI Port 4 USB Port x2


