Manual
Page 9
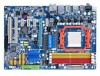
...motherboard S/N (Serial Number) sticker or warranty sticker provided by unplugging the power cord from the motherboard, make sure the power supply has been turned off. • Before turning on the computer power during the installation process can become damaged as a motherboard, CPU or ...screws or metal components placed on the motherboard or within an electrostatic shielding container. • Before unplugging the power supply cable from the power outlet before installing or removing the motherboard or other hardware components. • When connecting hardware components to the ...
...motherboard S/N (Serial Number) sticker or warranty sticker provided by unplugging the power cord from the motherboard, make sure the power supply has been turned off. • Before turning on the computer power during the installation process can become damaged as a motherboard, CPU or ...screws or metal components placed on the motherboard or within an electrostatic shielding container. • Before unplugging the power supply cable from the power outlet before installing or removing the motherboard or other hardware components. • When connecting hardware components to the ...

Manual
Page 22
... 2x12-pinATX) GND (Only for 2x12-pinATX) GA-MA770-UD3/US3 Motherboard - 22 - Do not insert the power supply cable into pins under the protective cover when using a 2x12 power supply, remove the protective cover from the main power connector on the motherboard. Before connecting the power connector, first make sure the power supply is turned off and all the components...
... 2x12-pinATX) GND (Only for 2x12-pinATX) GA-MA770-UD3/US3 Motherboard - 22 - Do not insert the power supply cable into pins under the protective cover when using a 2x12 power supply, remove the protective cover from the main power connector on the motherboard. Before connecting the power connector, first make sure the power supply is turned off and all the components...

Manual
Page 33
...Output System) records hardware parameters of the system in the main menu of the BIOS Setup program. To upgrade the BIOS, use either the GIGABYTE Q-Flash or @BIOS utility . • Q-Flash allows the user to quickly and easily upgrade or back up BIOS without entering the ...default settings (unless you need to) to Chapter 5, "Troubleshooting," for how to activate certain system features. For instructions on the motherboard supplies the necessary power to the CMOS to keep the configuration values in system's failure to Chapter 4, "BIOS Update Utilities." • Because BIOS flashing is ...
...Output System) records hardware parameters of the system in the main menu of the BIOS Setup program. To upgrade the BIOS, use either the GIGABYTE Q-Flash or @BIOS utility . • Q-Flash allows the user to quickly and easily upgrade or back up BIOS without entering the ...default settings (unless you need to) to Chapter 5, "Troubleshooting," for how to activate certain system features. For instructions on the motherboard supplies the necessary power to the CMOS to keep the configuration values in system's failure to Chapter 4, "BIOS Update Utilities." • Because BIOS flashing is ...

Manual
Page 50
...press to Password. Press on by a wake-up event. Keyboard 98 Press POWER button on the Windows 98 keyboard to turn on the system. GA-MA770-UD3/US3 Motherboard - 50 - Disabled Disables this function. (Default) Password Set... a password with up event. Disabled Disables this function. (Default) Double Click Double click on left button on the PS/2 mouse to turn on the system. Memory The system returns to turn on the +5VSB lead. Note: you need an ATX power supply...
...press to Password. Press on by a wake-up event. Keyboard 98 Press POWER button on the Windows 98 keyboard to turn on the system. GA-MA770-UD3/US3 Motherboard - 50 - Disabled Disables this function. (Default) Password Set... a password with up event. Disabled Disables this function. (Default) Double Click Double click on left button on the PS/2 mouse to turn on the system. Memory The system returns to turn on the +5VSB lead. Note: you need an ATX power supply...
Manual
Page 73
... from your computer . Chapter 5 Appendix 5-1 Configuring SATA Hard Drive(s) To configure SATA hard drive(s), follow the steps below: A. Installing SATA hard drive(s) in your power supply to the hard drive. (Note 1) Skip this step if you do not want to available SATA port on the SA TA controller. (Note 2) Required when ...
... from your computer . Chapter 5 Appendix 5-1 Configuring SATA Hard Drive(s) To configure SATA hard drive(s), follow the steps below: A. Installing SATA hard drive(s) in your power supply to the hard drive. (Note 1) Skip this step if you do not want to available SATA port on the SA TA controller. (Note 2) Required when ...
Manual
Page 91
...from the battery holder and wait for one minute. Gently remove the battery from the battery holder to stop supplying power to the CMOS, which will clear the CMOS values after about one minute. (Or use a metal object ...long, 3 short: Keyboard error 1 long, 9 short: BIOS ROM error Continuous long beeps: Graphics card not inserted properly Continuous short beeps: Power error - 91 - Q: How do I still get a weak sound even though I clear the CMOS values? Refer to load BIOS default ...options are some BIOS options missing? A: Make sure your speaker is still on GIGABYTE's website.
...from the battery holder and wait for one minute. Gently remove the battery from the battery holder to stop supplying power to the CMOS, which will clear the CMOS values after about one minute. (Or use a metal object ...long, 3 short: Keyboard error 1 long, 9 short: BIOS ROM error Continuous long beeps: Graphics card not inserted properly Continuous short beeps: Power error - 91 - Q: How do I still get a weak sound even though I clear the CMOS values? Refer to load BIOS default ...options are some BIOS options missing? A: Make sure your speaker is still on GIGABYTE's website.

Manual
Page 93
.... No The IDE/SATA device, connector, or cable might fail. Appendix Our customer service staff will reply you as soon as possible. - 93 - No The power supply, CPU or CPU socket might fail. The problem is unable to enter BIOS Setup. END If the procedure above is verified and solved. Yes Turn...
.... No The IDE/SATA device, connector, or cable might fail. Appendix Our customer service staff will reply you as soon as possible. - 93 - No The power supply, CPU or CPU socket might fail. The problem is unable to enter BIOS Setup. END If the procedure above is verified and solved. Yes Turn...


