Manual
Page 13
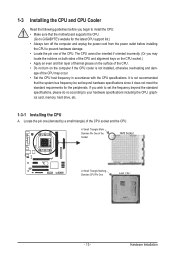
It is not recommended that the motherboard supports the CPU. (Go to GIGABYTE's website for the peripherals. age of the CPU may locate the notches on both sides of the CPU and alignment keys on the CPU socket.) &#... with the CPU specifications. 1-3 Installing the CPU and CPU Cooler Read the following guidelines before installing the CPU to your hardware specifications including the CPU, graphics card, memory, hard drive, etc. 1-3-1 Installing the CPU A. The CPU cannot be set the frequency beyond hardware specifications since it does not meet the standard requirements...
It is not recommended that the motherboard supports the CPU. (Go to GIGABYTE's website for the peripherals. age of the CPU may locate the notches on both sides of the CPU and alignment keys on the CPU socket.) &#... with the CPU specifications. 1-3 Installing the CPU and CPU Cooler Read the following guidelines before installing the CPU to your hardware specifications including the CPU, graphics card, memory, hard drive, etc. 1-3-1 Installing the CPU A. The CPU cannot be set the frequency beyond hardware specifications since it does not meet the standard requirements...
Manual
Page 18
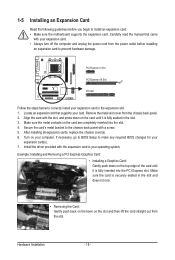
... seated in the expansion slot. 1. 1-5 Installing an Expansion Card Read the following guidelines before installing an expansion card to prevent hardware damage. After installing all expansion cards, replace the chassis cover(s). 6. Example: Installing and Removing a PCI Express Graphics Card: • Installing a Graphics Card: Gently push down on your expansion card. • Always turn off the computer and unplug...
... seated in the expansion slot. 1. 1-5 Installing an Expansion Card Read the following guidelines before installing an expansion card to prevent hardware damage. After installing all expansion cards, replace the chassis cover(s). 6. Example: Installing and Removing a PCI Express Graphics Card: • Installing a Graphics Card: Gently push down on your expansion card. • Always turn off the computer and unplug...
Manual
Page 39
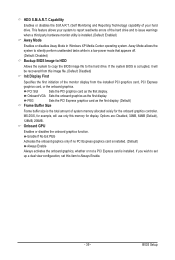
...) Init Display First Specifies the first initiation of the monitor display from the installed PCI graphics card, PCI Express graphics card, or the onboard graphics. Onboard VGA Sets the onboard graphics as the first display. MS-DOS, for example, will be recovered from this item to...are: Disabled, 32MB, 64MB (Default), 128MB, 256MB. HDD S.M.A.R.T. This feature allows your hard drive. PEG Sets the PCI Express graphics card as the first display. (Default) Frame Buffer Size Frame buffer size is installed. Capability Enables or disables the S.M.A.R.T. (Self Monitoring ...
...) Init Display First Specifies the first initiation of the monitor display from the installed PCI graphics card, PCI Express graphics card, or the onboard graphics. Onboard VGA Sets the onboard graphics as the first display. MS-DOS, for example, will be recovered from this item to...are: Disabled, 32MB, 64MB (Default), 128MB, 256MB. HDD S.M.A.R.T. This feature allows your hard drive. PEG Sets the PCI Express graphics card as the first display. (Default) Frame Buffer Size Frame buffer size is installed. Capability Enables or disables the S.M.A.R.T. (Self Monitoring ...

Manual
Page 55
... first physical hard drive that allows you to quickly compress and back up your system data and perform restoration of system memory • VESA compatible graphics card • Windows XP with Xpress Recovery cannot be restored using Xpress Recovery2. • USB hard drives are attached to the first and second SATA connectors...
... first physical hard drive that allows you to quickly compress and back up your system data and perform restoration of system memory • VESA compatible graphics card • Windows XP with Xpress Recovery cannot be restored using Xpress Recovery2. • USB hard drives are attached to the first and second SATA connectors...
Manual
Page 62
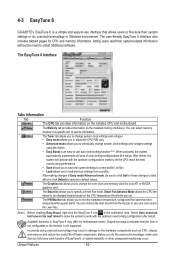
...automatically experiments all sorts of overclocking configurations till it hangs. Incorrectly doing overclock/overvoltage may result in the notification area. The Graphics tab allows you to specify a Smart Fan mode. Unique Features - 62 - The EasyTune 6 Interface Tabs Information Tab ... you to monitor hardware temperature, voltage and fan speed and set . 4-3 EasyTune 6 GIGABYTE's EasyTune 6 is a simple and easy-to-use your ATI or NVIDIA graphics card. After restart, the system will operate with the optimum overclocking configuration after restart. The ...
...automatically experiments all sorts of overclocking configurations till it hangs. Incorrectly doing overclock/overvoltage may result in the notification area. The Graphics tab allows you to specify a Smart Fan mode. Unique Features - 62 - The EasyTune 6 Interface Tabs Information Tab ... you to monitor hardware temperature, voltage and fan speed and set . 4-3 EasyTune 6 GIGABYTE's EasyTune 6 is a simple and easy-to-use your ATI or NVIDIA graphics card. After restart, the system will operate with the optimum overclocking configuration after restart. The ...
Manual
Page 81
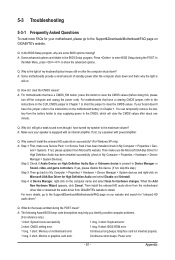
...our website and search for "onboard HD audio driver." Q: Why cannot I clear the CMOS values? If not, please update it from GIGABYTE's website to show the advanced options. If yes, please disable this device. (If not, skip this jumper, refer to clear the...: CMOS setting error 1 long, 9 short: BIOS ROM error 1 long, 1 short: Memory or motherboard error Continuous long beeps: Graphics card not inserted properly 1 long, 2 short: Monitor or graphics card error Continuous short beeps: Power error - 81 - If your board doesn't have a clearing CMOS jumper, refer to the instructions on...
...our website and search for "onboard HD audio driver." Q: Why cannot I clear the CMOS values? If not, please update it from GIGABYTE's website to show the advanced options. If yes, please disable this device. (If not, skip this jumper, refer to clear the...: CMOS setting error 1 long, 9 short: BIOS ROM error 1 long, 1 short: Memory or motherboard error Continuous long beeps: Graphics card not inserted properly 1 long, 2 short: Monitor or graphics card error Continuous short beeps: Power error - 81 - If your board doesn't have a clearing CMOS jumper, refer to the instructions on...
Manual
Page 82
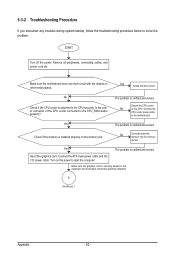
...the memory slot. Connect the CPU cooler power cable to solve the problem. Check if the memory is attached to the CPU securely. Insert the graphics card. Turn on the CPU. The problem is verified and solved. Secure the CPU cooler No on the power to the CPU_FAN header properly? Yes... The problem is verified and solved. Make sure the graphics card is verified and solved. Connect the ATX main power cable and the 12V power cable. Yes The problem is securely seated in the expansion slot...
...the memory slot. Connect the CPU cooler power cable to solve the problem. Check if the memory is attached to the CPU securely. Insert the graphics card. Turn on the CPU. The problem is verified and solved. Secure the CPU cooler No on the power to the CPU_FAN header properly? Yes... The problem is verified and solved. Make sure the graphics card is verified and solved. Connect the ATX main power cable and the 12V power cable. Yes The problem is securely seated in the expansion slot...
Manual
Page 83
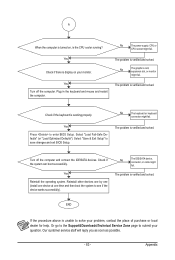
... then boot the system to submit your question. No The keyboard or keyboard connector might fail. The problem is verified and solved. Appendix No The graphics card, expansion slot, or monitor might fail. A When the computer is turned on your monitor. Select "Load Fail-Safe Defaults" (or "Load Optimized Defaults"). The problem...
... then boot the system to submit your question. No The keyboard or keyboard connector might fail. The problem is verified and solved. Appendix No The graphics card, expansion slot, or monitor might fail. A When the computer is turned on your monitor. Select "Load Fail-Safe Defaults" (or "Load Optimized Defaults"). The problem...


