Manual
Page 7
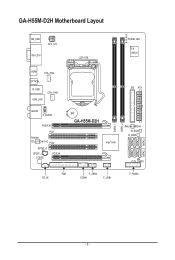
GA-H55M-D2H Motherboard Layout KB_USB ATX_12V VGA_DVI LGA1156 PHASE LED iTE IT8720 HDMI SYS_FAN OPTICAL R_USB USB_LAN CPU_FAN AUDIO F_AUDIO PCIEX16 PCI1 Realtek RTL8111D/8111E PCI2 SPDIF_O SPDIF_I CODEC PCIEX4 IDE ATX BAT GA-H55M-D2H Intel® H55 JMicron JMB368 M_BIOS B_BIOS CLR_CMOS FDD CD_IN F_USB2 COMA F_USB1 F_PANEL DDR3_1 DDR3_2 SATA2_5 SATA2_2 SATA2_4 SATA2_1 SATA2_3 SATA2_0 - 7 -
GA-H55M-D2H Motherboard Layout KB_USB ATX_12V VGA_DVI LGA1156 PHASE LED iTE IT8720 HDMI SYS_FAN OPTICAL R_USB USB_LAN CPU_FAN AUDIO F_AUDIO PCIEX16 PCI1 Realtek RTL8111D/8111E PCI2 SPDIF_O SPDIF_I CODEC PCIEX4 IDE ATX BAT GA-H55M-D2H Intel® H55 JMicron JMB368 M_BIOS B_BIOS CLR_CMOS FDD CD_IN F_USB2 COMA F_USB1 F_PANEL DDR3_1 DDR3_2 SATA2_5 SATA2_2 SATA2_4 SATA2_1 SATA2_3 SATA2_0 - 7 -

Manual
Page 21
... 9 1) ATX_12V 2) ATX 3) CPU_FAN 4) SYS_FAN 5) FDD 6) IDE 7) SATA2_0/1/2/3/4/5 8) BAT 9) F_PANEL 10) F_AUDIO 11) CD_IN 12) SPDIF_I 13) SPDIF_O 14) F_USB1/F_USB2 15) COMA 16) CLR_CMOS 17) PHASE LED Read the following guidelines before connecting external devices: • First make sure the device cable has been securely attached to the connector on the computer...
... 9 1) ATX_12V 2) ATX 3) CPU_FAN 4) SYS_FAN 5) FDD 6) IDE 7) SATA2_0/1/2/3/4/5 8) BAT 9) F_PANEL 10) F_AUDIO 11) CD_IN 12) SPDIF_I 13) SPDIF_O 14) F_USB1/F_USB2 15) COMA 16) CLR_CMOS 17) PHASE LED Read the following guidelines before connecting external devices: • First make sure the device cable has been securely attached to the connector on the computer...
Manual
Page 30
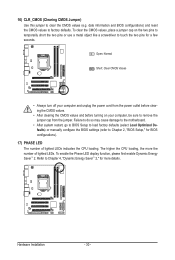
...2," for more the number of lighted LEDs indicates the CPU loading. To clear the CMOS values, place a jumper cap on your computer, be sure to factory defaults. The higher the CPU loading, the more details. To enable the Phase LED display function, please first enable Dynamic ...Energy Saver™ 2. Refer to Chapter 2, "BIOS Setup," for BIOS configurations). 17) PHASE LED The number of lighted LEDs. 16) CLR_CMOS (Clearing CMOS Jumper) Use this jumper to touch...
...2," for more the number of lighted LEDs indicates the CPU loading. To clear the CMOS values, place a jumper cap on your computer, be sure to factory defaults. The higher the CPU loading, the more details. To enable the Phase LED display function, please first enable Dynamic ...Energy Saver™ 2. Refer to Chapter 2, "BIOS Setup," for BIOS configurations). 17) PHASE LED The number of lighted LEDs. 16) CLR_CMOS (Clearing CMOS Jumper) Use this jumper to touch...

Manual
Page 69
Meter Mode In Meter Mode, GIGABYTE Dynamic Energy Saver™ 2 shows how much power they have saved in a set period of the devices currently in taskbar) 14 INFO/Help 15 Motherboard Phase LED On/Off Switch (Default: On) 16 Live Utility Update (Check for...Minimize (Application will continue to provide exceptional power savings and enhanced power efficiency without sacrificing computing performance. 4-4 Dynamic Energy Saver™ 2 GIGABYTE Dynamic Energy Saver™ 2 (Note 1) is for reference only. Unique Features Actual results may vary depending on testing method. - ...
Meter Mode In Meter Mode, GIGABYTE Dynamic Energy Saver™ 2 shows how much power they have saved in a set period of the devices currently in taskbar) 14 INFO/Help 15 Motherboard Phase LED On/Off Switch (Default: On) 16 Live Utility Update (Check for...Minimize (Application will continue to provide exceptional power savings and enhanced power efficiency without sacrificing computing performance. 4-4 Dynamic Energy Saver™ 2 GIGABYTE Dynamic Energy Saver™ 2 (Note 1) is for reference only. Unique Features Actual results may vary depending on testing method. - ...

Manual
Page 70
... with Dynamic Energy Saver enabled) (Note 4) 4 Time/Date Dynamic Energy Saver Enabled 5 Total Mode Switch 6 Meter Mode Switch 7 Dynamic Power Phase Status 8 Power Saving Status (Icons of time since activating Dynamic Energy Saver™ 2 for the latest utility version) C. Stealth Mode In Stealth... power saving reaches 99999999 Watts. Total Mode In Total Mode, users are set period of the devices currently in taskbar) 13 INFO/Help 14 Motherboard Phase LED On/Off Switch (Default: On) 15 Live Utility Update (Check for the first time (Note 3). 11 12 13 3 2 4 65 1 7 8...
... with Dynamic Energy Saver enabled) (Note 4) 4 Time/Date Dynamic Energy Saver Enabled 5 Total Mode Switch 6 Meter Mode Switch 7 Dynamic Power Phase Status 8 Power Saving Status (Icons of time since activating Dynamic Energy Saver™ 2 for the latest utility version) C. Stealth Mode In Stealth... power saving reaches 99999999 Watts. Total Mode In Total Mode, users are set period of the devices currently in taskbar) 13 INFO/Help 14 Motherboard Phase LED On/Off Switch (Default: On) 15 Live Utility Update (Check for the first time (Note 3). 11 12 13 3 2 4 65 1 7 8...


