
Manual
Page 1
GA-H55M-D2H LGA1156 socket motherboard for Intel® Core™ i7 processor family/ Intel® Core™ i5 processor family/ Intel® Core™ i3 processor family User's Manual Rev. 1301 12ME-H55MD2H-1301R
GA-H55M-D2H LGA1156 socket motherboard for Intel® Core™ i7 processor family/ Intel® Core™ i5 processor family/ Intel® Core™ i3 processor family User's Manual Rev. 1301 12ME-H55MD2H-1301R
Manual
Page 3
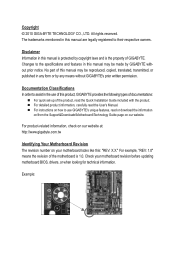
...Guide included with the product. Check your motherboard looks like this manual are legally registered to assist in this manual is protected by copyright laws and is 1.0. Changes to use of this product, GIGABYTE provides the following types of documentations: For quick set-up of... on how to the specifications and features in this : "REV: X.X." Example: The trademarks mentioned in this manual may be reproduced, copied, translated, transmitted, or published in any form or by GIGABYTE without GIGABYTE's prior written permission. No part of the product, read the User...
...Guide included with the product. Check your motherboard looks like this manual are legally registered to assist in this manual is protected by copyright laws and is 1.0. Changes to use of this product, GIGABYTE provides the following types of documentations: For quick set-up of... on how to the specifications and features in this : "REV: X.X." Example: The trademarks mentioned in this manual may be reproduced, copied, translated, transmitted, or published in any form or by GIGABYTE without GIGABYTE's prior written permission. No part of the product, read the User...

Manual
Page 5
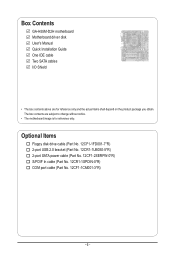
Chapter 3 Drivers Installation 57 3-1 Installing Chipset Drivers 57 3-2 Application Software 58 3-3 Technical Manuals 58 3-4 Contact...59 3-5 System...59 3-6 Download Center 60 3-7 New Utilities...60 Chapter 4 Unique Features 61 4-1 Xpress Recovery2 61 4-2 BIOS Update Utilities 64 4-2-1 Updating the BIOS ...
Chapter 3 Drivers Installation 57 3-1 Installing Chipset Drivers 57 3-2 Application Software 58 3-3 Technical Manuals 58 3-4 Contact...59 3-5 System...59 3-6 Download Center 60 3-7 New Utilities...60 Chapter 4 Unique Features 61 4-1 Xpress Recovery2 61 4-2 BIOS Update Utilities 64 4-2-1 Updating the BIOS ...
Manual
Page 6
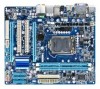
Box Contents GA-H55M-D2H motherboard Motherboard driver disk User's Manual Quick Installation Guide One IDE cable Two SATA cables I/O Shield • The box contents above are subject to change without notice. • The motherboard image ...
Box Contents GA-H55M-D2H motherboard Motherboard driver disk User's Manual Quick Installation Guide One IDE cable Two SATA cables I/O Shield • The box contents above are subject to change without notice. • The motherboard image ...

Manual
Page 9
Hardware Installation Prior to installation, carefully read the user's manual and follow these procedures: • Prior to installation, do not allow screws to come in contact with the motherboard circuit or its components. • Make ...
Hardware Installation Prior to installation, carefully read the user's manual and follow these procedures: • Prior to installation, do not allow screws to come in contact with the motherboard circuit or its components. • Make ...

Manual
Page 15
... the CPU fan header (CPU_FAN) on the motherboard. Check that the Male and Female push pins are joined closely. (Refer to your CPU cooler installation manual for instructions on installing the cooler.) Step 5: After the installation, check the back of arrow is to remove the cooler, on the contrary, is to...
... the CPU fan header (CPU_FAN) on the motherboard. Check that the Male and Female push pins are joined closely. (Refer to your CPU cooler installation manual for instructions on installing the cooler.) Step 5: After the installation, check the back of arrow is to remove the cooler, on the contrary, is to...
Manual
Page 18
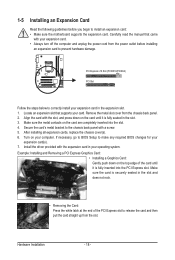
.... • Removing the Card: Press the white latch at the end of the card until it is fully inserted into the slot. 4. Carefully read the manual that supports your expansion card. • Always turn off the computer and unplug the power cord from the chassis back panel. 2. Example: Installing and Removing...
.... • Removing the Card: Press the white latch at the end of the card until it is fully inserted into the slot. 4. Carefully read the manual that supports your expansion card. • Always turn off the computer and unplug the power cord from the chassis back panel. 2. Example: Installing and Removing...
Manual
Page 28
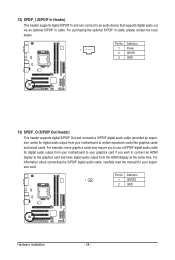
... purchasing the optional S/PDIF In cable, please contact the local dealer. Pin No. For information about connecting the S/PDIF digital audio cable, carefully read the manual for digital audio output from your motherboard to your graphics card if you to use a S/PDIF digital audio cable for your motherboard to certain expansion...
... purchasing the optional S/PDIF In cable, please contact the local dealer. Pin No. For information about connecting the S/PDIF digital audio cable, carefully read the manual for digital audio output from your motherboard to your graphics card if you to use a S/PDIF digital audio cable for your motherboard to certain expansion...
Manual
Page 30
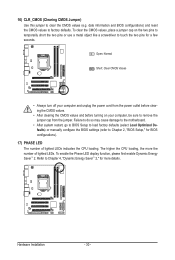
... do so may cause damage to the motherboard. • After system restart, go to BIOS Setup to load factory defaults (select Load Optimized Defaults) or manually configure the BIOS settings (refer to touch the two pins for a few seconds. To clear the CMOS values, place a jumper cap on your computer and...
... do so may cause damage to the motherboard. • After system restart, go to BIOS Setup to load factory defaults (select Load Optimized Defaults) or manually configure the BIOS settings (refer to touch the two pins for a few seconds. To clear the CMOS values, place a jumper cap on your computer and...
Manual
Page 37
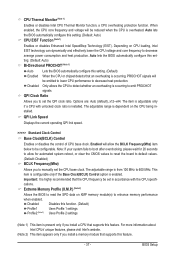
... set the QPI clock ratio. This item is configurable only if the Base Clock(BCLK) Control option is installed. The adjustable range is occurring to manually set in accordance with unlocked clock ratio is enabled. Enabled will be set the CPU base clock. When enabled, the CPU core frequency and voltage...
... set the QPI clock ratio. This item is configurable only if the Base Clock(BCLK) Control option is installed. The adjustable range is occurring to manually set in accordance with unlocked clock ratio is enabled. Enabled will be set the CPU base clock. When enabled, the CPU core frequency and voltage...

Manual
Page 38
... used; Options are: 700mV, 800mV, 900mV (default), 1000mV. the second is the memory frequency that supports this feature. PCI Express Clock Drive Allows you to manually set the CPU clock prior to the Chipset clock. System Memory Multiplier (SPD) Allows you install a memory module that is from 90 MHz to 150...
... used; Options are: 700mV, 800mV, 900mV (default), 1000mV. the second is the memory frequency that supports this feature. PCI Express Clock Drive Allows you to manually set the CPU clock prior to the Chipset clock. System Memory Multiplier (SPD) Allows you install a memory module that is from 90 MHz to 150...
Manual
Page 43
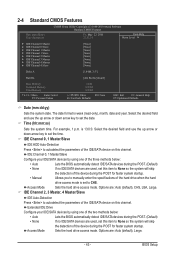
... HDD Auto-Detection Press to autodetect the parameters of the hard drive when the hard drive access mode is set the date. Allows you to manually enter the specifications of the IDE/SATA device on this channel. Sets the hard drive access mode. Options are : Auto (default), CHS,...format is 13:0:0. Extended IDE Drive Configure your IDE/SATA devices by using one of the two methods below : • Auto • None Manual Access Mode Lets the BIOS automatically detect IDE/SATA devices during the POST. (Default) If no IDE/SATA devices are used, set this item ...
... HDD Auto-Detection Press to autodetect the parameters of the hard drive when the hard drive access mode is set the date. Allows you to manually enter the specifications of the IDE/SATA device on this channel. Sets the hard drive access mode. Options are : Auto (default), CHS,...format is 13:0:0. Extended IDE Drive Configure your IDE/SATA devices by using one of the two methods below : • Auto • None Manual Access Mode Lets the BIOS automatically detect IDE/SATA devices during the POST. (Default) If no IDE/SATA devices are used, set this item ...

Manual
Page 44
... you do not install a floppy disk drive, set this item to the information on the system. Halt On Allows you wish to enter the parameters manually, refer to None. All, But Disk/Key The system boot will not stop for a keyboard or a floppy disk drive error but it will stop for...
... you do not install a floppy disk drive, set this item to the information on the system. Halt On Allows you wish to enter the parameters manually, refer to None. All, But Disk/Key The system boot will not stop for a keyboard or a floppy disk drive error but it will stop for...
Manual
Page 57
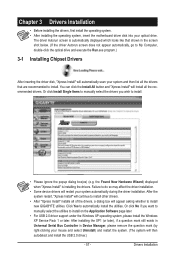
Or click Install Single Items to manually select the drivers you want to manually select the utilities to install on the Application Software page later. • For USB 2.0 driver support under the Windows XP operating system, please install ...installation. • Some device drivers will restart your mouse and select Uninstall) and restart the system. (The system will appear asking whether to install new GIGABYTE utilities. the Found New Hardware Wizard) displayed when "Xpress Install" is automatically displayed which looks like that shown in Device Manager, please remove the question...
Or click Install Single Items to manually select the drivers you want to manually select the utilities to install on the Application Software page later. • For USB 2.0 driver support under the Windows XP operating system, please install ...installation. • Some device drivers will restart your mouse and select Uninstall) and restart the system. (The system will appear asking whether to install new GIGABYTE utilities. the Found New Hardware Wizard) displayed when "Xpress Install" is automatically displayed which looks like that shown in Device Manager, please remove the question...

Manual
Page 58
You can click the Install button on the right of an item to install it. 3-3 Technical Manuals This page provides GIGABYTE's application guides, content descriptions for this driver disk, and the motherboard manuals. 3-2 Application Software This page displays all the utilities and applications that GIGABYTE develops and some free software. Drivers Installation - 58 -
You can click the Install button on the right of an item to install it. 3-3 Technical Manuals This page provides GIGABYTE's application guides, content descriptions for this driver disk, and the motherboard manuals. 3-2 Application Software This page displays all the utilities and applications that GIGABYTE develops and some free software. Drivers Installation - 58 -

Manual
Page 64
...BIOS chip. GIGABYTE Q-Flash and @BIOS are easy-to-use FAT32/16/12 file system. 3. However, if the main BIOS is potentially risky, please do it with the Q-Flash Utility A. What is DualBIOS™? Before You Begin 1. Extract the file and save the new BIOS file (e.g. H55M-D2H E2 . ...motherboard features the DualBIOS™ design, which enhances protection for the safety and stability of system safety, users cannot update the backup BIOS manually. What is Q-Flash™? Award Modular BIOS v6.00PG, An Energy Star Ally Copyright (C) 1984-2010, Award Software, Inc. Normally,...
...BIOS chip. GIGABYTE Q-Flash and @BIOS are easy-to-use FAT32/16/12 file system. 3. However, if the main BIOS is potentially risky, please do it with the Q-Flash Utility A. What is DualBIOS™? Before You Begin 1. Extract the file and save the new BIOS file (e.g. H55M-D2H E2 . ...motherboard features the DualBIOS™ design, which enhances protection for the safety and stability of system safety, users cannot update the backup BIOS manually. What is Q-Flash™? Award Modular BIOS v6.00PG, An Energy Star Ally Copyright (C) 1984-2010, Award Software, Inc. Normally,...

Manual
Page 67
...matches your motherboard model. Using @BIOS 1. C. Make sure that is not present on the @BIOS server site, please manually download the BIOS update file from GIGABYTE's website and follow the instructions in a corrupted BIOS or a system that the BIOS file to be flashed matches your ...motherboard model. Do not use the G.O.M. (GIGABYTE Online Management) function when using @BIOS. 4. Update the BIOS Using the Internet Update Function: Click Update BIOS from an inadequate BIOS flashing....
...matches your motherboard model. Using @BIOS 1. C. Make sure that is not present on the @BIOS server site, please manually download the BIOS update file from GIGABYTE's website and follow the instructions in a corrupted BIOS or a system that the BIOS file to be flashed matches your ...motherboard model. Do not use the G.O.M. (GIGABYTE Online Management) function when using @BIOS. 4. Update the BIOS Using the Internet Update Function: Click Update BIOS from an inadequate BIOS flashing....
Manual
Page 77
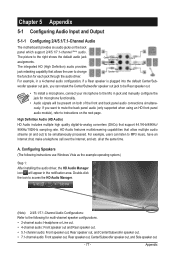
... integrated HD (High Definition) audio provides jack retasking capability that allows the user to -analog converters (DACs) that allow multiple audio streams (in jack and manually configure the jack for microphone functionality. • Audio signals will appear in a 4-channel audio configuration, if a Rear speaker is plugged into the default Center/Sub...
... integrated HD (High Definition) audio provides jack retasking capability that allows the user to -analog converters (DACs) that allow multiple audio streams (in jack and manually configure the jack for microphone functionality. • Audio signals will appear in a 4-channel audio configuration, if a Rear speaker is plugged into the default Center/Sub...

Manual
Page 87
... this document is no longer useful to you purchased the product for details of environmentally safe recycling. w When your product's user's manual and we will fulfill the national laws as most of the materials in a manner that protects human health and the environment. 5-3 ...the 2002/96/EC WEEE (Waste Electrical and Electronic Equipment) directive. Also note that do not use of our natural resources, GIGABYTE provides the following information on its packaging, which indicates that the information contained herein was accurate in Electrical and Electronic Equipment) and ...
... this document is no longer useful to you purchased the product for details of environmentally safe recycling. w When your product's user's manual and we will fulfill the national laws as most of the materials in a manner that protects human health and the environment. 5-3 ...the 2002/96/EC WEEE (Waste Electrical and Electronic Equipment) directive. Also note that do not use of our natural resources, GIGABYTE provides the following information on its packaging, which indicates that the information contained herein was accurate in Electrical and Electronic Equipment) and ...


