Manual
Page 3
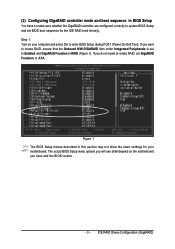
... GigaRAID Function to RAID (Figure 1). If you want to create RAID, set to Enabled and GigaRAID Function to ATA. The actual BIOS Setup menu options you will see shall depend on your computer and press Del to make sure whether the GigaRAID controller are configured correctly...: Move Enter: Select F5: Previous Values +/-/PU/PD: Value F10: Save F6: Fail-Safe Defaults Figure 1 ESC: Exit F1: General Help F7: Optimized Defaults The BIOS Setup menus described in system BIOS Setup and set BIOS boot sequence for your motherboard. Step 1: Turn on the motherboard you have to enter...
... GigaRAID Function to RAID (Figure 1). If you want to create RAID, set to Enabled and GigaRAID Function to ATA. The actual BIOS Setup menu options you will see shall depend on your computer and press Del to make sure whether the GigaRAID controller are configured correctly...: Move Enter: Select F5: Previous Values +/-/PU/PD: Value F10: Save F6: Fail-Safe Defaults Figure 1 ESC: Exit F1: General Help F7: Optimized Defaults The BIOS Setup menus described in system BIOS Setup and set BIOS boot sequence for your motherboard. Step 1: Turn on the motherboard you have to enter...
Manual
Page 4
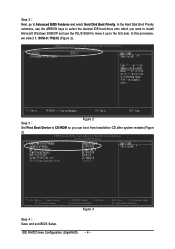
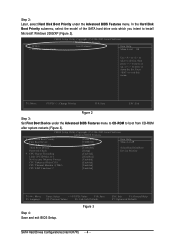
...ROM so you can boot from Installation CD after system restarts.(Figure 3) CMOS Setup Utility-Copyright (C) 1984-2004 Award Software Advanced BIOS Features : Move Enter: Select F5: Previous Values +/-/PU/PD: Value F10: Save F6: Fail-Safe Defaults Figure 3 ESC: Exit F1...: General Help F7: Optimized Defaults Step 4 Save and exit BIOS Setup. In this procedure, we select 1. IDE RAID Drives Configuration (GigaRAID) - 4 - Ác Step 2 Next, go to Advanced BIOS Features and select Hard Disk Boot Priority.
...ROM so you can boot from Installation CD after system restarts.(Figure 3) CMOS Setup Utility-Copyright (C) 1984-2004 Award Software Advanced BIOS Features : Move Enter: Select F5: Previous Values +/-/PU/PD: Value F10: Save F6: Fail-Safe Defaults Figure 3 ESC: Exit F1...: General Help F7: Optimized Defaults Step 4 Save and exit BIOS Setup. In this procedure, we select 1. IDE RAID Drives Configuration (GigaRAID) - 4 - Ác Step 2 Next, go to Advanced BIOS Features and select Hard Disk Boot Priority.
Manual
Page 3
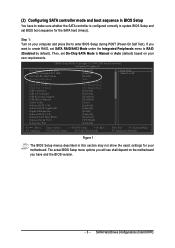
...Select +/-/PU/PD: Value F10: Save F5: Previous Values F6: Fail-Safe Defaults ESC: Exit F1: General Help F7: Optimized Defaults Figure 1 The BIOS Setup menus described in system BIOS Setup and set SATA RAID/AHCI Mode under the Integrated Peripherals menu to RAID (Disabled by default). SATA Hard Drives... Configurations (Intel ICH7R) (2) Configuring SATA controller mode and boot sequence in BIOS Setup You have and the BIOS version. - 3 - If you will see shall depend on your computer and press Del to create RAID, set...
...Select +/-/PU/PD: Value F10: Save F5: Previous Values F6: Fail-Safe Defaults ESC: Exit F1: General Help F7: Optimized Defaults Figure 1 The BIOS Setup menus described in system BIOS Setup and set SATA RAID/AHCI Mode under the Integrated Peripherals menu to RAID (Disabled by default). SATA Hard Drives... Configurations (Intel ICH7R) (2) Configuring SATA controller mode and boot sequence in BIOS Setup You have and the BIOS version. - 3 - If you will see shall depend on your computer and press Del to create RAID, set...
Manual
Page 4
... up, or to install ¤¤ Microsoft Windows 2000/XP (Figure 2). CMOS Setup Utility-Copyright (C) 1984-2005 Award Software Advanced BIOS Features ` Hard Disk Boot Priority First Boot Device Second Boot Device Third Boot Device Password Check # CPU Hyper-Threading Limit CPUID Max... menu. Ác Step 2: Later, select Hard Disk Boot Priority under the Advanced BIOS Features menu to CD-ROM to boot from CD-ROM after system restarts (Figure 3). ESC: Exit F1: General Help F7: Optimized Defaults SATA Hard Drives Configurations (Intel ICH7R) - 4 - CMOS Setup Utility-Copyright (C)...
... up, or to install ¤¤ Microsoft Windows 2000/XP (Figure 2). CMOS Setup Utility-Copyright (C) 1984-2005 Award Software Advanced BIOS Features ` Hard Disk Boot Priority First Boot Device Second Boot Device Third Boot Device Password Check # CPU Hyper-Threading Limit CPUID Max... menu. Ác Step 2: Later, select Hard Disk Boot Priority under the Advanced BIOS Features menu to CD-ROM to boot from CD-ROM after system restarts (Figure 3). ESC: Exit F1: General Help F7: Optimized Defaults SATA Hard Drives Configurations (Intel ICH7R) - 4 - CMOS Setup Utility-Copyright (C)...

Manual
Page 29
... . - 29 - The CMOS SETUP saves the configuration in the event that you to be used. When the power is recommended that BIOS needs to the CMOS SETUP screen. Status Page Setup Menu / Option Page Setup Menu Press F1 to its original settings. If you wish... operating system. @BIOS is displayed at the bottom of the motherboard. BIOS Setup When the power is turned on -line description of the highlighted setup function is a Windows-based utility that describes the appropriate keys to a new BIOS, either Gigabyte's Q-Flash or @BIOS utility can enter the BIOS setup screen by pressing...
... . - 29 - The CMOS SETUP saves the configuration in the event that you to be used. When the power is recommended that BIOS needs to the CMOS SETUP screen. Status Page Setup Menu / Option Page Setup Menu Press F1 to its original settings. If you wish... operating system. @BIOS is displayed at the bottom of the motherboard. BIOS Setup When the power is turned on -line description of the highlighted setup function is a Windows-based utility that describes the appropriate keys to a new BIOS, either Gigabyte's Q-Flash or @BIOS utility can enter the BIOS setup screen by pressing...

Manual
Page 32
... 1999 to Sat. Manual User can use one of three methods: Auto Allows BIOS to set the access mode for faster system start up. Hard drive information should be labeled on this option for GA-8I945G Pro. Enter the appropriate option based on the outside drive casing. Jan. IDE Device ...KLJI: Move Enter: Select +/-/PU/PD: Value F10: Save F3: Language1 F5: Previous Values F6: Fail-Safe Defaults ESC: Exit F1: General Help F7: Optimized Defaults Date The date format is display only The month, Jan. IDE Channel 0 Master, Slave IDE HDD Auto-Detection Press "Enter" to ...
... 1999 to Sat. Manual User can use one of three methods: Auto Allows BIOS to set the access mode for faster system start up. Hard drive information should be labeled on this option for GA-8I945G Pro. Enter the appropriate option based on the outside drive casing. Jan. IDE Device ...KLJI: Move Enter: Select +/-/PU/PD: Value F10: Save F3: Language1 F5: Previous Values F6: Fail-Safe Defaults ESC: Exit F1: General Help F7: Optimized Defaults Date The date format is display only The month, Jan. IDE Channel 0 Master, Slave IDE HDD Auto-Detection Press "Enter" to ...
Manual
Page 34
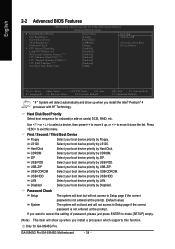
...USB-CDROM. USB-CDROM Select your boot device priority by Hard Disk. GA-8I945G Pro/GA-8I945G Motherboard - 34 - Disabled Select your boot device priority by ZIP. ... your boot device priority by USB-FDD. English 2-2 Advanced BIOS Features CMOS Setup Utility-Copyright (C) 1984-2005 Award Software Advanced BIOS Features ` Hard Disk Boot Priority First Boot Device Second Boot...F10: Save F3: Language1 F5: Previous Values F6: Fail-Safe Defaults ESC: Exit F1: General Help F7: Optimized Defaults " # " System will not access to Setup page if the correct password is not...
...USB-CDROM. USB-CDROM Select your boot device priority by Hard Disk. GA-8I945G Pro/GA-8I945G Motherboard - 34 - Disabled Select your boot device priority by ZIP. ... your boot device priority by USB-FDD. English 2-2 Advanced BIOS Features CMOS Setup Utility-Copyright (C) 1984-2005 Award Software Advanced BIOS Features ` Hard Disk Boot Priority First Boot Device Second Boot...F10: Save F3: Language1 F5: Previous Values F6: Fail-Safe Defaults ESC: Exit F1: General Help F7: Optimized Defaults " # " System will not access to Setup page if the correct password is not...

Manual
Page 39
...F10: Save F3: Language1 F5: Previous Values F6: Fail-Safe Defaults ESC: Exit F1: General Help F7: Optimized Defaults ACPI Suspend Type S1(POS) Set ACPI suspend type to S1/POS(Power On Suspend).... mm: ss) Alarm : (0~23) : (0~59) : (0~59) Power On By Mouse Disabled Disabled this function. BIOS Setup Press power button 4 sec. Enter suspend if button is Enabled. If Resume by Alarm" item to enabled and key...left button to POWER ON system. Only for GA-8I945G Pro. - 39 - Disabled Disable this function. (Default value) Enabled Enable alarm function to power on the ...
...F10: Save F3: Language1 F5: Previous Values F6: Fail-Safe Defaults ESC: Exit F1: General Help F7: Optimized Defaults ACPI Suspend Type S1(POS) Set ACPI suspend type to S1/POS(Power On Suspend).... mm: ss) Alarm : (0~23) : (0~59) : (0~59) Power On By Mouse Disabled Disabled this function. BIOS Setup Press power button 4 sec. Enter suspend if button is Enabled. If Resume by Alarm" item to enabled and key...left button to POWER ON system. Only for GA-8I945G Pro. - 39 - Disabled Disable this function. (Default value) Enabled Enable alarm function to power on the ...

Manual
Page 41
Only for GA-8I945G Pro. - 41 - English 2-5 PnP/PCI Configurations CMOS Setup Utility-Copyright (C) 1984-2005 Award Software PnP/PCI Configurations PCI 1 ...Select +/-/PU/PD: Value F10: Save F3: Language1 F5: Previous Values F6: Fail-Safe Defaults ESC: Exit F1: General Help F7: Optimized Defaults PCI 1 IRQ Assignment Auto 3,4,5,7,9,10,11,12,14,15 PCI 2 IRQ Assignment Auto 3,4,5,7,9,10,11,12,14,15 Auto... assign IRQ to PCI 1. (Default value) Set IRQ 3,4,5,7,9,10,11,12,14,15 to PCI 2. BIOS Setup Auto assign IRQ to PCI 2. (Default value) Set IRQ 3,4,5,7,9,10,11,12,14,15 to PCI 1.
Only for GA-8I945G Pro. - 41 - English 2-5 PnP/PCI Configurations CMOS Setup Utility-Copyright (C) 1984-2005 Award Software PnP/PCI Configurations PCI 1 ...Select +/-/PU/PD: Value F10: Save F3: Language1 F5: Previous Values F6: Fail-Safe Defaults ESC: Exit F1: General Help F7: Optimized Defaults PCI 1 IRQ Assignment Auto 3,4,5,7,9,10,11,12,14,15 PCI 2 IRQ Assignment Auto 3,4,5,7,9,10,11,12,14,15 Auto... assign IRQ to PCI 1. (Default value) Set IRQ 3,4,5,7,9,10,11,12,14,15 to PCI 2. BIOS Setup Auto assign IRQ to PCI 2. (Default value) Set IRQ 3,4,5,7,9,10,11,12,14,15 to PCI 1.


