Manual
Page 2
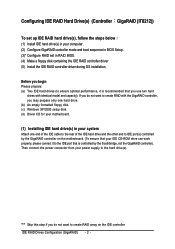
...computer. (2) Configure GigaRAID controller mode and boot sequence in BIOS Setup. (3)* Configure RAID set in your system Attach one hard drive. (b) An empty formatted floppy disk. (c) Windows XP/2000 setup disk. (d) Driver CD for your motherboard. (1) Installing IDE hard drive(s) in RAID BIOS. (4) Make a floppy disk containing the IDE RAID controller driver (5) Install the IDE RAID controller driver during OS installation. Before you begin Please prepare: (a) Two IDE hard drives (to create RAID array on the motherboard. (To ensure that your power supply to the IDE port that you...
...computer. (2) Configure GigaRAID controller mode and boot sequence in BIOS Setup. (3)* Configure RAID set in your system Attach one hard drive. (b) An empty formatted floppy disk. (c) Windows XP/2000 setup disk. (d) Driver CD for your motherboard. (1) Installing IDE hard drive(s) in RAID BIOS. (4) Make a floppy disk containing the IDE RAID controller driver (5) Install the IDE RAID controller driver during OS installation. Before you begin Please prepare: (a) Two IDE hard drives (to create RAID array on the motherboard. (To ensure that your power supply to the IDE port that you...
Manual
Page 4
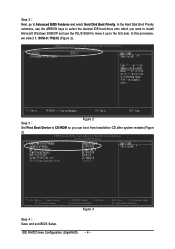
...-2004 Award Software Hard Disk Boot Priority Step 3 Figure 2 Set First Boot Device to CD-ROM so you want to install ¤¤ Microsoft Windows 2000/XP and use the ARROW keys to select the desired IDE hard drive onto which you can boot from Installation CD after system restarts.(Figure 3) CMOS Setup Utility-Copyright (C) 1984-2004 Award Software Advanced BIOS Features : Move Enter: Select F5: Previous Values +/-/PU/PD: Value F10: Save F6: Fail-Safe Defaults...
...-2004 Award Software Hard Disk Boot Priority Step 3 Figure 2 Set First Boot Device to CD-ROM so you want to install ¤¤ Microsoft Windows 2000/XP and use the ARROW keys to select the desired IDE hard drive onto which you can boot from Installation CD after system restarts.(Figure 3) CMOS Setup Utility-Copyright (C) 1984-2004 Award Software Advanced BIOS Features : Move Enter: Select F5: Previous Values +/-/PU/PD: Value F10: Save F6: Fail-Safe Defaults...
Manual
Page 14
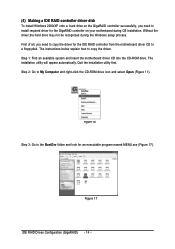
... the IDE RAID controller from the motherboard driver CD to a floppydisk. Step 2: Go to copy the driver. Ác (4) Making a IDE RAID controller driver disk Åé To install Windows 2000/XP onto a hard drive on the GigaRAID controller successfully, you need to install required driver for the GigaRAID controller on your motherboard during the Windows setup process. ¤å First of all, you need to copy the driver for an executable program named MENU...
... the IDE RAID controller from the motherboard driver CD to a floppydisk. Step 2: Go to copy the driver. Ác (4) Making a IDE RAID controller driver disk Åé To install Windows 2000/XP onto a hard drive on the GigaRAID controller successfully, you need to install required driver for the GigaRAID controller on your motherboard during the Windows setup process. ¤å First of all, you need to copy the driver for an executable program named MENU...
Manual
Page 6
... support IDE drivers ranging from the traditional software RAID system. It can use ATA/133 drive and RAID function to the highest speed of system's stability. It includes one RAID Chip combining CPU, firmware, advanced PCI controller and IDE controller. It is in high CPU operation or PCI traffic, users won't have any compatibility issue. Similarly, it can support the RAID0 (striping), RAID1 (mirroring), RAID0+1 (striping and mirroring) or JBOD (spanning) mode. v2.2. Thus, users...
... support IDE drivers ranging from the traditional software RAID system. It can use ATA/133 drive and RAID function to the highest speed of system's stability. It includes one RAID Chip combining CPU, firmware, advanced PCI controller and IDE controller. It is in high CPU operation or PCI traffic, users won't have any compatibility issue. Similarly, it can support the RAID0 (striping), RAID1 (mirroring), RAID0+1 (striping and mirroring) or JBOD (spanning) mode. v2.2. Thus, users...
Manual
Page 8
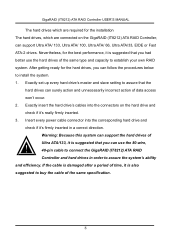
... RAID system. Exactly insert the hard drive's cables into the corresponding hard drive and check if it 's really firmly inserted. 3. Insert every power cable connector into the connectors on the GigaRAID (IT8212) ATA RAID Controller, can follow the procedures below to install the system. 1. Ultra ATA/133, it is suggested that you had better use the 80-wire, 40-pin cable to connect the GigaRAID (IT8212) ATA RAID Controller and hard drives...
... RAID system. Exactly insert the hard drive's cables into the corresponding hard drive and check if it 's really firmly inserted. 3. Insert every power cable connector into the connectors on the GigaRAID (IT8212) ATA RAID Controller, can follow the procedures below to install the system. 1. Ultra ATA/133, it is suggested that you had better use the 80-wire, 40-pin cable to connect the GigaRAID (IT8212) ATA RAID Controller and hard drives...
Manual
Page 38
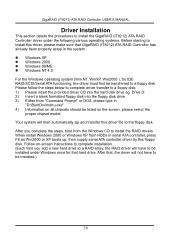
... boots up, then supply serial ATA controller driver by this driver file to the floppy disk. Drive D: 2) Insert a blank formatted floppy disk into the hard disk drive eg. Follow on the screen, please select the proper chipset model. Windows XP Windows 2000 Windows 98/ME Windows NT 4.0 For the Windows operating system (Win NT, WinXP, Win2000 ), for that GigaRAID (IT8212) ATA RAID Controller has already been properly setup in "D:\BootDrv\menu.exe" 4) Information on all chipsets should be listed on -screen instructions...
... boots up, then supply serial ATA controller driver by this driver file to the floppy disk. Drive D: 2) Insert a blank formatted floppy disk into the hard disk drive eg. Follow on the screen, please select the proper chipset model. Windows XP Windows 2000 Windows 98/ME Windows NT 4.0 For the Windows operating system (Win NT, WinXP, Win2000 ), for that GigaRAID (IT8212) ATA RAID Controller has already been properly setup in "D:\BootDrv\menu.exe" 4) Information on all chipsets should be listed on -screen instructions...

Manual
Page 39
...) ATA RAID Controller Driver diskette into the floppy disk drive then press the key to continue. 6. Boot from floppy with Windows installation diskette. GigaRAID (IT8212) ATA RAID Controller (Windows 2000/XP) should be contained on the window then press the key to continue. 5. Boot from floppy with un-installable diskette. Select GigaRAID (IT8212) ATA RAID Controller (Windows 2000/XP) from CD-ROM with Windows installation CD. 2. The installation will be different. Follow the instruction of the ! Start Windows XP installation...
...) ATA RAID Controller Driver diskette into the floppy disk drive then press the key to continue. 6. Boot from floppy with Windows installation diskette. GigaRAID (IT8212) ATA RAID Controller (Windows 2000/XP) should be contained on the window then press the key to continue. 5. Boot from floppy with un-installable diskette. Select GigaRAID (IT8212) ATA RAID Controller (Windows 2000/XP) from CD-ROM with Windows installation CD. 2. The installation will be different. Follow the instruction of the ! Start Windows XP installation...

Manual
Page 45
... floppy with un-installable diskette. Boot from floppy with Windows installation CD. 2. Press the key to continue. 6. Boot from CD-ROM with Windows installation diskette. The devices that are going to continue. 5. GigaRAID (IT8212) ATA RAID Controller USER'S MANUAL Windows 2000 Install the driver during Windows 2000 installation 1. Follow the instruction of the installation program to insert the GigaRAID (IT8212) ATA RAID Controller Driver diskette into the floppy disk drive then press the key to be installed will be listed on the window...
... floppy with un-installable diskette. Boot from floppy with Windows installation CD. 2. Press the key to continue. 6. Boot from CD-ROM with Windows installation diskette. The devices that are going to continue. 5. GigaRAID (IT8212) ATA RAID Controller USER'S MANUAL Windows 2000 Install the driver during Windows 2000 installation 1. Follow the instruction of the installation program to insert the GigaRAID (IT8212) ATA RAID Controller Driver diskette into the floppy disk drive then press the key to be installed will be listed on the window...
Manual
Page 9
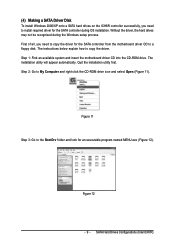
... a floppy disk. Figure 12 - 9 - SATA Hard Drives Configurations (Intel ICH7R) (4) Making a SATA Driver Disk To install Windows 2000/XP onto a SATA hard drives on the ICH6R controller successfully, you need to install required driver for the SATA controller during the Windows setup process. First of all, you need to copy the driver for an executable program named MENU.exe (Figure 12). Step 1: Find an available system and insert the motherboard driver CD into the CD-ROM drive...
... a floppy disk. Figure 12 - 9 - SATA Hard Drives Configurations (Intel ICH7R) (4) Making a SATA Driver Disk To install Windows 2000/XP onto a SATA hard drives on the ICH6R controller successfully, you need to install required driver for the SATA controller during the Windows setup process. First of all, you need to copy the driver for an executable program named MENU.exe (Figure 12). Step 1: Find an available system and insert the motherboard driver CD into the CD-ROM drive...
Manual
Page 11
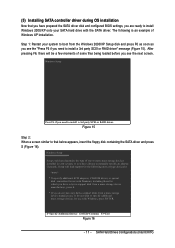
... or RAID driver" message (Figure 15). Windows Setup Setup could not determine the type of some files being loaded before you see the "Press F6 if you need to manually specify an adapter. Windows Setup Press F6 if you need to specify additional mass storage devices for use with Windows, including those for use with the SATA driver. (5) Installing SATA controller driver during OS installation Now that you have prepared the SATA driver disk and configured BIOS settings, you...
... or RAID driver" message (Figure 15). Windows Setup Setup could not determine the type of some files being loaded before you see the "Press F6 if you need to manually specify an adapter. Windows Setup Press F6 if you need to specify additional mass storage devices for use with Windows, including those for use with the SATA driver. (5) Installing SATA controller driver during OS installation Now that you have prepared the SATA driver disk and configured BIOS settings, you...
Manual
Page 11
...; Supports ATAPI mode for HDD Š Supports IDE bus master operation Š Supports ATA133/RAID mode switch by BIOS Š Displays status and error checking messages during boot-up Š Mirroring supports automatic background rebuilds Š Features LBA and Extended Interrupt 13 drive translation in controller onboard BIOS Š IT8712 Š System voltage detection Š CPU temperature detection Š CPU / System / Power fan speed detection Š CPU warning temperature Š CPU / System / Power fan failure warning Š CPU smart fan control Š Use of licensed AWARD BIOS...
...; Supports ATAPI mode for HDD Š Supports IDE bus master operation Š Supports ATA133/RAID mode switch by BIOS Š Displays status and error checking messages during boot-up Š Mirroring supports automatic background rebuilds Š Features LBA and Extended Interrupt 13 drive translation in controller onboard BIOS Š IT8712 Š System voltage detection Š CPU temperature detection Š CPU / System / Power fan speed detection Š CPU warning temperature Š CPU / System / Power fan failure warning Š CPU smart fan control Š Use of licensed AWARD BIOS...

Manual
Page 22
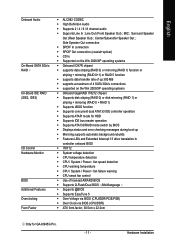
... install the proper driver in order to support HD Audio. For optional front panel audio module, please contact your chassis manufacturer. 1 2 HD Audio: Pin No. 1 2 3 4 5 6 7 8 9 10 9 10 Definition MIC2_L GND MIC2_R -ACZ_DET Line2_R FSENSE1 FAUDIO_JD No Pin LINE2_L FSENSE2 AC'97 Audio: Pin No. GA-8I945G Pro/GA-8I945G Motherboard - 22 - Definition 1 MIC 2 GND 3 MIC Power 4 NC 5 Line Out (R) 6 NC 7 NC 8 No Pin 9 Line Out (L) 10 NC By default, the audio driver is configured to work...
... install the proper driver in order to support HD Audio. For optional front panel audio module, please contact your chassis manufacturer. 1 2 HD Audio: Pin No. 1 2 3 4 5 6 7 8 9 10 9 10 Definition MIC2_L GND MIC2_R -ACZ_DET Line2_R FSENSE1 FAUDIO_JD No Pin LINE2_L FSENSE2 AC'97 Audio: Pin No. GA-8I945G Pro/GA-8I945G Motherboard - 22 - Definition 1 MIC 2 GND 3 MIC Power 4 NC 5 Line Out (R) 6 NC 7 NC 8 No Pin 9 Line Out (L) 10 NC By default, the audio driver is configured to work...

Manual
Page 32
... Help Menu Level` ` IDE Channel 0 Master ` IDE Channel 0 Slave [None] [None] Change the day, month, year Drive A Drive B Floppy 3 Mode Suport Halt On Base Memory Extended Memory Total Memory [1.44M, 3.5"] [None] [Disabled] [All, But Keyboard] 640K 511M 512M Sun. The four options are used and the system will skip the automatic detection step and allow for automatic device detection. to set the access mode for GA-8I945G Pro. You can manually input the correct settings Access Mode Use this...
... Help Menu Level` ` IDE Channel 0 Master ` IDE Channel 0 Slave [None] [None] Change the day, month, year Drive A Drive B Floppy 3 Mode Suport Halt On Base Memory Extended Memory Total Memory [1.44M, 3.5"] [None] [Disabled] [All, But Keyboard] 640K 511M 512M Sun. The four options are used and the system will skip the automatic detection step and allow for automatic device detection. to set the access mode for GA-8I945G Pro. You can manually input the correct settings Access Mode Use this...
Manual
Page 55
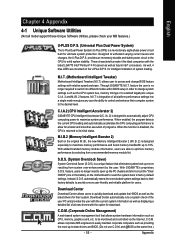
... up the PC chassis and short-circuit the "Clear CMOS" pins or the battery on the U-Plus D.P.S. When enabled, the program detects the current CPU loading and automatically accelerates the CPU computing performance to provide a more user-friendly and reliable platform for a faster and smoother execution of all new drivers with relative speed and ease. With GIGABYTE's proprietary S.O.S. Instead, S.O.S. automatically resets the overclocked system settings back to...
... up the PC chassis and short-circuit the "Clear CMOS" pins or the battery on the U-Plus D.P.S. When enabled, the program detects the current CPU loading and automatically accelerates the CPU computing performance to provide a more user-friendly and reliable platform for a faster and smoother execution of all new drivers with relative speed and ease. With GIGABYTE's proprietary S.O.S. Instead, S.O.S. automatically resets the overclocked system settings back to...
Manual
Page 57
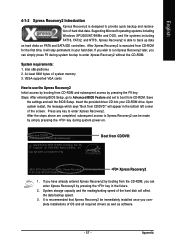
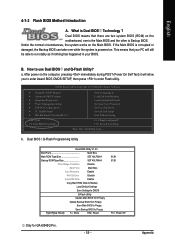
... entering BIOS Setup, go to Advanced BIOS Feature and set to boot from CD/DVD: Press any key to back up data on hard disks on . . . Appendix Boot from CD-ROM. Upon system restart, the message which says "Boot from CD-ROM for 8I945G Pro F9a . . . . :BIOS Setup/Q-Flash, : Xpress Recovery2, For Boot Menu 11/07/2005-I945-6A79HG0GC-00 Xpress Recovery2 1. VESA-supported VGA cards How to use the Xpress Recovery2 Initial access by booting from...
... entering BIOS Setup, go to Advanced BIOS Feature and set to boot from CD/DVD: Press any key to back up data on hard disks on . . . Appendix Boot from CD-ROM. Upon system restart, the message which says "Boot from CD-ROM for 8I945G Pro F9a . . . . :BIOS Setup/Q-Flash, : Xpress Recovery2, For Boot Menu 11/07/2005-I945-6A79HG0GC-00 Xpress Recovery2 1. VESA-supported VGA cards How to use the Xpress Recovery2 Initial access by booting from...
Manual
Page 59
... ROM Type/Size SST 49LF004A Wide Range Protection Disable Boot From Main Bios Auto Recovery Enable Halt On Error Disable Keep DMI Data Enable Copy Main ROM Data to Backup Load Default Settings Save Settings to CMOS Q-Flash Utility Update Main BIOS from Floppy Update Backup BIOS from Floppy Save Main BIOS to Floppy Save Backup BIOS to use Dual BIOS and Q-Flash Utility? After power on the motherboard, one is the Main BIOS and the other is Backup BIOS. How to Floppy PgDn/PgUp: Modify : Move ESC: Reset 512K 512K F10: Power Off Only for GA-8I945G Pro...
... ROM Type/Size SST 49LF004A Wide Range Protection Disable Boot From Main Bios Auto Recovery Enable Halt On Error Disable Keep DMI Data Enable Copy Main ROM Data to Backup Load Default Settings Save Settings to CMOS Q-Flash Utility Update Main BIOS from Floppy Update Backup BIOS from Floppy Save Main BIOS to Floppy Save Backup BIOS to use Dual BIOS and Q-Flash Utility? After power on the motherboard, one is the Main BIOS and the other is Backup BIOS. How to Floppy PgDn/PgUp: Modify : Move ESC: Reset 512K 512K F10: Power Off Only for GA-8I945G Pro...
Manual
Page 62
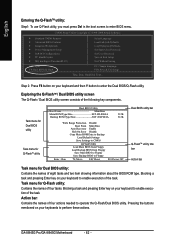
...BIOS/Q-Flash Select Language Load Fail-Safe Defaults Load Optimized Defaults Set Supervisor Password Set User Password Save & Exit Setup Exit Without Saving F3: Change Language F10: Save & Exit Setup Time, Date, Hard Disk Type... Blocking a task and pressing Enter key on your keyboard to operate the Q-Flash/Dual BIOS utility. Blocking a task and pressing Enter key on your keyboard to perform these actions. Exploring the Q-FlashTM / Dual BIOS utility screen The Q-Flash / Dual BIOS utility screen consists of the task. Pressing the buttons mentioned on your keyboards to enable...
...BIOS/Q-Flash Select Language Load Fail-Safe Defaults Load Optimized Defaults Set Supervisor Password Set User Password Save & Exit Setup Exit Without Saving F3: Change Language F10: Save & Exit Setup Time, Date, Hard Disk Type... Blocking a task and pressing Enter key on your keyboard to operate the Q-Flash/Dual BIOS utility. Blocking a task and pressing Enter key on your keyboard to perform these actions. Exploring the Q-FlashTM / Dual BIOS utility screen The Q-Flash / Dual BIOS utility screen consists of the task. Pressing the buttons mentioned on your keyboards to enable...

Manual
Page 68
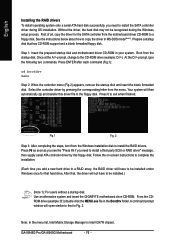
... steps: I. GA-8I945G Pro/GA-8I945G Motherboard - 68 - The @BIOS Utility Click " " Click "Update New BIOS" Fig 4. Select the desired @BIOS server 1. Do not click "Internet Update" icon b. Fig 1. Installing the @BIOS utility Fig 2. II. e. Select @BIOSTM sever d. Select the exact model name on your motherboard e. Please search for BIOS unzip file, downloading from internet or any other methods (such as: 8I945G Pro.F2d). Complete update process following the instruction. Click "Internet Update" icon b. System...
... steps: I. GA-8I945G Pro/GA-8I945G Motherboard - 68 - The @BIOS Utility Click " " Click "Update New BIOS" Fig 4. Select the desired @BIOS server 1. Do not click "Internet Update" icon b. Fig 1. Installing the @BIOS utility Fig 2. II. e. Select @BIOSTM sever d. Select the exact model name on your motherboard e. Please search for BIOS unzip file, downloading from internet or any other methods (such as: 8I945G Pro.F2d). Complete update process following the instruction. Click "Internet Update" icon b. System...
Manual
Page 76
... floppy disk. Your system will have to be recognized during OS installation. GA-8I945G Pro/GA-8I945G Motherboard - 76 - Press ENTER after each command (Fig.1): cd bootdrv menu Step 2: When the controller menu (Fig.2) appears, remove the startup disk and insert the blank formatted disk. Once at the A:\> prompt, change to the CD-ROM drive (example: D:\>). Use an alternative system and insert the GIGABYTE motherboard drive CD-ROM. English Installing the RAID drivers To install operating system onto a serial...
... floppy disk. Your system will have to be recognized during OS installation. GA-8I945G Pro/GA-8I945G Motherboard - 76 - Press ENTER after each command (Fig.1): cd bootdrv menu Step 2: When the controller menu (Fig.2) appears, remove the startup disk and insert the blank formatted disk. Once at the A:\> prompt, change to the CD-ROM drive (example: D:\>). Use an alternative system and insert the GIGABYTE motherboard drive CD-ROM. English Installing the RAID drivers To install operating system onto a serial...

Manual
Page 81
... memory bad AWARD BIOS Beep Codes 1 short: System boots successfully 2 short: CMOS setting error 1 long 1 short: DRAM or M/B error 1 long 2 short: Monitor or display card error 1 long 3 short: Keyboard error 1 long 9 short: BIOS ROM error Continuous long beeps: DRAM error Continuous short beeps: Power error - 81 - Answer: The beep codes below : Steps: 1. Appendix To check general asked questions. Connect power cord to enter BIOS and load Fail-Safe Defaults(or load Optimized Defaults). 7. If not, please change another speaker with an internal amplifier. Answer: In some options...
... memory bad AWARD BIOS Beep Codes 1 short: System boots successfully 2 short: CMOS setting error 1 long 1 short: DRAM or M/B error 1 long 2 short: Monitor or display card error 1 long 3 short: Keyboard error 1 long 9 short: BIOS ROM error Continuous long beeps: DRAM error Continuous short beeps: Power error - 81 - Answer: The beep codes below : Steps: 1. Appendix To check general asked questions. Connect power cord to enter BIOS and load Fail-Safe Defaults(or load Optimized Defaults). 7. If not, please change another speaker with an internal amplifier. Answer: In some options...


