Manual
Page 1
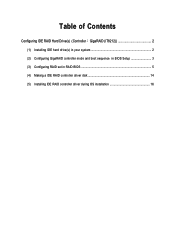
Table of Contents Configuring IDE RAID Hard Drive(s) (Controller GigaRAID (IT8212 2 (1) Installing IDE hard drive(s) in your system 2 (2) Configuring GigaRAID controller mode and boot sequence in BIOS Setup 3 (3) Configuring RAID set in RAID BIOS 5 (4) Making a IDE RAID controller driver disk 14 (5) Installing IDE RAID controller driver during OS installation 16
Table of Contents Configuring IDE RAID Hard Drive(s) (Controller GigaRAID (IT8212 2 (1) Installing IDE hard drive(s) in your system 2 (2) Configuring GigaRAID controller mode and boot sequence in BIOS Setup 3 (3) Configuring RAID set in RAID BIOS 5 (4) Making a IDE RAID controller driver disk 14 (5) Installing IDE RAID controller driver during OS installation 16
Manual
Page 2
... An empty formatted floppy disk. (c) Windows XP/2000 setup disk. (d) Driver CD for your motherboard. (1) Installing IDE hard drive(s) in RAID BIOS. (4) Make a floppy disk containing the IDE RAID controller driver (5) Install the IDE RAID controller driver during OS installation. Before you begin Please prepare...supply to the hard drive(s). Then connect the power connector from your computer. (2) Configure GigaRAID controller mode and boot sequence in BIOS Setup. (3)* Configure RAID set in your IDE CD-ROM drive can work properly, please connect it is controlled by the GigaRAID...
... An empty formatted floppy disk. (c) Windows XP/2000 setup disk. (d) Driver CD for your motherboard. (1) Installing IDE hard drive(s) in RAID BIOS. (4) Make a floppy disk containing the IDE RAID controller driver (5) Install the IDE RAID controller driver during OS installation. Before you begin Please prepare...supply to the hard drive(s). Then connect the power connector from your computer. (2) Configure GigaRAID controller mode and boot sequence in BIOS Setup. (3)* Configure RAID set in your IDE CD-ROM drive can work properly, please connect it is controlled by the GigaRAID...
Manual
Page 3
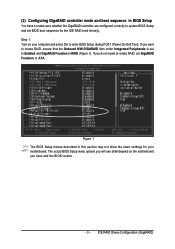
...want to create RAID, assure that the Onboard H/W GIGARAID item under Integrated Peripherals is set to Enabled and GigaRAID Function to enter BIOS Setup during POST (Power-On Self Test). IDE RAID Drives Configuration (GigaRAID) If you will see shall depend on your motherboard. The ...actual BIOS Setup menu options you want to create RAID, set BIOS boot sequence for your computer and press Del to RAID (Figure 1). CMOS Setup Utility-Copyright (C) 1984-2004 Award Software...
...want to create RAID, assure that the Onboard H/W GIGARAID item under Integrated Peripherals is set to Enabled and GigaRAID Function to enter BIOS Setup during POST (Power-On Self Test). IDE RAID Drives Configuration (GigaRAID) If you will see shall depend on your motherboard. The ...actual BIOS Setup menu options you want to create RAID, set BIOS boot sequence for your computer and press Del to RAID (Figure 1). CMOS Setup Utility-Copyright (C) 1984-2004 Award Software...
Manual
Page 4
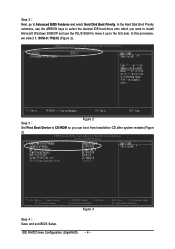
... desired IDE hard drive onto which you can boot from Installation CD after system restarts.(Figure 3) CMOS Setup Utility-Copyright (C) 1984-2004 Award Software Advanced BIOS Features : Move Enter: Select F5: Previous Values +/-/PU/PD: Value F10: Save F6: Fail-Safe Defaults Figure 3 ESC: Exit F1: General ...Help F7: Optimized Defaults Step 4 Save and exit BIOS Setup. Ác Step 2 Next, go to the first item. In the Hard Disk Boot Priority Åé submenu, use the PLUS SIGN to move...
... desired IDE hard drive onto which you can boot from Installation CD after system restarts.(Figure 3) CMOS Setup Utility-Copyright (C) 1984-2004 Award Software Advanced BIOS Features : Move Enter: Select F5: Previous Values +/-/PU/PD: Value F10: Save F6: Fail-Safe Defaults Figure 3 ESC: Exit F1: General ...Help F7: Optimized Defaults Step 4 Save and exit BIOS Setup. Ác Step 2 Next, go to the first item. In the Hard Disk Boot Priority Åé submenu, use the PLUS SIGN to move...
Manual
Page 5
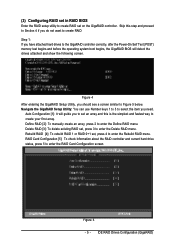
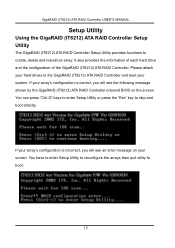
... drives to the GigaRAID controller correctly, after the Power-On Self Test (POST) memory test begins and before the operating system boot begins, the GigaRAID BIOS will guide you to set , press 3 to enter the Delete RAID menu. Define RAID [2]: To manually create an array, press 2 to enter ...the RAID Card Configuration screen. (3) Configuring RAID set in RAID BIOS Enter the RAID setup utility to create RAID set , press 4 to enter the Rebuild RAID menu. Figure 4 After entering the GigaRAID Setup Utility, you...
... drives to the GigaRAID controller correctly, after the Power-On Self Test (POST) memory test begins and before the operating system boot begins, the GigaRAID BIOS will guide you to set , press 3 to enter the Delete RAID menu. Define RAID [2]: To manually create an array, press 2 to enter ...the RAID Card Configuration screen. (3) Configuring RAID set in RAID BIOS Enter the RAID setup utility to create RAID set , press 4 to enter the Rebuild RAID menu. Figure 4 After entering the GigaRAID Setup Utility, you...
Manual
Page 16
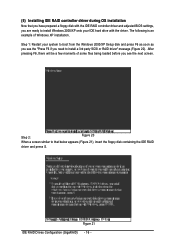
... drive with the driver. Step 2: Figure 20 When a screen similar to that you have prepared a floppy disk with the IDE RAID controller driver and adjusted BIOS settings, you need to install a 3rd party SCSI or RAID driver" message (Figure 20). Figure 21 IDE RAID Drives Configuration (GigaRAID) - 16 - The following is...
... drive with the driver. Step 2: Figure 20 When a screen similar to that you have prepared a floppy disk with the IDE RAID controller driver and adjusted BIOS settings, you need to install a 3rd party SCSI or RAID driver" message (Figure 20). Figure 21 IDE RAID Drives Configuration (GigaRAID) - 16 - The following is...
Manual
Page 9
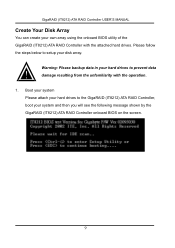
... GigaRAID (IT8212) ATA RAID Controller, boot your system and then you will see the following message shown by the GigaRAID (IT8212) ATA RAID Controller onboard BIOS on the screen. 9 Warning: Please backup data in your hard drives to prevent data ! damage resulting from the unfamiliarity with the attached hard drives. GigaRAID... (IT8212) ATA RAID Controller USER'S MANUAL Create Your Disk Array You can create your own array using the onboard BIOS utility of the GigaRAID (IT8212) ATA RAID Controller with the operation. 1.
... GigaRAID (IT8212) ATA RAID Controller, boot your system and then you will see the following message shown by the GigaRAID (IT8212) ATA RAID Controller onboard BIOS on the screen. 9 Warning: Please backup data in your hard drives to prevent data ! damage resulting from the unfamiliarity with the attached hard drives. GigaRAID... (IT8212) ATA RAID Controller USER'S MANUAL Create Your Disk Array You can create your own array using the onboard BIOS utility of the GigaRAID (IT8212) ATA RAID Controller with the operation. 1.

Manual
Page 10
The screen below will be shown. 10 GigaRAID (IT8212) ATA RAID Controller USER'S MANUAL Please press "Ctrl-G" keys to enter the BIOS utility Main Menu.
The screen below will be shown. 10 GigaRAID (IT8212) ATA RAID Controller USER'S MANUAL Please press "Ctrl-G" keys to enter the BIOS utility Main Menu.
Manual
Page 14
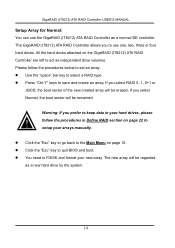
... by the system. 14 Click the "Esc" key to save and create an array. The new array will be remained. Press "Ctrl-Y" keys to quit BIOS and boot. You need to FDISK and format your arrays manually. Click the "Esc" key to go back to the Main Menu on the GigaRAID...
... by the system. 14 Click the "Esc" key to save and create an array. The new array will be remained. Press "Ctrl-Y" keys to quit BIOS and boot. You need to FDISK and format your arrays manually. Click the "Esc" key to go back to the Main Menu on the GigaRAID...
Manual
Page 15
... skip and boot directly. If your array's configuration is incorrect, you will see the following message shown by the GigaRAID (IT8212) ATA RAID Controller onboard BIOS on your system. You can press "Ctrl-G" keys to enter Setup Utility or press the "Esc" key to the GigaRAID (IT8212) ATA RAID Controller and...
... skip and boot directly. If your array's configuration is incorrect, you will see the following message shown by the GigaRAID (IT8212) ATA RAID Controller onboard BIOS on your system. You can press "Ctrl-G" keys to enter Setup Utility or press the "Esc" key to the GigaRAID (IT8212) ATA RAID Controller and...
Manual
Page 88
... right away? A: For two RAID0, it is suggested that HD should be used? Q: How to get a better performance. 4. Q: For R0+1, when two HDs in the BIOS. 2. A: Please set booting device to some HDs. GigaRAID (IT8212) ATA RAID Controller USER'S MANUAL Q&A 1.
... right away? A: For two RAID0, it is suggested that HD should be used? Q: How to get a better performance. 4. Q: For R0+1, when two HDs in the BIOS. 2. A: Please set booting device to some HDs. GigaRAID (IT8212) ATA RAID Controller USER'S MANUAL Q&A 1.

Manual
Page 1
Table of Contents Configuring SATA Hard Drive(s) (Controller: Intel ICH7R 2 (1) Installing SATA hard drive(s) in your computer 2 (2) Configuring SATA controller mode and boot sequence in BIOS Setup 3 (3) Configuring RAID set in RAID BIOS 5 (4) Making a SATA Driver Disk ...9 (5) Installing SATA controller driver during OS installation 11
Table of Contents Configuring SATA Hard Drive(s) (Controller: Intel ICH7R 2 (1) Installing SATA hard drive(s) in your computer 2 (2) Configuring SATA controller mode and boot sequence in BIOS Setup 3 (3) Configuring RAID set in RAID BIOS 5 (4) Making a SATA Driver Disk ...9 (5) Installing SATA controller driver during OS installation 11
Manual
Page 2
.... (b) An empty formatted floppy disk. (c) Windows XP/2000 setup disk. (d) Driver CD for your motherboard. (1) Installing SATA hard drive(s) in RAID BIOS. (4) Make a floppy disk containing the SATA controller driver. (5) Install the SATA controller driver during OS installation. Then connect the power connector from your...follow the steps below: ¤å (1) Install SATA hard drive(s) in your system. (2) Configure SATA controller mode and boot sequence in BIOS Setup. (3)* Configure RAID set in your computer Attach one end of the SATA signal cable to the rear of the SATA hard drive and...
.... (b) An empty formatted floppy disk. (c) Windows XP/2000 setup disk. (d) Driver CD for your motherboard. (1) Installing SATA hard drive(s) in RAID BIOS. (4) Make a floppy disk containing the SATA controller driver. (5) Install the SATA controller driver during OS installation. Then connect the power connector from your...follow the steps below: ¤å (1) Install SATA hard drive(s) in your system. (2) Configure SATA controller mode and boot sequence in BIOS Setup. (3)* Configure RAID set in your computer Attach one end of the SATA signal cable to the rear of the SATA hard drive and...
Manual
Page 3
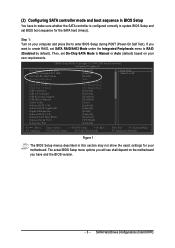
... options you will see shall depend on the motherboard you want to create RAID, set BIOS boot sequence for your own requirements. (2) Configuring SATA controller mode and boot sequence in BIOS Setup You have and the BIOS version. - 3 - Then, set On-Chip SATA Mode to RAID (Disabled by default... F10: Save F5: Previous Values F6: Fail-Safe Defaults ESC: Exit F1: General Help F7: Optimized Defaults Figure 1 The BIOS Setup menus described in system BIOS Setup and set SATA RAID/AHCI Mode under the Integrated Peripherals menu to Manual or Auto (default) based on your computer and ...
... options you will see shall depend on the motherboard you want to create RAID, set BIOS boot sequence for your own requirements. (2) Configuring SATA controller mode and boot sequence in BIOS Setup You have and the BIOS version. - 3 - Then, set On-Chip SATA Mode to RAID (Disabled by default... F10: Save F5: Previous Values F6: Fail-Safe Defaults ESC: Exit F1: General Help F7: Optimized Defaults Figure 1 The BIOS Setup menus described in system BIOS Setup and set SATA RAID/AHCI Mode under the Integrated Peripherals menu to Manual or Auto (default) based on your computer and ...
Manual
Page 4
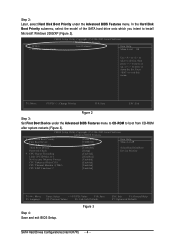
...it up, or to install ¤¤ Microsoft Windows 2000/XP (Figure 2). CMOS Setup Utility-Copyright (C) 1984-2005 Award Software Advanced BIOS Features ` Hard Disk Boot Priority First Boot Device Second Boot Device Third Boot Device Password Check # CPU Hyper-Threading Limit CPUID Max. KL...: Move PU/PD/+/-: Change Priority F10: Save ESC: Exit Figure 2 Step 3: Set First Boot Device under the Advanced BIOS Features menu. SCSI-0 : Hard Disk Boot Priority Intel Volume0 Item Help 2. Bootable Add-in Cards Menu Level `` Use or to select a device...
...it up, or to install ¤¤ Microsoft Windows 2000/XP (Figure 2). CMOS Setup Utility-Copyright (C) 1984-2005 Award Software Advanced BIOS Features ` Hard Disk Boot Priority First Boot Device Second Boot Device Third Boot Device Password Check # CPU Hyper-Threading Limit CPUID Max. KL...: Move PU/PD/+/-: Change Priority F10: Save ESC: Exit Figure 2 Step 3: Set First Boot Device under the Advanced BIOS Features menu. SCSI-0 : Hard Disk Boot Priority Intel Volume0 Item Help 2. Bootable Add-in Cards Menu Level `` Use or to select a device...
Manual
Page 5
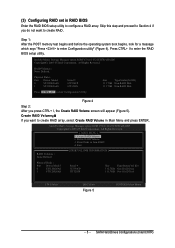
...]-Select Menu - 5 - Skip this step and proceed to Section 4 if you do not want to create RAID array, select Create RAID Volume in RAID BIOS Enter the RAID BIOS setup utility to configure a RAID array. Create RAID Volume¡G If you press CTRL+ I to create RAID. All Rights Reversed. Delete RAID Volume... ID) 111.7GB Non-RAID Disk 111.7GB Non-RAID Disk Press to enter Configuration Utility Figure 4 Step 2: After you want to enter the RAID BIOS setup utility.
...]-Select Menu - 5 - Skip this step and proceed to Section 4 if you do not want to create RAID array, select Create RAID Volume in RAID BIOS Enter the RAID BIOS setup utility to configure a RAID array. Create RAID Volume¡G If you press CTRL+ I to create RAID. All Rights Reversed. Delete RAID Volume... ID) 111.7GB Non-RAID Disk 111.7GB Non-RAID Disk Press to enter Configuration Utility Figure 4 Step 2: After you want to enter the RAID BIOS setup utility.

Manual
Page 8
... Size Type/Status(Vol ID) 111.8GB Member Disk(0) 111.8GB Member Disk(0) [KL]-Select [ESC]-Exit [ENTER]-Select Menu To exit the ICH7R RAID BIOS utility, press ESC in the DISK/ VOLUME INFORMATION section, including RAID mode, disk block size, disk name, and disk capacity, etc. Reset Disks to the...
... Size Type/Status(Vol ID) 111.8GB Member Disk(0) 111.8GB Member Disk(0) [KL]-Select [ESC]-Exit [ENTER]-Select Menu To exit the ICH7R RAID BIOS utility, press ESC in the DISK/ VOLUME INFORMATION section, including RAID mode, disk block size, disk name, and disk capacity, etc. Reset Disks to the...
Manual
Page 11
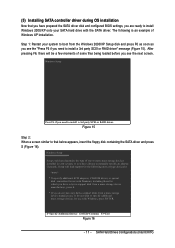
... following is an example of one or more mass storage devices installed in your system, or you have prepared the SATA driver disk and configured BIOS settings, you are ready to install Windows 2000/XP onto your system to boot from a mass storage device manufacturer, or do not want to specify...
... following is an example of one or more mass storage devices installed in your system, or you have prepared the SATA driver disk and configured BIOS settings, you are ready to install Windows 2000/XP onto your system to boot from a mass storage device manufacturer, or do not want to specify...

Manual
Page 4
Table of Contents GA-8I945G Pro Motherboard Layout 6 GA-8I945G Motherboard Layout 7 Block Diagram ...8 Chapter 1 Hardware Installation 9 1-1 Considerations Prior to Installation 9 1-2 Feature Summary 10 1-3 Installation of the ...14 1-6 Installation of Expansion Cards 16 1-7 I/O Back Panel Introduction 17 1-8 Connectors Introduction 18 Chapter 2 BIOS Setup 29 The Main Menu (For example: BIOS Ver. : GA-8I945G Pro F2d 30 2-1 Standard CMOS Features 32 2-2 Advanced BIOS Features 34 2-3 IntegratedPeripherals 36 2-4 Power Management Setup 39 2-5 PnP/PCI Configurations 41 2-6 PC Health ...
Table of Contents GA-8I945G Pro Motherboard Layout 6 GA-8I945G Motherboard Layout 7 Block Diagram ...8 Chapter 1 Hardware Installation 9 1-1 Considerations Prior to Installation 9 1-2 Feature Summary 10 1-3 Installation of the ...14 1-6 Installation of Expansion Cards 16 1-7 I/O Back Panel Introduction 17 1-8 Connectors Introduction 18 Chapter 2 BIOS Setup 29 The Main Menu (For example: BIOS Ver. : GA-8I945G Pro F2d 30 2-1 Standard CMOS Features 32 2-2 Advanced BIOS Features 34 2-3 IntegratedPeripherals 36 2-4 Power Management Setup 39 2-5 PnP/PCI Configurations 41 2-6 PC Health ...
Manual
Page 5
Chapter 3 Install Drivers 51 3-1 Install Chipset Drivers 51 3-2 SoftwareApplications 52 3-3 Driver CD Information 52 3-4 Hardware Information 53 3-5 Contact Us ...53 Chapter 4 Appendix 55 4-1 Unique Software Utilities 55 4-1-1 EasyTune 5 Introduction 56 4-1-2 Xpress Recovery2 Introduction 57 4-1-3 Flash BIOS Method Introduction 59 4-1-4 Serial ATA BIOS Setting Utility Introduction 70 4-1-5 2- / 4- / 6- / 8- Channel Audio Function Introduction 77 4-2 Troubleshooting 81 Only for GA-8I945G Pro. - 5 -
Chapter 3 Install Drivers 51 3-1 Install Chipset Drivers 51 3-2 SoftwareApplications 52 3-3 Driver CD Information 52 3-4 Hardware Information 53 3-5 Contact Us ...53 Chapter 4 Appendix 55 4-1 Unique Software Utilities 55 4-1-1 EasyTune 5 Introduction 56 4-1-2 Xpress Recovery2 Introduction 57 4-1-3 Flash BIOS Method Introduction 59 4-1-4 Serial ATA BIOS Setting Utility Introduction 70 4-1-5 2- / 4- / 6- / 8- Channel Audio Function Introduction 77 4-2 Troubleshooting 81 Only for GA-8I945G Pro. - 5 -


