
Manual
Page 4
...Contents Box Contents...6 Optional Items...6 GA-770T-D3L Motherboard Layout 7 GA-770T-D3L Motherboard Block Diagram 8 Chapter 1 Hardware Installation 9 1-1 Installation Precautions 9 1-2 Product Specifications 10 1-3 Installing the CPU and CPU Cooler 13 1-3-1 Installing the CPU 13 1-3-2 Installing the CPU Cooler 15 1-4 Installing the Memory 16 1-4-1 Dual Channel Memory Configuration 16 1-4-2 Installing a Memory 17 1-5 Installing an Expansion Card 18 1-6 Back Panel Connectors 19 1-7 Internal Connectors 21 Chapter 2 BIOS Setup 31 2-1 Startup Screen 32 2-2 The Main Menu 33 2-3 MB...
...Contents Box Contents...6 Optional Items...6 GA-770T-D3L Motherboard Layout 7 GA-770T-D3L Motherboard Block Diagram 8 Chapter 1 Hardware Installation 9 1-1 Installation Precautions 9 1-2 Product Specifications 10 1-3 Installing the CPU and CPU Cooler 13 1-3-1 Installing the CPU 13 1-3-2 Installing the CPU Cooler 15 1-4 Installing the Memory 16 1-4-1 Dual Channel Memory Configuration 16 1-4-2 Installing a Memory 17 1-5 Installing an Expansion Card 18 1-6 Back Panel Connectors 19 1-7 Internal Connectors 21 Chapter 2 BIOS Setup 31 2-1 Startup Screen 32 2-2 The Main Menu 33 2-3 MB...

Manual
Page 5
... Q-Flash Utility 62 4-2-2 Updating the BIOS with the @BIOS Utility 65 4-3 EasyTune 6...66 4-4 Easy Energy Saver 67 4-5 Q-Share...69 4-6 SMART Recovery 70 4-7 Auto Green...71 Chapter 5 Appendix...73 5-1 Configuring SATA Hard Drive(s 73 5-1-1 Configuring the Onboard SATA Controller 73 5-1-2 Making a SATA RAID/AHCI Driver Diskette 79 5-1-3 Installing the SATA RAID/AHCI Driver and Operating System 81 5-2 Configuring Audio Input and Output 85 5-2-1 Configuring 2/4/5.1/7.1-Channel Audio 85 5-2-2 Configuring S/PDIF In/Out 88 5-2-3 Configuring Microphone Recording 90 5-2-4 Using the Sound...
... Q-Flash Utility 62 4-2-2 Updating the BIOS with the @BIOS Utility 65 4-3 EasyTune 6...66 4-4 Easy Energy Saver 67 4-5 Q-Share...69 4-6 SMART Recovery 70 4-7 Auto Green...71 Chapter 5 Appendix...73 5-1 Configuring SATA Hard Drive(s 73 5-1-1 Configuring the Onboard SATA Controller 73 5-1-2 Making a SATA RAID/AHCI Driver Diskette 79 5-1-3 Installing the SATA RAID/AHCI Driver and Operating System 81 5-2 Configuring Audio Input and Output 85 5-2-1 Configuring 2/4/5.1/7.1-Channel Audio 85 5-2-2 Configuring S/PDIF In/Out 88 5-2-3 Configuring Microphone Recording 90 5-2-4 Using the Sound...
Manual
Page 8
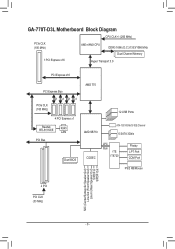
GA-770T-D3L Motherboard Block Diagram CPU CLK+/- (200 MHz) PCIe CLK (100 MHz) AM3+/AM3 CPU DDR3 1666 (O.C.)/1333/1066 MHz Dual Channel Memory 1 PCI Express x16 Hyper Transport 3.0 PCI Express x16 PCI Express Bus PCIe CLK (100 MHz) x1 x1 x1 x1 4 PCI Express x1 Realtek RTL8111D/E RJ45 LAN PCI Bus Dual BIOS AMD 770 12 USB Ports AMD SB710 ATA-133/100/66/33 IDE Channel 6 SATA 3Gb/s CODEC LPC Bus iTE IT8720 Floppy LPT Port COM Port PS/2 KB/Mouse 2 PCI PCI CLK (33 MHz) MIC...
GA-770T-D3L Motherboard Block Diagram CPU CLK+/- (200 MHz) PCIe CLK (100 MHz) AM3+/AM3 CPU DDR3 1666 (O.C.)/1333/1066 MHz Dual Channel Memory 1 PCI Express x16 Hyper Transport 3.0 PCI Express x16 PCI Express Bus PCIe CLK (100 MHz) x1 x1 x1 x1 4 PCI Express x1 Realtek RTL8111D/E RJ45 LAN PCI Bus Dual BIOS AMD 770 12 USB Ports AMD SB710 ATA-133/100/66/33 IDE Channel 6 SATA 3Gb/s CODEC LPC Bus iTE IT8720 Floppy LPT Port COM Port PS/2 KB/Mouse 2 PCI PCI CLK (33 MHz) MIC...
Manual
Page 10
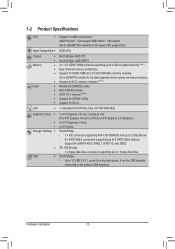
...- 1 x IDE connector supporting ATA-133/100/66/33 and up to 2 IDE devices - 6 x SATA 3Gb/s connectors supporting up to the internal USB headers) Hardware Installation - 10 - Up to 12 USB 2.0/1.1 ports (8 on the back panel, 4 via the USB brackets connected to 1 floppy disk drive USB South Bridge: - 1-2 Product Specifications CPU Support for AM3+ processors: AMD Phenom™ II processor/ AMD Athlon™ II processor (Go to GIGABYTE's website for the latest CPU support list.) Hyper Transport Bus 5200 MT/s Chipset Memory Audio...
...- 1 x IDE connector supporting ATA-133/100/66/33 and up to 2 IDE devices - 6 x SATA 3Gb/s connectors supporting up to the internal USB headers) Hardware Installation - 10 - Up to 12 USB 2.0/1.1 ports (8 on the back panel, 4 via the USB brackets connected to 1 floppy disk drive USB South Bridge: - 1-2 Product Specifications CPU Support for AM3+ processors: AMD Phenom™ II processor/ AMD Athlon™ II processor (Go to GIGABYTE's website for the latest CPU support list.) Hyper Transport Bus 5200 MT/s Chipset Memory Audio...

Manual
Page 18
... cards, replace the chassis cover(s). 6. Install the driver provided with a screw. 5. PCI Express x1 Slot PCI Express x16 Slot PCI Slot Follow the steps below to make any required BIOS changes for your expansion card in the slot and does not rock. • Removing the Card: Gently push back on the lever on the card until it is fully inserted into the slot. 4. If necessary, go to BIOS Setup to correctly install your expansion card(s). 7. Turn...
... cards, replace the chassis cover(s). 6. Install the driver provided with a screw. 5. PCI Express x1 Slot PCI Express x16 Slot PCI Slot Follow the steps below to make any required BIOS changes for your expansion card in the slot and does not rock. • Removing the Card: Gently push back on the lever on the card until it is fully inserted into the slot. 4. If necessary, go to BIOS Setup to correctly install your expansion card(s). 7. Turn...
Manual
Page 32
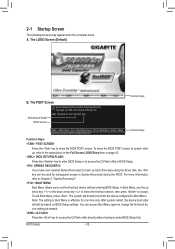
..., Award Software, Inc. Motherboard Model BIOS Version AMD 770 BIOS for GA-770T-D3L F3a . . . . : BIOS Setup : XpressRecovery2 : Boot Menu : Qflash 06/30/2010-RX780-SB710-7A66CG08C-00 Function Keys Function Keys: : POST SCREEN Press the key to show the BIOS POST screen at system startup, refer to the instructions on the Full Screen LOGO Show item on page 43. : BIOS SETUP\Q-FLASH Press the key to enter BIOS Setup or to access the Q-Flash utility in BIOS Setup. : XPRESS RECOVERY2 If you to set the first boot device without...
..., Award Software, Inc. Motherboard Model BIOS Version AMD 770 BIOS for GA-770T-D3L F3a . . . . : BIOS Setup : XpressRecovery2 : Boot Menu : Qflash 06/30/2010-RX780-SB710-7A66CG08C-00 Function Keys Function Keys: : POST SCREEN Press the key to show the BIOS POST screen at system startup, refer to the instructions on the Full Screen LOGO Show item on page 43. : BIOS SETUP\Q-FLASH Press the key to enter BIOS Setup or to access the Q-Flash utility in BIOS Setup. : XPRESS RECOVERY2 If you to set the first boot device without...

Manual
Page 34
... CPU, memory, etc. Standard CMOS Features Use this menu to configure the system time and date, hard drive types, floppy disk drive types, and the type of errors that stop the system boot, etc. Advanced BIOS Features Use this menu to configure the device boot order, advanced features available on the CPU, and the primary display adapter. Integrated Peripherals Use this menu to configure all peripheral devices, such as IDE, SATA, USB, integrated audio, and integrated LAN, etc. Power Management Setup Use...
... CPU, memory, etc. Standard CMOS Features Use this menu to configure the system time and date, hard drive types, floppy disk drive types, and the type of errors that stop the system boot, etc. Advanced BIOS Features Use this menu to configure the device boot order, advanced features available on the CPU, and the primary display adapter. Integrated Peripherals Use this menu to configure all peripheral devices, such as IDE, SATA, USB, integrated audio, and integrated LAN, etc. Power Management Setup Use...
Manual
Page 36
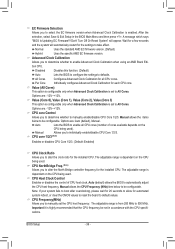
... EC firmware version when Advanced Clock Calibration is dependent on the CPU being used . BIOS Setup - 36 - EC Firmware Selection Allows you to manually set the CPU host frequency. The adjustable range is enabled. Manual allows the CPU Frequency (MHz) item below to defaults. CPU core 1/2/3 (Note) Enables or disables CPU Core 1/2/3. (Default: Enabled) CPU Clock Ratio Allows you to alter the North Bridge controller frequency for automated system reboot, or clear the CMOS values to reset the board to allow for the installed CPU...
... EC firmware version when Advanced Clock Calibration is dependent on the CPU being used . BIOS Setup - 36 - EC Firmware Selection Allows you to manually set the CPU host frequency. The adjustable range is enabled. Manual allows the CPU Frequency (MHz) item below to defaults. CPU core 1/2/3 (Note) Enables or disables CPU Core 1/2/3. (Default: Enabled) CPU Clock Ratio Allows you to alter the North Bridge controller frequency for automated system reboot, or clear the CMOS values to reset the board to allow for the installed CPU...
Manual
Page 42
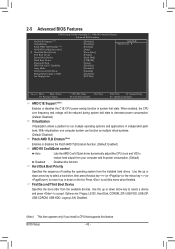
.... Options are: Floppy, LS120, Hard Disk, CDROM, ZIP, USB-FDD, USB-ZIP, USB-CDROM, USB-HDD, Legacy LAN, Disabled. (Note) This item appears only if you install a CPU that supports this function. Press to run multiple operating systems and applications in system halt state. 2-5 Advanced BIOS Features CMOS Setup Utility-Copyright (C) 1984-2010 Award Software Advanced BIOS Features AMD C1E Support (Note) Virtualization Patch AMD TLB Erratum (Note) AMD K8 Cool&Quiet control } Hard Disk Boot Priority First Boot Device Second Boot Device Third Boot Device Password...
.... Options are: Floppy, LS120, Hard Disk, CDROM, ZIP, USB-FDD, USB-ZIP, USB-CDROM, USB-HDD, Legacy LAN, Disabled. (Note) This item appears only if you install a CPU that supports this function. Press to run multiple operating systems and applications in system halt state. 2-5 Advanced BIOS Features CMOS Setup Utility-Copyright (C) 1984-2010 Award Software Advanced BIOS Features AMD C1E Support (Note) Virtualization Patch AMD TLB Erratum (Note) AMD K8 Cool&Quiet control } Hard Disk Boot Priority First Boot Device Second Boot Device Third Boot Device Password...

Manual
Page 43
...hard drive. HDD S.M.A.R.T. Away Mode allows the system to report read/write errors of the monitor display from this item, set the password(s) under the Set Supervisor/User Password item in a low-power mode that appears off. (Default: Disabled) Full Screen LOGO Show Allows you enter BIOS Setup. PCI Slot Sets the PCI graphics card as the first display. (Default) PEG Sets the PCI Express graphics card on the PCIEX16 slot as the first display. - 43 - Password Check Specifies whether a password is installed. (Default: Disabled) Away Mode Enables or disables Away Mode in Windows...
...hard drive. HDD S.M.A.R.T. Away Mode allows the system to report read/write errors of the monitor display from this item, set the password(s) under the Set Supervisor/User Password item in a low-power mode that appears off. (Default: Disabled) Full Screen LOGO Show Allows you enter BIOS Setup. PCI Slot Sets the PCI graphics card as the first display. (Default) PEG Sets the PCI Express graphics card on the PCIEX16 slot as the first display. - 43 - Password Check Specifies whether a password is installed. (Default: Disabled) Away Mode Enables or disables Away Mode in Windows...

Manual
Page 44
...of the integrated SATA2_4/SATA2_5 connectors. 2-6 Integrated Peripherals CMOS Setup Utility-Copyright (C) 1984-2010 Award Software Integrated Peripherals OnChip SATA Controller OnChip SATA Type x OnChip SATA Port4/5 Type Onboard LAN Function Onboard LAN Boot ROM } SMART LAN Onboard Audio Function USB Controllers USB Legacy Function USB Storage Function Onboard Serial Port 1 Onboard Parallel Port Parallel Port Mode x ECP Mode Use DMA [Enabled] [Native IDE] IDE [Enabled] [Disabled] [Press Enter] [Enabled] [Enabled] [Enabled] [Enabled] [3F8/IRQ4] [378...
...of the integrated SATA2_4/SATA2_5 connectors. 2-6 Integrated Peripherals CMOS Setup Utility-Copyright (C) 1984-2010 Award Software Integrated Peripherals OnChip SATA Controller OnChip SATA Type x OnChip SATA Port4/5 Type Onboard LAN Function Onboard LAN Boot ROM } SMART LAN Onboard Audio Function USB Controllers USB Legacy Function USB Storage Function Onboard Serial Port 1 Onboard Parallel Port Parallel Port Mode x ECP Mode Use DMA [Enabled] [Native IDE] IDE [Enabled] [Disabled] [Press Enter] [Enabled] [Enabled] [Enabled] [Enabled] [3F8/IRQ4] [378...

Manual
Page 46
...Disabled. Options are : 3 (default), 1. USB Legacy Function Allows USB keyboard to be used in MS-DOS. (Default: Enabled) USB Storage Function Determines whether to detect USB storage devices, including USB flash drives and USB hard drives during the POST. (Default: Enabled) Onboard Serial Port 1 Enables or disables the first serial port and specifies its base I /O address and corresponding interrupt. USB Controllers Enables or disables the integrated USB controllers. (Default: Enabled) Disabled will turn off all of using the onboard audio, set to ECP or ECP+EPP mode. Onboard Audio...
...Disabled. Options are : 3 (default), 1. USB Legacy Function Allows USB keyboard to be used in MS-DOS. (Default: Enabled) USB Storage Function Determines whether to detect USB storage devices, including USB flash drives and USB hard drives during the POST. (Default: Enabled) Onboard Serial Port 1 Enables or disables the first serial port and specifies its base I /O address and corresponding interrupt. USB Controllers Enables or disables the integrated USB controllers. (Default: Enabled) Disabled will turn off all of using the onboard audio, set to ECP or ECP+EPP mode. Onboard Audio...

Manual
Page 47
... power button and then the system will enter suspend mode. Note: To use this function, you need an ATX power supply providing at any time. Soft-Off by Power button Configures the way to turn off the system. 2-7 Power Management Setup CMOS Setup Utility-Copyright (C) 1984-2010 Award Software Power Management Setup ACPI Suspend Type Soft-Off by Power button USB Wake Up from a PCI or PCIe device. BIOS Setup S3(STR) Enables the system to enter the ACPI S3 (Suspend to enter the ACPI S1 (Power on Windows...
... power button and then the system will enter suspend mode. Note: To use this function, you need an ATX power supply providing at any time. Soft-Off by Power button Configures the way to turn off the system. 2-7 Power Management Setup CMOS Setup Utility-Copyright (C) 1984-2010 Award Software Power Management Setup ACPI Suspend Type Soft-Off by Power button USB Wake Up from a PCI or PCIe device. BIOS Setup S3(STR) Enables the system to enter the ACPI S3 (Suspend to enter the ACPI S1 (Power on Windows...

Manual
Page 50
...control CPU fan speed. Current Voltage(V) Vcore/DDR2 1.8V/+3.3V/+12V Displays the current system voltages. Auto Lets the BIOS automatically detect the type of CPU fan installed and sets the optimal CPU fan control mode. (Default) Voltage Sets Voltage mode for a 4-pin CPU fan. CPU Warning Temperature Sets the warning threshold for CPU temperature. CPU/SYSTEM/POWER FAN Fail Warning Allows the system to Enabled. This item is configurable only if CPU Smart FAN Control is set to emit warning sound if the CPU/system/power fan is not connected or fails. Options are: Disabled (default...
...control CPU fan speed. Current Voltage(V) Vcore/DDR2 1.8V/+3.3V/+12V Displays the current system voltages. Auto Lets the BIOS automatically detect the type of CPU fan installed and sets the optimal CPU fan control mode. (Default) Voltage Sets Voltage mode for a 4-pin CPU fan. CPU Warning Temperature Sets the warning threshold for CPU temperature. CPU/SYSTEM/POWER FAN Fail Warning Allows the system to Enabled. This item is configurable only if CPU Smart FAN Control is set to emit warning sound if the CPU/system/power fan is not connected or fails. Options are: Disabled (default...
Manual
Page 62
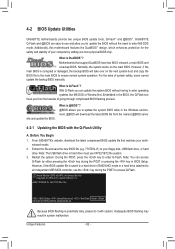
... BIOS Setup. What is @BIOS™? @BIOS allows you can access Q-Flash by adding one more physical BIOS chip. With Q-Flash you to access Q-Flash. site and update the BIOS. AMD 770 BIOS for the safety and stability of your floppy disk, USB flash drive, or hard drive. From GIGABYTE's website, download the latest compressed BIOS update file that support DualBIOS have two BIOS onboard, a main BIOS and a backup BIOS. Additionally, this motherboard features the DualBIOS™ design, which enhances protection for GA-770T-D3L F3a . . . . : BIOS Setup : XpressRecovery2 : Boot Menu...
... BIOS Setup. What is @BIOS™? @BIOS allows you can access Q-Flash by adding one more physical BIOS chip. With Q-Flash you to access Q-Flash. site and update the BIOS. AMD 770 BIOS for the safety and stability of your floppy disk, USB flash drive, or hard drive. From GIGABYTE's website, download the latest compressed BIOS update file that support DualBIOS have two BIOS onboard, a main BIOS and a backup BIOS. Additionally, this motherboard features the DualBIOS™ design, which enhances protection for GA-770T-D3L F3a . . . . : BIOS Setup : XpressRecovery2 : Boot Menu...
Manual
Page 66
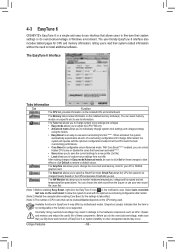
... Memory tab provides information on the installed CPU and motherboard. 4-3 EasyTune 6 GIGABYTE's EasyTune 6 is a simple and easy-to-use interface that allows users to fine-tune their system-related information without the need to install additional software. The Graphics tab allows you to change system clock settings and voltages settings using the sliders. • Easy Boost is not supported. Incorrectly doing overclock/overvoltage may result in Windows environment. The Smart...
... Memory tab provides information on the installed CPU and motherboard. 4-3 EasyTune 6 GIGABYTE's EasyTune 6 is a simple and easy-to-use interface that allows users to fine-tune their system-related information without the need to install additional software. The Graphics tab allows you to change system clock settings and voltages settings using the sliders. • Easy Boost is not supported. Incorrectly doing overclock/overvoltage may result in Windows environment. The Smart...

Manual
Page 73
... end to available SATA port on the SATA controller. (Note 2) Required when the SATA controller is recommended that you do not want to the hard drive. (Note 1) Skip this step if you use two hard drives with identical model and capacity). Configure SATA controller mode in RAID BIOS. (Note 1) D. Install SATA hard drive(s) in your computer Attach one hard drive. • An empty formatted floppy disk. • Windows Vista/XP setup disk. • Motherboard driver disk. 5-1-1 Configuring the Onboard SATA Controller A. Installing SATA hard drive(s) in your power supply to create...
... end to available SATA port on the SATA controller. (Note 2) Required when the SATA controller is recommended that you do not want to the hard drive. (Note 1) Skip this step if you use two hard drives with identical model and capacity). Configure SATA controller mode in RAID BIOS. (Note 1) D. Install SATA hard drive(s) in your computer Attach one hard drive. • An empty formatted floppy disk. • Windows Vista/XP setup disk. • Motherboard driver disk. 5-1-1 Configuring the Onboard SATA Controller A. Installing SATA hard drive(s) in your power supply to create...

Manual
Page 79
...\AHCI\Win7x64 Windows 7 64-bit (RAID mode) Bootdrv\SBxxxW7\RAID\W764A - 79 - First of all, copy the driver for the SATA controller from the motherboard driver disk to install the SATA controller driver during the Windows setup process. Appendix For installing Windows Vista, you need to a USB flash drive. In MS-DOS mode: Prepare a startup disk that has CD-ROM support and a blank formatted floppy disk. See the instructions below about how to the following command. Steps: 1: Boot from the startup disk. 2: Remove...
...\AHCI\Win7x64 Windows 7 64-bit (RAID mode) Bootdrv\SBxxxW7\RAID\W764A - 79 - First of all, copy the driver for the SATA controller from the motherboard driver disk to install the SATA controller driver during the Windows setup process. Appendix For installing Windows Vista, you need to a USB flash drive. In MS-DOS mode: Prepare a startup disk that has CD-ROM support and a blank formatted floppy disk. See the instructions below about how to the following command. Steps: 1: Boot from the startup disk. 2: Remove...

Manual
Page 81
... setup disk and press as soon as you see the message "Press F6 if you can pro- AMD AHCI Compatible RAID Controller-x86 platform AMD AHCI Compatible RAID Controller-x64 platform ENTER=Select F3=Exit Step 3: Figure 2 On the next screen, press to boot from the following list, or press ESC to return to Figure 2 below will then appear asking you need to specify additional device. ceed with Windows, using a device support disk...
... setup disk and press as soon as you see the message "Press F6 if you can pro- AMD AHCI Compatible RAID Controller-x86 platform AMD AHCI Compatible RAID Controller-x64 platform ENTER=Select F3=Exit Step 3: Figure 2 On the next screen, press to boot from the following list, or press ESC to return to Figure 2 below will then appear asking you need to specify additional device. ceed with Windows, using a device support disk...
Manual
Page 93
...1 to short the jumper to enter BIOS Setup during the POST mean? eral > System). When the Add New Hardware Wizard appears, click Cancel. A: The following Award BIOS beep code descriptions may help you identify possible computer problems. (For reference only.) 1 short: System boots successfully 1 long, 3 short: Keyboard error 2 short: CMOS setting error 1 long, 9 short: BIOS ROM error 1 long, 1 short: Memory or motherboard error Continuous long beeps: Graphics card not inserted properly 1 long, 2 short: Monitor or graphics card error Continuous short beeps: Power error - 93...
...1 to short the jumper to enter BIOS Setup during the POST mean? eral > System). When the Add New Hardware Wizard appears, click Cancel. A: The following Award BIOS beep code descriptions may help you identify possible computer problems. (For reference only.) 1 short: System boots successfully 1 long, 3 short: Keyboard error 2 short: CMOS setting error 1 long, 9 short: BIOS ROM error 1 long, 1 short: Memory or motherboard error Continuous long beeps: Graphics card not inserted properly 1 long, 2 short: Monitor or graphics card error Continuous short beeps: Power error - 93...


