Manual
Page 3
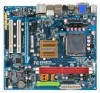
... carefully read or download the information on/from the Support\Motherboard\Technology Guide page on your motherboard revision before updating motherboard BIOS, drivers, or when looking for technical information. Changes to the specifications and features in any means without prior notice. Documentation... Copyright © 2009 GIGA-BYTE TECHNOLOGY CO., LTD. For product-related information, check on our website at: http://www.gigabyte.com.tw Identifying Your Motherboard Revision The revision number on our website. All rights reserved. Check your motherboard looks like this ...
... carefully read or download the information on/from the Support\Motherboard\Technology Guide page on your motherboard revision before updating motherboard BIOS, drivers, or when looking for technical information. Changes to the specifications and features in any means without prior notice. Documentation... Copyright © 2009 GIGA-BYTE TECHNOLOGY CO., LTD. For product-related information, check on our website at: http://www.gigabyte.com.tw Identifying Your Motherboard Revision The revision number on our website. All rights reserved. Check your motherboard looks like this ...

Manual
Page 4
...GA-73PVM-S2H Motherboard Layout 7 Block Diagram...8 Chapter 1 Hardware Installation 9 1-1 Installation Precautions 9 1-2 Product Specifications 10 1-3 Installing the CPU and CPU Cooler 13 1-3-1 Installing the CPU 13 1-3-2 Installing the CPU Cooler 15 1-4 Installing the Memory 16 1-4-1 Installing a Memory 16 1-5 Installing an Expansion Card 17 1-6 Back Panel Connectors 20 1-7 Internal Connectors 23 Chapter 2 BIOS... Setup 35 2-1 Startup Screen 36 2-2 The Main Menu 37 2-3 Standard CMOS Features 39 2-4 Advanced BIOS Features 41 2-5 Integrated ...
...GA-73PVM-S2H Motherboard Layout 7 Block Diagram...8 Chapter 1 Hardware Installation 9 1-1 Installation Precautions 9 1-2 Product Specifications 10 1-3 Installing the CPU and CPU Cooler 13 1-3-1 Installing the CPU 13 1-3-2 Installing the CPU Cooler 15 1-4 Installing the Memory 16 1-4-1 Installing a Memory 16 1-5 Installing an Expansion Card 17 1-6 Back Panel Connectors 20 1-7 Internal Connectors 23 Chapter 2 BIOS... Setup 35 2-1 Startup Screen 36 2-2 The Main Menu 37 2-3 Standard CMOS Features 39 2-4 Advanced BIOS Features 41 2-5 Integrated ...
Manual
Page 5
... 58 3-3 Driver CD Information 58 3-4 Hardware Information 59 3-5 Contact Us ...59 Chapter 4 Unique Features 61 4-1 Xpress Recovery2 61 4-2 BIOS Update Utilities 66 4-2-1 Updating the BIOS with the Q-Flash Utility 66 4-2-2 Updating the BIOS with the @BIOS Utility 69 4-3 EasyTune 5 ...71 4-4 Windows Vista ReadyBoost 72 Chapter 5 Appendix ...73 5-1 Configuring SATA Hard Drive(s 73 5-1-1 Configuring the...
... 58 3-3 Driver CD Information 58 3-4 Hardware Information 59 3-5 Contact Us ...59 Chapter 4 Unique Features 61 4-1 Xpress Recovery2 61 4-2 BIOS Update Utilities 66 4-2-1 Updating the BIOS with the Q-Flash Utility 66 4-2-2 Updating the BIOS with the @BIOS Utility 69 4-3 EasyTune 5 ...71 4-4 Windows Vista ReadyBoost 72 Chapter 5 Appendix ...73 5-1 Configuring SATA Hard Drive(s 73 5-1-1 Configuring the...
Manual
Page 7
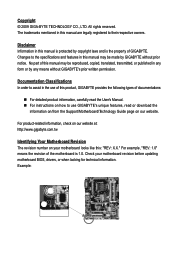
GA-73PVM-S2H Motherboard Layout KB_MS ATX_12V VGA DVI HDMI OPTICAL ESATA USB 1394 LAN USB RTL 8211B AUDIO F_AUDIO CD_IN PCIE_1 PCIE_16 CODEC PCI1 PCI2 SPDIF_IO F_USB3 F_USB1 F_USB2 LGA775 CPU_FAN ATX LPT GA-73PVM-S2H nVIDIA® GeForce 7100/ nForce 630i IDE SATAII1 SATAII0 SATAII2 DDRII1 DDRII2 BIOS TSB43AB23 IT8718 CLR_CMOS CI BATTERY F1_1394 FDD SYS_FAN PWR_LED COMA F_PANEL - 7 -
GA-73PVM-S2H Motherboard Layout KB_MS ATX_12V VGA DVI HDMI OPTICAL ESATA USB 1394 LAN USB RTL 8211B AUDIO F_AUDIO CD_IN PCIE_1 PCIE_16 CODEC PCI1 PCI2 SPDIF_IO F_USB3 F_USB1 F_USB2 LGA775 CPU_FAN ATX LPT GA-73PVM-S2H nVIDIA® GeForce 7100/ nForce 630i IDE SATAII1 SATAII0 SATAII2 DDRII1 DDRII2 BIOS TSB43AB23 IT8718 CLR_CMOS CI BATTERY F1_1394 FDD SYS_FAN PWR_LED COMA F_PANEL - 7 -

Manual
Page 8
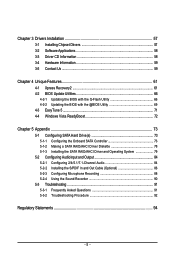
... PCI Express Bus PCI Bus TSB43AB23 nVIDIA® GeForce 7100/ nForce 630i 4 SATA 3Gb/s 10 USB Ports RTL 8211B LAN RJ45 LPC BUS IT8718 CODEC BIOS Floppy LPT Port COM Port 2 IEEE 1394a PS/2 KB/Mouse Surround Speaker Out Center/Subwoofer Speaker Out Side Speaker Out MIC Line-Out Line-In...
... PCI Express Bus PCI Bus TSB43AB23 nVIDIA® GeForce 7100/ nForce 630i 4 SATA 3Gb/s 10 USB Ports RTL 8211B LAN RJ45 LPC BUS IT8718 CODEC BIOS Floppy LPT Port COM Port 2 IEEE 1394a PS/2 KB/Mouse Surround Speaker Out Center/Subwoofer Speaker Out Side Speaker Out MIC Line-Out Line-In...

Manual
Page 11
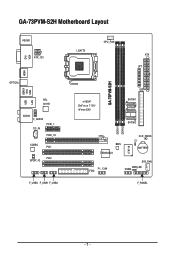
.../System temperature detection CPU/System fan speed detection CPU overheating warning CPU/System fan fail warning CPU/System fan speed control BIOS 1 x 4 Mbit flash Use of licensed AWARD BIOS PnP 1.0a, DMI 2.0, SM BIOS 2.4, ACPI 1.0b - 11 - Hardware Installation
.../System temperature detection CPU/System fan speed detection CPU overheating warning CPU/System fan fail warning CPU/System fan speed control BIOS 1 x 4 Mbit flash Use of licensed AWARD BIOS PnP 1.0a, DMI 2.0, SM BIOS 2.4, ACPI 1.0b - 11 - Hardware Installation
Manual
Page 12
... for Virtual Dual BIOS Norton Internet Security (OEM version) Support for Microsoft® Windows® Vista/XP Micro ATX Form Factor; 24.4cm x 22.0cm (Note 1) The DVI-D port does not support D-Sub connection by adapter. (Note 2) Available functions in Easytune may differ by motherboard model. GA-73PVM-S2H Motherboard - 12...
... for Virtual Dual BIOS Norton Internet Security (OEM version) Support for Microsoft® Windows® Vista/XP Micro ATX Form Factor; 24.4cm x 22.0cm (Note 1) The DVI-D port does not support D-Sub connection by adapter. (Note 2) Available functions in Easytune may differ by motherboard model. GA-73PVM-S2H Motherboard - 12...
Manual
Page 17
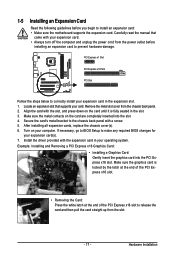
...your expansion card. • Always turn off the computer and unplug the power cord from the power outlet before you begin to make any required BIOS changes for your expansion card(s). 7. Make sure the metal contacts on the card until it is locked by the latch at the end of the... card's metal bracket to prevent hardware damage. Remove the metal slot cover from the slot. - 17 - Turn on your operating system. If necessary, go to BIOS Setup to install an expansion card: • Make sure the motherboard supports the expansion card. Align the card with the expansion card in the slot...
...your expansion card. • Always turn off the computer and unplug the power cord from the power outlet before you begin to make any required BIOS changes for your expansion card(s). 7. Make sure the metal contacts on the card until it is locked by the latch at the end of the... card's metal bracket to prevent hardware damage. Remove the metal slot cover from the slot. - 17 - Turn on your operating system. If necessary, go to BIOS Setup to install an expansion card: • Make sure the motherboard supports the expansion card. Align the card with the expansion card in the slot...

Manual
Page 22
..., the ~ audio jacks can be connected to the default Mic in jack ( ). Only microphones still MUST be reconfigured to Chapter 2, "BIOS Setup," "Advanced BIOS Features," for video output: DVI-D, HDMI and D-Sub. A. Playback of Frame Buffer Size (refer to perform different functions via the audio software...1920 x 1080p 1920 x 1080p 1920 x 1080p 1920 x 1080p 1920 x 1080p GA-73PVM-S2H Motherboard - 22 - Refer to use an Intel ® Pentium® E2160 processor or faster. • Memory: 1 GB of DDR2 800 memory • BIOS Setup: At least 256 MB of HD DVD and Blu-ray Discs: In ...
..., the ~ audio jacks can be connected to the default Mic in jack ( ). Only microphones still MUST be reconfigured to Chapter 2, "BIOS Setup," "Advanced BIOS Features," for video output: DVI-D, HDMI and D-Sub. A. Playback of Frame Buffer Size (refer to perform different functions via the audio software...1920 x 1080p 1920 x 1080p 1920 x 1080p 1920 x 1080p 1920 x 1080p GA-73PVM-S2H Motherboard - 22 - Refer to use an Intel ® Pentium® E2160 processor or faster. • Memory: 1 GB of DDR2 800 memory • BIOS Setup: At least 256 MB of HD DVD and Blu-ray Discs: In ...

Manual
Page 27
...; Always turn off . System Status LED S0 On S1 Blinking S3/S4/S5 Off 9) BATTERY The battery provides power to keep the values (such as BIOS configurations, date, and time information) in S1 sleep state. Turn off (S5). Pin No. The LED keeps blinking when the system is in the CMOS...
...; Always turn off . System Status LED S0 On S1 Blinking S3/S4/S5 Off 9) BATTERY The battery provides power to keep the values (such as BIOS configurations, date, and time information) in S1 sleep state. Turn off (S5). Pin No. The LED keeps blinking when the system is in the CMOS...

Manual
Page 28
...SPEAK (Speaker): Connects to the reset switch on the chassis front panel. When connecting your system using the power switch (refer to Chapter 2, "BIOS Setup," "Power Management Setup," for information about beep codes. • HD (IDE Hard Drive Activity LED) Connects to the power switch on the...panel to this header, make sure the wire assignments and the pin assignments are matched correctly. GA-73PVM-S2H Motherboard - 28 - The LED keeps blinking when S1 Blinking the system is detected, the BIOS may configure the way to turn of power switch, reset switch, power LED, hard drive...
...SPEAK (Speaker): Connects to the reset switch on the chassis front panel. When connecting your system using the power switch (refer to Chapter 2, "BIOS Setup," "Power Management Setup," for information about beep codes. • HD (IDE Hard Drive Activity LED) Connects to the power switch on the...panel to this header, make sure the wire assignments and the pin assignments are matched correctly. GA-73PVM-S2H Motherboard - 28 - The LED keeps blinking when S1 Blinking the system is detected, the BIOS may configure the way to turn of power switch, reset switch, power LED, hard drive...
Manual
Page 33
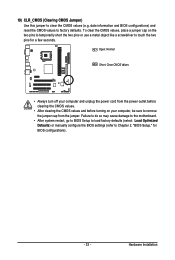
...before turning on the two pins to temporarily short the two pins or use a metal object like a screwdriver to touch the two pins for BIOS configurations). - 33 - Failure to do so may cause damage to the motherboard. • After system restart, go to... BIOS Setup to load factory defaults (select Load Optimized Defaults) or manually configure the BIOS settings (refer to factory defaults. date information and BIOS configurations) and reset the CMOS values to Chapter 2, "BIOS Setup," for a few seconds. To clear the CMOS values, ...
...before turning on the two pins to temporarily short the two pins or use a metal object like a screwdriver to touch the two pins for BIOS configurations). - 33 - Failure to do so may cause damage to the motherboard. • After system restart, go to... BIOS Setup to load factory defaults (select Load Optimized Defaults) or manually configure the BIOS settings (refer to factory defaults. date information and BIOS configurations) and reset the CMOS values to Chapter 2, "BIOS Setup," for a few seconds. To clear the CMOS values, ...
Manual
Page 35
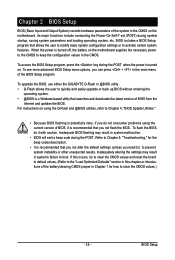
... turned on the motherboard. When the power is turned off, the battery on using the current version of BIOS, it with caution. To upgrade the BIOS, use either the GIGABYTE Q-Flash or @BIOS utility . • Q-Flash allows the user to activate certain system features. For instructions on the motherboard supplies the necessary power to...
... turned on the motherboard. When the power is turned off, the battery on using the current version of BIOS, it with caution. To upgrade the BIOS, use either the GIGABYTE Q-Flash or @BIOS utility . • Q-Flash allows the user to activate certain system features. For instructions on the motherboard supplies the necessary power to...
Manual
Page 36
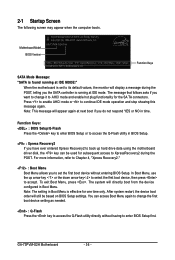
... will directly boot from the device configured in BIOS Setup. : Xpress Recovery2 If you want to change the first boot device setting as needed. : Q-Flash Press the key to continue IDE mode operation and stop showing this message again. GA-73PVM-S2H Motherboard - 36 - 2-1 Startup Screen The .... The system will still be used for subsequent access to AHCI mode and enable hot plug functionality for one time only. GA-73PVM-S2H F4a . . . . : BIOS Setup/Q-Flash : XpressRecovery2 : Boot Menu : Qflash 09/28/2007-NF73-6A61NG02C-00 Function Keys SATA Mode Message: "SATA is ...
... will directly boot from the device configured in BIOS Setup. : Xpress Recovery2 If you want to change the first boot device setting as needed. : Q-Flash Press the key to continue IDE mode operation and stop showing this message again. GA-73PVM-S2H Motherboard - 36 - 2-1 Startup Screen The .... The system will still be used for subsequent access to AHCI mode and enable hot plug functionality for one time only. GA-73PVM-S2H F4a . . . . : BIOS Setup/Q-Flash : XpressRecovery2 : Boot Menu : Qflash 09/28/2007-NF73-6A61NG02C-00 Function Keys SATA Mode Message: "SATA is ...

Manual
Page 37
...General Help) of function keys available for the current submenus Access the Q-Flash utility Display system information Save all the changes and exit the BIOS Setup program Main Menu Help The onscreen description of a highlighted setup option is in the Item Help block on the screen. Help for ...reference only and may differ by BIOS version. - 37 - Submenu Help While in this chapter are for each item is displayed on the bottom line of the submenu. •...
...General Help) of function keys available for the current submenus Access the Q-Flash utility Display system information Save all the changes and exit the BIOS Setup program Main Menu Help The onscreen description of a highlighted setup option is in the Item Help block on the screen. Help for ...reference only and may differ by BIOS version. - 37 - Submenu Help While in this chapter are for each item is displayed on the bottom line of the submenu. •...
Manual
Page 38
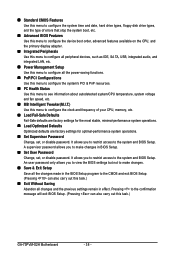
...changes. Save & Exit Setup Save all the changes made in effect. A supervisor password allows you to view the BIOS settings but not to make changes in BIOS Setup. Set User Password Change, set , or disable password. An user password only allows you to the confirmation ...speed, etc. MB Intelligent Tweaker(M.I.T.) Use this menu to the system and BIOS Setup. It allows you to restrict access to the CMOS and exit BIOS Setup. (Pressing can also carry out this task.) GA-73PVM-S2H Motherboard - 38 - Standard CMOS Features Use this menu to configure the...
...changes. Save & Exit Setup Save all the changes made in effect. A supervisor password allows you to view the BIOS settings but not to make changes in BIOS Setup. Set User Password Change, set , or disable password. An user password only allows you to the confirmation ...speed, etc. MB Intelligent Tweaker(M.I.T.) Use this menu to the system and BIOS Setup. It allows you to restrict access to the CMOS and exit BIOS Setup. (Pressing can also carry out this task.) GA-73PVM-S2H Motherboard - 38 - Standard CMOS Features Use this menu to configure the...
Manual
Page 39
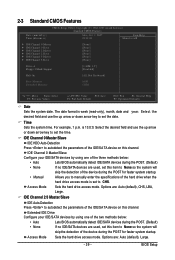
...p.m. IDE Channel 0 Master/Slave IDE HDD Auto-Detection Press to autodetect the parameters of the three methods below : • Auto • None Lets BIOS automatically detect IDE/SATA devices during the POST. (Default) If no IDE/SATA devices are used , set this channel. Access Mode Sets the hard drive ...system time. Extended IDE Drive Configure your IDE/SATA devices by using one of the two methods below : • Auto • None Lets BIOS automatically detect IDE/SATA devices during the POST. (Default) If no IDE/SATA devices are used , set to None so the system will ...
...p.m. IDE Channel 0 Master/Slave IDE HDD Auto-Detection Press to autodetect the parameters of the three methods below : • Auto • None Lets BIOS automatically detect IDE/SATA devices during the POST. (Default) If no IDE/SATA devices are used , set this channel. Access Mode Sets the hard drive ...system time. Extended IDE Drive Configure your IDE/SATA devices by using one of the two methods below : • Auto • None Lets BIOS automatically detect IDE/SATA devices during the POST. (Default) If no IDE/SATA devices are used , set to None so the system will ...

Manual
Page 40
...2M/5.25", 720K/3.5", 1.44M/3.5", 2.88M/3.5". Base Memory Also called conventional memory. Typically, 640 KB will stop for the MS-DOS operating system. GA-73PVM-S2H Motherboard - 40 - Landing Zone Landing zone. Allows you to the information on Allows you to None. If you wish to enter the parameters...drive is 3-mode floppy disk drive, a Japanese standard floppy disk drive. Extended Memory The amount of cylinders. All Errors Whenever the BIOS detects a non-fatal error the system boot will stop for any error. Sector Drive A Number of heads. Halt on the hard...
...2M/5.25", 720K/3.5", 1.44M/3.5", 2.88M/3.5". Base Memory Also called conventional memory. Typically, 640 KB will stop for the MS-DOS operating system. GA-73PVM-S2H Motherboard - 40 - Landing Zone Landing zone. Allows you to the information on Allows you to None. If you wish to enter the parameters...drive is 3-mode floppy disk drive, a Japanese standard floppy disk drive. Extended Memory The amount of cylinders. All Errors Whenever the BIOS detects a non-fatal error the system boot will stop for any error. Sector Drive A Number of heads. Halt on the hard...
Manual
Page 41
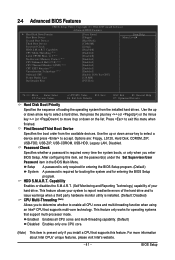
...when finished. Enabled Enables all CPU cores and multi-threading function when using an Intel® CPU that supports multi-core technology. BIOS Setup Press to accept. First/Second/Third Boot Device Specifies the boot order from the installed hard drives. After configuring this feature....multi-threading capability. (Default) Disabled Enables only one CPU core. (Note) This item is present only if you enter BIOS Setup. This feature only works for entering the BIOS Setup program. Capability CPU Multi-Threading (Note) Limit CPUID Max. to 3 (Note) No-Execute Memory Protect (Note) ...
...when finished. Enabled Enables all CPU cores and multi-threading function when using an Intel® CPU that supports multi-core technology. BIOS Setup Press to accept. First/Second/Third Boot Device Specifies the boot order from the installed hard drives. After configuring this feature....multi-threading capability. (Default) Disabled Enables only one CPU core. (Note) This item is present only if you enter BIOS Setup. This feature only works for entering the BIOS Setup program. Capability CPU Multi-Threading (Note) Limit CPUID Max. to 3 (Note) No-Execute Memory Protect (Note) ...
Manual
Page 43
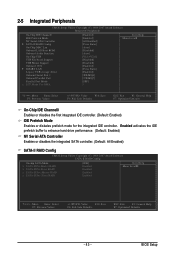
... IDE Channel0 Enables or disables the first integrated IDE controller. (Default: Enabled) IDE Prefetch Mode Enables or disbales prefetch mode for the integrated IDE controller. BIOS Setup Enabled activates the IDE prefetch buffer to enhance hard drive performance. (Default: Enabled) NV Serial-ATA Controller Enables or disables the integrated SATA controller...
... IDE Channel0 Enables or disables the first integrated IDE controller. (Default: Enabled) IDE Prefetch Mode Enables or disbales prefetch mode for the integrated IDE controller. BIOS Setup Enabled activates the IDE prefetch buffer to enhance hard drive performance. (Default: Enabled) NV Serial-ATA Controller Enables or disables the integrated SATA controller...


