User's Guide
Page 4
... the 1.92GHz to notification and coordination with this equipment is connected. Please specify stock number 004000-00345-4 when ordering copies. For body worn operation, this phone has been tested and meets the FCC RF exposure guidelines when used with the belt clip supplied with UTAM. Any relocation of this product. Licensing...
... the 1.92GHz to notification and coordination with this equipment is connected. Please specify stock number 004000-00345-4 when ordering copies. For body worn operation, this phone has been tested and meets the FCC RF exposure guidelines when used with the belt clip supplied with UTAM. Any relocation of this product. Licensing...
User's Guide
Page 5
... RF Radiation Exposure Statement 4 Information for DECT Product...........4 Introduction 7 Before You Begin 7 Parts Checklist 7 Telephone Jack Requirements...........8 Installation 8 Digital Security System 8 Important Installation Guidelines.....9 Base Layout 10 Front View 10 Top View 10 Handset Layout 11 Display Icons 11 Installing the... Phone 12 Installing the Handset Battery........ 12 Base Station 13 Answering System Setup 14 Answerer 14 Handset Access 15 Message...
... RF Radiation Exposure Statement 4 Information for DECT Product...........4 Introduction 7 Before You Begin 7 Parts Checklist 7 Telephone Jack Requirements...........8 Installation 8 Digital Security System 8 Important Installation Guidelines.....9 Base Layout 10 Front View 10 Top View 10 Handset Layout 11 Display Icons 11 Installing the... Phone 12 Installing the Handset Battery........ 12 Base Station 13 Answering System Setup 14 Answerer 14 Handset Access 15 Message...
User's Guide
Page 6
...Message/Memo 49 Screening Calls from the Base........ 49 Messages Playback 50 Memory Full 50 Erasing Messages 50 Remote Access 51 Cordless Handset 51 Screening Calls from the Handset 51 Accessing the Answering System from Another Location 52 Memory Full 53 Changing the ...Battery 53 Battery Safety Precautions 54 Display Messages 54 Answering System Display Messages 57 Troubleshooting Guide 57 Caller ID Solutions 57 Cordless Phone Solutions 58 Battery Solutions 59 Answering System Solutions...........60 Causes of Poor Reception 61 General Product Care 61 Warranty Assistance 62...
...Message/Memo 49 Screening Calls from the Base........ 49 Messages Playback 50 Memory Full 50 Erasing Messages 50 Remote Access 51 Cordless Handset 51 Screening Calls from the Handset 51 Accessing the Answering System from Another Location 52 Memory Full 53 Changing the ...Battery 53 Battery Safety Precautions 54 Display Messages 54 Answering System Display Messages 57 Troubleshooting Guide 57 Caller ID Solutions 57 Cordless Phone Solutions 58 Battery Solutions 59 Answering System Solutions...........60 Causes of Poor Reception 61 General Product Care 61 Warranty Assistance 62...
User's Guide
Page 7
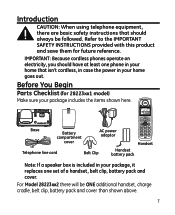
For Model 28223xx2 there will be followed. Before You Begin Parts Checklist (for future reference. IMPORTANT: Because cordless phones operate on electricity, you should have at least one set of a handset, belt clip, battery pack and cover. Base Battery compartment cover... includes the items shown here. Introduction CAUTION: When using telephone equipment, there are basic safety instructions that isn't cordless, in case the power in your package, it replaces one phone in your home that should always be ONE additional handset, charge cradle, belt clip, battery pack and cover than...
For Model 28223xx2 there will be followed. Before You Begin Parts Checklist (for future reference. IMPORTANT: Because cordless phones operate on electricity, you should have at least one set of a handset, belt clip, battery pack and cover. Base Battery compartment cover... includes the items shown here. Introduction CAUTION: When using telephone equipment, there are basic safety instructions that isn't cordless, in case the power in your package, it replaces one phone in your home that should always be ONE additional handset, charge cradle, belt clip, battery pack and cover than...

User's Guide
Page 8
... covers than shown above. For Model 28223xx6 there will be FOUR additional handsets, charge cradles, belt clips, battery packs and covers than shown above . Installation Digital Security System Your cordless phone uses a digital security system to protect against false ringing, unauthorized access, and charges to get jack one pictured here, installed in your...
... covers than shown above. For Model 28223xx6 there will be FOUR additional handsets, charge cradles, belt clips, battery packs and covers than shown above . Installation Digital Security System Your cordless phone uses a digital security system to protect against false ringing, unauthorized access, and charges to get jack one pictured here, installed in your...

User's Guide
Page 12
... the battery compartment by pushing the door up until it snaps into the jack inside a plastic bag and are separate from the handset. 2. Installing the Phone Installing the Handset Battery NOTE: You must connect the handset battery before use only the Thomson Inc. Locate battery and battery door which are packaged...
... the battery compartment by pushing the door up until it snaps into the jack inside a plastic bag and are separate from the handset. 2. Installing the Phone Installing the Handset Battery NOTE: You must connect the handset battery before use only the Thomson Inc. Locate battery and battery door which are packaged...

User's Guide
Page 13
... indicator turns on the wall. 2. Place the handset in use only the 5-2812 power adaptor listed in a vertical or floor mount position. 13 Allow the phone to charge for 16 hours prior to be correctly orientated in the user's guide. CAUTION: To reduce risk of the base. 4. Choose an area near... an electrical outlet and a telephone wall jack (RJ11C), and place your cordless telephone on a level surface, such as a desktop or tabletop, or you don't properly charge the...
... indicator turns on the wall. 2. Place the handset in use only the 5-2812 power adaptor listed in a vertical or floor mount position. 13 Allow the phone to charge for 16 hours prior to be correctly orientated in the user's guide. CAUTION: To reduce risk of the base. 4. Choose an area near... an electrical outlet and a telephone wall jack (RJ11C), and place your cordless telephone on a level surface, such as a desktop or tabletop, or you don't properly charge the...
User's Guide
Page 14
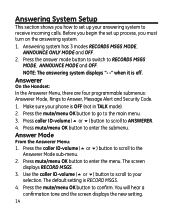
... button to enter the menu. Press mute/menu OK button to enter the submenu. Use the caller ID-volume (5 or 6) button to scroll to your phone is OFF (not in TALK mode). 2. Answering System Setup This section shows you how to set up process, you begin the set up your answering...
... button to enter the menu. Press mute/menu OK button to enter the submenu. Use the caller ID-volume (5 or 6) button to scroll to your phone is OFF (not in TALK mode). 2. Answering System Setup This section shows you how to set up process, you begin the set up your answering...
User's Guide
Page 15
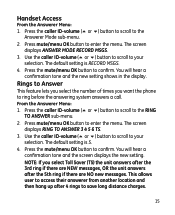
... 5. 4. Press mute/menu OK button to confirm. You will hear a confirmation tone and the new setting shows in the display. NOTE: If you want the phone to ring before the answering system answers a call. The screen displays ANSWER MODE RECORD MSGS. 3. Press the mute/menu OK button to enter the menu...
... 5. 4. Press mute/menu OK button to confirm. You will hear a confirmation tone and the new setting shows in the display. NOTE: If you want the phone to ring before the answering system answers a call. The screen displays ANSWER MODE RECORD MSGS. 3. Press the mute/menu OK button to enter the menu...
User's Guide
Page 18
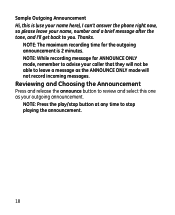
... any time to leave a message as your outgoing announcement. NOTE: While recording message for the outgoing announcement is (use your name here), I can't answer the phone right now, so please leave your name, number and a brief message after the tone, and I'll get back to review and select this is 2 minutes.
... any time to leave a message as your outgoing announcement. NOTE: While recording message for the outgoing announcement is (use your name here), I can't answer the phone right now, so please leave your name, number and a brief message after the tone, and I'll get back to review and select this is 2 minutes.

User's Guide
Page 19
"GOOG-411: Free 411 by simply pressing the GOOG-411 button. 1. GOOG-411 will connect you with keypad (for . Speak into the phone and say "help" 19 With purchasing the GE phone, you can access 1-800-GOOG-411 service at anytime by Google" shows in the call: • To go back say "go back... 411 service. When finished, press END/cancel button to hang up. With GOOG-411, you can find local business information completely free, directly from your phone. GOOG411 GOOG-411 is dialed out immediately.
"GOOG-411: Free 411 by simply pressing the GOOG-411 button. 1. GOOG-411 will connect you with keypad (for . Speak into the phone and say "help" 19 With purchasing the GE phone, you can access 1-800-GOOG-411 service at anytime by Google" shows in the call: • To go back say "go back... 411 service. When finished, press END/cancel button to hang up. With GOOG-411, you can find local business information completely free, directly from your phone. GOOG411 GOOG-411 is dialed out immediately.
User's Guide
Page 20
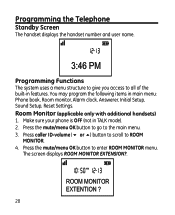
...ROOM MONITOR menu. Press the mute/menu OK button to go to ROOM MONITOR. 4. You may program the following items in features. Make sure your phone is OFF (not in TALK mode). 2. Press caller ID-volume (6 or 5) button to scroll to the main menu. 3. The screen displays ROOM... MONITOR EXTENSION?. 20 Press the mute/menu OK button to all of the built-in main menu: Phone book, Room monitor, Alarm clock, Answerer, Initial Setup, Sound Setup, Reset Settings. Room Monitor (applicable only with additional handsets) 1. Programming the ...
...ROOM MONITOR menu. Press the mute/menu OK button to go to ROOM MONITOR. 4. You may program the following items in features. Make sure your phone is OFF (not in TALK mode). 2. Press caller ID-volume (6 or 5) button to scroll to the main menu. 3. The screen displays ROOM... MONITOR EXTENSION?. 20 Press the mute/menu OK button to all of the built-in main menu: Phone book, Room monitor, Alarm clock, Answerer, Initial Setup, Sound Setup, Reset Settings. Room Monitor (applicable only with additional handsets) 1. Programming the ...
User's Guide
Page 21
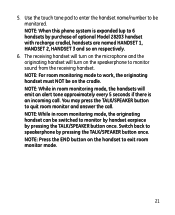
... is expanded (up to monitor by handset earpiece by pressing the TALK/SPEAKER button once. NOTE: Press the END button on respectively. 6. 5. NOTE: When this phone system is an incoming call . You may press the TALK/SPEAKER button to be switched to 6 handsets by pressing the TALK/SPEAKER button once. Use...
... is expanded (up to monitor by handset earpiece by pressing the TALK/SPEAKER button once. NOTE: Press the END button on respectively. 6. 5. NOTE: When this phone system is an incoming call . You may press the TALK/SPEAKER button to be switched to 6 handsets by pressing the TALK/SPEAKER button once. Use...

User's Guide
Page 22
... > OFF. 5. Use the caller ID-volume (5 or 6) button to save selection. Press the mute/menu ok button to select AM or PM. 7. Make sure your phone is OFF (not in TALK mode) 2. Press caller ID-volume (5 or 6) button to scroll to select ON or OFF. Use the caller ID-volume (5 or... (5 or 6) button to scroll to the main menu. 3. Press the mute/menu OK button to the main menu. 3. Initial Setup 1. Alarm Clock 1. Make sure your phone is selected, then the screen displays SET ALARM TIME. Press the mute/menu OK button to go to ALARM CLOCK. 4.
... > OFF. 5. Use the caller ID-volume (5 or 6) button to save selection. Press the mute/menu ok button to select AM or PM. 7. Make sure your phone is OFF (not in TALK mode) 2. Press caller ID-volume (5 or 6) button to scroll to select ON or OFF. Use the caller ID-volume (5 or... (5 or 6) button to scroll to the main menu. 3. Press the mute/menu OK button to the main menu. 3. Initial Setup 1. Alarm Clock 1. Make sure your phone is selected, then the screen displays SET ALARM TIME. Press the mute/menu OK button to go to ALARM CLOCK. 4.
User's Guide
Page 28
... items: Ringer Tone, Ringer Volume, Key Tone. 28 Release the find button on the base once. Press and release the find button. 5. Make sure your phone is re-registered. 1. Continue to ensure proper system operation. Press and hold the find button reconnect the power. 3. Disconnect power from the base by pulling...
... items: Ringer Tone, Ringer Volume, Key Tone. 28 Release the find button on the base once. Press and release the find button. 5. Make sure your phone is re-registered. 1. Continue to ensure proper system operation. Press and hold the find button reconnect the power. 3. Disconnect power from the base by pulling...
User's Guide
Page 30
... SETTINGS. 4. Use caller ID-volume (5 or 6) button to scroll to the VOICEMAIL sub-menu. 2. Press the caller ID-volume (5 or 6) button to scroll to your phone is NO. 3. The default setting is OFF (not in use LED on ALL handsets, and the charge/in TALK mode). 2.
... SETTINGS. 4. Use caller ID-volume (5 or 6) button to scroll to the VOICEMAIL sub-menu. 2. Press the caller ID-volume (5 or 6) button to scroll to your phone is NO. 3. The default setting is OFF (not in use LED on ALL handsets, and the charge/in TALK mode). 2.
User's Guide
Page 32
... VMWI indicator on Handset IMPORTANT: In order to use this unit's Voice Mail Waiting Indicator (VMWI) feature, you must subscribe to this service from your phone company. OR - Press the caller ID-volume (5 or 6) button to end conversation. Also, it serves as a Visual Ringer function. It will flash when there is... an incoming call. NOTE: You may enter up . VMWI / Visual Ringer Indicator on the top of the digits are using the speakerphone and want to delete the pre-dial number you are erased. 32 If you are speaking to 28 pre-dial...
... VMWI indicator on Handset IMPORTANT: In order to use this unit's Voice Mail Waiting Indicator (VMWI) feature, you must subscribe to this service from your phone company. OR - Press the caller ID-volume (5 or 6) button to end conversation. Also, it serves as a Visual Ringer function. It will flash when there is... an incoming call. NOTE: You may enter up . VMWI / Visual Ringer Indicator on the top of the digits are using the speakerphone and want to delete the pre-dial number you are erased. 32 If you are speaking to 28 pre-dial...
User's Guide
Page 33
... Functions; One is selected, pick up the handset and press the TALK/ SPEAKER button. 2. When finished, press END button to your selection. OR - When the phone rings, pick up the handset from the charge cradle to display SET RINGER LEVEL 5. 3. Call Timer After you place the handset in TALK mode). 2. LEVEL... in the cradle while the handset is off the hook (during a call immediately. Press the #pause/ringer button to answer the call . Make sure the phone is the default setting. 4.
... Functions; One is selected, pick up the handset and press the TALK/ SPEAKER button. 2. When finished, press END button to your selection. OR - When the phone rings, pick up the handset from the charge cradle to display SET RINGER LEVEL 5. 3. Call Timer After you place the handset in TALK mode). 2. LEVEL... in the cradle while the handset is off the hook (during a call immediately. Press the #pause/ringer button to answer the call . Make sure the phone is the default setting. 4.
User's Guide
Page 34
...the waiting call shows on the handset display. • To connect to the waiting call, press the flash button on Call Waiting calls. During a phone call, you get a busy signal and want to keep dialing the number, press the redial/format button to quickly redial the number. 34 Press the...subscribe to the combined Call Waiting Caller ID service from the last three numbers that were dialed. 4. NOTE: You may redial a number up to 20 digits long. If you will receive Caller ID information (if available) on the handset, and your local telephone company, you dialed: 1. Press the redial/format...
...the waiting call shows on the handset display. • To connect to the waiting call, press the flash button on Call Waiting calls. During a phone call, you get a busy signal and want to keep dialing the number, press the redial/format button to quickly redial the number. 34 Press the...subscribe to the combined Call Waiting Caller ID service from the last three numbers that were dialed. 4. NOTE: You may redial a number up to 20 digits long. If you will receive Caller ID information (if available) on the handset, and your local telephone company, you dialed: 1. Press the redial/format...

User's Guide
Page 35
...you, but you may adjust the receiver volume by pressing the caller ID-volume (5 or 6) button. Press the mute/menu OK button. If your phone conversation. Receiver Volume Control When the handset is not registered, follow the instructions in TALK mode) you can hear them. 1. Press the find button...to cancel and return to your handset is ON (in the Registration section of this manual. VOL 1 is minimum and VOL 5 is reached, the phone beeps twice. Paging from . The handset screen displays MUTE ON. 2. All handsets beep for two minutes, and each handset. There are five volume ...
...you, but you may adjust the receiver volume by pressing the caller ID-volume (5 or 6) button. Press the mute/menu OK button. If your phone conversation. Receiver Volume Control When the handset is not registered, follow the instructions in TALK mode) you can hear them. 1. Press the find button...to cancel and return to your handset is ON (in the Registration section of this manual. VOL 1 is minimum and VOL 5 is reached, the phone beeps twice. Paging from . The handset screen displays MUTE ON. 2. All handsets beep for two minutes, and each handset. There are five volume ...


