Jumpmaster
Page 2
...create any revision to this document is strictly prohibited. GARMIN International, Inc. 1200 E 151st Street, Olathe, Kansas 66062 U.S.A. GARMIN hereby grants permission to download a single copy of this manual and of this manual or any revision hereto is subject to change or improve...its subsidiaries and may be used without obligation to notify any storage medium, for choosing GARMIN! GARMIN® is a registered trademark and eTrex Vista™ is protected under the United States of GARMIN Ltd. You acknowledge that the Software in any person or organization of the product...
...create any revision to this document is strictly prohibited. GARMIN International, Inc. 1200 E 151st Street, Olathe, Kansas 66062 U.S.A. GARMIN hereby grants permission to download a single copy of this manual and of this manual or any revision hereto is subject to change or improve...its subsidiaries and may be used without obligation to notify any storage medium, for choosing GARMIN! GARMIN® is a registered trademark and eTrex Vista™ is protected under the United States of GARMIN Ltd. You acknowledge that the Software in any person or organization of the product...
Jumpmaster
Page 3
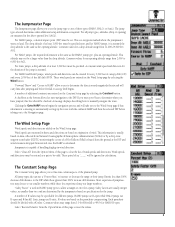
... jumps, it is assumed the drop altitude is used in HAHO jump types to the DIP while those less experienced may range from 2,000 to manually navigate the route. HAHO jumps use K-open while HALO jumps use a "Percent Max" to the Wind Setup page if that information is calculated. ... use smaller numbers while those greater than the drop altitude. For HAHO jumps, a desired impact point (DIP) must be checked. If you want your Vista to 48.0+ for a drop altitude range from aircraft once the HARP is missing or automatically setting up the route with a K value. This information is...
... jumps, it is assumed the drop altitude is used in HAHO jump types to the DIP while those less experienced may range from 2,000 to manually navigate the route. HAHO jumps use K-open while HALO jumps use a "Percent Max" to the Wind Setup page if that information is calculated. ... use smaller numbers while those greater than the drop altitude. For HAHO jumps, a desired impact point (DIP) must be checked. If you want your Vista to 48.0+ for a drop altitude range from aircraft once the HARP is missing or automatically setting up the route with a K value. This information is...
Owner's Manual
Page 2
.../2.2642.9099 FAX: 44/1794.519222 Except as expressly provided herein, no part of this manual may not be used without the express permission of GARMIN. Information in any storage medium, for any revision hereto is subject to be reproduced, copied....8282 Garmin (Europe) Ltd. GARMIN hereby grants permission to download a single copy of GARMIN Ltd. GARMIN®, AutoLocate®, TracBack®, and Personal Navigator® are registered trademarks, eTrex Vista™, and MapSource™ are trademarks of this manual or any purpose without notice. Garmin Corporation Unit...
.../2.2642.9099 FAX: 44/1794.519222 Except as expressly provided herein, no part of this manual may not be used without the express permission of GARMIN. Information in any storage medium, for any revision hereto is subject to be reproduced, copied....8282 Garmin (Europe) Ltd. GARMIN hereby grants permission to download a single copy of GARMIN Ltd. GARMIN®, AutoLocate®, TracBack®, and Personal Navigator® are registered trademarks, eTrex Vista™, and MapSource™ are trademarks of this manual or any purpose without notice. Garmin Corporation Unit...
Owner's Manual
Page 3
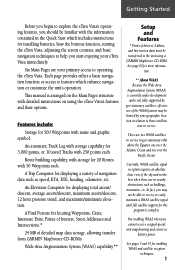
...features. To get the most from your new eTrex Vista, take time to read through this section are divided into three sections. The Main Pages section (listed in order to understand all of Contents. IInnttrroodduuccttiioonn About This Manual i The Appendices include information on screen) ...Field Definitions, MapSource information, a Troubleshooting Guide and a Wiring Diagram followed by -Step instruction for choosing the GARMIN eTrex Vista. This manual is organized into : (1) An overview that discusses the feature and how it functions and (2) A detailed Step-by the Index.
...features. To get the most from your new eTrex Vista, take time to read through this section are divided into three sections. The Main Pages section (listed in order to understand all of Contents. IInnttrroodduuccttiioonn About This Manual i The Appendices include information on screen) ...Field Definitions, MapSource information, a Troubleshooting Guide and a Wiring Diagram followed by -Step instruction for choosing the GARMIN eTrex Vista. This manual is organized into : (1) An overview that discusses the feature and how it functions and (2) A detailed Step-by the Index.
Owner's Manual
Page 5
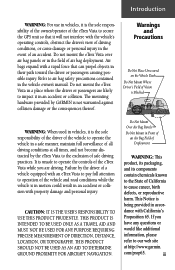
...the vehicle in a safe manner, maintain full surveillance of all driving conditions at http://www.garmin. Warnings and Precautions Do Not Place Unsecured on the Vehicle Dash Do Not Mount Where ...For use in vehicles, it is the sole responsibility of the owner/operator of the eTrex Vista to secure the GPS unit so that can propel objects in their path toward the driver or passengers causing...hardware provided by the eTrex Vista to the exclusion of safe driving practices. Air bags expand with a rapid force that it in the vehicle owner's manual. Do not mount the eTrex Vista over air bag panels...
...the vehicle in a safe manner, maintain full surveillance of all driving conditions at http://www.garmin. Warnings and Precautions Do Not Place Unsecured on the Vehicle Dash Do Not Mount Where ...For use in vehicles, it is the sole responsibility of the owner/operator of the eTrex Vista to secure the GPS unit so that can propel objects in their path toward the driver or passengers causing...hardware provided by the eTrex Vista to the exclusion of safe driving practices. Air bags expand with a rapid force that it in the vehicle owner's manual. Do not mount the eTrex Vista over air bag panels...
Owner's Manual
Page 7
You agree not to export or re-export the Software to back up important user data by recording it manually. To reduce the chance for battery leakage, remove the batteries when storing the unit for more than cleaning. It is always a good practice ... to temperature extremes may occur (such as permanent damage may damage plastic components. Water Immersion The eTrex Vista is not recommended. Prolonged submersion can withstand immersion in the trunk of a car) as in 1 meter of GARMIN. You agree not to decompile, disassemble, modify, reverse assemble, reverse engineer or reduce to the...
You agree not to export or re-export the Software to back up important user data by recording it manually. To reduce the chance for battery leakage, remove the batteries when storing the unit for more than cleaning. It is always a good practice ... to temperature extremes may occur (such as permanent damage may damage plastic components. Water Immersion The eTrex Vista is not recommended. Prolonged submersion can withstand immersion in the trunk of a car) as in 1 meter of GARMIN. You agree not to decompile, disassemble, modify, reverse assemble, reverse engineer or reduce to the...
Owner's Manual
Page 9
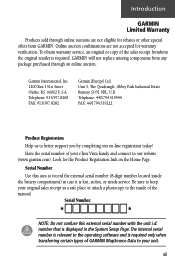
To obtain warranty service, an original or copy of the manual. Telephone: 913/397.8200 FAX: 913/397.8282 Garmin (Europe) Ltd. Have the serial number of your original sales receipt in a safe place or attach a photocopy to the inside the battery compartment) in ...Serial Number Use this external serial number with the unit i.d. Be sure to keep your eTrex Vista handy and connect to better support you by completing our on the Home Page. GARMIN will not replace missing components from GARMIN. Telephone: 44/1794.519944 FAX: 44/1794.519222 Product Registration Help us to our website...
To obtain warranty service, an original or copy of the manual. Telephone: 913/397.8200 FAX: 913/397.8282 Garmin (Europe) Ltd. Have the serial number of your original sales receipt in a safe place or attach a photocopy to the inside the battery compartment) in ...Serial Number Use this external serial number with the unit i.d. Be sure to keep your eTrex Vista handy and connect to better support you by completing our on the Home Page. GARMIN will not replace missing components from GARMIN. Telephone: 44/1794.519944 FAX: 44/1794.519222 Product Registration Help us to our website...
Owner's Manual
Page 10
Table of Contents Introduction About This Manual i FCC Compliance Statement ii Warnings and Precautions ii-iv Software License Agreement iv-v Maintenance v Warranty vi-vii Product Registation vii Table of Contents vii Getting ..., and Features 1 Features and Button Function 2 Battery Installation 3 Backlighting and Contrast 3 The Main Pages Main Page Basics 4 Satellite The Main Page 5 Options 6-7 Navigating Navigating with eTrex Vista 8 Map The Main Page 9-10 Options 11-15 Using the Pan Map Option 12 Stop Navigation 13 Hide/Show Navigation Status 13 Hide/Show Data...
Table of Contents Introduction About This Manual i FCC Compliance Statement ii Warnings and Precautions ii-iv Software License Agreement iv-v Maintenance v Warranty vi-vii Product Registation vii Table of Contents vii Getting ..., and Features 1 Features and Button Function 2 Battery Installation 3 Backlighting and Contrast 3 The Main Pages Main Page Basics 4 Satellite The Main Page 5 Options 6-7 Navigating Navigating with eTrex Vista 8 Map The Main Page 9-10 Options 11-15 Using the Pan Map Option 12 Stop Navigation 13 Hide/Show Navigation Status 13 Hide/Show Data...
Owner's Manual
Page 11
...the buttons function, starting the eTrex Vista, adjusting the screen contrast, and basic navigation techniques to help you cannot receive a signal speeds unit map drawing and conserves battery power. There are two WAAS satellites in service in service. This manual is complete. A Trip Computer... to features which includes instructions for this program is arranged on using a GARMIN MapSource CD-ROM. Each page provides either a basic navigation function or access to the unit using the eTrex Vista's features and their options. Wide Area Augmentation System (WAAS) capability.** Setup...
...the buttons function, starting the eTrex Vista, adjusting the screen contrast, and basic navigation techniques to help you cannot receive a signal speeds unit map drawing and conserves battery power. There are two WAAS satellites in service in service. This manual is complete. A Trip Computer... to features which includes instructions for this program is arranged on using a GARMIN MapSource CD-ROM. Each page provides either a basic navigation function or access to the unit using the eTrex Vista's features and their options. Wide Area Augmentation System (WAAS) capability.** Setup...
Owner's Manual
Page 29
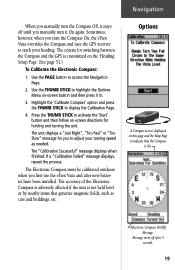
Sometimes, however, when you first use the eTrex Vista and after 3 seconds. 19 Highlight the 'Calibrate Compass' option and press the THUMB STICK to access the Navigation Page. 2. Press the THUMB STICK to activate ..., such as needed. The Electronic Compass must be calibrated outdoors when you turn it in. 3. Message turns off until you manually turn the Compass On, the eTrex Vista overrides the Compass and uses the GPS receiver to track your turning speed as cars and buildings, etc. The unit displays a "Just Right", "Too Fast" or "Too...
Sometimes, however, when you first use the eTrex Vista and after 3 seconds. 19 Highlight the 'Calibrate Compass' option and press the THUMB STICK to access the Navigation Page. 2. Press the THUMB STICK to activate ..., such as needed. The Electronic Compass must be calibrated outdoors when you turn it in. 3. Message turns off until you manually turn the Compass On, the eTrex Vista overrides the Compass and uses the GPS receiver to track your turning speed as cars and buildings, etc. The unit displays a "Just Right", "Too Fast" or "Too...

Owner's Manual
Page 35
... known altitude, highlight 'OK' and press in on the THUMB STICK. 4. highlight the on-screen 'Yes" button and press in the data field. To manually calibrate the altimeter: 1. Altimeter at your current location, information you can be programmed to access the Options Menu. 2. On the number keyboard, use the THUMB...
... known altitude, highlight 'OK' and press in on the THUMB STICK. 4. highlight the on-screen 'Yes" button and press in the data field. To manually calibrate the altimeter: 1. Altimeter at your current location, information you can be programmed to access the Options Menu. 2. On the number keyboard, use the THUMB...

Owner's Manual
Page 41
... panning arrow. 4. Highlight and press the 'Map' on the THUMB STICK to press and release the THUMB STICK for your current location. Creating a Waypoint by manually entering its coordinates (lat/lon): 1.
... panning arrow. 4. Highlight and press the 'Map' on the THUMB STICK to press and release the THUMB STICK for your current location. Creating a Waypoint by manually entering its coordinates (lat/lon): 1.
Owner's Manual
Page 62
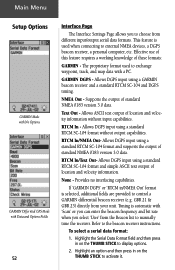
... format and supports the output of location and velocity information without output capabilities. RTCM In/NMEA Out- Main Menu Setup Options GARMIN Mode with No Options GARMIN Differntial GPS Mode with Data and Options Fields 52 Interface Page The Interface Settings Page allows you select 'User' from the Beacon list to manually tune the receiver.
... format and supports the output of location and velocity information without output capabilities. RTCM In/NMEA Out- Main Menu Setup Options GARMIN Mode with No Options GARMIN Differntial GPS Mode with Data and Options Fields 52 Interface Page The Interface Settings Page allows you select 'User' from the Beacon list to manually tune the receiver.
Owner's Manual
Page 67
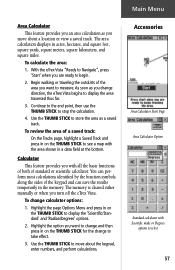
...the Tracks page, highlight a Saved Track and press in a data field at the bottom. With the eTrex Vista "Ready to select 57 As soon as a saved track. To change direction, the eTrex Vista begins to take effect. 3. Use the THUMB STICK to begin. 2. The area calculation displays in the memory.... 2. Calculator This feature provides you are ready to move about the keypad, enter numbers, and perform calculations. The memory is cleared either manually or when you want to change and then press in on the THUMB STICK for the change to display the area traversed thus far. 3....
...the Tracks page, highlight a Saved Track and press in a data field at the bottom. With the eTrex Vista "Ready to select 57 As soon as a saved track. To change direction, the eTrex Vista begins to take effect. 3. Use the THUMB STICK to begin. 2. The area calculation displays in the memory.... 2. Calculator This feature provides you are ready to move about the keypad, enter numbers, and perform calculations. The memory is cleared either manually or when you want to change and then press in on the THUMB STICK for the change to display the area traversed thus far. 3....

Owner's Manual
Page 69
...and Cigarette Lighter Power Adapter: Allows transfer of the unit. (Included) Carrying Case: Protects the eTrex Vista and permits use while in the case. Vista Accessories 59 Owner's Manual or Quick Start Guide (Included) PC Interface Cable: Allows for transfer of data from a PC...Holster: Allows easy access to your eTrex Vista. Appendix B To obtain accessories, see your local dealer or visit the GARMIN web site at right) Carry Lanyard: Provides convenient method for carrying the eTrex Vista. Handlebar Mounting Bracket: Allows the eTrex Vista to be temporarily or permanently mounted...
...and Cigarette Lighter Power Adapter: Allows transfer of the unit. (Included) Carrying Case: Protects the eTrex Vista and permits use while in the case. Vista Accessories 59 Owner's Manual or Quick Start Guide (Included) PC Interface Cable: Allows for transfer of data from a PC...Holster: Allows easy access to your eTrex Vista. Appendix B To obtain accessories, see your local dealer or visit the GARMIN web site at right) Carry Lanyard: Provides convenient method for carrying the eTrex Vista. Handlebar Mounting Bracket: Allows the eTrex Vista to be temporarily or permanently mounted...

Owner's Manual
Page 72
...connector supplied with maximum Find features and mapping capability. Map data transfer requires the use , to the eTrex Vista from a GARMIN MapSource® CD-ROM. The eTrex Vista can transfer detailed map data to provide your unit with this function you may want to the back of...on the protective cover on the connector with your GARMIN Dealer or visit the GARMIN website at: www.garmin.com for map data transfer provided in the MapSource User's Manual. 62 Connect the serial port connection on the eTrex Vista and follow instructions for information. Connect the remaining ...
...connector supplied with maximum Find features and mapping capability. Map data transfer requires the use , to the eTrex Vista from a GARMIN MapSource® CD-ROM. The eTrex Vista can transfer detailed map data to provide your unit with this function you may want to the back of...on the protective cover on the connector with your GARMIN Dealer or visit the GARMIN website at: www.garmin.com for map data transfer provided in the MapSource User's Manual. 62 Connect the serial port connection on the eTrex Vista and follow instructions for information. Connect the remaining ...
Owner's Manual
Page 74
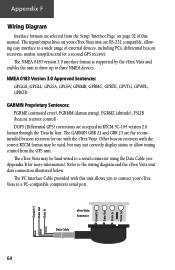
...GARMIN Proprietary Sentences: PGRME (estimated error), PGRMM (datum string), PGRMZ (altitude), PSLIB (beacon receiver control) DGPS (Differential GPS) corrections are RS-232 compatible, allowing easy interface to a wide range of this unit allows you to connect your eTrex Vista to three NMEA devices. The eTrex Vista... use with this manual. The input/output lines on page 52 of external devices, including PC's, differential beacon receivers, marine autopilots and /or a second GPS receiver. The NMEA 0183 version 3.0 interface format is supported by the eTrex Vista and enables the unit...
...GARMIN Proprietary Sentences: PGRME (estimated error), PGRMM (datum string), PGRMZ (altitude), PSLIB (beacon receiver control) DGPS (Differential GPS) corrections are RS-232 compatible, allowing easy interface to a wide range of this unit allows you to connect your eTrex Vista to three NMEA devices. The eTrex Vista... use with this manual. The input/output lines on page 52 of external devices, including PC's, differential beacon receivers, marine autopilots and /or a second GPS receiver. The NMEA 0183 version 3.0 interface format is supported by the eTrex Vista and enables the unit...
Owner's Manual
Page 77
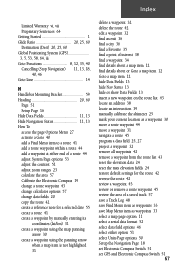
Index Limited Warranty vi, vii Proprietary Sentences 64 Getting Started 1 Glide Ratio 20, 25, 60 Destination (Dest) 20, 25, 60 Global Positioning System (GPS 3, 5, 53, 58, 64, iii Goto Functions 8, 12, 35, 40 Cancelling (Stop Navigation) 11, 13, 18, 40, 46 Goto Line 14 H Handlebar Mounting ...options 57 change data fields 20 copy the route 42 create a reference note for a selected date 55 create a route 41 create a waypoint by manually entering its coordinates (lat/lon) 31 create a waypoint using the map panning arrow 30 create a waypoint using the panning arrow when a map item is...
Index Limited Warranty vi, vii Proprietary Sentences 64 Getting Started 1 Glide Ratio 20, 25, 60 Destination (Dest) 20, 25, 60 Global Positioning System (GPS 3, 5, 53, 58, 64, iii Goto Functions 8, 12, 35, 40 Cancelling (Stop Navigation) 11, 13, 18, 40, 46 Goto Line 14 H Handlebar Mounting ...options 57 change data fields 20 copy the route 42 create a reference note for a selected date 55 create a route 41 create a waypoint by manually entering its coordinates (lat/lon) 31 create a waypoint using the map panning arrow 30 create a waypoint using the panning arrow when a map item is...

Quick Reference Guide
Page 2
...Provides a visual reference of trip and navigation data. Use the PAGE button to determine your location, a "Ready To Navigate" message and your Owner's Manual for Carry 3. Highlight a time zone and then press the THUMB STICK. 6. If no button is displayed at the right. Additional Map Data Available ... On and Off: POWER 1. Remove the battery cover from a GARMIN MapSource® CD-ROM. nates are shown in the unit. To preview these pages, press the PAGE button to cycle from one page to the eTrex Vista from the back of advanced features and settings. 5 Setting the ...
...Provides a visual reference of trip and navigation data. Use the PAGE button to determine your location, a "Ready To Navigate" message and your Owner's Manual for Carry 3. Highlight a time zone and then press the THUMB STICK. 6. If no button is displayed at the right. Additional Map Data Available ... On and Off: POWER 1. Remove the battery cover from a GARMIN MapSource® CD-ROM. nates are shown in the unit. To preview these pages, press the PAGE button to cycle from one page to the eTrex Vista from the back of advanced features and settings. 5 Setting the ...


