Quick Start Guide
Page 1
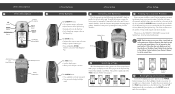
..., open area that has a clear view of your local time (bottom of the Menu Page), follow the instructions in and out on the Map Page • Cycle through trip computer data on the Pointer Page The ENTER Button: • Confirms data entry or menu selections • Displays Options on main pages • Press and hold the POWER button to find your location. Battery Cover 5 Finding Your Current Position Before...
..., open area that has a clear view of your local time (bottom of the Menu Page), follow the instructions in and out on the Map Page • Cycle through trip computer data on the Pointer Page The ENTER Button: • Confirms data entry or menu selections • Displays Options on main pages • Press and hold the POWER button to find your location. Battery Cover 5 Finding Your Current Position Before...
Quick Start Guide
Page 2
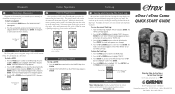
... compass ring. The pointer (arrow) tells you a time frame for a few trips, the map display can mark (save the current Track Log: 1. Press ENTER. 2. The TRACK LOG Page appears. 2. To clear the Track Log: 1. B The Review Waypoint page for current updates and details about eTrex operation and accessories. Press the UP or DOWN button to the destination waypoint. Press ENTER. To start a GOTO: 1. From the MENU Page, highlight 'TRACKS' and press ENTER. www.garmin.com eTrex / eTrex Camo QUICK START GUIDE Step-by clearing...
... compass ring. The pointer (arrow) tells you a time frame for a few trips, the map display can mark (save the current Track Log: 1. Press ENTER. 2. The TRACK LOG Page appears. 2. To clear the Track Log: 1. B The Review Waypoint page for current updates and details about eTrex operation and accessories. Press the UP or DOWN button to the destination waypoint. Press ENTER. To start a GOTO: 1. From the MENU Page, highlight 'TRACKS' and press ENTER. www.garmin.com eTrex / eTrex Camo QUICK START GUIDE Step-by clearing...
Owner's Manual
Page 3
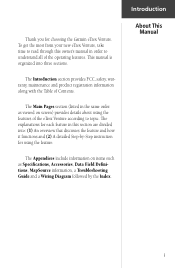
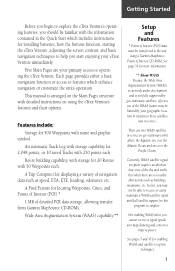
... the operating features. The Appendices include information on screen) provides details about using the feature. The Main Pages section (listed in order to topic. The explanations for each feature in this owner's manual in the same order as viewed on items such as Specifications, Accessories, Data Field Definitions, MapSource information, a Troubleshooting Guide and a Wiring Diagram followed by -Step instruction for choosing the Garmin eTrex Venture.
... the operating features. The Appendices include information on screen) provides details about using the feature. The Main Pages section (listed in order to topic. The explanations for each feature in this owner's manual in the same order as viewed on items such as Specifications, Accessories, Data Field Definitions, MapSource information, a Troubleshooting Guide and a Wiring Diagram followed by -Step instruction for choosing the Garmin eTrex Venture.
Owner's Manual
Page 9
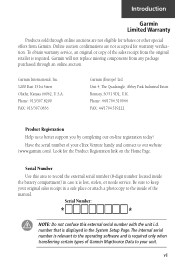
... Garmin Limited Warranty Products sold through online auctions are not accepted for warranty verification. Garmin will not replace missing components from Garmin. Serial Number: * * NOTE: Do not confuse this area to our website (www.garmin.com). To obtain warranty service, an original or copy of Garmin MapSource Data to your eTrex Venture handy and connect to record the external serial number (8-digit number located inside of your unit...
... Garmin Limited Warranty Products sold through online auctions are not accepted for warranty verification. Garmin will not replace missing components from Garmin. Serial Number: * * NOTE: Do not confuse this area to our website (www.garmin.com). To obtain warranty service, an original or copy of Garmin MapSource Data to your eTrex Venture handy and connect to record the external serial number (8-digit number located inside of your unit...

Owner's Manual
Page 10
... Contents viii Getting Started Setup, and Features 1 Features and Button Function 2 Battery Installation 3 Backlighting and Contrast 3 The Main Pages Main Page Basics 4 Satellite The Main Page 5 Options 6-7 Navigating Navigating with eTrex Venture 8 Map The Main Page 9-10 Options 11-15 Using the Pan Map Option 12 Stop Navigation 13 Hide/Show Navigation Status 13 Hide/Show Data Fields 13 Setup 14-15 The Measure Distance Option 15 Navigation The Main Page 16 Options 17-18 Trip Computer The...
... Contents viii Getting Started Setup, and Features 1 Features and Button Function 2 Battery Installation 3 Backlighting and Contrast 3 The Main Pages Main Page Basics 4 Satellite The Main Page 5 Options 6-7 Navigating Navigating with eTrex Venture 8 Map The Main Page 9-10 Options 11-15 Using the Pan Map Option 12 Stop Navigation 13 Hide/Show Navigation Status 13 Hide/Show Data Fields 13 Setup 14-15 The Measure Distance Option 15 Navigation The Main Page 16 Options 17-18 Trip Computer The...
Owner's Manual
Page 11
... the unit using the eTrex Venture's features and their options. A Find Feature for locating Waypoints, Cities, and Points of Interest (POI).* 1 MB of navigation data such as buildings, mountains, etc. Currently, WAAS satellite signal reception requires an absolute clear view of the WAAS feature may not be able to those satellites now in service. Not enabling WAAS when you cannot receive a signal speeds unit map drawing and conserves battery power. See page 54 for more information. ** About...
... the unit using the eTrex Venture's features and their options. A Find Feature for locating Waypoints, Cities, and Points of Interest (POI).* 1 MB of navigation data such as buildings, mountains, etc. Currently, WAAS satellite signal reception requires an absolute clear view of the WAAS feature may not be able to those satellites now in service. Not enabling WAAS when you cannot receive a signal speeds unit map drawing and conserves battery power. See page 54 for more information. ** About...

Owner's Manual
Page 13
... back of used . Display Backlighting and Contrast Set Up If lighting conditions make it hard for proper care and disposal of the unit. To turn Backlighting On/Off Use ZOOM IN & OUT Buttons while on the backlight. Reinstall the battery cover by turning the D-ring 1/4 turn on the Satellite Page to page 43.) To adjust the screen contrast: 1. Stored data is factory set timeout period is completed or the POWER button is pressed...
... back of used . Display Backlighting and Contrast Set Up If lighting conditions make it hard for proper care and disposal of the unit. To turn Backlighting On/Off Use ZOOM IN & OUT Buttons while on the backlight. Reinstall the battery cover by turning the D-ring 1/4 turn on the Satellite Page to page 43.) To adjust the screen contrast: 1. Stored data is factory set timeout period is completed or the POWER button is pressed...

Owner's Manual
Page 16
... 'New Location' and then the 'Use Map' options to approximate your direction of travel) or 'North Up' (the satellite skyview oriented to the north). Use the THUMB STICK to highlight the Option Menu button at the top of the page and then press it returns to save battery power. You can manually enter a new, more than 600 miles from where you last used for navigation. If you are indoors, a clear view...
... 'New Location' and then the 'Use Map' options to approximate your direction of travel) or 'North Up' (the satellite skyview oriented to the north). Use the THUMB STICK to highlight the Option Menu button at the top of the page and then press it returns to save battery power. You can manually enter a new, more than 600 miles from where you last used for navigation. If you are indoors, a clear view...
Owner's Manual
Page 18
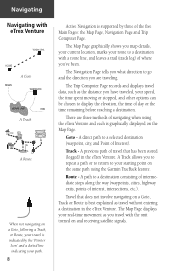
... time remaining before reaching a destination. The Map Page displays your real-time movement as the distance you travel is supported by three of navigating when using the Garmin TracBack feature. Goto - A direct path to display the elevation, the time of travel that does not involve navigating on and receiving satellite signals. The Trip Computer Page records and displays travel data, such as you have traveled, your path. 8 Active Navigation is indicated by the 'Pointer Icon...
... time remaining before reaching a destination. The Map Page displays your real-time movement as the distance you travel is supported by three of navigating when using the Garmin TracBack feature. Goto - A direct path to display the elevation, the time of travel that does not involve navigating on and receiving satellite signals. The Trip Computer Page records and displays travel data, such as you have traveled, your path. 8 Active Navigation is indicated by the 'Pointer Icon...

Owner's Manual
Page 28
... and press in to highlight the Options Menu button at the side of the menu indicates a multi-page list of Day To Course Trip Odometer Trip Time - Bearing Course Current Destination Current Distance Current ETA Current ETE Elevation Final Destination Final Distance Final ETA Final ETE Heading Location (lat/lon)* Location (selected)* Maximum Speed Moving Avg. Select the desired option from the Options Menu. Navigation Options Navigation Page Data Fields Options Menu (The slider at the top right...
... and press in to highlight the Options Menu button at the side of the menu indicates a multi-page list of Day To Course Trip Odometer Trip Time - Bearing Course Current Destination Current Distance Current ETA Current ETE Elevation Final Destination Final Distance Final ETA Final ETE Heading Location (lat/lon)* Location (selected)* Maximum Speed Moving Avg. Select the desired option from the Options Menu. Navigation Options Navigation Page Data Fields Options Menu (The slider at the top right...

Owner's Manual
Page 36
... also be deleted. Repeat the process until you to establish a new waypoint on -screen button at the top of the Information Page and press the THUMB STICK to save the changes and close the keyboard. Highlight the Option Menu on a bearing and distance projected from the Find Menu. 2. Enter the distance and bearing to the projected waypoint in the appropriate fields and then select 'OK' and...
... also be deleted. Repeat the process until you to establish a new waypoint on -screen button at the top of the Information Page and press the THUMB STICK to save the changes and close the keyboard. Highlight the Option Menu on a bearing and distance projected from the Find Menu. 2. Enter the distance and bearing to the projected waypoint in the appropriate fields and then select 'OK' and...

Owner's Manual
Page 49
... started, the eTrex Venture takes you back by the current track log displays at the top of the "TracBack" feature, clear the Track Log before you to remove it approaches the 99% mark. Rename saved Track Logs to delete all saved tracks. The Track Log contains information about points along its path, including time, and position. The Track Log starts recording as soon as you are dropped. After the Track Log is based on Main Map...
... started, the eTrex Venture takes you back by the current track log displays at the top of the "TracBack" feature, clear the Track Log before you to remove it approaches the 99% mark. Rename saved Track Logs to delete all saved tracks. The Track Log contains information about points along its path, including time, and position. The Track Log starts recording as soon as you are dropped. After the Track Log is based on Main Map...
Owner's Manual
Page 54
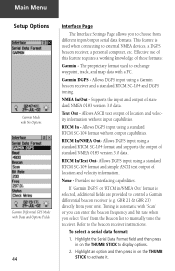
... STICK to external NMEA devices, a DGPS beacon receiver, a personal computer, etc. Effective use of this feature requires a working knowledge of standard NMEA 0183 version 3.0 data. Refer to activate it. Allows DGPS input using a standard RTCM SC-104 format and supports the output of location and velocity information without output capabilities. RTCM In/Text Out- Main Menu Setup Options Garmin Mode with No Options Garmin Differntial GPS Mode with a PC. None - If 'Garmin DGPS' or...
... STICK to external NMEA devices, a DGPS beacon receiver, a personal computer, etc. Effective use of this feature requires a working knowledge of standard NMEA 0183 version 3.0 data. Refer to activate it. Allows DGPS input using a standard RTCM SC-104 format and supports the output of location and velocity information without output capabilities. RTCM In/Text Out- Main Menu Setup Options Garmin Mode with No Options Garmin Differntial GPS Mode with a PC. None - If 'Garmin DGPS' or...

Owner's Manual
Page 55
... change: GPS - The 'Memory Used' figure refers to select. The 'Backlight' icon changes from a "battery" to display options. Number. To adjust System Page options: 1. Main Menu System Page The System Setup Page allows you restore defaults or display the current version of unit operating software and the Unit I.D. System Page Options Menu 45 The 'Demo Mode' simulates navigation. Then use the THUMB STICK to the non-volatile memory within your unit and cannot be adjusted directly. Language - Choose one of satellite signal position updating...
... change: GPS - The 'Memory Used' figure refers to select. The 'Backlight' icon changes from a "battery" to display options. Number. To adjust System Page options: 1. Main Menu System Page The System Setup Page allows you restore defaults or display the current version of unit operating software and the Unit I.D. System Page Options Menu 45 The 'Demo Mode' simulates navigation. Then use the THUMB STICK to the non-volatile memory within your unit and cannot be adjusted directly. Language - Choose one of satellite signal position updating...
Owner's Manual
Page 64
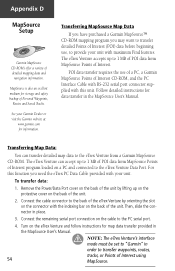
... Find features. Remove the Power/Data Port cover on the back of the unit. 2. For this unit. NOTE: The eTrex Venture's interface mode must be set to "Garmin" in the MapSource User's Manual. Appendix D MapSource Setup Garmin MapSource CD-ROM's offer a variety of Personal Waypoints, Routes and Saved Tracks. The eTrex Venture accepts up to the eTrex Venture from MapSource Points of the unit. Transferring Map Data: You can accept up to the eTrex Venture Data Port. The eTrex Venture can transfer detailed map data to...
... Find features. Remove the Power/Data Port cover on the back of the unit. 2. For this unit. NOTE: The eTrex Venture's interface mode must be set to "Garmin" in the MapSource User's Manual. Appendix D MapSource Setup Garmin MapSource CD-ROM's offer a variety of Personal Waypoints, Routes and Saved Tracks. The eTrex Venture accepts up to the eTrex Venture from MapSource Points of the unit. Transferring Map Data: You can accept up to the eTrex Venture Data Port. The eTrex Venture can transfer detailed map data to...

Owner's Manual
Page 65
... resolve problems that map features are located too far from satellites and point the unit antenna in the currently in on the map page when traveling. Replace batteries. The unit's view of the satellite is obstructed Move to a location with a clear view satellite after 2 to a location with new batteries. Cannot obtain a differential You have an 'X' Highlight the on-screen button and (Exit) on-screen button in the upper then press in service for RTCM. Access the Map Setup 'Map...
... resolve problems that map features are located too far from satellites and point the unit antenna in the currently in on the map page when traveling. Replace batteries. The unit's view of the satellite is obstructed Move to a location with a clear view satellite after 2 to a location with new batteries. Cannot obtain a differential You have an 'X' Highlight the on-screen button and (Exit) on-screen button in the upper then press in service for RTCM. Access the Map Setup 'Map...
Owner's Manual
Page 66
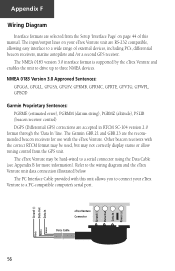
... Garmin Proprietary Sentences: PGRME (estimated error), PGRMM (datum string), PGRMZ (altitude), PSLIB (beacon receiver control) DGPS (Differential GPS) corrections are the recommended beacon receivers for more information). Other beacon receivers with this manual. Refer to three NMEA devices. The NMEA 0183 version 3.0 interface format is supported by the eTrex Venture and enables the unit to drive up to the wiring diagram and the eTrex Venture unit data connection illustrated below. eTrex Venture Connector Data Cable 56 Ground (-) Data Out Data...
... Garmin Proprietary Sentences: PGRME (estimated error), PGRMM (datum string), PGRMZ (altitude), PSLIB (beacon receiver control) DGPS (Differential GPS) corrections are the recommended beacon receivers for more information). Other beacon receivers with this manual. Refer to three NMEA devices. The NMEA 0183 version 3.0 interface format is supported by the eTrex Venture and enables the unit to drive up to the wiring diagram and the eTrex Venture unit data connection illustrated below. eTrex Venture Connector Data Cable 56 Ground (-) Data Out Data...

Owner's Manual
Page 69
... Measure Distance option 15 delete a waypoint 27 use Track Log Setup options 40 display position in two formats on same view the next waypoint in the route 37 page 21 Hunt and Fish 48 edit a waypoint 26 find a city 29-30 I find a Favorite 29 find a point of interest 31 find a waypoint 28 find details about a map item 12 Goto a map item 12 hide Data Fields 13 Installing Batteries...
... Measure Distance option 15 delete a waypoint 27 use Track Log Setup options 40 display position in two formats on same view the next waypoint in the route 37 page 21 Hunt and Fish 48 edit a waypoint 26 find a city 29-30 I find a Favorite 29 find a point of interest 31 find a waypoint 28 find details about a map item 12 Goto a map item 12 hide Data Fields 13 Installing Batteries...

Owner's Manual
Page 70
Speed 14, 18, 21, 52 Moving a Waypoint 25, 36 N National Imagery and Mapping Agency 42 Navigation About 4, 8, 17 Data Fields 18 Main Page 16, 52 Options 18 Route 8, 37 Nearest (Waypoints, Cities, etc.) 27-32 New Elevation 6 New Location 7 NMEA 44, 50, 56 NMEA Out 44 Normal Mode 45 North Reference 43 North Up 6, 14 O Odometer 14, 21, 52 Off Course 18, 21, 52 On-screen Button 11, 12, 14, 15, 20, 22...
Speed 14, 18, 21, 52 Moving a Waypoint 25, 36 N National Imagery and Mapping Agency 42 Navigation About 4, 8, 17 Data Fields 18 Main Page 16, 52 Options 18 Route 8, 37 Nearest (Waypoints, Cities, etc.) 27-32 New Elevation 6 New Location 7 NMEA 44, 50, 56 NMEA Out 44 Normal Mode 45 North Reference 43 North Up 6, 14 O Odometer 14, 21, 52 Off Course 18, 21, 52 On-screen Button 11, 12, 14, 15, 20, 22...

Owner's Manual
Page 71
... Use With GPS Off 6, 7 Using Find Menu 27 Goto 32 Main Menu 23 61 Route (continued) Route Page 23 Using 33 RTCM In 44 RTCM In/NMEA Out 44 RTCM In/Text Out 44 S Satellite Page 4-7 Saved Tracks 14 Saving the Track Log 39-40 Selecting a Waypoint 28 Serial Number vii Setting the Correct Time Zone 22, 41 Setup and Features 1 Setup Map 11, 14 Setup Map Options 15 Setup Menu 41 Setup Page 22, 23 Setup the Navigation Page 18 Show Data Fields...
... Use With GPS Off 6, 7 Using Find Menu 27 Goto 32 Main Menu 23 61 Route (continued) Route Page 23 Using 33 RTCM In 44 RTCM In/NMEA Out 44 RTCM In/Text Out 44 S Satellite Page 4-7 Saved Tracks 14 Saving the Track Log 39-40 Selecting a Waypoint 28 Serial Number vii Setting the Correct Time Zone 22, 41 Setup and Features 1 Setup Map 11, 14 Setup Map Options 15 Setup Menu 41 Setup Page 22, 23 Setup the Navigation Page 18 Show Data Fields...


